
What is Git?
Git (/ɡɪt/) is a distributed revision control system with an emphasis on speed, data integrity, and support for distributed, non-linear workflows.
Git was initially designed and developed by Linus Torvalds for Linux kernel development in 2005, and has since become the most widely adopted version control system for software development.
Source: Git - Wikipedia
What is Version Control?
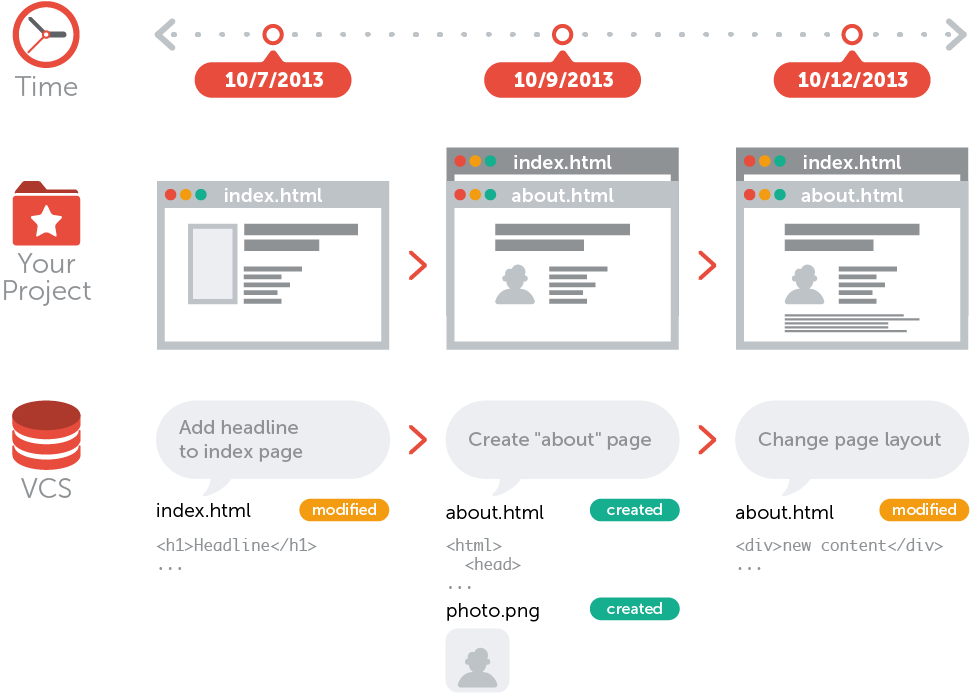
Source: Learn Version Control with Git
Why Using Version Control?
-
Collaboration
-
Storing Versions (Properly)
-
Restoring Previous Versions
-
Understanding What Happened
-
Backup
Source: Learn Version Control with Git
Git is "one of many" solutions for version control ...


and TFS, Perforce, ...
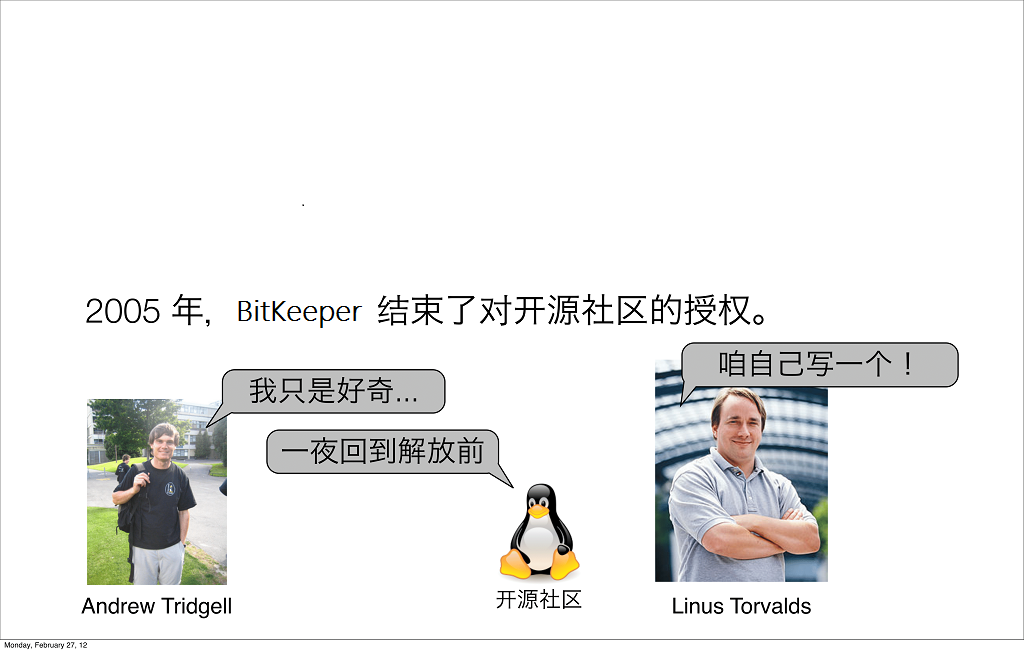
History of Git

Reference: Git Introduction for Beginners


Design Criteria of Git
-
High performance with speed and efficiency.
-
Take Concurrent Versions System (CVS) as an example of what not to do; if in doubt, make the exact opposite decision.
-
Support a distributed, BitKeeper-like workflow.
-
Very strong safeguards against corruption, either accidental or malicious.
Source: Git - Wikipedia
Torvalds has quipped about the name git, which is British English slang meaning "unpleasant person".
The man page describes Git as "the stupid content tracker".
Source: Git - Wikipedia
Why Git?
The "Most Popular"

Why so Popular?

Centralized vs. Distributed
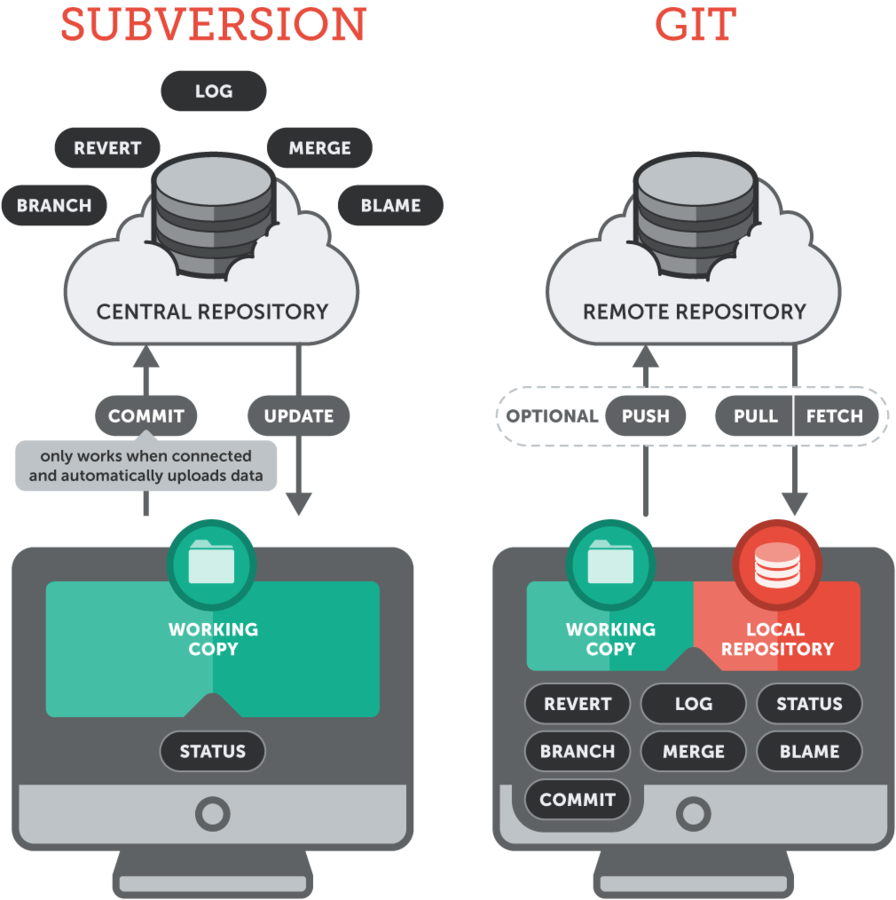
Subversion is a centralized version control system:
-
All team members work towards a single central repository, placed on a remote server.
-
A "checkout" from this central repository will place a "working copy" on the user's machine. (This is a snapshot from a certain version of the project on his disk.)
So why Git?
The Basics
Repository

Glossary
Think of a repository as a kind of database where your VCS stores all the versions and metadata that accumulate in the course of your project.
In Git, the repository is just a simple hidden folder named ".git" in the root directory of your project.
Knowing that this folder exists is more than enough. You don't have to (and, moreover, should not) touch anything inside this magical folder.
Starting with an Unversioned Project
Change into the project's root folder, and use the "git init" command to start versioning this project:
$ cd path/to/project/folder
$ git init
You'll see that a new, hidden folder was added, named ".git". All that happened is that Git created an empty local repository for us.
Please mind the word "empty": Git did not add the current content of your working copy as something like an "initial version". The repository contains not a single version of your project, yet.
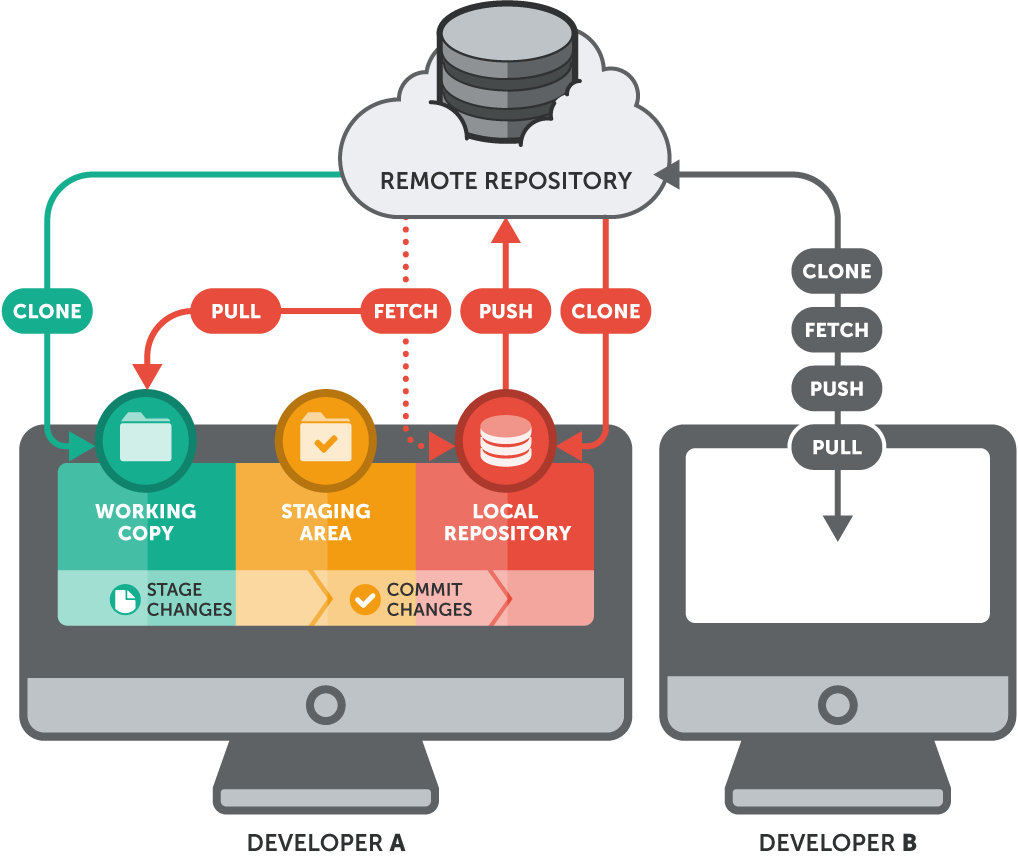
Local & Remote Repos
Glossary
- A "local" repository resides on your local computer, as a ".git" folder inside your project's root folder. You are the only person that can work with this repository, by committing changes to it.
- A "remote" repository, in contrast, is typically located on a remote server on the internet or in your local network. Teams are using remote repositories to share & exchange data: they serve as a common base where everybody can publish their own changes and receive changes from their teammates.
Starting with an Exiting Project on Server
$ git clone http://example.com/git-repo.git
$ git clone https://example.com/git-repo.git
$ git clone git://example.com/git-repo.git
$ git clone ssh://user@server/git-repo.git
$ git clone user@server:git-repo.git
Git will now download a complete copy of this repository to your local disk - on condition that you're allowed to access this repository.
- For the "http" and "git" protocols, no access rights are necessary.
- For "https" URLs, you might need a username and a password.
- For "ssh" URLs (either with a leading "ssh://" or, with the shorter form, "user@server..."), you'll have to use "SSH Public Key" authentication.
Working on Your Project
Source: Working on Your Project
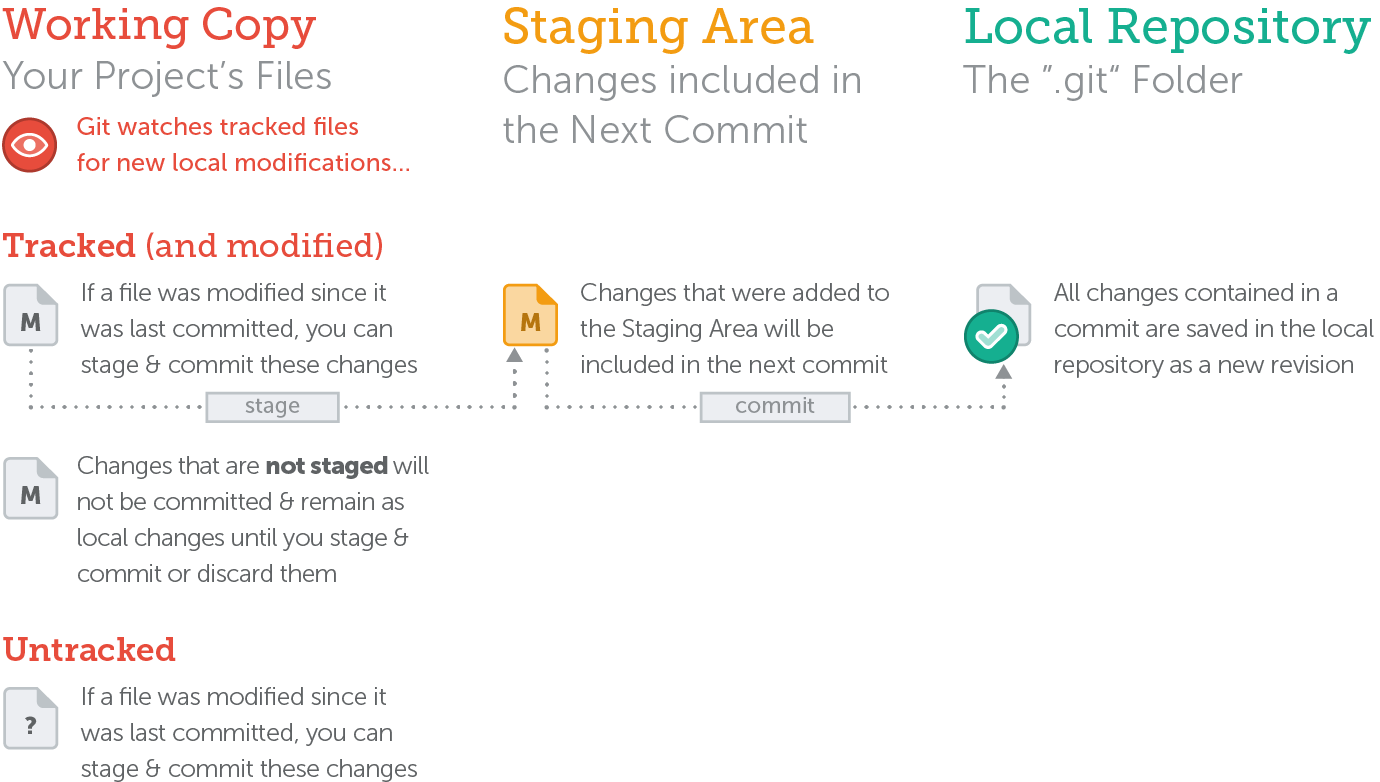
The Status of a File

Concept
In general, files can have one of two statuses in Git:
-
untracked: a file that is not under version control yet. This means that the version control system doesn't watch for (or "track") changes to this file.
- In most cases, these are either files that are newly created or files that are ignored and which you don't want to include in version control at all.
- tracked: all files that are already under version control. Git watches these files for changes and allows you to commit or discard them.
Source: Working on Your Project
Commit
Glossary
A commit is a wrapper for a specific set of changes. The author of a commit has to comment what he did in a short "commit message". This helps other people (and himself) to understand later what his intention was when making these changes.
Every set of changes implicitly creates a new, different version of your project. Therefore, every commit also marks a specific version. It's a snapshot of your complete project at that certain point in time (but saved in a much more efficient way than simply duplicating the whole project...).
Getting an Overview of Your Changes
To get an overview of what you've changed since your last commit, you simply use the "git status" command:
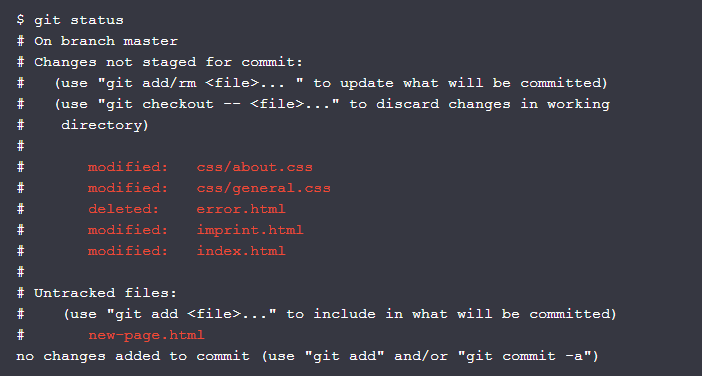
Source: Working on Your Project
Getting Ready to Commit
To stage some changes with the "git add" command:
$ git add new-page.html index.html css/*To record the removals with the "git rm" command:
$ git rm error.html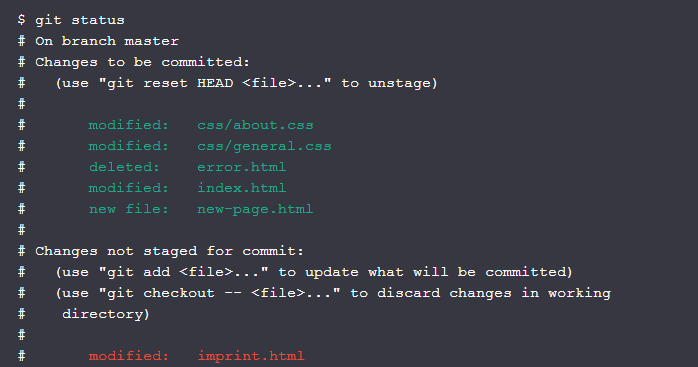
Committing Your Changes
The "git commit" command wraps up your changes:
$ git commit -m "Implement the new login box"Use "git log" command to display commit history:
$ git log

commit 2dfe283e6c81ca48d6edc1574b1f2d4d84ae7fa1
Author: Tobias Günther <support@learn-git.com>
Date: Fri Jul 26 10:52:04 2013 +0200

    Implement the new login box

commit 2b504bee4083a20e0ef1e037eea0bd913a4d56b6
Author: Tobias Günther <support@learn-git.com>
Date: Fri Jul 26 10:05:48 2013 +0200

    Change headlines for about and imprint
Source: Working on Your Project
What Makes a Good Commit?
Related Changes
Complete Work
Tested Work
Short and Descriptive Messages
Make it a habit to commit often!
Source: Working on Your Project
Best Known Methods

The Commit Hash
Glossary
Every commit has a unique identifier: a 40-character checksum called the "commit hash".
Since in most projects, the first 7 characters of the hash are enough for it to be unique, referring to a commit using a shortened version is very common.
In centralized version control systems like Subversion or CVS, an ascending revision number is used for this, this is simply not possible anymore in a distributed VCS like Git: The reason herefore is that, in Git, multiple people can work in parallel, committing their work offline, without being connected to a shared repository. In this case, you can't say anymore whose commit is #5 and whose is #6.
Source: Working on Your Project
Local / Remote Workflow
Branching
& Merging
A World Without Branches
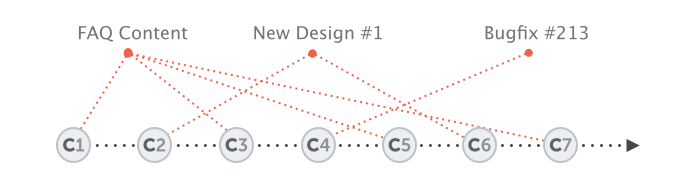
- While you're preparing 2 new variations of your website's design (context 1 & 2)...
- you're also trying to fix an annoying bug (context 3).
- On the side, you also update some content on your FAQ pages (context 4), while...
- one of your teammates is working on a new feature for your shopping cart (context 5),...
- and another colleague is experimenting with a whole new login functionality (context 6).
Branches to Rescue
Source: Branching Can Change Your Life

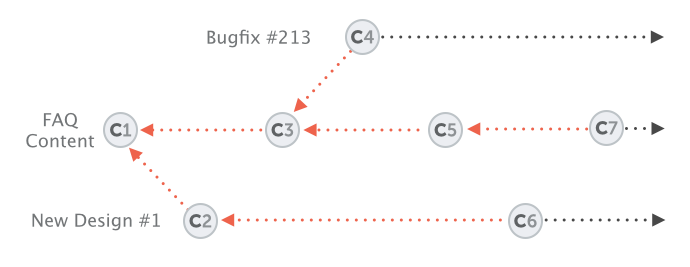
All the changes you make at any time will only apply to the currently active branch; all other branches are left untouched. This gives you the freedom to both work on different things in parallel and, in case things go wrong you can always go back / undo / start fresh / switch contexts...
Working with Branches
We create a new branch and name it "contact-form":
$ git branch contact-formUse the "git branch" command lists all of our branches:
$ git branch -v
  contact-form 3de33cc Implement the new login box
* master       3de33cc [ahead 1] Implement the new login box
Our new branch "contact-form" was created and is based on the same version as "master". Additionally, the little asterisk character (*) next to "master" indicates that this is our current HEAD branch. To emphasize this: the "git branch" command only created that new branch - but it didn't make it active.
Source: Working With Branches
Never Commit Half-Done Work
You should only commit code when it’s completed.
This doesn’t mean you have to complete a whole, large feature before committing. Quite the contrary: split the feature’s implementation into logical chunks and remember to commit early and often.
But don’t commit just to get half-done work out of your way when you need a "clean working copy". For these cases, consider using Git’s “Stash” feature instead.
Best Known Methods
Source: Working With Branches
The Stash
Glossary
Think of the Stash as a clipboard on steroids: it takes all the changes in your working copy and saves them for you on a new clipboard. You're left with a clean working copy, i.e. you have no more local changes.
Later, at any time, you can restore the changes from that clipboard in your working copy - and continue working where you left off.
You can create as many Stashes as you want - you're not limited to storing only one set of changes. Also, a Stash is not bound to the branch where you created it: when you restore it, the changes will be applied to your current HEAD branch, whichever this may be.
Source: Saving Changes Temporarily
Saving Changes Temporarily
Stash away local changes to have a clean working copy:
$ git stash
Saved working directory and index state WIP on master:
   2dfe283 Implement the new login box
HEAD is now at 2dfe283 Implement the new login box

$ git status
# On branch master
nothing to commit (working directory clean)

$ git stash list
stash@{0}: WIP on master: 2d6e283 Implement the new login box- Calling "git stash pop" will apply the newest Stash and clear it from your Stash clipboard.
- Calling "git stash apply <stashname>" will also apply the specified Stash, but it will remain saved. You can delete it later via "git stash drop <stashname>".
When to Stash?
Stashing helps you get a clean working copy. While it can be helpful in many cases, it's strongly recommended...
-
...before checking out a different branch.
-
...before pulling remote changes.
-
...before merging or rebasing a branch.
Best Known Methods
Source: Saving Changes Temporarily
Checking Out a Local Branch
Switch to (or "check out") our newly created branch:
$ git checkout contact-form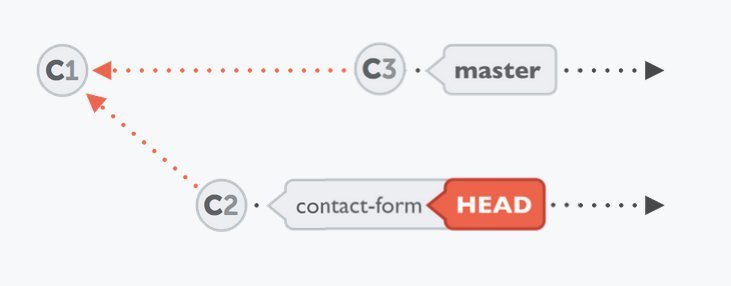
At each point in time, only one branch can be HEAD / checked out / active. The files in your working copy are those that are associated with this exact branch. All other branches (and their associated files) are safely stored in Git's database.
Source: Checking Out a Local Branch
Merging Changes
Integrate the changes from "contact-form" into "master":
$ git checkout master
$ git merge contact-form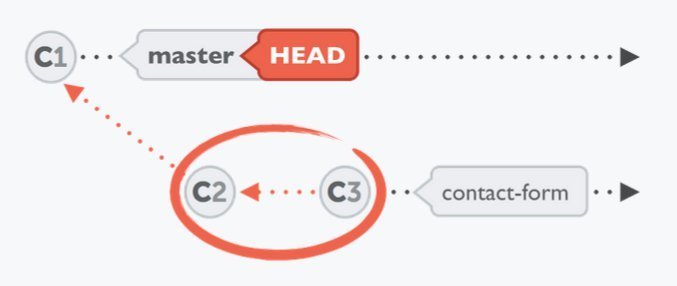
When starting a merge, you don't have to (and cannot) pick individual commits that shall be integrated. Instead, you tell Git which branch you want to integrate, only these commits will then be integrated as a result.
Source: Merging Changes
Connecting a Remote Repository
When you clone a repository from a remote server, Git automatically remembers this connection for you. It saves it as a remote called "origin" by default.
In other cases where you started with a fresh local repository, no remote connections are saved. In that situation, we need to connect our local repository to a new remote before we can try some remote interactions:
$ git remote add crash-course-remote
    https://github.com/gittower/git-crash-course-remote.git

$ git remote -v
crash-course-remote   https://github.com/gittower/git-crash-course-remote.git (fetch)
crash-course-remote   https://github.com/gittower/git-crash-course-remote.git (push)
origin   https://github.com/gittower/git-crash-course (fetch)
origin   https://github.com/gittower/git-crash-course (push)
Source: Connecting a Remote Repository
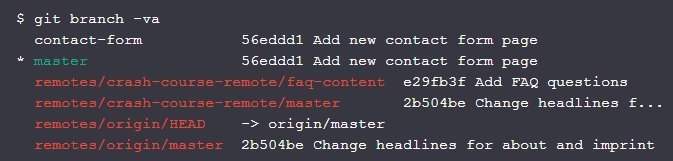
Inspecting Remote Data
So, what exactly did we achieve by connecting remote?
Apparently not much happened: still our two local branches ("master" and "contact-form") and two items from our "origin" remote ("remotes/origin/HEAD" and "remotes/origin/master").
So why don't we see any data from our new "crash-course-remote"? Because, with the "git remote add" command, we have only established a relationship - but no data was exchanged so far.
Source: Inspecting Remote Data

Remote Data is a Snapshot
Concept
Git stores information about remote data (like branches, commits, etc.) in your local repository for you. However, there is no "live" connection to your remote. E.g. you will not automatically see new commits or branches that your teammates published on a remote - because you have to explicitly tell Git to update!
The information about remote branches, remote commits, etc. is only as fresh as the last snapshot that you requested. There is no "automatic" update in the background.
Source: Inspecting Remote Data
Fetching Data from Remote
To update the information about a remote, use "Fetch":
$ git fetch crash-course-remote
From https://github.com/gittower/git-crash-course-remote
 * [new branch]     faq-content -> crash-course-remote/faq-content
 * [new branch]     master -> crash-course-remote/master
Fetch will not touch any of your local branches or the files in your working copy. It just downloads data from the specified remote and makes it visible for you.
Source: Inspecting Remote Data
Checking Out a Remote Branch
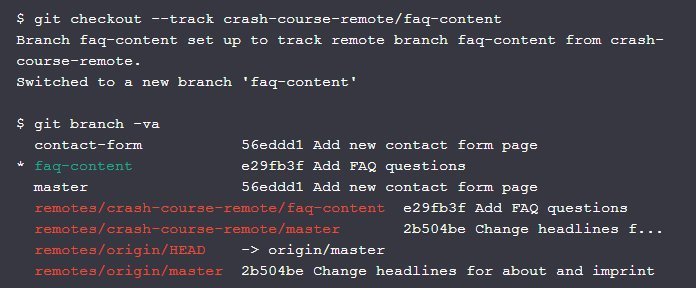
- This command creates a new local branch with the same name as the remote one ("faq-content").
- It checks this new branch out, makes it our local HEAD branch and populates our working copy with the associated files from that branch's latest revision.
- Using the "--track" flag, it establishes a so-called "tracking relationship" between the new local branch and the remote branch it's based on.
Tracking Branches
Concept
In general, branches have nothing to do with each other. However, a local branch can be set up to "track" a remote branch. Git will then inform you if one branch contains new commits that the other one doesn't have:
- If your local branch contains commits that haven't been pushed to the remote repository, your local branch is "ahead" of its remote counterpart by some commits.
- If your teammates, on their part, have uploaded commits to the remote, the remote branch will have commits that you haven't downloaded / pulled to your local branch. Your local branch is then "behind" its remote counterpart branch.
Source: Inspecting Remote Data
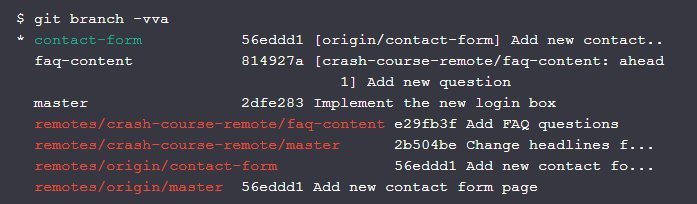
Pushing to Remote Repo
$ git status
# On branch faq-content
# Changes not staged for commit:
#   (use "git add <file>..." to update what will be committed)
#   (use "git checkout -- <file>..." to discard changes in working
#    directory)
#
#       modified:   faq.html
#
no changes added to commit (use "git add" and/or "git commit -a")

$ git add faq.html

$ git commit -m "Add new question"
[faq-content 814927a] Add new question
 1 file changed, 1 insertion(+)
With a new local branch "faq-content" checked out, we're ready to contribute to this feature. Let's make some modifications, and share these changes we've just made with our colleagues:
$ git pushSource: Inspecting Remote Data
The Tracking Connections
Concept
By default, the "git push" command expects us to provide it with two things:
- To which remote repository we want to push.
- To which branch on that remote repository we want to push.
The full command, therefore, looks something like this:
$ git push crash-course-remote faq-contentWith the tracking connection that we've set up already, we've defined a "remote counterpart" branch for our local branch. Git can then use this tracking information and lets us use the "git push" and "git pull" commands without further arguments.
Source: Inspecting Remote Data
Integrating Remote Changes
To integrate changes into working copy, use "git pull":
$ git pullThis command downloads new commits from the remote and directly integrates them into your working copy.
It's actually a "fetch" command (which only downloads data) and a "merge" command (which integrates this data into your working copy) combined.
As with the "git push" command: in case no tracking connection was established for your local HEAD branch, you will have to tell Git from which remote repository and which remote branch you want to pull ("git pull origin master", e.g.). If a tracking connection already exists, "git pull" is sufficient.
Source: Integrating Remote Changes
Publishing a Local Branch
Let's share "contact-form" branch on the "origin" remote:
$ git checkout contact-form
Switched to branch 'contact-form'

$ git push -u origin contact-form
Counting objects: 36, done.
Delta compression using up to 4 threads.
Compressing objects: 100% (31/31), done.
Writing objects: 100% (36/36), 90.67 KiB, done.
Total 36 (delta 12), reused 0 (delta 0)
Unpacking objects: 100% (36/36), done.
To file://Users/tobidobi/Desktop/GitCrashkurs/remote-test.git
 * [new branch]    contact-form -> contact-form
Branch contact-form set up to track remote branch contact-form from origin.
Source: Publishing a Local Branch
This command tells Git to publish our current local HEAD branch on the "origin" remote under the name "contact-form"
The "-u" flag establishes a tracking connection between that newly created branch on the remote and our local "contact-form" branch.
Deleting Branches
To delete a local branch, we can use below command:
$ git branch -d contact-formWe can also delete the remote branch by adding "-r" flag:
$ git branch -dr origin/contact-formSource: Deleting Branches
After publishing the local branch, we now get:
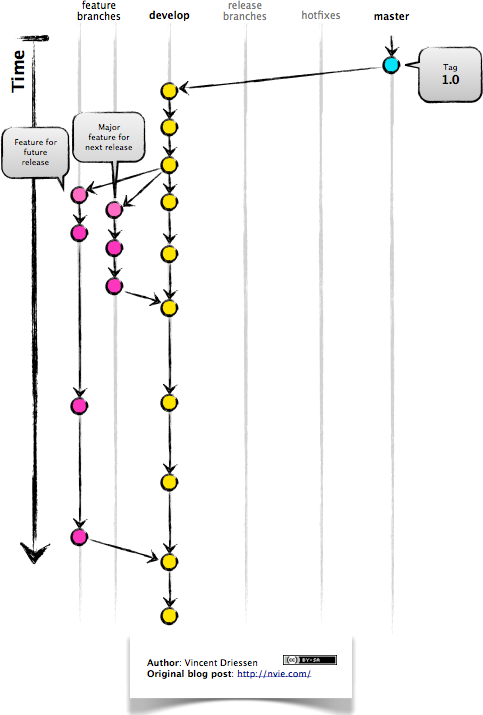
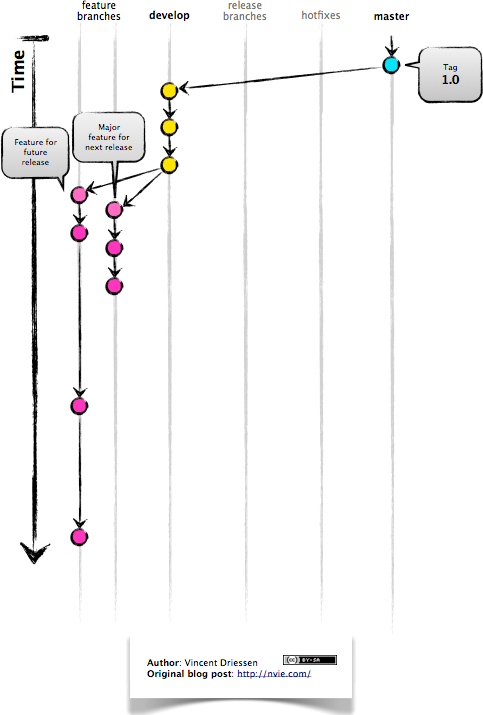
Git Flow
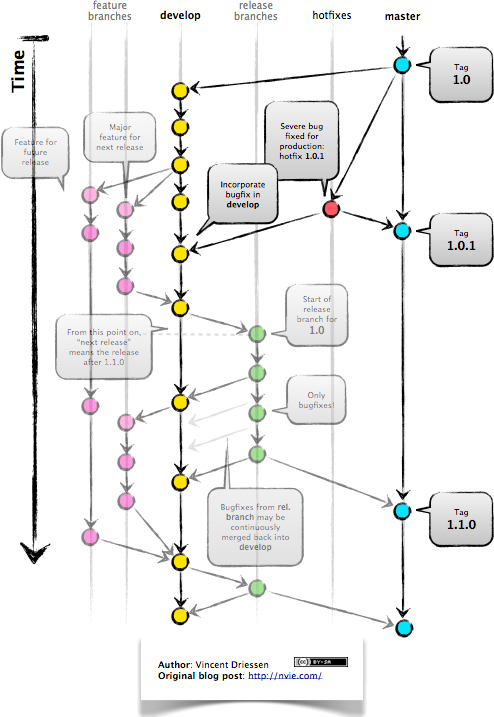
Source: A Successful Git Branching Model
The Model
Main Branches:
- master
- develop
Supporting Branches:
- feature
- release
- hotfix
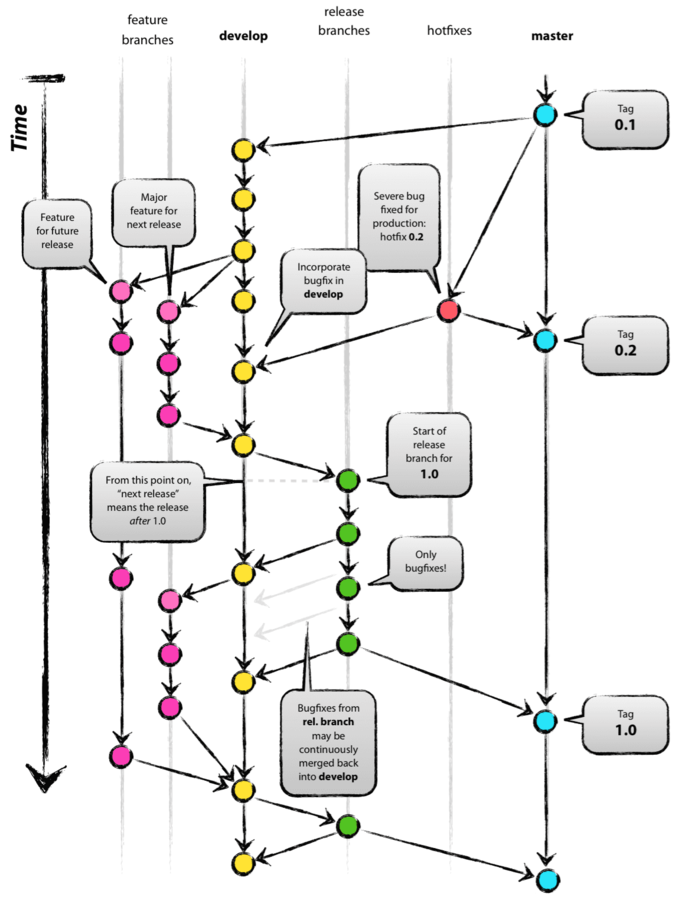
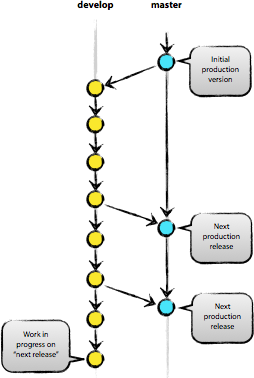
Master & Develop
- master: production ready
- develop: latest for next release
Both branches have infinite lifetime
Feature Branches
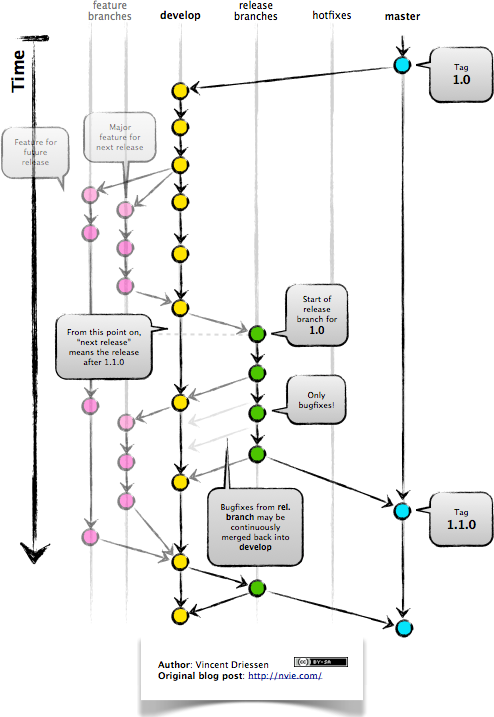
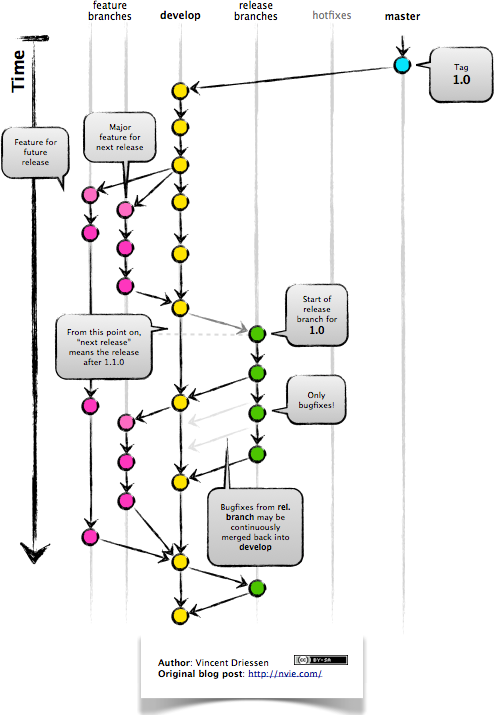
Release Branches
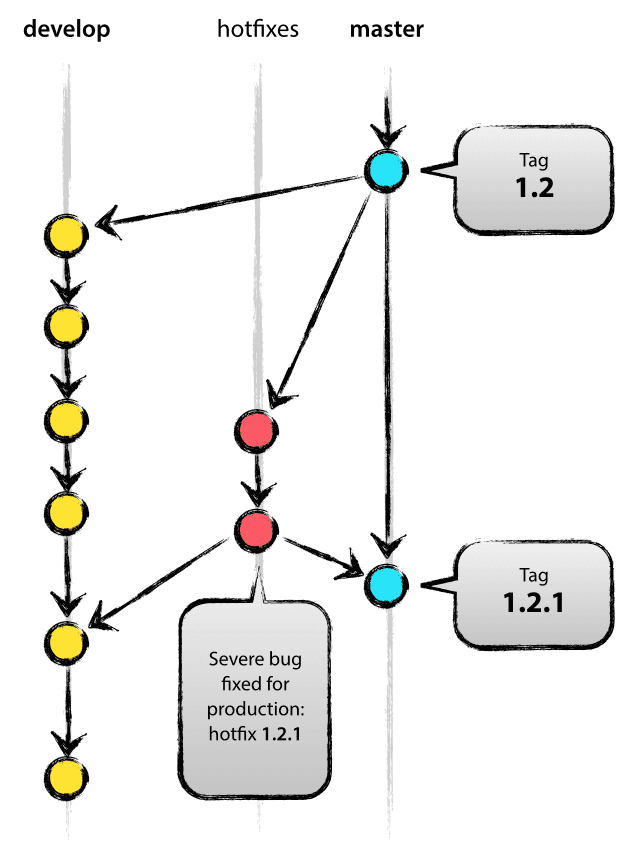
Hotfix Branches
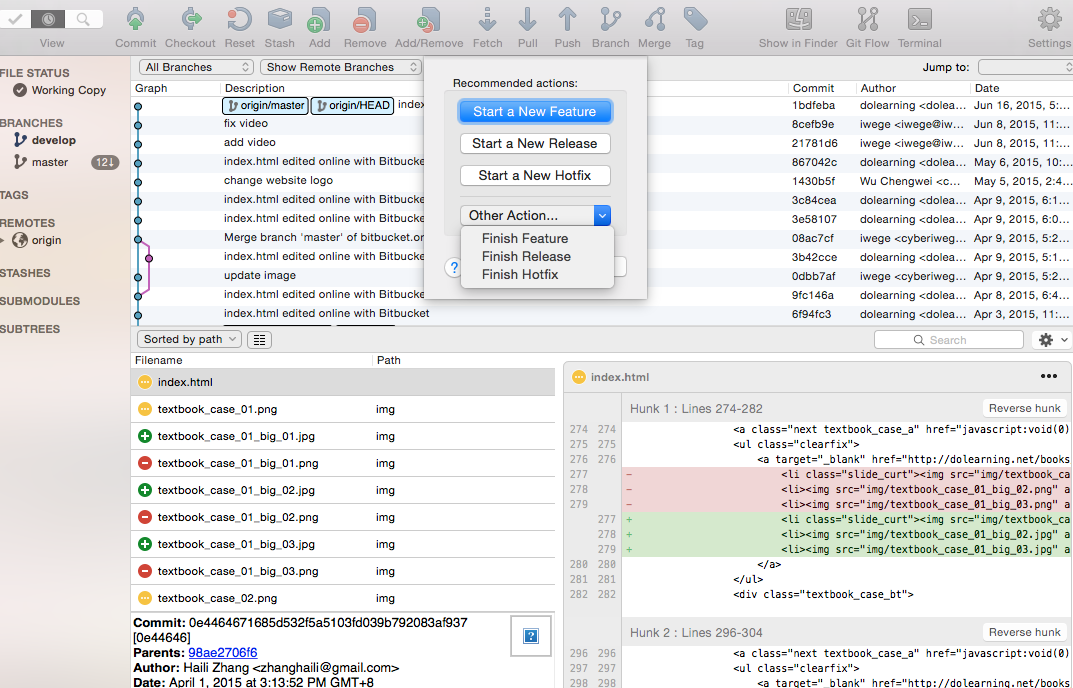
Git Flow Support in SourceTree
Revert, Diff,
& Conflicts
Undoing Local Changes
To restore a file to last committed version, use "git checkout":
$ git checkout -- file/to/restore.extIf you use it with two dashes and (separated with a space!) the path to a file, it will discard the uncommitted changes in that file.
If you need to discard all current changes in your working copy and restore the last committed version of your complete project, use "git reset" command:
$ git reset --hard HEADThis tells Git to replace the files in your working copy with the "HEAD" revision (which is the last committed version).
Discarding uncommitted changes cannot be undone.
Source: Undoing Things
Undoing Committed Changes
Using the "git revert" command is a possible way to undo a previous commit. It reverts the effects of a certain commit, by producing a new commit with changes that revert each of the changes in that unwanted commit.
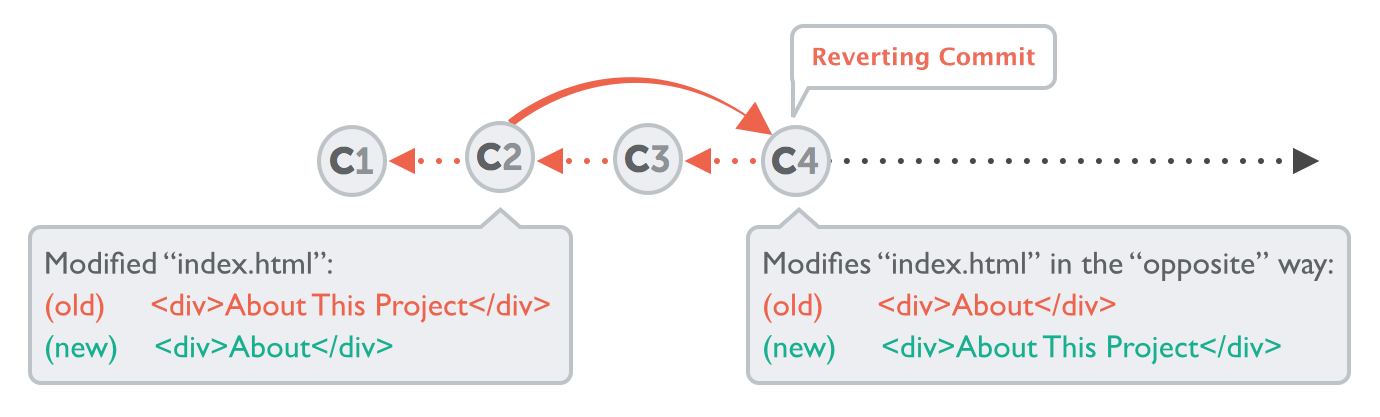
$ git revert 2b504be
[master 364d412] Revert "Change headlines for about and imprint"
 2 files changed, 2 insertions(+), 2 deletions (-)
Source: Undoing Things
Undoing Committed Changes (cont.)
Another tool to "undo" commits is the "git reset" command. It neither produces any new commits nor does it delete any old ones. It works by rolling back your current HEAD branch to an older revision:
$ git reset --hard 2be18d9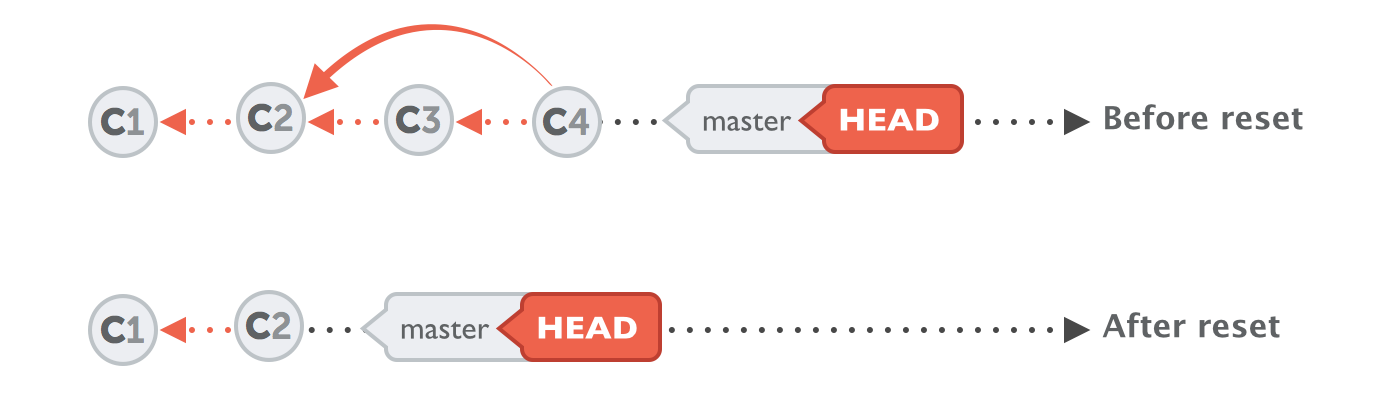
- Be careful: calling the command with the "--hard" option will discard all local changes you currently have.
- If you call it with "--keep" instead of "--hard", all changes from rolled back revisions will be preserved as local changes in your working directory.
Source: Undoing Things
Revert and Reset
Both commands, "revert" and "reset", only affect your current HEAD branch. Therefore, you should make sure you have checked out the correct branch before starting to play with them.
Just like "revert", the "reset" command also doesn't delete any commits. It just makes it look as if they hadn't existed and removes them from the history. However, they are still stored in Git's database for at least 30 days. So if you should ever notice you accidentally removed commits you still need, one of your Git expert colleagues will still be able to restore them for you.
Source: Undoing Things
Note
Reading Change Diffs
Source: Inspecting Changes with Diffs

Inspecting Local Changes
$ git diff
diff --git a/about.html b/about.html
index d09ab79..0c20c33 100644
--- a/about.html
+++ b/about.html
@@ -19,7 +19,7 @@
   </div>

   <div id="headerContainer">
-    <h1>About</h1>
+    <h1>About This Project</h1>
   </div>

<div id="contentContainer">"git diff" will show us all current local changes in our working copy that are unstaged.
If you want to see only changes that have already been added to the Staging Area, use "git diff --staged".
Source: Inspecting Changes with Diffs
Comparing Branches and Revisions
To know how one branch differs from another one:
$ git diff master..contact-formInstead of requesting such information on the branch level, you can even compare two arbitrary revisions with each other:
$ git diff 0023cdd..fcd6199Source: Inspecting Changes with Diffs
How to Solve a Conflict
Git will tell you that you have "unmerged paths" (which is just another way of telling you that you have one or more conflicts) via "git status":
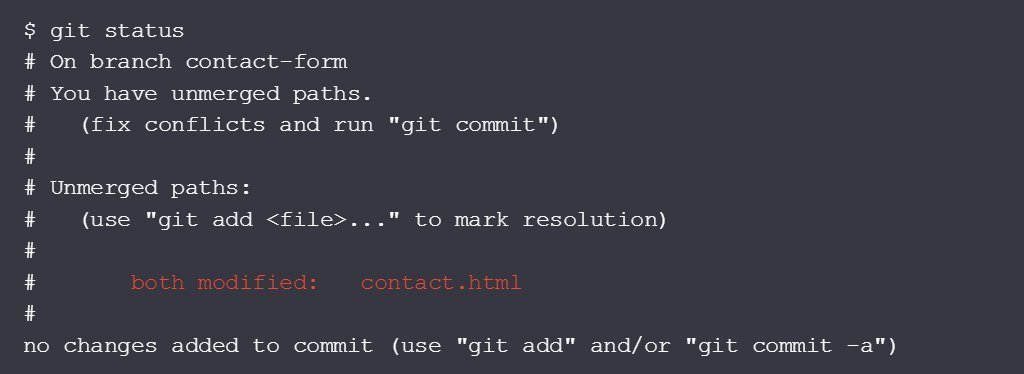

Source: Dealing with Merge Conflicts
Submodules
Source: Submodules
Repositories Inside Repositories
Often in a project, you want to include libraries and other resources. The manual way is to simply download the necessary code files, copy them to your project, and commit the new files into your Git repository, while:
- This mixes external code with our own, unique project files. The library, actually, is a project of itself and should be kept separate from our work. There's no need to keep these files in the same version control context.
- Should the library change (because bugs were fixed or new features added), we'll have a hard time updating the library code. Again, we need to download the raw files and replace the original items.
Since these are quite common problems in everyday projects, Git of course offers a solution: Submodules.
Submodule
Glossary
A "Submodule" is just a standard Git repository. The only specialty is that it is nested inside a parent repository.
In the common case of including a code library, you can simply add the library as a Submodule in your main project.
A Submodule remains a fully functional Git repository: you can modify files, commit, pull, push, etc. from inside it like with any other repository.
Adding a Submodule
We first create a new "lib" folder to host this (and future) library code, with the "git submodule add" command, we'll add a little JavaScript library from GitHub:
$ git submodule add https://github.com/djyde/ToProgress

Cloning into 'lib/ToProgress'...
remote: Counting objects: 180, done.
remote: Compressing objects: 100% (89/89), done.
remote: Total 180 (delta 51), reused 0 (delta 0), pack-reused 91
Receiving objects: 100% (180/180), 29.99 KiB | 0 bytes/s, done.
Resolving deltas: 100% (90/90), done.
Checking connectivity... done.
Content of Submodule
It's important to understand that the actual contents of a Submodule are not stored in its parent repository. Only its remote URL, the local path inside the main project and the checked out revision are stored by main repository.
Of course, the Submodule's working files are placed inside the specified directory in your project. But they are not part of the parent project's version control contents.
A new ".gitmodules" file was created. This is where Git keeps track of our Submodules and their configuration:
Note
[submodule "lib/ToProgress"]
    path = lib/ToProgress
    url = https://github.com/djyde/ToProgress
Adding Submodule (cont.)
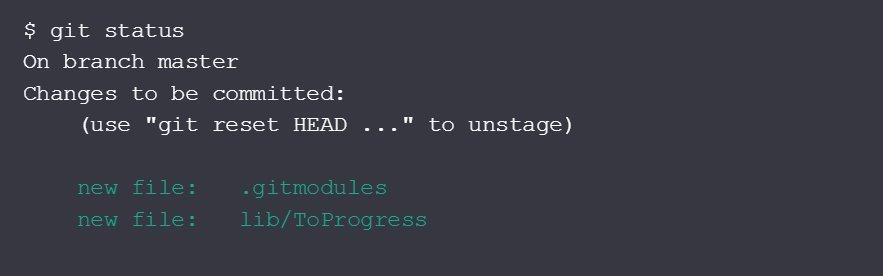
Let's have a look at our project's status:
$ git commit -m "Add 'ToProgress' Javascript library as Submodule"Git regards adding a Submodule as a modification like any other and requests you to commit it to the repo:
Cloning a Project with Submdules
When you clone a project that contains Submodules: by default, the "git clone" command only downloads the project itself. Our "lib" folder, would stay empty.
You have two options to end up with a populated "lib" folder (or wherever else you choose to save your Submodules; "lib" is just an example):
-
You can add the "--recurse-submodules" option to "git clone"; this tells Git to also initialize all Submodules when the cloning is finished.
- If you used a simple "git clone" command without this option, you need to initialize the Submodules afterwards with "git submodule update --init --recursive"
Checking Out a Revision
$ cd lib/ToProgress/

$ git log --oneline --decorate
83298f7 (HEAD, master) update .gitignore
a3b6186 remove page
ed693b7 update doc
3557a0e (tag: 0.1.1) change version code
2421796 update readme

$ git checkout 0.1.1

$ git submodule status
+3557a0e0f7280fb3aba18fb9035d204c7de6344f   lib/ToProgress (0.1.1)
We see that Git regards moving the Submodule's pointer as a change like any other:
$ git status
On branch master
Changes not staged for commit:
    (use "git add ..." to update what will be committed)
    (use "git checkout -- ..." to discard changes in working directory)

    modified:   lib/ToProgress (new commits)
Updating a Submodule
When its Pointer was Moved
What if one of our teammates does this in our project? Let's say we integrate his changes after he has moved the Submodule pointer to a different revision:
$ git pull
Updating 43d0c47..3919c52
Fast-forward
 lib/ToProgress | 2 +-
 1 file changed, 1 insertion(+), 1 deletion(-)

$ git submodule status
+83298f72c975c29f727c846579c297938492b245 lib/ToProgress (0.1.1-8-g83298f7)
That little "+" sign tells us that the Submodule revision was moved (not the one we committed before).
The "update" command helps us correct this:
$ git submodule update lib/ToProgress
Submodule path 'lib/ToProgress': checked out '3557a0e0f7280fb3aba18fb9035d204c7de6344f'
Checking for New Changes
Let's see if there's new code available in the Submodule:
$ cd lib/ToProgress
$ git fetch
remote: Counting objects: 3, done.
remote: Compressing objects: 100% (3/3), done.
remote: Total 3 (delta 0), reused 0 (delta 0), pack-reused 0
Unpacking objects: 100% (3/3), done.
From https://github.com/djyde/ToProgress
    83298f7..3e20bc2  master     -> origin/master
When checking the Submodule's status, we're informed that we're on a detached HEAD:
$ git status
    HEAD detached at 3557a0e
    nothing to commit, working directory clean

$ git pull origin master
$ git checkout master
Note that you cannot use the shorthand "git pull" syntax but instead need to specify the remote and branch, too.
Working in a Submodule
In some cases, you might want to make some custom changes to a Submodule. You've already seen that working in a Submodule is like working in any other Git repository: any Git commands that you perform inside a Submodule directory are executed in the context of that sub-repository.
You should make sure you currently have a branch checked out in the Submodule before you commit. That's because if you're in a detached HEAD situation, your commit will easily get lost: it's not attached to any branch and will be gone as soon as you check out anything else.
Apart from that, everything else you've already learned still applies: in the main project, "git submodule status" will tell you that the Submodule pointer was moved and that you'll have to commit the move.
Deleting a Submodule
If you really want to remove a submodule, please don't do this manually: trying to mess with all the configuration files in a correct way will almost inevitably cause problems.
$ git submodule deinit lib/ToProgress
$ git rm lib/ToPogress
$ git status
...
    modified:   .gitmodules
deleted: lib/ToProgress- With "git submodule deinit", we made sure that the Submodule is cleanly removed from the configuration files.
- With "git rm", we finally delete the actual Submodule files - and other obsolete parts of your configuration.
Questions?
So Why Git ?!!
-
Save Time - Git is lightning fast
-
Work Offline - Distributed VCS
-
Undo Mistakes - Revert, Reset, etc.
-
Make Useful Commits - Staging Area
-
Work in Your Own Way
-
Don’t Mix Things Up - Branching
-
Go With the Flow - Git is most popular!
Source: Why Git?
Git 101
By Haili Zhang


