Custom
Form Controls
in Angular
@AdiSreyaj


Angular & Forms
Angular has in-built tools to work with forms. Being a framework, this is a really good advantage Angular has over others.
The Angular Forms APIs captures user input events from the view, validate the user input, create a form model and data model to update, and provide a way to track changes.
- Template Driven Forms
- Reactive Forms
Both of them work with the same Forms API.
Angular Forms API
Template Driven Forms
- Easiest way to get started with forms in Angular
- Low entry barrier
- Directives are used to interact with HTML elements
- Logic can be solely managed in the template
- Can be used for simple and complex forms
import { Component } from "@angular/core";

@Component({
  selector: "app-root",
  template:`
    <div>
      <label for="email">Email</label>
      <input type="email" id="email" [(ngModel)]="email" />
    </div>
  `,
  styleUrls: ["./app.component.css"]
})
export class AppComponent {
  email = "hi@adi.so";
}
CONTINUED...
Reactive Forms
- Needs getting used to
- Direct access to the form data model
- Robust, scalable, reusable, & testable
- Easier if you already follow reactive approach
- For form-heavy apps, Ideal choice.
import { Component } from "@angular/core";
import { FormControl } from "@angular/forms";

@Component({
  selector: "app-root",
  template: `
    <div>
      <label for="email">Email</label>
      <input type="email" id="email" [formControl]="email" />
    </div>
  `,
  styleUrls: ["./app.component.css"]
})
export class AppComponent {
  email = new FormControl("hi@adi.so");
}
How does angular connect to html form elements?
HTML form elements like input, radio, checkbox etc has certain properties and events that can be used to interact with them.
// Listent to the user input
input.addEventListener("input", (evt) => {
  console.log(evt.target.value);
});

// Update the value of the input field
button.addEventListener("click", () => {
  input.setAttribute("value", "Adithya");
});

// Disable the input field
disable.addEventListener("click", () => {
  input.setAttribute("disabled", true);
});- Creates a wrapper around these native APIs and events.
- This abstracts away most of the logic needed for interaction.
- Angular then exposes a simple class called Control Value Accessor to interact with the elements in a nicer way.
Continued....
Angular has created Control Value Accessors
for all the basic input elements that we have:
- Text Field - DefaultValueAccessor
- Number Field - NumberValueAccessor
- Checkbox - CheckboxControlValueAccessor
- Radio Button - RadioControlValueAccessor
- Select - SelectControlValueAccessor
- etc
Find all Control Value Accessors in the docs
@Directive({
  selector:
      `input[type=checkbox][formControlName],
       input[type=checkbox][formControl],
       input[type=checkbox][ngModel]`,
  host: {
    '(change)': 'onChange($event.target.checked)',
    '(blur)': 'onTouched()'
  },
  providers: [CHECKBOX_VALUE_ACCESSOR]
})
export class CheckboxControlValueAccessor
  extends BuiltInControlValueAccessor
  implements ControlValueAccessor {

  writeValue(value: any): void {
    this.setProperty('checked', value);
  }
}
Custom Form Controls
Similar to what Angular has done with build-in value accessors, we can create our own accessors by implementing the ControlValueAccessor interface.
interface ControlValueAccessor {
  writeValue(obj: any): void
  registerOnChange(fn: any): void
  registerOnTouched(fn: any): void
  setDisabledState(isDisabled: boolean)?: void
}
Let's dive deep into each of these properties!
COntrolValueAccessor interface
- This function will be called by the Forms API to update the view.
- The new value to write will be passed as the function parameter.
- It doesn't return anything.
writeValue(obj: any): void;
- Registers a callback function that is called when the control's value changes in the UI.
- So when we are building custom form elements, when a user makes changes from the UI, we call our registered function to update the form data model.
- This is how we let Angular know that we need to update the model.
registerOnChange(fn: any): void;
Continued...
- Registers a callback function that is called by the forms API on initialisation to update the form model on blur.
- When user interacts with out custom element, we can mark it as touched.
registerOnTouched(fn: any): void
- Function that is called by the forms API when the control status changes to or from 'DISABLED'.
- We can write the custom logic which will disable our custom element.
setDisabledState(isDisabled: boolean)?: void
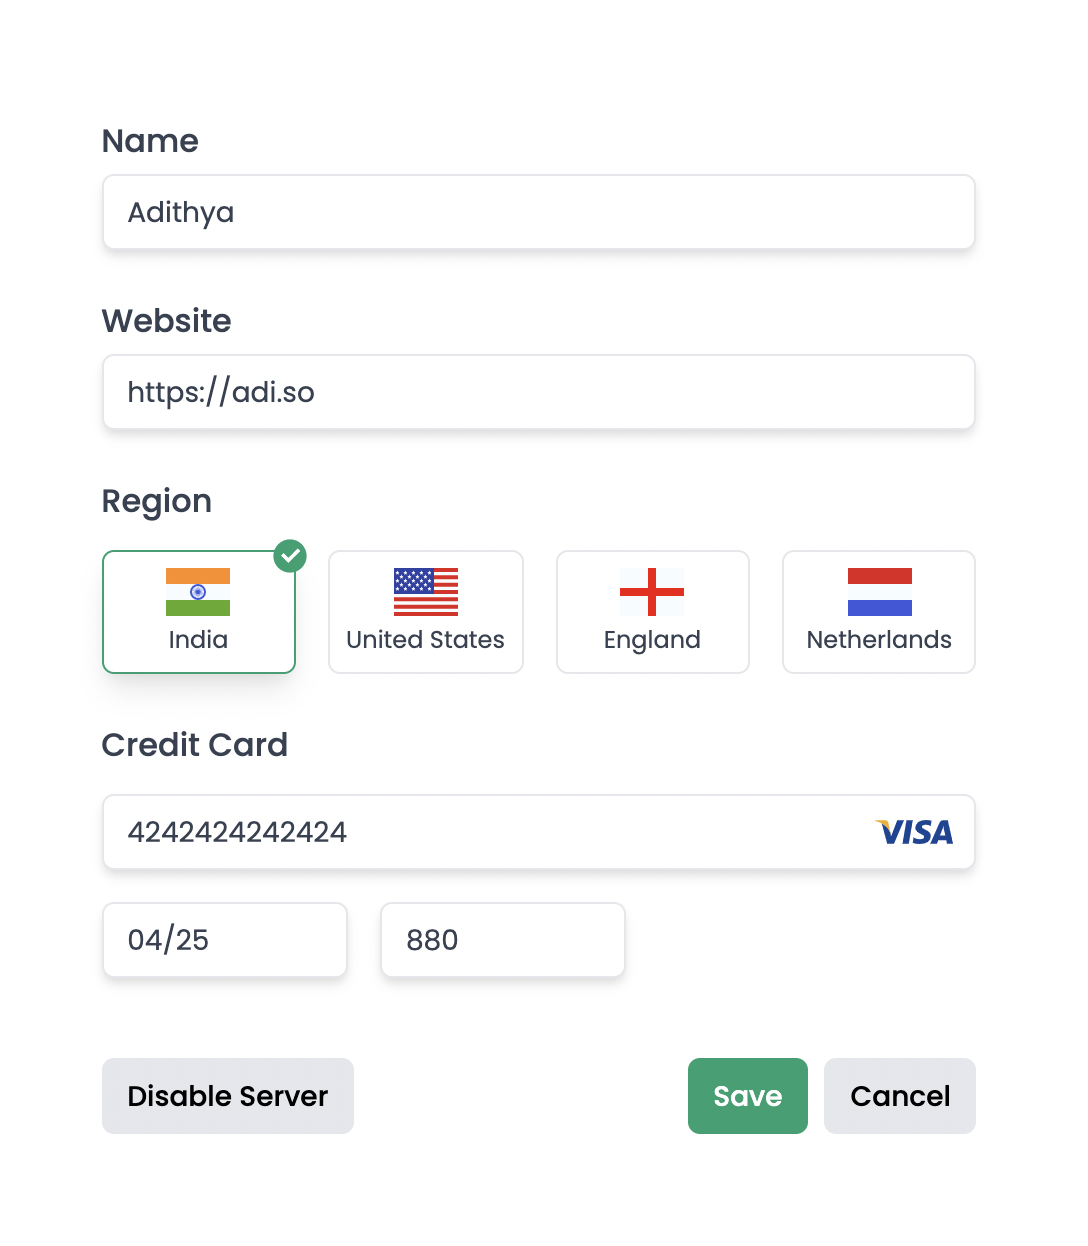
Coding
Now let's see how its done!
- Custom Country Selector Element
- Custom Credit Card Input Element
- We'll use combination of Reactive Forms & Template Driven Forms
Thankyou!
Here are some important links:
Feel free to reach out to me on twitter @AdiSreyaj
Custom Form Controls
By adisreyaj


