


Alejandro Arroyo Duque
Front-end & game developer
Meetup VideoGameArmy
Repositorio: https://github.com/alexarroyoduque/intro-phaser
slides: http://goo.gl/cdHZTk
Demo online: http://goo.gl/bntMU8
Vídeo de esta charla: http://goo.gl/RvnzEP
"El único límite es tu imaginación"
Phaser es un framework de código libre, rápido, gratuito y divertido para hacer juegos HTML5 para escritorio y navegadores móviles. Usa Pixi.js internamente para una aceleración 2D y renderizado de WebGL.
Una herramienta para generar arte
Vamos a usar el generador de Yeoman para Phaser. Así que es necesario instalar algunas cosas antes
npm install -g yo
npm install -g bower
npm install -g yo generator-phaser
npm install -g gulp
npm install -g yo generator-phaser
npm install -g gulp
Primero creamos una carpeta donde crearemos nuestro primer juego
Introducimos en un terminal
Nos pedirá el nombre de nuestro juego
Si algo falla durante la instalación de dependencias
yo phaser
npm install && bower install
Ejecutamos en un terminal
gulp
Se arrancará el juego y podemos verlo en nuestro navegador en la dirección http://localhost:9000
gulp
El canvas es un tag de HTML
Lienzo donde se pinta lo que ocurre en el juego
Soporte
Chrome 4.0
Explorer 9
Firefox 2.0
Opera 9
Safari 3.1
<canvas id="myCanvas"></canvas>Preload
Carga los recursos
Create
Se crean los elementos del juego: el jugador, fondos, música, enemigos...
Update
Se ejecuta constantemente
Render
Sirve para debuggear
<head>
  <meta charset="utf-8">
  <title>intro/title>

  <link rel="stylesheet" href="css/main.css">
</head>
<body>
  <div id="intro-game" class="game"></div>

  <script src="http://localhost:35729/livereload.js"></script>

  <script src="bower_components/phaser-official/build/phaser.min.js"></script>

  <script src="js/boot.js"></script>
  <script src="js/preloader.js"></script>
  <script src="js/menu.js"></script>
  <script src="js/game.js"></script>
  <script src="js/main.js"></script>
</body>* {
-webkit-user-select: none;
user-select: none;
}
html, body {
width: 100%;
height: 100%;
overflow: hidden;
background: #000;
}
.game {
width: 640px;
height: 480px;
margin: 20px auto;
}var game,
ns = window['intro'];
game = new Phaser.Game(640, 480, Phaser.AUTO, 'intro-game');
game.state.add('boot', ns.Boot);
game.state.add('preloader', ns.Preloader);
game.state.add('menu', ns.Menu);
game.state.add('game', ns.Game);
game.state.start('boot');Inicia un estado
que se ha agregado previamente
game = new Phaser.Game(
    640, /* ancho */
    480, /* alto */
    Phaser.AUTO, /* renderizador: Phaser.WEBGL, Phaser.CANVAS o Phaser.HEADLESS */
    'intro-game' /* elemento del DOM donde se inyecta el canvas */
);
En el objeto Phaser.Game ocurre la magia. Es el corazón del juego. Nos proporciona acceso a muchas funciones de Phaser y es capaz de iniciar el cambio entre pantallas
"El modo AUTO me ha dado problemas. Recomiendo poner CANVAS para los ejercicios de la presentación"
  function Boot() {}

  Boot.prototype = {

    preload: function () {
      this.load.image('preloader', 'assets/preloader.gif');
    },

    create: function () {
      this.game.input.maxPointers = 1;

      if (this.game.device.desktop) {
        this.game.scale.pageAlignHorizontally = true;
      } else {
        this.game.scaleMode = Phaser.ScaleManager.SHOW_ALL;
        this.game.scale.minWidth =  480;
        this.game.scale.minHeight = 260;
        this.game.scale.maxWidth = 640;
        this.game.scale.maxHeight = 480;
        this.game.scale.forceLandscape = true;
        this.game.scale.pageAlignHorizontally = true;
        this.game.scale.setScreenSize(true);
      }
      this.game.state.start('preloader');
    }
  };

  window['intro'] = window['intro'] || {};
  window['intro'].Boot = Boot;
carga un .gif
lanza un estado que ha sido agregado en el main.js
registra una pantalla para este JS que será agregada al juego en el main.js
establece el número máximo de punteros y las dimensiones del juego
  function Preloader() {
    this.asset = null;
    this.ready = false;
  }
  Preloader.prototype = {

    preload: function () {
      this.asset = this.add.sprite(320, 240, 'preloader');
      this.asset.anchor.setTo(0.5, 0.5);

      this.load.onLoadComplete.addOnce(this.onLoadComplete, this);
      this.load.setPreloadSprite(this.asset);
      this.load.image('player', 'assets/player.png');
      this.load.bitmapFont('minecraftia', 'assets/minecraftia.png', 'assets/minecraftia.xml');
    },

    create: function () {
      this.asset.cropEnabled = false;
    },

    update: function () {
      if (!!this.ready) {
        this.game.state.start('menu');
      }
    },

    onLoadComplete: function () {
      this.ready = true;
    }
  };

  window['intro'] = window['intro'] || {};
  window['intro'].Preloader = Preloader;
carga recursos
cuando se han cargado todos los recursos se lanza el 'menu'
registra una pantalla para este JS que será agregada al juego en el main.js
asigna un recurso para que sea una barra de carga
function Menu() {
this.titleTxt = null;
this.startTxt = null;
}
Menu.prototype = {
create: function () {
var x = this.game.width / 2
, y = this.game.height / 2;
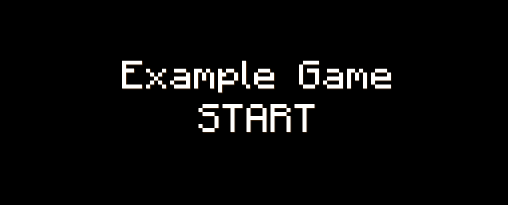
this.titleTxt = this.add.bitmapText(x, y, 'minecraftia', 'Example Game' );
this.titleTxt.align = 'center';
this.titleTxt.x = this.game.width / 2 - this.titleTxt.textWidth / 2;
y = y + this.titleTxt.height + 5;
this.startTxt = this.add.bitmapText(x, y, 'minecraftia', 'START');
this.startTxt.align = 'center';
this.startTxt.x = this.game.width / 2 - this.startTxt.textWidth / 2;
this.input.onDown.add(this.onDown, this);
},
update: function () {},
onDown: function () {
this.game.state.start('game');
}
};
window['intro'] = window['intro'] || {};
window['intro'].Menu = Menu;guarda en x e y el centro del juego
asigna un evento a una entrada. Si se hace click o se toca la pantalla ejecuta la función onDown
registra una pantalla para este JS que será agregada al juego en el main.js
Crea un texto
Crea un texto
esta función lanza el 'game'
  function Game() {
    this.player = null;
  }
  Game.prototype = {
    create: function () {
      var x = this.game.width / 2
        , y = this.game.height / 2;

      this.player = this.add.sprite(x, y, 'player');
      this.player.anchor.setTo(0.5, 0.5);


      this.input.onDown.add(this.onInputDown, this);
    },

    update: function () {
      /* ... */
    },

    onInputDown: function () {
      this.game.state.start('menu');
    }

  };

  window['intro'] = window['intro'] || {};
  window['intro'].Game = Game;
crea un jugador con una imagen cargada en el preloader.js
el contenido de update se ejecuta constantemente. detecta la posición del ratón y realiza las operaciones necesarias para que la imagen del jugador haga zoom y rote
registra una pantalla para este JS que será agregada al juego en el main.js
asigna un evento a una entrada. Si se hace click o se toca la pantalla ejecuta la función onDown
Los diferentes sistemas pueden combinarse entre sí
this.game.physics.startSystem(Phaser.Physics.ARCADE);
this.game.physics.startSystem(Phaser.Physics.NINJA);
this.game.physics.startSystem(Phaser.Physics.P2);Velocidad de decodificado
Peso
node-webkit
Rápida
Ligero
Sí
Rápida
Pesado
No
Muy lenta
Ligero
No
"El sonido y la música son el 50% del entretenimiento en una película": George Lucas
(function () {
    'use strict';
    function Demo() {}

    Demo.prototype = {

        create: function () {
            var x = this.game.width / 2,
                y = this.game.height / 2,
                textStyle = {
                    'align': 'center',
                    'fill': '#FABADA'
                }

            var miTexto = this.game.add.text(x, y, 'Hola juego', textStyle)
            miTexto.anchor.setTo(0.5, 0.5);
        },

        update: function () {}
    };

    window['intro'] = window['intro'] || {};
    window['intro'].Demo= Demo;
}());
ruta: src/js/ejemplos/demo.js
<script src="js/boot.js"></script>
<script src="js/preloader.js"></script>
<script src="js/menu.js"></script>
<script src="js/game.js"></script>

<script src="js/ejemplos/demo.js"></script>

<script src="js/main.js"></script>game.state.add('boot', ns.Boot);
game.state.add('preloader', ns.Preloader);
game.state.add('menu', ns.Menu);
game.state.add('game', ns.Game);
game.state.add('demo', ns.Demo);
game.state.start('boot');Modificamos el preloader.js para que lance a ejemplo1
Ejecutamos por consola a gulp si no está funcionando
update: function () {
  if (!!this.ready) {
    this.game.state.start('demo');
  }
},
gulp
Podemos verlo en nuestro navegador en la dirección http://localhost:9000
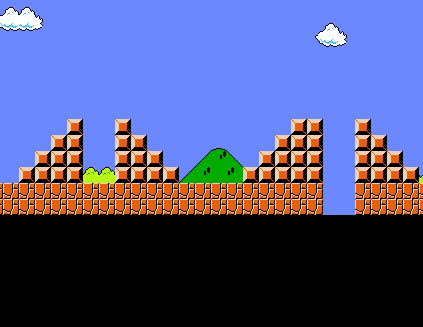
Necesitamos una imagen de fondo
src/assets/scenario/sky.jpg
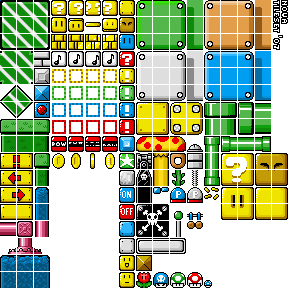
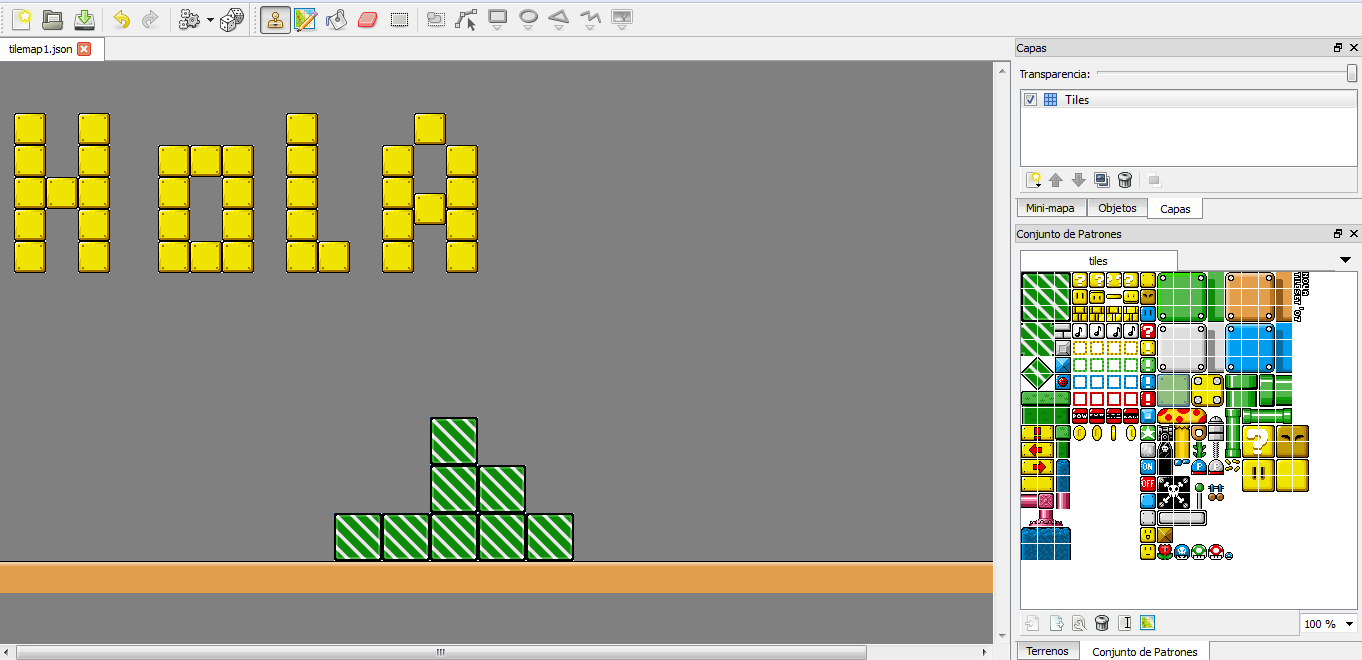
Necesitamos un sprite con todas tiles (baldosas)
src/assets/scenario/tiles.png
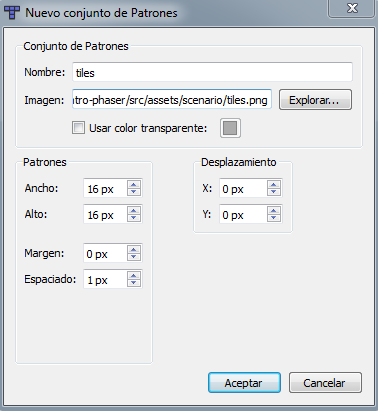
16px + 1px
16px
Necesitamos un mapa para el nivel del juego
Primero cargaremos en Tiled el sprite de tiles
Mapa > Nuevo conjunto de patrones...
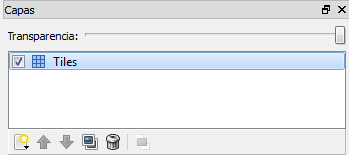
Crearemos una capa llamada tiles que contendrá nuestro mapa
Cuando tengamos el mapa listo lo guardamos como tilemap1.json en la carpeta src/assets/scenario
this.load.image('sky', 'assets/scenario/sky.jpg');
this.load.spritesheet('tiles', 'assets/scenario/tiles.png', 16, 16, 1, 0);
this.load.tilemap('tilemap1', 'assets/scenario/tilemap1.json', null, Phaser.Tilemap.TILED_JSON);create: function () {
this.game.physics.startSystem(Phaser.Physics.ARCADE);
this.game.physics.arcade.gravity.y = 485;
this.bg = this.game.add.tileSprite(0, 0, 640, 480, 'sky');
this.bg.fixedToCamera = true;
// map
this.map = this.game.add.tilemap('tilemap1');
this.map.addTilesetImage('tiles');
this.map.setCollisionBetween(0, this.map.tiles.length);
this.layer = this.map.createLayer('Tiles');
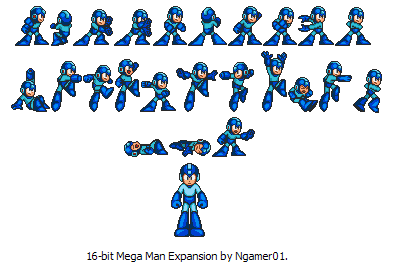
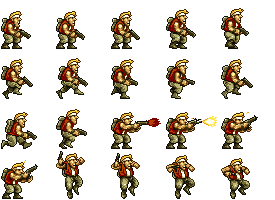
this.layer.resizeWorld();Necesitamos un sprite con todas las animaciones
src/assets/character/marco-rossi.png
55px
50px
this.load.sprite('marco', 'assets/character/marco-rossi.png', 55, 50);
//this.load.sprite(clave, ruta, ancho, alto);
create: function () {
    //map
    /* ... */

    // player
    function setupPlayer(player) {
        player.animations.add('standby', [0, 1, 2, 1], 6, true);
        player.animations.add('move', [3, 4, 5, 6, 7, 8, 9, 10, 11], 18, true);
        player.animations.add('fire', [12, 13, 14, 15], 12, true);
        player.body.collideWorldBounds = true;
        player.body.setSize(18, 35, -6, 6);
        player.anchor.setTo(0.3, 0.5);
        player.fireTimer = 0;
        player.health = 1;
    }


    this.player = this.game.add.sprite(100, 20, 'marco');
    this.game.physics.enable(this.player, Phaser.Physics.ARCADE);
    setupPlayer(this.player);
    this.game.camera.follow(this.player);
},
tamaño colisión, ancla, escalado, vida
animaciones
creación del personaje,
físicas,
le decimos a la camara que le siga
update: function () {
    this.game.physics.arcade.collide(this.player, this.layer);
},
render: function () {
    this.game.debug.body(this.player);
    this.game.debug.spriteInfo(this.player, 150, 30);
}
Phaser proporciona el método render para ayudarnos a debuggear
create: function () {
// map ...
// player ...
// controls
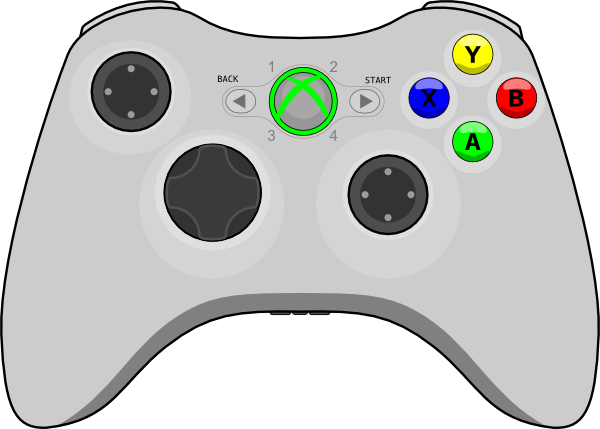
function createControls(gameContext) {
gameContext.controls= {
'left': gameContext.game.input.keyboard.addKey(65), //A
'right': gameContext.game.input.keyboard.addKey(68), //D
'down': gameContext.game.input.keyboard.addKey(83), //S
'up': gameContext.game.input.keyboard.addKey(87), //W
'fire': gameContext.game.input.keyboard.addKey(75), // K
'jump': gameContext.game.input.keyboard.addKey(Phaser.Keyboard.SPACEBAR)
};
}
createControls(this);
},update: function() {
this.game.physics.arcade.collide(this.player, this.layer);
this.player.body.velocity.x = 0;
if (this.controls.left.isDown) {
this.player.body.velocity.x = -150;
this.player.animations.play('move');
if (this.player.scale.x > 0) {
this.player.scale.x = - 1;
this.player.body.setSize(18, 35, 0, 6);
}
} else if (this.controls.right.isDown) {
this.player.body.velocity.x = 150;
this.player.animations.play('move');
if (this.player.scale.x < 0) {
this.player.scale.x = 1;
this.player.body.setSize(18, 35, -6, 6);
}
} else {
this.player.animations.play('standby');
}
if (this.controls.jump.isDown && this.player.body.onFloor()) {
this.player.body.velocity.y = - 250;
}
},Necesitamos un sprite con todas las animaciones
src/assets/enemies/abul-abbas.png
41px
41px
Cargamos en el preloader.js el recurso
this.load.spritesheet('abul', 'assets/enemies/abul-abbas.png', 41, 41);
create: function() {
    // map, player, controls ...
    // enemies
    // abul-abbas
    function setupAbul(enemy) {
        this.game.physics.enable(enemy, Phaser.Physics.ARCADE);
        enemy.animations.add('default', [0, 1, 2, 3, 4, 5], 10, true);
        enemy.body.collideWorldBounds = true;
        enemy.body.setSize(20, 38);
        enemy.anchor.setTo(0.5, 0.5);
        enemy.health = 3;
        enemy.animations.play('default');
    }
    this.abuls = this.game.add.group();
    this.abuls.create(460, 390, 'abul');
    this.abuls.create(880, 530, 'abul');
    this.abuls.forEach(setupAbul, this);
},
update: function() {
    this.game.physics.arcade.collide(this.abuls, this.layer);
    //...
creamos un grupo de enemigos con características similares
colision con el mapa
update: function() {
    this.game.physics.arcade.collide(this.player, this.layer);
    this.game.physics.arcade.collide(this.abuls, this.layer);
    this.abuls.forEach(function (abul) {
        if (this.game.physics.arcade.distanceBetween(abul, this.player) < 250) {
            this.game.physics.arcade.accelerateToObject(abul, this.player, 120, 120, 0)
            // accelerateToObject(objeto, destino, vel, xVelMax, yVelMax)
        } else {
            abul.body.velocity.x = 0;
        }
    }, this);

//...update: function() {
//...
this.game.physics.arcade.collide(this.abuls, this.player, this.playerIsDamaged, null, this);
// collide(object1, object2, collideCallback, processCallback, callbackContext)
//..
},
playerIsDamaged: function (player) {
player.damage(1);
},Necesitamos una imagen del proyectil
src/assets/character/bullet.png
Cargamos en el preloader.js el recurso
this.load.image('bullet', 'assets/character/bullet.png');
create: function() {
    // map, player, enemies, ...
    // bullets
    function setupBullet(bullet) {
        this.game.physics.enable(bullet, Phaser.Physics.ARCADE);
        bullet.body.collideWorldBounds = false;
        bullet.body.setSize(13, 13);
        bullet.anchor.setTo(0.5, 0.5);
        bullet.lifespan = 1000;
        bullet.outOfBoundsKill = true;
        bullet.checkWorldBounds = true;
        bullet.body.allowGravity = false;
    }
    this.bullets = this.game.add.group();
    this.bullets.createMultiple(20, 'bullet');
    this.bullets.forEach(setupBullet, this);
},
update: function() {
    //...
    } else if (this.controls.fire.isDown && this.player.alive) {
        this.player.animations.play('fire');
        this.fireBullet(this);
    } else {
        this.player.animations.play('standby');
    }
    //...
},
fireBullet: function (context) {
    if (context.game.time.now > context.player.fireTimer) {
        var bullet = context.bullets.getFirstExists(false);
        if (bullet) {
            bullet.reset(context.player.x, context.player.y - 6);
            bullet.body.velocity.x = 400 * context.player.scale.x;
            context.player.fireTimer = context.game.time.now + 200;
        }
    }
},update: function() {
//...
this.game.physics.arcade.collide(this.abuls, this.bullets, this.enemyIsDamaged, null, this);
this.game.physics.arcade.collide(this.layer, this.bullets, this.destroyBullet, null, this);
//...
},
enemyIsDamaged: function (enemy, bullet) {
enemy.damage(1);
bullet.kill();
},
destroyBullet: function (bullet) {
bullet.kill();
},Pongamos música y sonido al disparar
src/assets/audio/ryu-remix.ogg
src/assets/audio/shoot.wav
this.load.audio('music', 'assets/audio/ryu-remix.ogg');
this.load.audio('shootSound', 'assets/audio/shoot.wav');
Cargamos en el preloader.js el recurso
create: function() {
    // map, player, enemies, bullets, ...
    // audio
    this.game.sound.stopAll();
    this.music = this.game.add.audio('music');
    this.shootSound = this.game.add.audio('shootSound');
    this.music.play('', 0, 1, true);
},
update: function() {/*...*/},
fireBullet: function (context) {
    if (context.game.time.now > context.player.fireTimer) {
        var bullet = context.bullets.getFirstExists(false);
        if (bullet) {
            context.shootSound.play('', 0, 0.4, false);
            bullet.reset(context.player.x, context.player.y - 6);
            bullet.body.velocity.x = 400 * context.player.scale.x;
            context.player.fireTimer = context.game.time.now + 200;
        }
    }
},
creamos los audios
la música se empieza a reproducir
en cada disparo se reproduce un sonido
¡Registro a próximos MeetUps ya disponible!
By Alejandro Arroyo Duque
Charla para el meetup @videogamearmy