Familiar with SME Web
by building a new screen from scratch
Step 1 - Initialise a screen
- Create structured folders
- Add routes
- Add module
|--src
|--practise
|--practiseList
|--components
|--PractiseListView.js
|--PractiseListModule.js
|--getPractiseListRoutes.js
Create folders and source file as following
import React from 'react';

export default () => <div>HelloWorld</div>;
Create a screen root view - PractiseListView.js
import React from 'react';

import PractiseListView from './components/PractiseListView';

export default class ContactDetailModule {
  constructor({
    setRootView,
  }) {
    this.setRootView = setRootView;
  }

  render = () => {
    this.setRootView(<PractiseListView />);
  }

  /* required lifecycle methods */
  run() {
    this.render();
  }

  unsubscribeFromStore = () => {}

  resetState = () => {}
}
Create module - PractiseListModule.js
import PractiseListModule from './practiseList/PractiseListModule';

export default ({ setRootView }) => (
  [
    {
      name: 'practiseList',
      path: '/',
      module: new PractiseListModule({
        setRootView,
      }),
    },
  ]
);
Create routes - getPractiseRoutes.js
Add your routes into router
Open the getRoutes.js under the root path and import and add your route. Then visit
https://localhost:3000/#/au/4d0429b1-c5c1-4b90-803d-03d3124fc216/practises to verify your changes.
const getRoutes = ({
  setRootView
}) => [
  ...,
  {
    name: 'practises',
    rootPath: '/:region/:businessId/practises',
    subRoutes: getPractiseRoutes({
      setRootView,
    }),
  },
]
Some Concepts
- Module
- Router/Route system in sme-web
- Lifecycle methods
Module
The module concept in sme-web is very similar with controller in MVC pattern. The responsibilities include:
- Initialise store(model)
- Handle DOM/VDOM events
- Update store(model)
- Clean up context before/after page transition

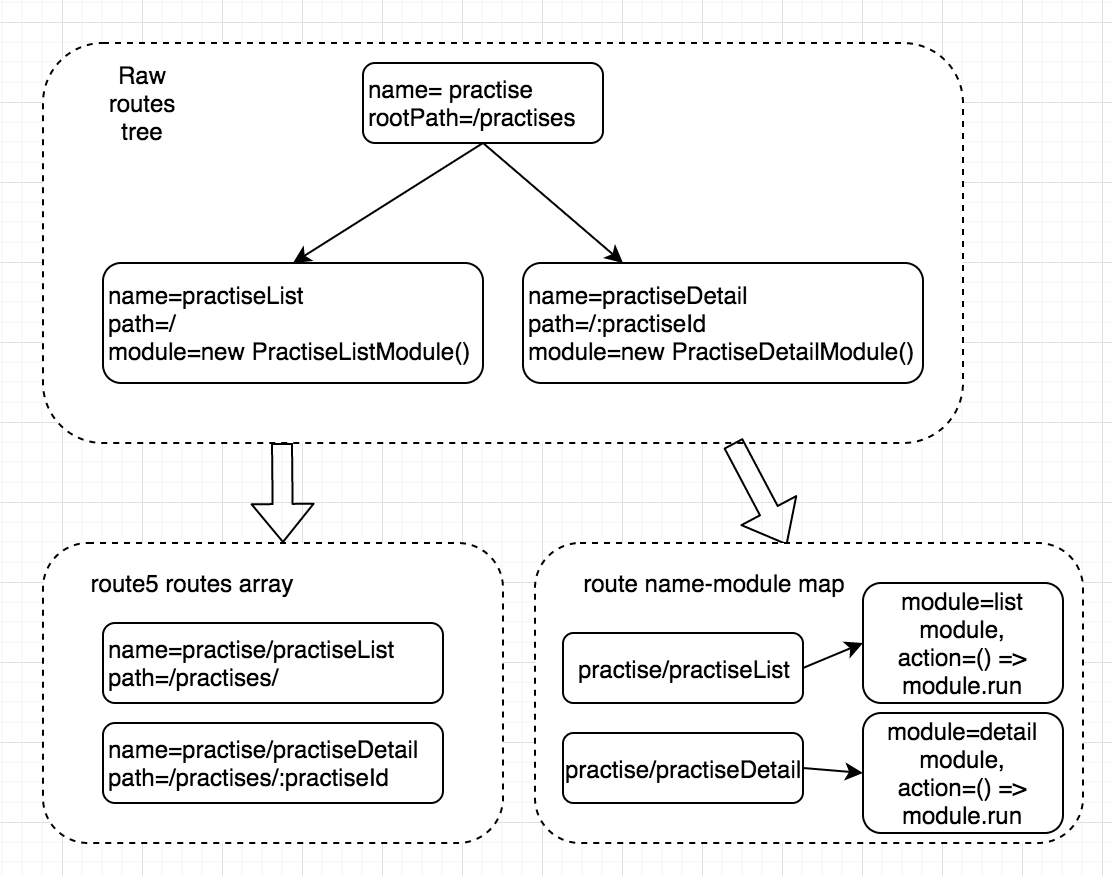
Router/Route
The router in sme-web is based on `router5` and sme-web wrap `router5` with a Router class which takes following reponsibilities
- Flat route tree into routes array with composited unique name
- Build route-to-module map
- Subscribe router change
- Call lifecycle methods
Required Lifecycle Methods
- module.unsubscribeFromStore - called before page transition
- module.resetState - called before page transition
- module.run - called when route changed
Step 2 - Show in navigation bar
- Add new screen to enabled feature list
- Add new screen to navConfig.js
- Add navigation selectors for new screen
- Create menu component
- Use new created menu component in NavigrationBar component
Add new screen to enabled feature list
{
  "businessName": "Stark Industries",
  "region": "au",
  "enabledFeatures": [
     ...,
    "practises"
  ]
}
navigationConfig.json
Add new screen to active mapping and endpoint path map
export const activeMapping = {
  ...,
  'practises/practiseList': 'jumpStart',
};
navConfig.js
export const featuresConfig = {
  ...,
  practises: {
    routeName: 'practises/practiseList',
  },
};
Add selectors
export const getJumpStartUrl = createSelector(
  getEnabledUrls,
  enabledUrls => ({
    practises: enabledUrls.practises,
  }),
);

export const hasJumpStartUrls = createSelector(
  getJumpStartUrl,
  urls => Object.values(urls).some(Boolean),
);
NavigationSelectors.js
Create menu component
import { getActiveNav, getJumpStartUrl } from '../NavigationSelectors';
import handleMenuLinkClick from './handlers/handleMenuLinkClick';

const getMenuLink = (url, label, onMenuLinkClick) => (
  <Navigation.MenuLink
    key={label}
    url={url}
    label={label}
    onClick={handleMenuLinkClick(onMenuLinkClick, url)}
  />
);

const getItems = (urls, onMenuLinkClick) => [
  urls.practises && getMenuLink(urls.practises, 'Practises', onMenuLinkClick),
].filter(Boolean);

const JumpStartMenu = ({
  urls, activeNav, onMenuSelect, onMenuLinkClick,
}) => (
  <Navigation.Menu
    label="JumpStart"
    icon={<Icons.Caret />}
    onSelect={onMenuSelect}
    items={getItems(urls, onMenuLinkClick)}
    active={activeNav === 'jumpStart'}
  />
);

const mapStateToProps = (state, props) => ({
  urls: getJumpStartUrl(state, props),
  activeNav: getActiveNav(state),
});
export default connect(mapStateToProps)(JumpStartMenu);
JumpStartMenu.js
const mapStateToProps = state => ({
  ...,
  shouldDisplayJumpStartMenu: hasJumpStartUrls(state),
});
const getPrimary = ({
  ...,
  shouldDisplayJumpStartMenu,
}) => [
  ...,
  shouldDisplayJumpStartMenu && <JumpStartMenu key="JumpStartMenu" ... />,
].filter(Boolean);
const NavigationBar = ({
  ...,
  shouldDisplayJumpStartMenu,
}) => {
  const primaryMenuItems = getPrimary({
    ...,
    shouldDisplayJumpStartMenu,
  });
  const secondary = getSecondary({ onMenuSelect, onMenuLinkClick, shouldDisplayBusinessMenu });
  const brand = (...);
  const primary = primaryMenuItems.length ? primaryMenuItems : [''];
  return (
    <Navigation brand={brand} primary={primary} secondary={secondary} />
  );
};
Add menu into NavigationBar component
JumpStartMenu.js
Step 3 - Build list view with Feelix
- Create root view
- Create filter options
- Create mock data
Use StandardTemplate for layout
import {
  Button, PageHead, StandardTemplate,
} from '@myob/myob-widgets';
import React from 'react';

export default () => {
  const alertComponent = (<div>Alert Section</div>);

  const filterBar = (<div>Filter Section</div>);

  const pageHead = (
    <PageHead title="Practises List">
      <Button>Create Practise</Button>
    </PageHead>
  );

  return (
    <StandardTemplate alert={alertComponent} sticky="none" pageHead={pageHead} filterBar={filterBar}>
      <div>List Section</div>
    </StandardTemplate>
  );
};
PractiseListView.js
Use Feelix FilterBar to build filter options
import {
  FilterBar, Search, Select,
} from '@myob/myob-widgets';
import React from 'react';

const PractiseListFilterOptions = () => (
  <FilterBar onApply={() => {}}>
    <FilterBar.Item>
      <Select name="type" label="Practise type">
        <Select.Option value="active" label="Active" key="active" />
        <Select.Option value="inactive" label="Inactive" key="inactive" />
      </Select>
    </FilterBar.Item>
    <FilterBar.Item>
      <Search id="Search_Box" name="keywords" label="Search" placeholder="Search" maxLength={255} />
    </FilterBar.Item>
  </FilterBar>
);

export default PractiseListFilterOptions;
PractiseListFilterOptions.js
Use Feelix Table to build list
const tableConfig = {
  name: { width: 'flex-1', valign: 'top' },
  type: { width: '15rem', valign: 'top' },
};

const PractiseListTable = ({
  isTableLoading,
  onSort,
  order,
  entries,
}) => {
  const isTableEmpty = entries.length === 0;

  const header = (
    <Table.Header>
      <Table.HeaderItem {...tableConfig.name}>
        <HeaderSort title="Name" sortName="Name" activeSort={order} onSort={onSort} />
      </Table.HeaderItem>
      <Table.HeaderItem {...tableConfig.type}>
        <HeaderSort title="Type" sortName="Type" activeSort={order} onSort={onSort} />
      </Table.HeaderItem>
    </Table.Header>
  );
PractiseListTable.js
Use Feelix Table to build list
const body = (
    <Table.Body>
      {
        entries.map(entry => (
          <Table.Row key={entry.id}>
            <Table.RowItem {...tableConfig.name}>
              {entry.name}
            </Table.RowItem>
            <Table.RowItem {...tableConfig.type}>{entry.type}</Table.RowItem>
          </Table.Row>
        ))
      }
    </Table.Body>
  );

  return (
    <TableView
      isLoading={isTableLoading}
      isEmpty={isTableEmpty}
      header={header}
      emptyMessage="There are no data."
    >
      {body}
    </TableView>
  );
};
PractiseListTable.js
Add mock data for development
{
  "entries": [
    {
      "id": "1",
      "name": "Practise A",
      "type": "active"
    },
    {
      "id": "2",
      "name": "Practise B",
      "type": "inactive"
    },
    {
      "id": "3",
      "name": "Practise C",
      "type": "active"
    }
  ]
}
src/integration/data/practises/practiseList.json
Step 4 - Work with `store`
- Create intent with symbols
- Update module to introduce store
- Bind view to store via connect HOC
Create symbols and reducer
export const LOAD_PRACTISE_LIST = Symbol('Load list of practises')
PractiseIntents.js
import { LOAD_PRACTISE_LIST } from '../PractiseIntents';
import createReducer from '../../store/createReducer';

const getDefaultState = () => (
  {
    entries: [],
  }
);

const handlers = {
  [LOAD_PRACTISE_LIST]: (state, action) => ({
    ...state,
    entries: action.entries,
  }),
};

export default createReducer(getDefaultState(), handlers);
PractiseListReducer.js
Update module to use store
PractiseListModule.js
constructor({
  setRootView,
}) {
  this.setRootView = setRootView;
  this.store = new Store(reducer);
}
render = () => {
  this.setRootView(
    <Provider store={this.store}>
      <PractiseListView />
    </Provider>,
  );
}
loadPractiseList = () => {
  this.store.dispatch({
    intent: LOAD_PRACTISE_LIST,
    ...listData,
  });
}
run(context) {
  this.render();
  this.loadPractiseList();
}
Bind table component with store
PractiseListTable.js
const mapStateToProps = ({ entries }) => ({
  entries,
});

export default connect(mapStateToProps)(PractiseListTable);
Step 5 - Work with `integraion`
- Define action mapping for new screen
- Include new action mapping to root mapping
- Pass integration through the route
- Use integration in module
Add interaction mappings
src/integration/memoryMapping/PractiseMapping.js
import {
  LOAD_PRACTISE_LIST,
} from '../../practise/PractiseIntents';
import practiseListLoadResponse from '../data/practises/practiseList';

const loadPractiseList = ({ onSuccess }) => onSuccess(practiseListLoadResponse);

const PractiseListMapping = {
  [LOAD_PRACTISE_LIST]: loadPractiseList,
};

export default PractiseListMapping;
src/integration/memoryMapping/RootMapping.js
...
import PractiseMapping from './PractiseMapping';
const RootMapping = Object.freeze({
  ...,
  ...PractiseMapping,
});

export default RootMapping;
Pass through integration in route
getPractiseRoutes.js
export default ({ setRootView, integration }) => (
  [
    {
      name: 'practiseList',
      path: '/',
      module: new PractiseListModule({
        setRootView, integration,
      }),
    },
  ]
);
Use integration in module
PractiseListModule.js
constructor({
  setRootView,
  integration,
}) {
  this.integration = integration;
  this.setRootView = setRootView;
  this.store = new Store(reducer);
}
loadPractiseList = () => {
  const intent = LOAD_PRACTISE_LIST;
  const urlParams = {
    businessId: this.store.getState().businessId,
  };

  const onSuccess = ({
    entries,
  }) => {
    this.store.dispatch({
      intent,
      entries,
    });
  };

  this.integration.read({
    intent,
    urlParams,
    onSuccess,
  });
}
Step 6 - Interact with UI (sort the list)
- Update defaultState and mock data
- Add intent and reducer to update state
- Update mapStateToProps function
- Add event handler in module
SME Web Jump Start
By Alex Li


