Designing Distributed Systems
Part I. Single-Node Patterns
Motivations
- Resource isolation
- Modular reuse
- Easy to be tested, updated, and deployed
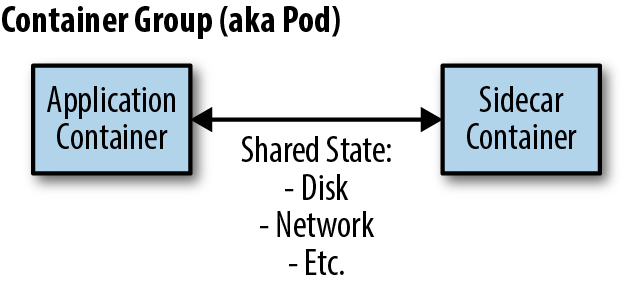
The Sidecar Pattern
- Application container
- Sidecar container
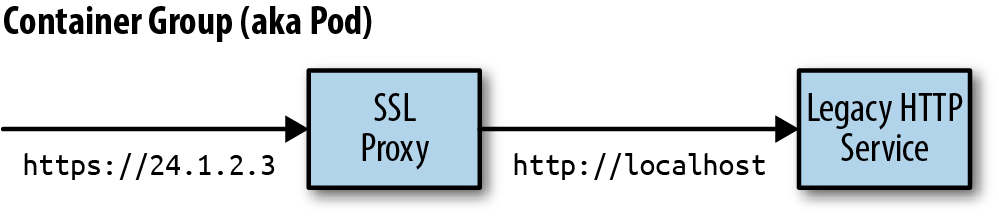
An Example Sidecar: Adding HTTPS to a Legacy Service
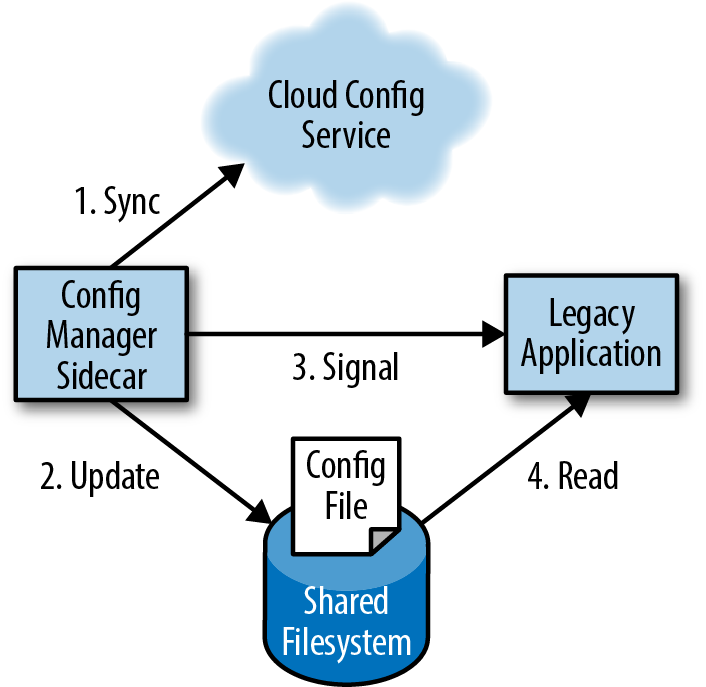
Dynamic Configuration with Sidecars
Demo
docker run -d redis
docker run -d --pid=container:{redis_container_hash} -p 8080:8080 brendanburns/topz:db0fa58 /server --addr=0.0.0.0:8080

visit: http://localhost:8080/topz
Summary
- In the sidecar pattern, a sidecar container augments and extends an application container to add functionality.
- Sidecars can be used to update existing legacy applications when changing the applicationis too costly.
- Likewise, they can be used to create modular utility containers that standardize implementations of common functionality.
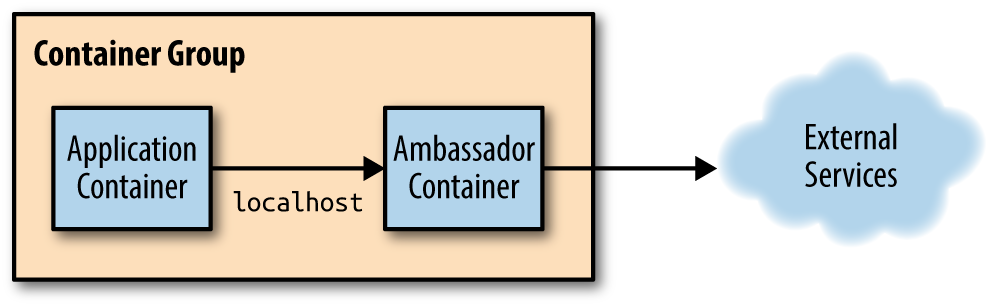
Ambassadors
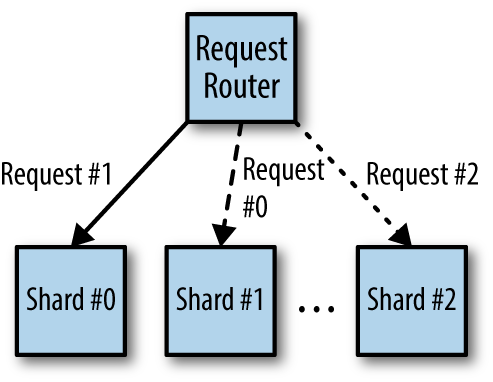
Using an Ambassador to Shard a Service
Hands On: Implementing a Sharded Redis
apiVersion: apps/v1beta1
kind: StatefulSet
metadata:
  name: sharded-redis
spec:
  serviceName: "redis"
  replicas: 3
  template:
    metadata:
      labels:
        app: redis
    spec:
      terminationGracePeriodSeconds: 10
      containers:
      - name: redis
        image: redis
        ports:
        - containerPort: 6379
          name: redis
apiVersion: v1
kind: Service
metadata:
name: redis
labels:
app: redis
spec:
ports:
- port: 6379
name: redis
clusterIP: None
selector:
app: redisredis:
listen: 127.0.0.1:6379
hash: fnv1a_64
distribution: ketama
auto_eject_hosts: true
redis: true
timeout: 400
server_retry_timeout: 2000
server_failure_limit: 1
servers:
- sharded-redis-0.redis:6379:1
- sharded-redis-1.redis:6379:1
- sharded-redis-2.redis:6379:1apiVersion: v1
kind: Pod
metadata:
name: ambassador-example
spec:
containers:
# This is where the application container would go, for example
# - name: nginx
# image: nginx
# This is the ambassador container
- name: twemproxy
image: ganomede/twemproxy
command:
- "nutcracker"
- "-c"
- "/etc/config/nutcracker.yaml"
- "-v"
- "7"
- "-s"
- "6222"
volumeMounts:
- name: config-volume
mountPath: /etc/config
volumes:
- name: config-volume
configMap:
name: twem-configkubectl create -f redis-shards.yaml
kubectl get pods
kubectl create -f redis-service.yaml
kubectl create configmap twem-config --from-file=./nutcracker.yaml
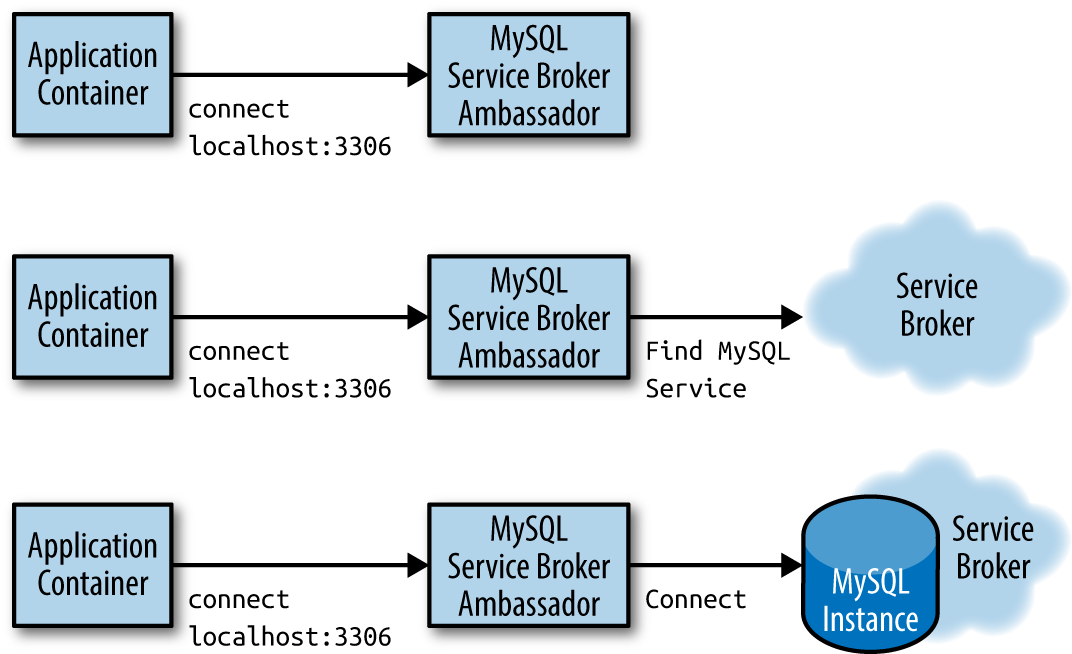
kubectl create -f ambassador-example.yamlUsing an Ambassador for Service Brokering
Hands On: Implementing 10% Experiments
worker_processes  5;
error_log  error.log;
pid        nginx.pid;
worker_rlimit_nofile 8192;

events {
  worker_connections  1024;
}

http {
    upstream backend {
        ip_hash;
        server web weight=9;
        server experiment;
    }

    server {
        listen localhost:80;
        location / {
            proxy_pass http://backend;
        }
    }
# This is the 'experiment' service
apiVersion: v1
kind: Service
metadata:
  name: experiment
  labels:
    app: experiment
spec:
  ports:
  - port: 80
    name: web
  selector:
    # Change this selector to match your application's labels
    app: experiment
---
# This is the 'prod' service
apiVersion: v1
kind: Service
metadata:
  name: web
  labels:
    app: web
spec:
  ports:
  - port: 80
    name: web
  selector:
    # Change this selector to match your application's labels
    app: web
apiVersion: v1
kind: Pod
metadata:
name: experiment-example
spec:
containers:
# This is where the application container would go, for example
# - name: some-name
# image: some-image
# This is the ambassador container
- name: nginx
image: nginx
volumeMounts:
- name: config-volume
mountPath: /etc/nginx
volumes:
- name: config-volume
configMap:
name: experiment-configAdapters
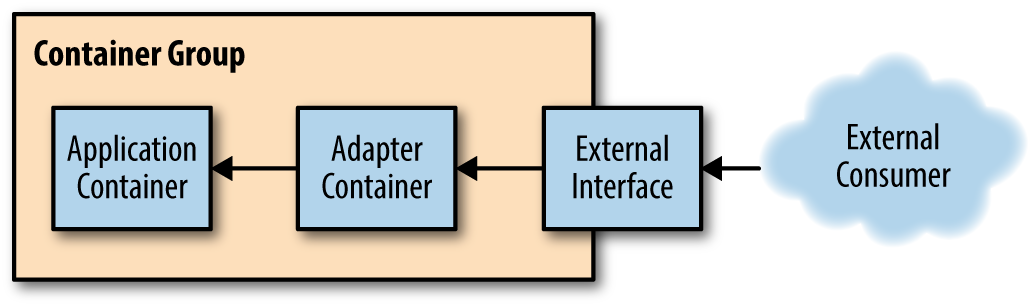
Monitoring
Hands On: Using Prometheus for Monitoring
apiVersion: v1
kind: Pod
metadata:
  name: adapter-example
  namespace: default
spec:
  containers:
  - image: redis
    name: redis
apiVersion: v1
kind: Pod
metadata:
name: adapter-example
namespace: default
spec:
containers:
- image: redis
name: redis
# Provide an adapter that implements the Prometheus interface
- image: oliver006/redis_exporter
name: adapterLogging
Hands On: Normalizing Different Logging Formats with Fluentd
Fluentd
- Fluentd is one of the more popular open source logging agents available. One of its major features is a rich set of community-supported plugins that enable a great deal of flexibility in monitoring a variety of applications.
- https://www.fluentd.org/architecture
<source>
  type redis_slowlog
  host localhost
  port 6379
  tag redis.slowlog
</source>
<source>
type storm
tag storm
url http://localhost:8080
window 600
sys 0
</source>Adding a Health Monitor
Hands On: Adding Rich Health Monitoring for MySQL
package main

import (
	"database/sql"
	"flag"
	"fmt"
	"net/http"

	_ "github.com/go-sql-driver/mysql"
)

var (
	user   = flag.String("user", "", "The database user name")
	passwd = flag.String("password", "", "The database password")
	db     = flag.String("database", "", "The database to connect to")
	query  = flag.String("query", "", "The test query")
	addr   = flag.String("address", "localhost:8080",
	                    "The address to listen on")
)

// Basic usage:
//   db-check --query="SELECT * from my-cool-table" \
//            --user=bdburns \
//            --passwd="you wish"
//
func main() {
	flag.Parse()
	db, err := sql.Open("localhost",
	                    fmt.Sprintf("%s:%s@/%s", *user, *passwd, *db))
	if err != nil {
		fmt.Printf("Error opening database: %v", err)
	}

 // Simple web handler that runs the query
	http.HandleFunc("", func(res http.ResponseWriter, req *http.Request) {
		_, err := db.Exec(*query)
		if err != nil {
			res.WriteHeader(http.StatusInternalServerError)
			res.Write([]byte(err.Error()))
			return
		}
		res.WriteHeader(http.StatusOK)
		res.Write([]byte("OK"))
		return
	})
 // Startup the server
	http.ListenAndServe(*addr, nil)
}
apiVersion: v1
kind: Pod
metadata:
  name: adapter-example-health
  namespace: default
spec:
  containers:
  - image: mysql
    name: mysql
  - image: brendanburns/mysql-adapter
    name: adapter
Part II. Serving Patterns
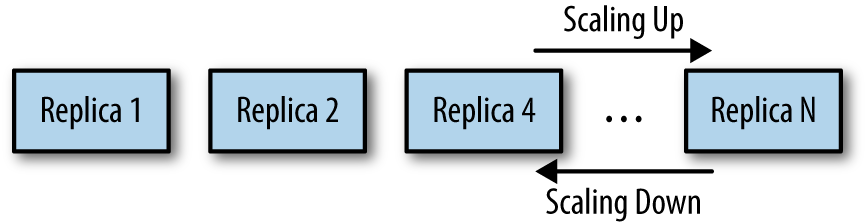
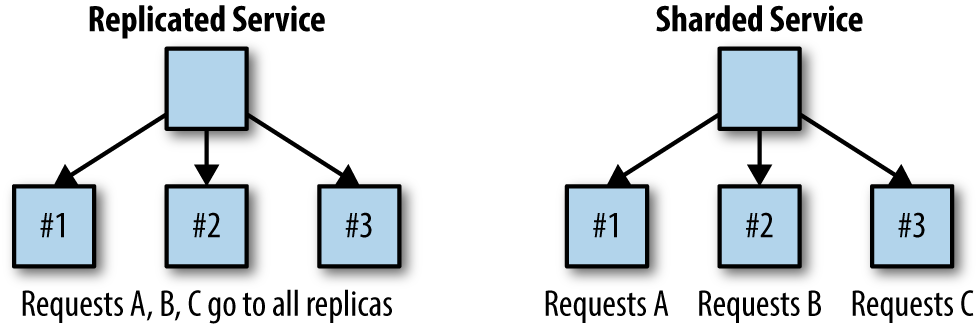
Replicated Load-Balanced Services
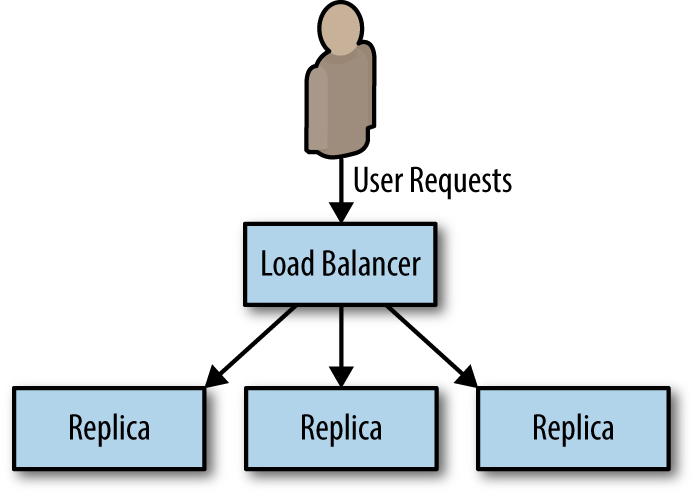
Scale up and sale down in replicated stateless application
Readiness Probes for Load Balancing
- A readiness probe determines when an applicationis ready to serve user requests.
- When building an application for a replicated service pattern, be sure to include a special URL that implements this readiness check.
Hands On: Creating a Replicated Service in Kubernetes
docker run -p 8080:8080 brendanburns/dictionary-server
http://localhost:8080/dog
kubectl create -f dictionary-deploy.yaml
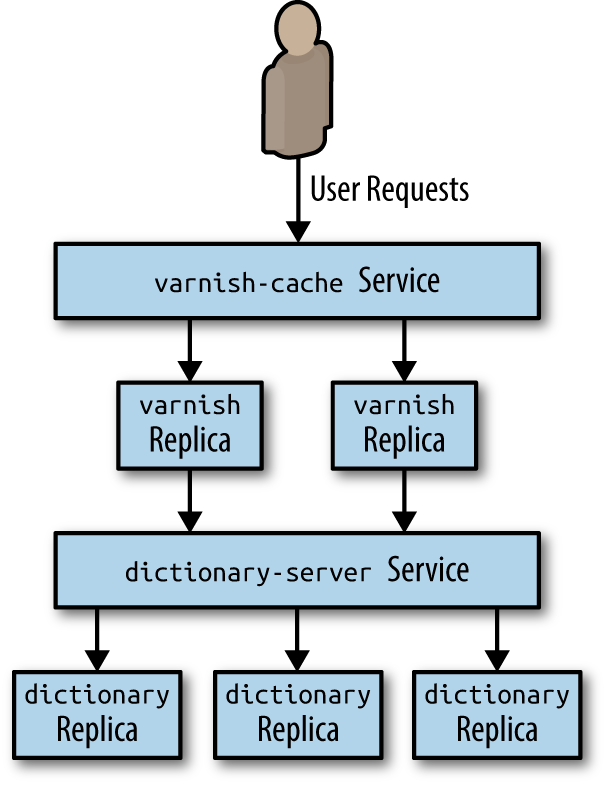
kubectl create -f dictionary-service.yamlIntroducing a Caching Layer
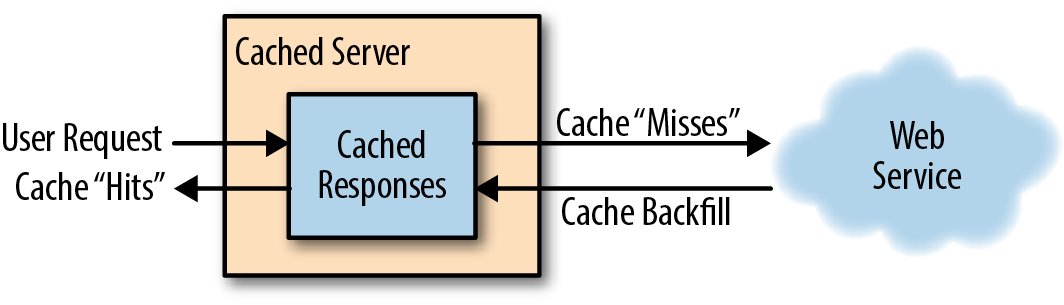
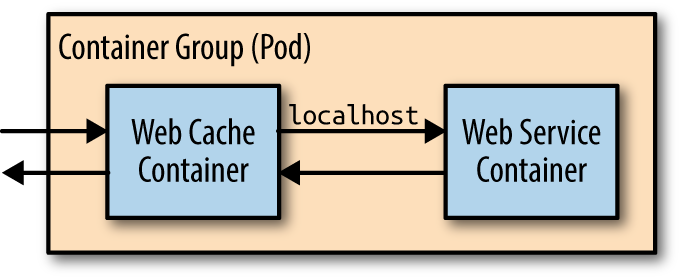
Deploying Your Cache (sidecar)
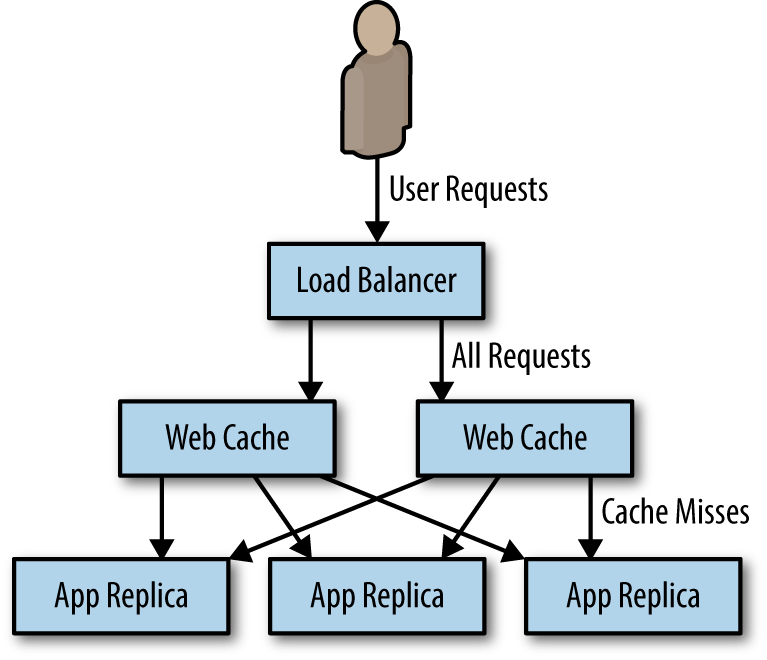
Deploying Your Cache
Hands On: Deploying the Caching Layer
kubectl create configmap varnish-config --from-file=default.vcl

kubectl create -f varnish-deploy.yaml

kubectl create -f varnish-service.yaml
Hands On: Deploying nginx and SSL Termination
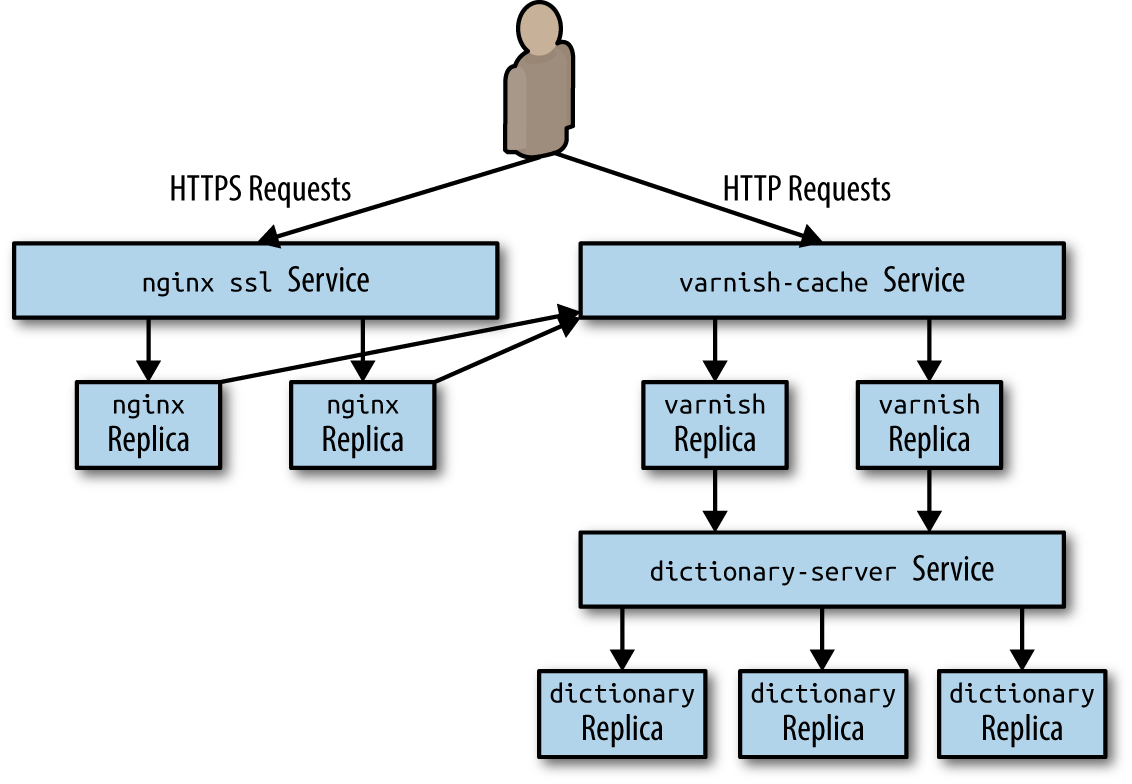
kubectl create secret tls ssl --cert=server.crt --key=server.key

kubectl create configmap nginx-conf --from-file=nginx.conf

kubectl create -f nginx-deploy.yaml

kubectl create -f nginx-service.yaml
Sharded Services
Sharded Caching

Hands On: Deploying an Ambassador and Memcache for a Sharded Cache
kubectl create -f memcached-shards.yaml

kubectl create -f memcached-service.yaml

kubectl create configmap --from-file=nutcracker.yaml twem-config

kubectl create -f memcached-ambassador-pod.yaml
kubectl create configmap --from-file=shared-nutcracker.yaml shared-twem-config
kubectl create -f shared-twemproxy-deploy.yaml
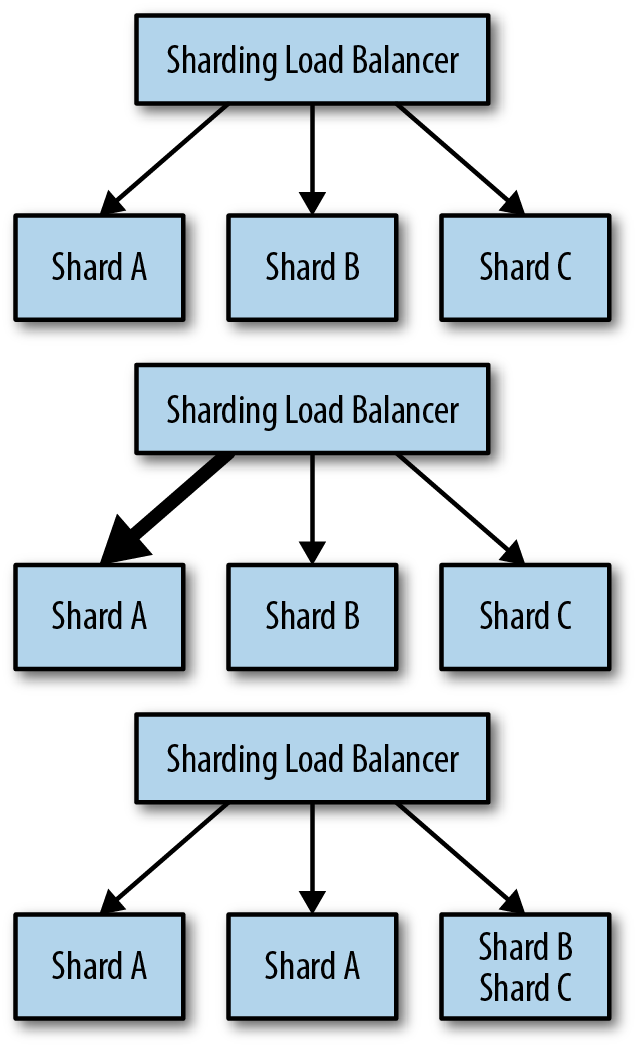
kubectl create -f shard-router-service.yamlAn Examination of Sharding Functions
- Shard = ShardingFunction(Req)
-
The hash function has two important characteristics for our sharding:
-
Determinism
The output should always be the same for a unique input.
-
Uniformity
The distribution of outputs across the output space should be equal.
-
Hands On: Building a Consistent HTTP Sharding Proxy
worker_processes  5;
error_log  error.log;
pid        nginx.pid;
worker_rlimit_nofile 8192;

events {
  worker_connections  1024;
}

http {
    # define a named 'backend' that we can use in the proxy directive
    # below.
    upstream backend {
        # Has the full URI of the request and use a consistent hash
        hash $request_uri consistent
        server web-shard-1.web;
        server web-shard-2.web;
        server web-shard-3.web;
    }

    server {
        listen localhost:80;
        location / {
            proxy_pass http://backend;
        }
    }
}
Hot Sharding Systems
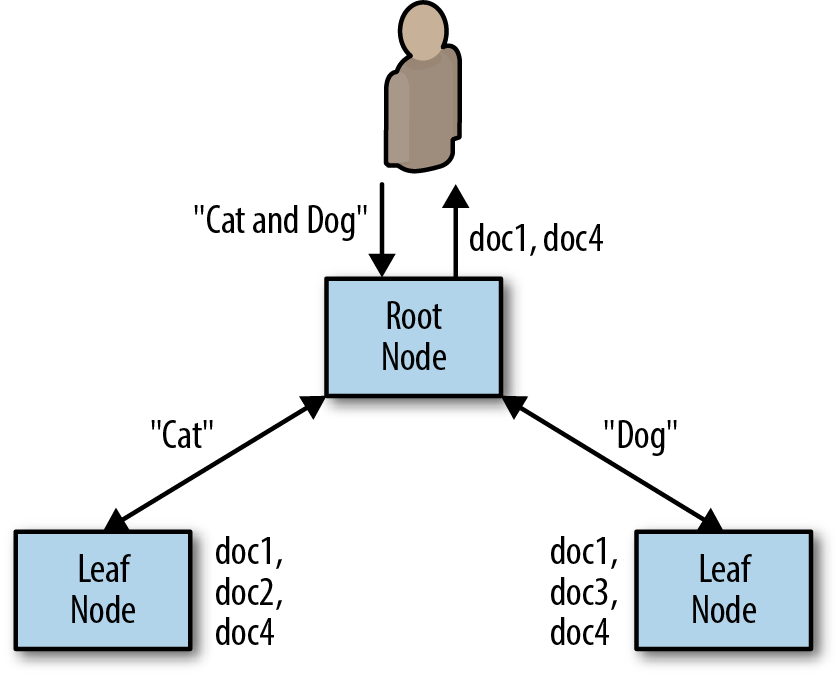
Scatter/Gather
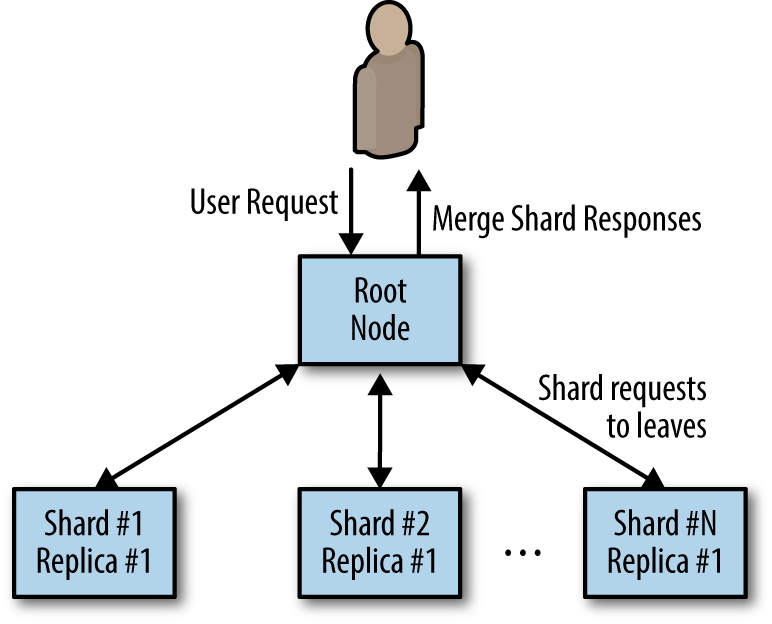
Scatter/Gather with Root Distribution
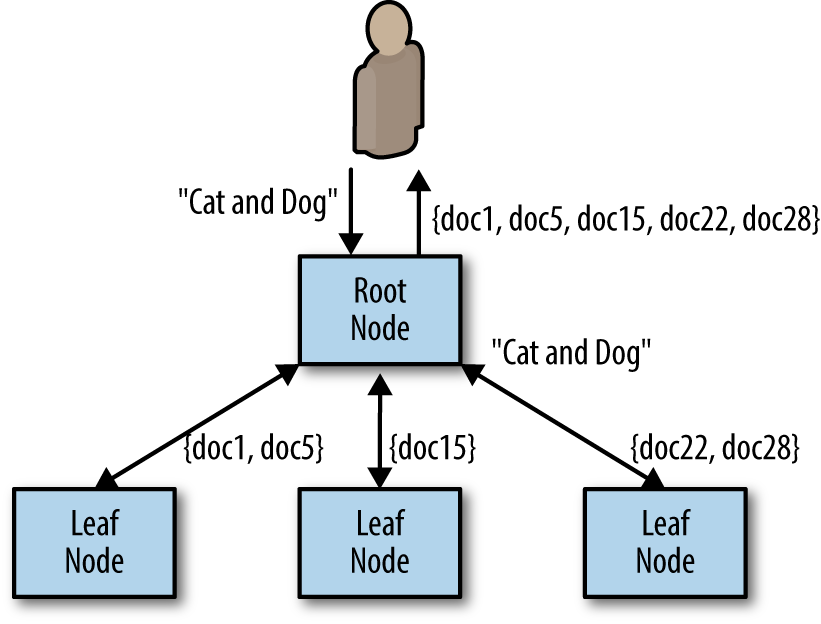
Scatter/Gather with Leaf Sharding
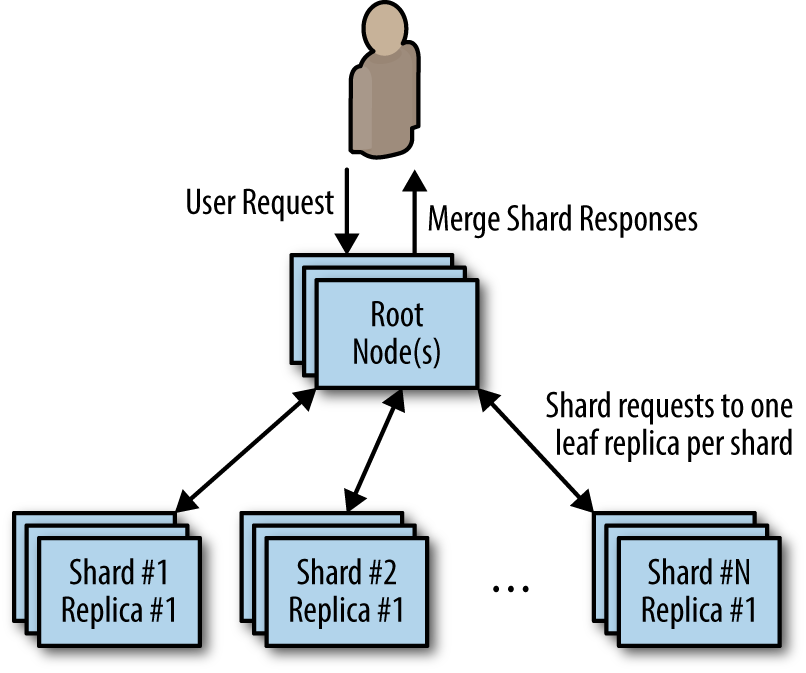
Scaling Scatter/Gather for Reliability and Scale
Functions and Event-Driven Processing
What is FasS
- There is a class of applications that might only need to temporarily come into existence to handle a single request, or simply need to respond to a specific event.
- This style of request or event-driven application design has flourished recently as large-scale public cloud providers have developed function-as-a-service (FaaS) products.
- More recently, FaaS implementations have also emerged running on top of cluster orchestrators in private cloud or physical environments.
Determining When FaaS Makes Sense
The benefits
- It dramatically simplifies the distance from code to running service.
- the code that is deployed is managed and scaled automatically.
- much like containers, functions are an even more granular building block for designing distributed systems.
The challenges
It is often quite difficult to obtain a comprehensive view of your service, determine how the various functions integrate with one another, and understand when things go wrong, and why they go wrong. As an example, consider the following functions:
- functionA() which calls functionB()
- functionB() which calls functionC()
- functionC() which calls back to functionA()
The challenges
- The Need for Background Processing
- The Need to Hold Data in Memory
- The Costs of Sustained Request-Based Processing
Patterns for FaaS
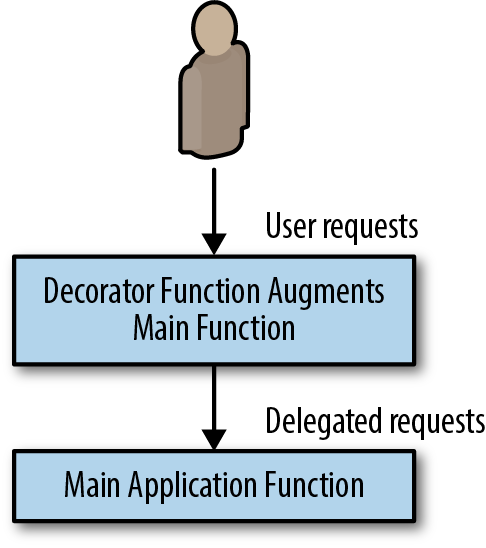
The Decorator Pattern: Request or Response Transformation
Hands On: Adding Request Defaulting Prior to Request Processing
# Simple handler function for adding default values
def handler(context):
  # Get the input value
  obj = context.json
  # If the 'name' field is not present, set it randomly
  if obj.get("name", None) is None:
    obj["name"] = random_name()
  # If the 'color' field is not present, set it to 'blue'
  if obj.get("color", None) is None:
    obj["color"] = "blue"
  # Call the actual API, potentially with the new default
  # values, and return the result
  return call_my_api(obj)
kubeless function deploy add-defaults \
--runtime python27 \
--handler defaults.handler \
--from-file defaults.py \
--trigger-http
kubeless function call add-defaults --data '{"name": "foo"}'- Events tend to be largely independent and stateless in nature, and because the rate of events can be highly variable, they are ideal candidates for event-driven and FaaS architectures.
- In this role, they are often deployed alongside a production application server as augmentation to the main user experience, or to handle some sort of reactive, background processing.
Handling Events
Hands On: Implementing Two-Factor Authentication
def two_factor(context):
  # Generate a random six digit code
  code = random.randint(100000, 999999)

  # Register the code with the login service
  user = context.json["user"]
  register_code_with_login_service(user, code)

  # Use the twillio library to send texts
  account = "my-account-sid"
  token = "my-token"
  client = twilio.rest.Client(account, token)

  user_number = context.json["phoneNumber"]
  msg = "Hello {} your authentication code is: {}.".format(user, code)
  message = client.api.account.messages.create(to=user_number,
                                               from_="+12065251212",
                                               body=msg)
  return {"status": "ok"}
kubeless function deploy add-two-factor \
--runtime python27 \
--handler two_factor.two_factor \
--from-file two_factor.py \
--trigger-httpEvent-Based Pipelines
- Event pipelines often resemble the flowcharts of old. They can be represented as a directed graph of connected event syncs.
- In the event pipeline pattern, each node is a different function or webhook, and the edges linking the graph together are HTTP or other network calls to the function/webhook.
- In general, there is no shared state between the different pieces of the pipeline, but there may be a context or other reference point that can be used to look up information in shared storage.
Hands On: Implementing a Pipeline for New-User Signup
def create_user(context):
  # For required event handlers, call them universally
  for key, value in required.items():
    call_function(value.webhook, context.json)

  # For optional event handlers, check and call them
  # conditionally
  for key, value in optional.items():
    if context.json.get(key, None) is not None:
      call_function(value.webhook, context.json)
def email_user(context):
# Get the user name
user = context.json['username']
msg = 'Hello {} thanks for joining my awesome service!".format(user)
send_email(msg, contex.json['email])
def subscribe_user(context):
# Get the user name
email = context.json['email']
subscribe_user(email)Ownership Election
What is ownership
Determining If You Even Need Master Election
- The simplest form of ownership is to just have a single replica of the service.
- There is problem when rolling out new software
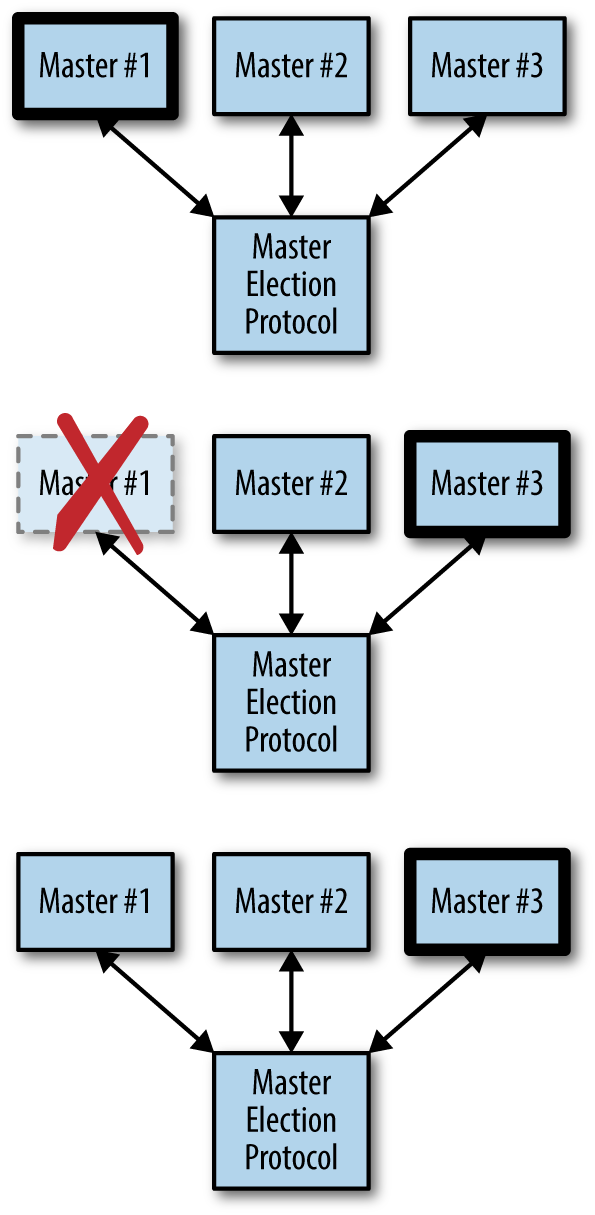
The Basics of Master Election
- Implement a distributed consensus algorithm like Paxos or RAFT
- There are a large number of distributed key-value stores that have implemented such consensus algorithms for you, like etcd, ZooKeeper, and consul
- compare-and-swap
- time-to-live (TTL)
compare-and-swap
var lock = sync.Mutex{}
var store = map[string]string{}

func compareAndSwap(key, nextValue, currentValue string) (bool, error) {
  lock.Lock()
  defer lock.Unlock()
  _, containsKey := store[key]
  if !containsKey {
    if len(currentValue) == 0 {
      store[key] = nextValue
      return true, nil
    }
    return false, fmt.Errorf("Expected value %s for key %s, but
    found empty", currentValue, key)
  }
  if store[key] == currentValue {
    store[key] = nextValue
    return true, nil
  }
  return false, nil
}
Implementing Locks
acquire the lock
func (Lock l) simpleLock() boolean {
  // compare and swap "1" for "0"
  locked, _ = compareAndSwap(l.lockName, "1", "0")
  return locked
}
handle lock not exist
func (Lock l) simpleLock() boolean {
  // compare and swap "1" for "0"
  locked, error = compareAndSwap(l.lockName, "1", "0")
  // lock doesn't exist, try to write "1" with a previous value of
  // non-existent
  if error != nil {
    locked, _ = compareAndSwap(l.lockName, "1", nil)
  }
  return locked
}
block until the lock is acquired
func (Lock l) lock() {
  while (!l.simpleLock()) {
    sleep(2)
  }
}
key-value stores let you watch for changes
func (Lock l) lock() {
  while (!l.simpleLock()) {
    waitForChanges(l.lockName)
  }
}
unlock
func (Lock l) unlock() {
  compareAndSwap(l.lockName, "0", "1")
}
take advantage of the TTL functionality of thekey-value store
func (Lock l) simpleLock() boolean {
  // compare and swap "1" for "0"
  locked, error = compareAndSwap(l.lockName, "1", "0", l.ttl)
  // lock doesn't exist, try to write "1" with a previous value of
  // non-existent
  if error != nil {
    locked, _ = compareAndSwap(l.lockName, "1", nil, l.ttl)
  }
  return locked
}
Bug introduced
Consider the following scenario:
- Process-1 obtains the lock with TTL t.
- Process-1 runs really slowly for some reason, for longer than t.
- The lock expires.
- Process-2 acquires the lock, since Process-1 has lost it due to TTL.
- Process-1 finishes and calls unlock.
- Process-3 acquires the lock.
Leverage resource version
func (Lock l) simpleLock() boolean {
  // compare and swap "1" for "0"
  locked, l.version, error = compareAndSwap(l.lockName, "1", "0", l.ttl)
  // lock doesn't exist, try to write "1" with a previous value of
  // non-existent
  if error != null {
    locked, l.version, _ = compareAndSwap(l.lockName, "1", null, l.ttl)
  }
  return locked
}

func (Lock l) unlock() {
  compareAndSwap(l.lockName, "0", "1", l.version)
}
Implementing Ownership
- One way to do this would be to extend the TTL for the lock to a very long period (say a week or longer), but this has the significant downside that if the current lock owner fails, anew lock owner wouldn’t be chosen until the TTL expired a week later.
- Instead, we need to create a renewable lock, which can be periodically renewed by the owner so that the lock can be retained for an arbitrary period of time.
renewable lock
func (Lock l) renew() boolean {
  locked, _ = compareAndSwap(l.lockName, "1", "1", l.version, ttl)
  return locked
}

for {
  if !l.renew() {
    handleLockLost()
  }
  sleep(ttl/2)
}
Part III. Batch Computational Patterns
Title Text
Designing Distributed Systems
By bawu


