


Howie Chen
建中資訊社 副社長兼學術 陳泓宇
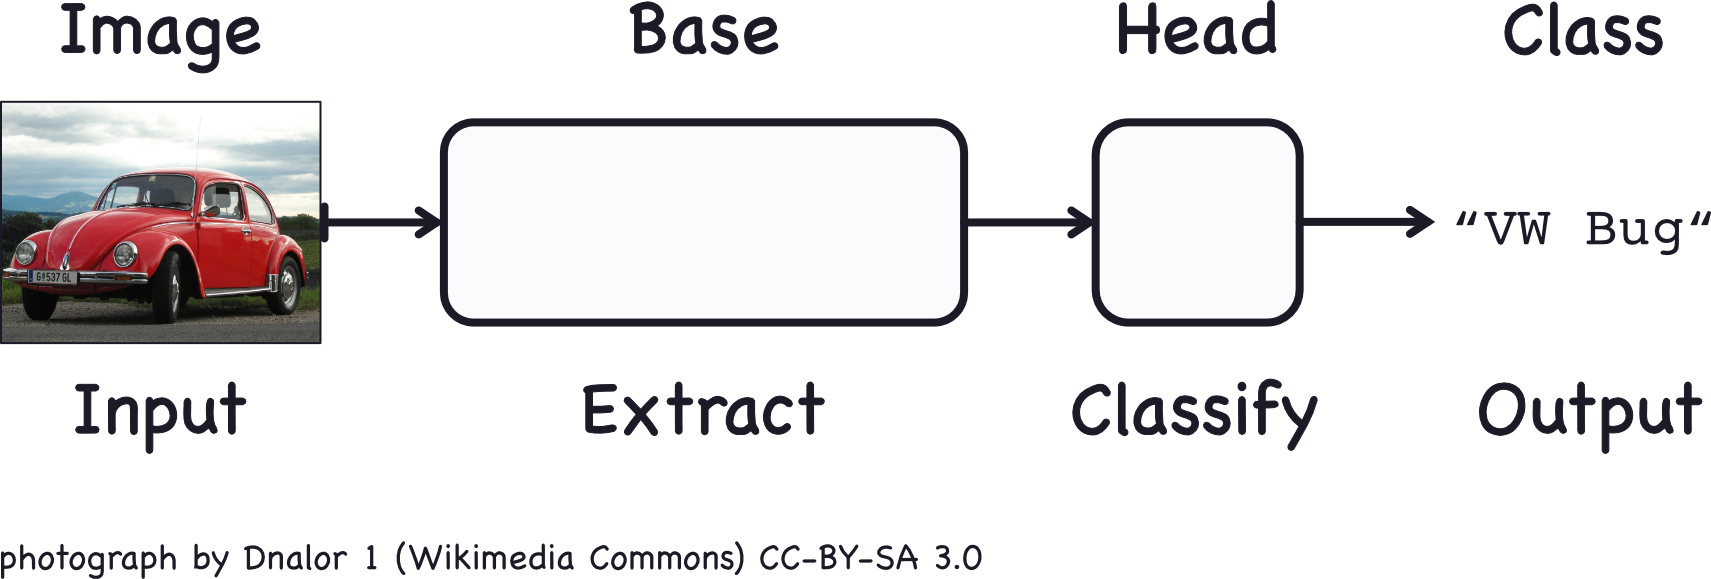
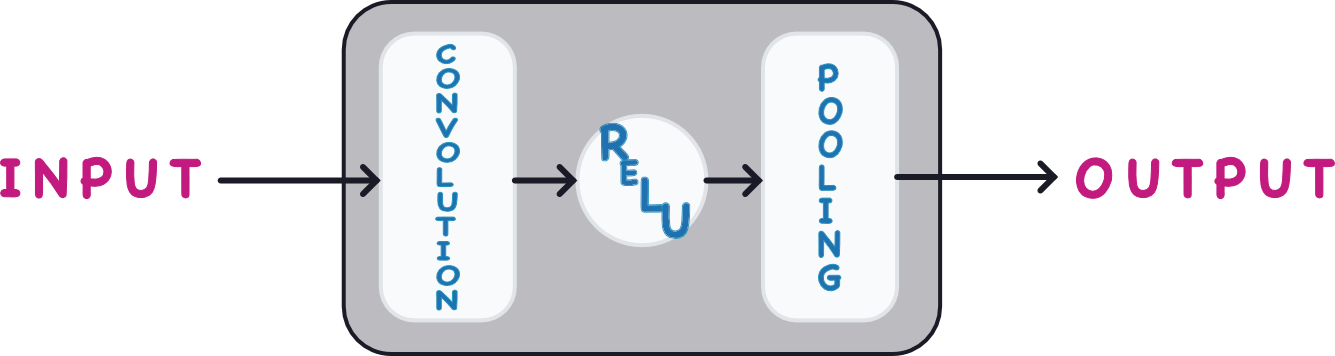
Computer Vision
Computer Vision Intro
利用卷積神經網路(Convolutional Neural Networks)來讓電腦可以判斷圖像
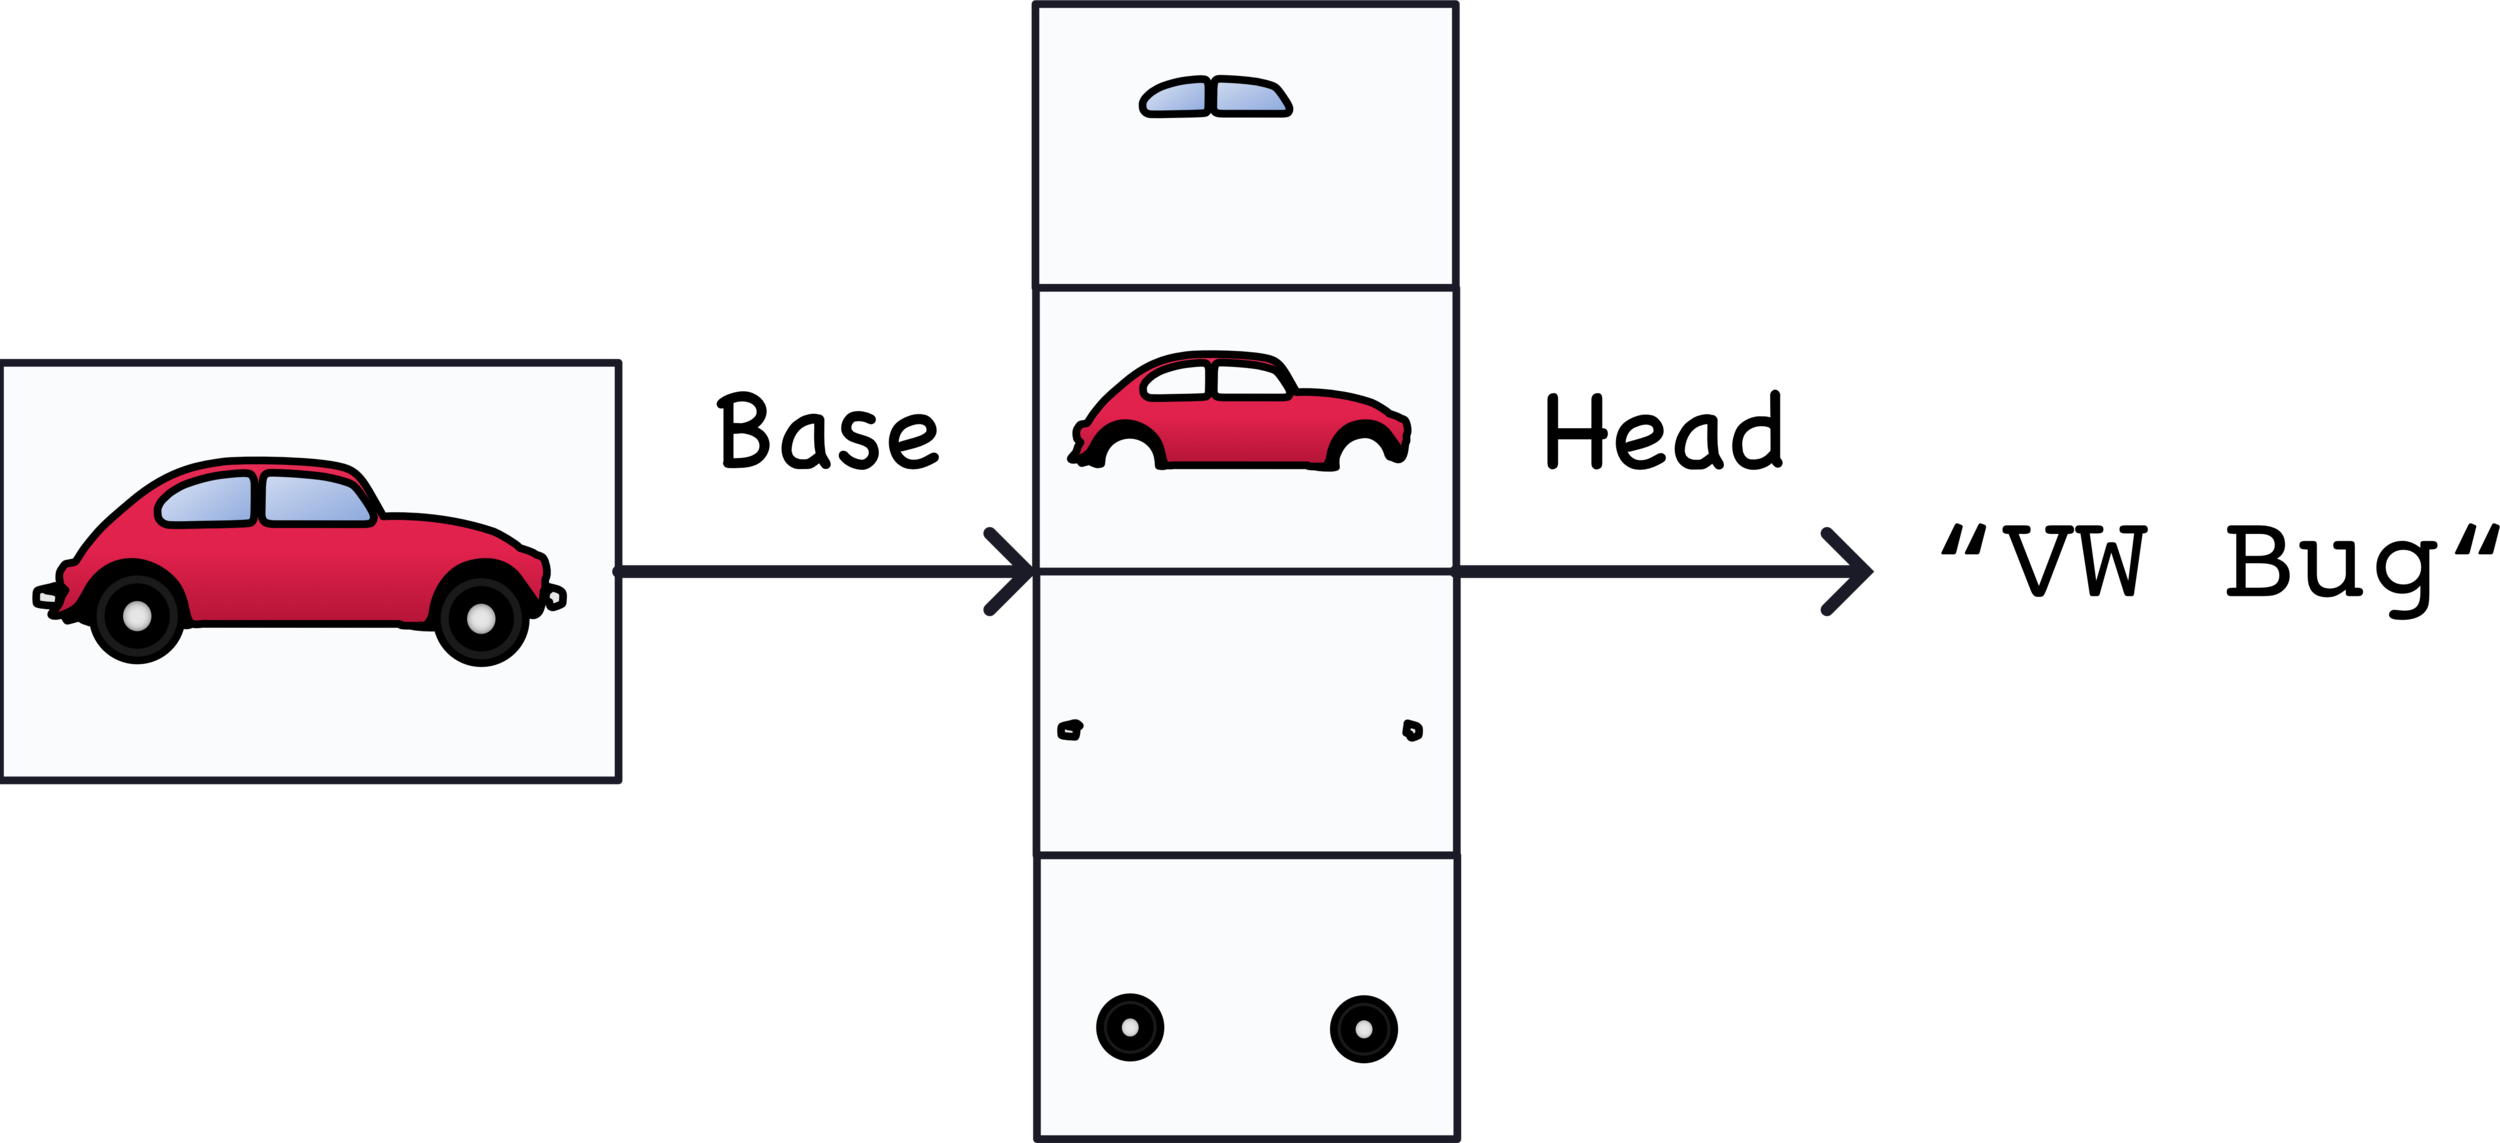
Convolutional Classifier
利用捲積神經網路把圖片中的特徵提取出來
extract the features
使用前面提取出來的特徵來分類
classify
Training Convolutional Classifier
如今很少人會從頭開始訓練捲積網路,因此,我們可以重複使用提取特徵的模型,並使用不同的層(layer)來處理特徵分類
Transfer Learning
載入資料
載入已經訓練好的模型
訓練模型
連接訓練好的分類模型
from tensorflow.keras.preprocessing import image_dataset_from_directory

ds_train_ = image_dataset_from_directory(
    'car-or-truck/train',
    labels='inferred',
    label_mode='binary',
    image_size=[128, 128],
    interpolation='nearest',
    batch_size=64,
    shuffle=True,
)

ds_valid_ = image_dataset_from_directory(
    'car-or-truck/valid',
    labels='inferred',
    label_mode='binary',
    image_size=[128, 128],
    interpolation='nearest',
    batch_size=64,
    shuffle=False,
)import tensorflow as tf
def convert_to_float(image, label):
image = tf.image.convert_image_dtype(image, dtype=tf.float32)
return image, label
AUTOTUNE = tf.data.experimental.AUTOTUNE
ds_train = (
ds_train_
.map(convert_to_float)
.cache()
.prefetch(buffer_size=AUTOTUNE)
)
ds_valid = (
ds_valid_
.map(convert_to_float)
.cache()
.prefetch(buffer_size=AUTOTUNE)
)pretrained_base = tf.keras.models.load_model(
'cv-course-models/vgg16-pretrained-base',
)
pretrained_base.trainable = Falsefrom tensorflow import keras
from tensorflow.keras import layers
model = keras.Sequential([
pretrained_base,
layers.Flatten(),
layers.Dense(6, activation='relu'),
layers.Dense(1, activation='sigmoid'),
])
model.compile(
optimizer='adam',
loss='binary_crossentropy',
metrics=['binary_accuracy'],
)
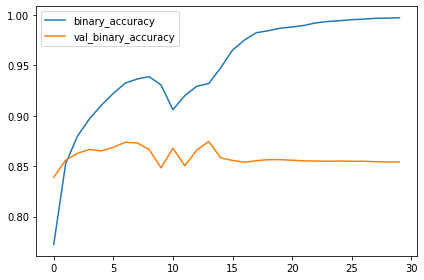
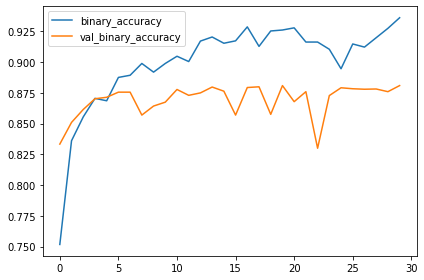
history = model.fit(
ds_train,
validation_data=ds_valid,
epochs=30,
)Feature Extraction
卷積神經網路
ReLU
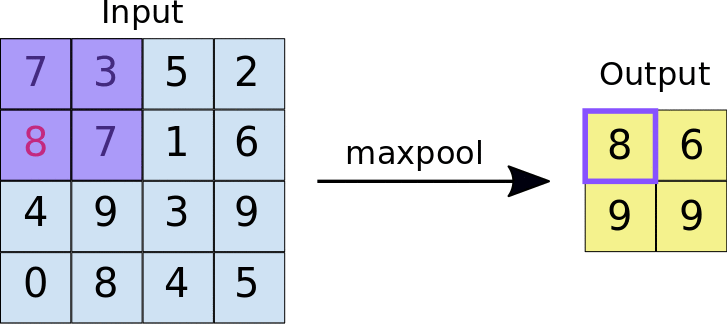
最大池化
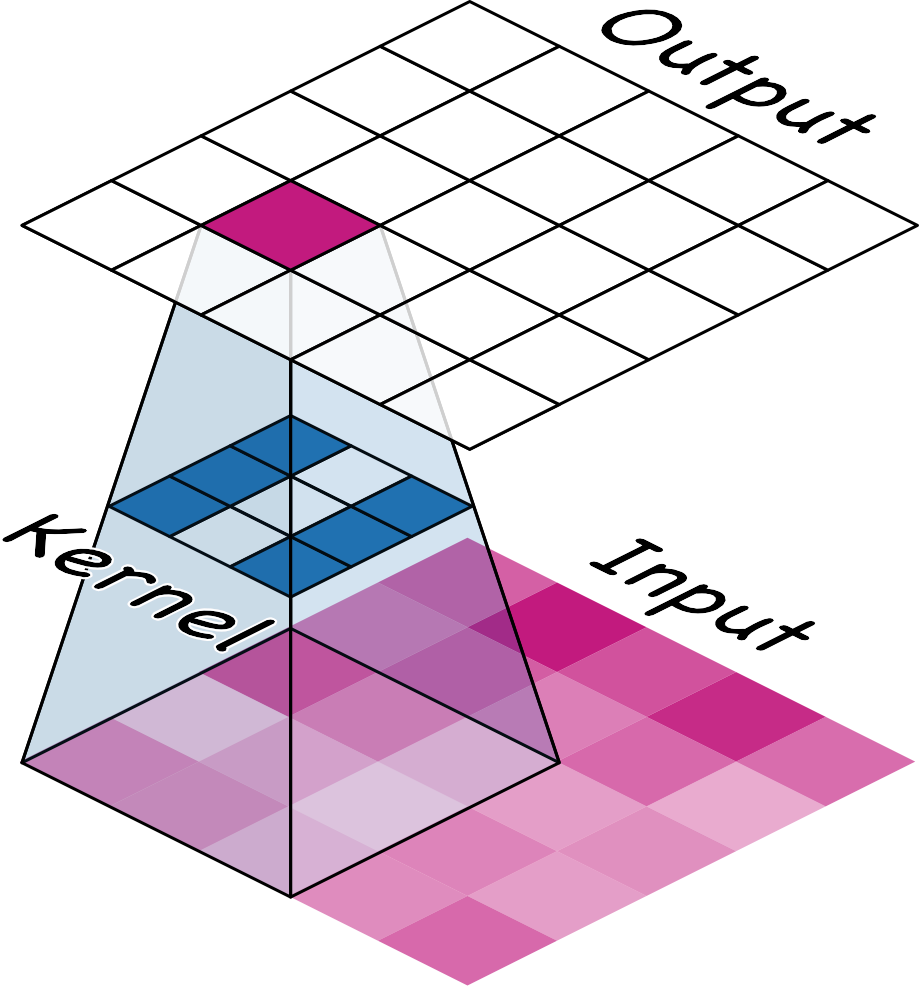
Convolutional Neural Network
Convolutional Neural Network
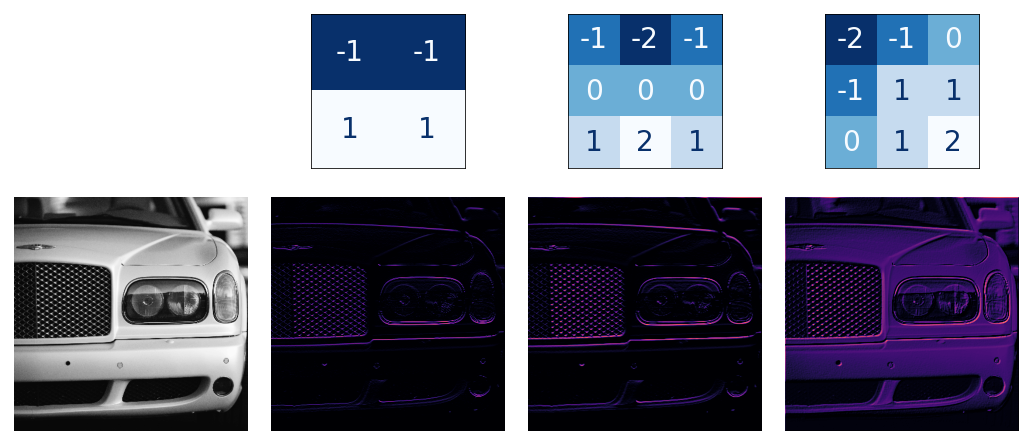
Kernel
Feature Maps
ReLU
model = keras.Sequential([
layers.Conv2D(
filters=64,
kernel_size=3,
activation='relu',
)
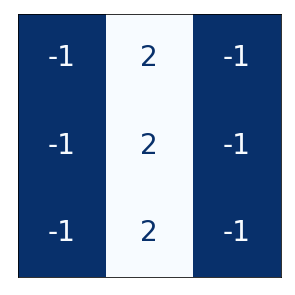
])filters : 輸出特徵圖的數量
kernel size : 卷積核的大小
activation : 激勵函數
Convolutional Neural Network
import tensorflow as tf
import matplotlib.pyplot as plt
plt.rc('figure', autolayout=True)
plt.rc('axes', labelweight='bold', labelsize='large',
titleweight='bold', titlesize=18, titlepad=10)
plt.rc('image', cmap='magma')
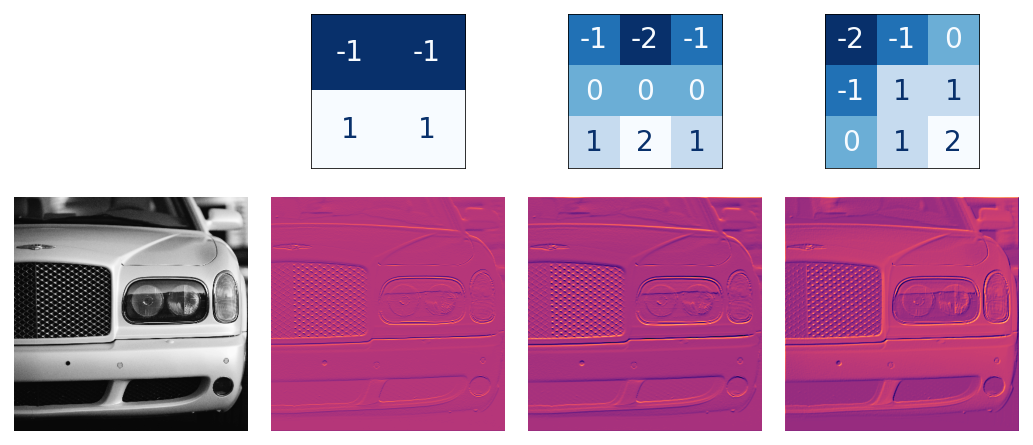
image_path = 'computer-vision-resources/car_feature.jpg'
image = tf.io.read_file(image_path)
image = tf.io.decode_jpeg(image)
image = tf.image.convert_image_dtype(image, dtype=tf.float32)
image = tf.expand_dims(image, axis=0)kernel = tf.constant([
[-1, -1, -1],
[-1, 8, -1],
[-1, -1, -1],
])
kernel = tf.reshape(kernel, [*kernel.shape, 1, 1])
kernel = tf.cast(kernel, dtype=tf.float32)image_filter = tf.nn.conv2d(
input=image,
filters=kernel,
strides=1,
padding='SAME',
)import tensorflow as tf
import matplotlib.pyplot as plt
plt.rc('figure', autolayout=True)
plt.rc('axes', labelweight='bold', labelsize='large',
titleweight='bold', titlesize=18, titlepad=10)
plt.rc('image', cmap='magma')
image_path = 'computer-vision-resources/car_feature.jpg'
image = tf.io.read_file(image_path)
image = tf.io.decode_jpeg(image)
plt.figure(figsize=(6, 6))
plt.imshow(tf.squeeze(image), cmap='gray')
plt.axis('off')
plt.show()
kernel = tf.constant([
[-1, -1, -1],
[-1, 8, -1],
[-1, -1, -1],
])
image = tf.image.convert_image_dtype(image, dtype=tf.float32)
image = tf.expand_dims(image, axis=0)
kernel = tf.reshape(kernel, [*kernel.shape, 1, 1])
kernel = tf.cast(kernel, dtype=tf.float32)
image_filter = tf.nn.conv2d(
    input=image,
    filters=kernel,
    strides=1,
    padding='SAME',
)
plt.figure(figsize=(6, 6))
plt.imshow(tf.squeeze(image_filter))
plt.axis('off')
plt.show()Pooling Layer
可以在壓縮圖片大小的同時,保留重要的特徵
減少圖片的網格數,以此來降低訓練所需的資源
from tensorflow import keras
from tensorflow.keras import layers
model = keras.Sequential([
layers.Conv2D(filters=64, kernel_size=3),
layers.MaxPool2D(pool_size=2),
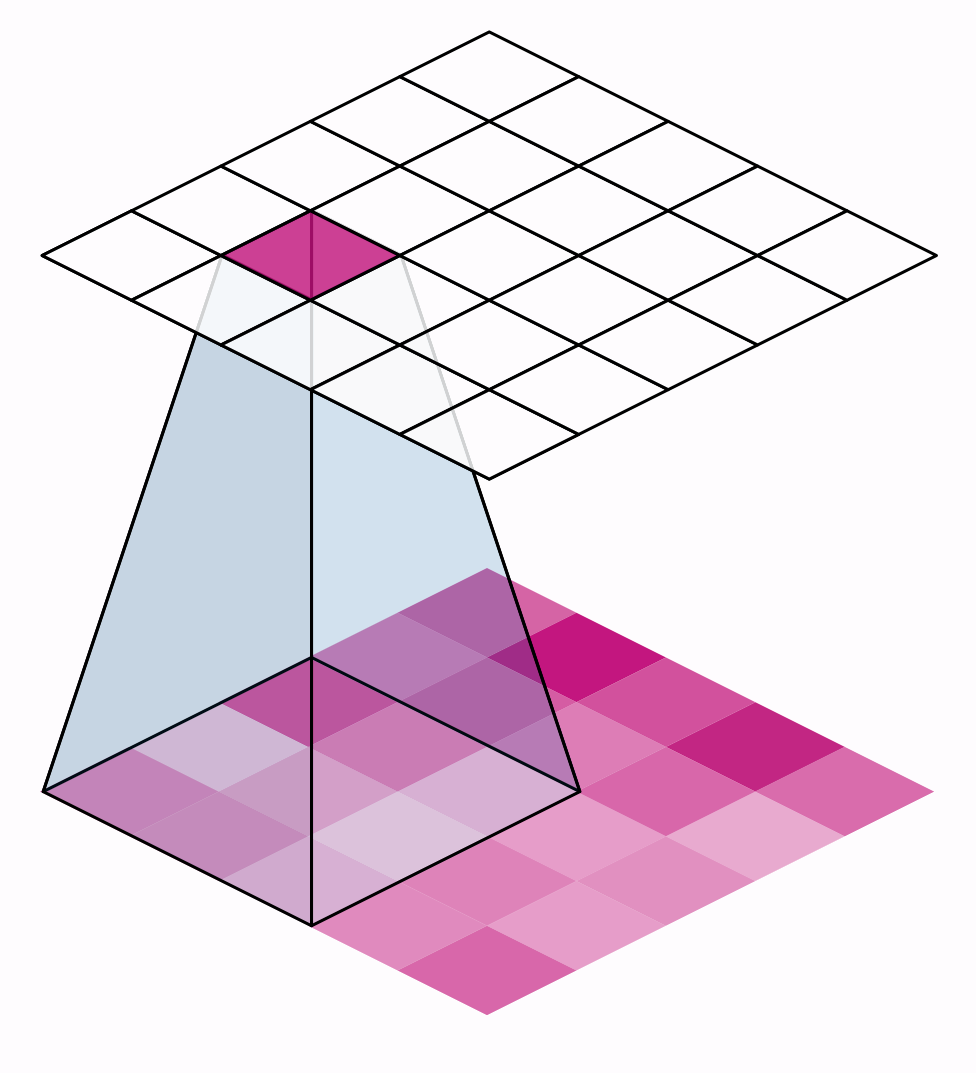
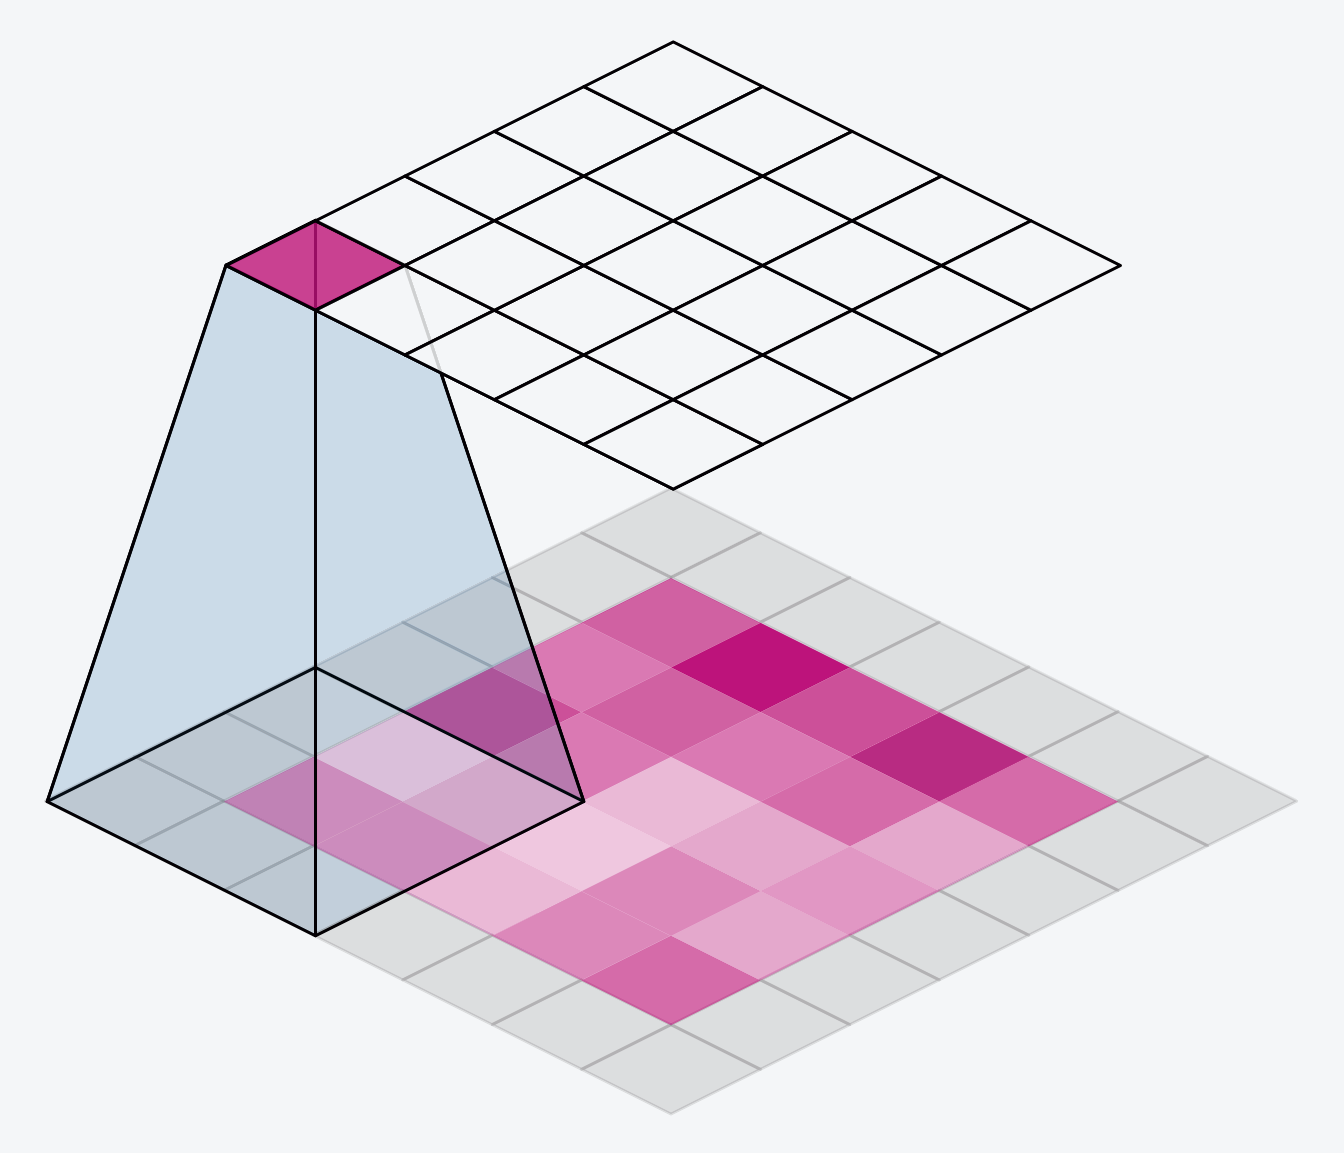
])Sliding Window
前面提到對圖片的三種操作都在滑動窗口上執行
窗口一次移動的距離
stride
strides=(2, 2)
padding
網格數不變
網格數變少
Custom Convnet
model = keras.Sequential([
    layers.Conv2D(filters=32, kernel_size=5, activation="relu", padding='same',
                  input_shape=[128, 128, 3]),
    layers.MaxPool2D(),

    layers.Conv2D(filters=64, kernel_size=3, activation="relu", padding='same'),
    layers.MaxPool2D(),

    layers.Conv2D(filters=128, kernel_size=3, activation="relu", padding='same'),
    layers.MaxPool2D(),

    layers.Flatten(),
    layers.Dense(units=6, activation="relu"),
    layers.Dense(units=1, activation="sigmoid"),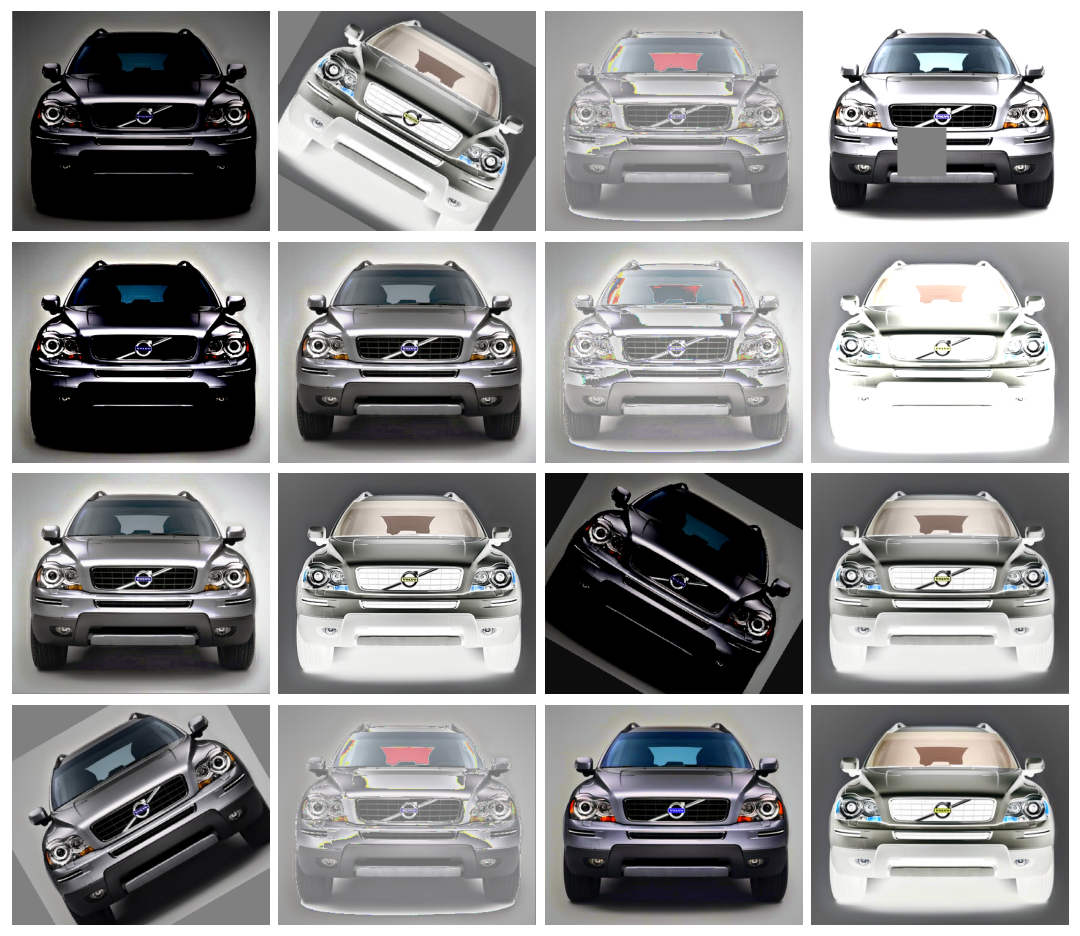
])Data Augmentation
在訓練深度學習模型的時候,資料肯定是越多越好
對圖片進行各種處理
ex. 深淺、旋轉角度、位置、鏡像
from tensorflow import keras
from tensorflow.keras import layers
from tensorflow.keras.layers.experimental import preprocessing
pretrained_base = tf.keras.models.load_model(
'../input/cv-course-models/cv-course-models/vgg16-pretrained-base',
)
pretrained_base.trainable = False
model = keras.Sequential([
preprocessing.RandomFlip('horizontal'),
preprocessing.RandomContrast(0.5),
pretrained_base,
layers.Flatten(),
layers.Dense(6, activation='relu'),
layers.Dense(1, activation='sigmoid'),
])
model.compile(
optimizer='adam',
loss='binary_crossentropy',
metrics=['binary_accuracy'],
)
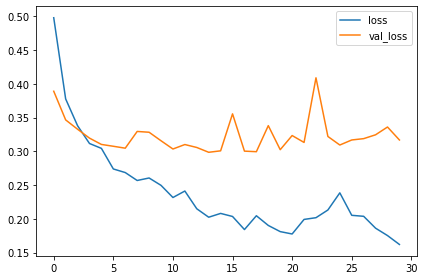
history = model.fit(
ds_train,
validation_data=ds_valid,
epochs=30,
verbose=0,
)
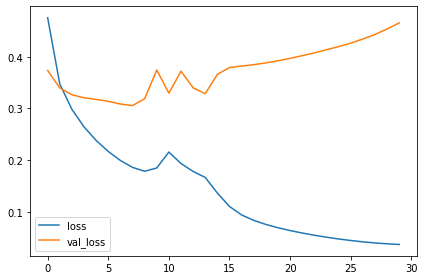
import pandas as pd
history_frame = pd.DataFrame(history.history)
history_frame.loc[:, ['loss', 'val_loss']].plot()
history_frame.loc[:, ['binary_accuracy', 'val_binary_accuracy']].plot();By Howie Chen
電腦視覺


