


Content ITV PRO
This is Itvedant Content department
Understand common wireless/network attacks and implement basic prevention techniques.
Business Scenario
You are a Cyber Security Analyst at SecureXit tasked with assessing a test network environment after unusual network activity was detected.
As part of this assessment, you will study common network attacks such as DoS, MITM, Wi-Fi attacks, and packet sniffing, perform network scanning and traffic analysis, identify network and wireless vulnerabilities, and apply basic security controls to reduce risks.
The findings will help strengthen network security, improve wireless configurations, and enhance the organization's ability to detect and mitigate network-based threats.
Pre-Lab Preparation
Topic : Cyber Threats and Attack Vectors
1) Different types of Malware Threat.
2) Overview of social engineering attacks.
3) Wireless & Network Attacks and prevention.
You are a Cyber Security Analyst at SecureXit tasked with assessing a test network environment after unusual network activity was detected.
As part of this assessment, you will study common network attacks such as DoS, MITM, Wi-Fi attacks, and packet sniffing, perform network scanning and traffic analysis, identify network and wireless vulnerabilities, and apply basic security controls to reduce risks.
The findings will help strengthen network security, improve wireless configurations, and enhance the organization's ability to detect and mitigate network-based threats.
Task 1: Verify Connectivity
1
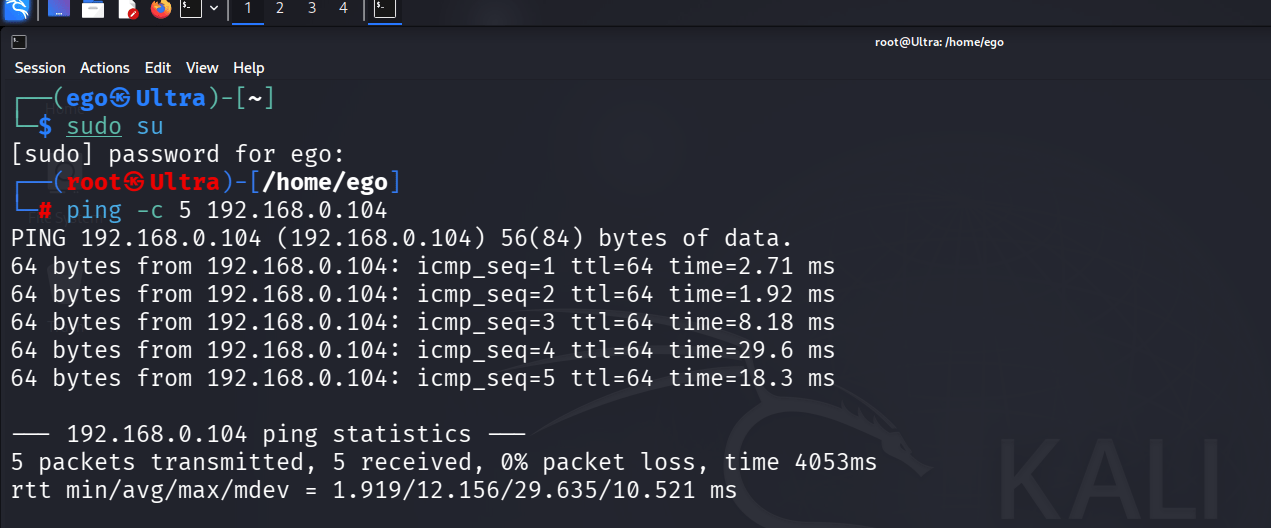
Open a terminal on the attacker machine and switch to the root user.
sudo su2
Verify connectivity with the target machine.
ping -c 5 192.168.0.1043
Confirm that all packets are successfully received before proceeding.
Task 2: Perform ICMP Flood Attack
1
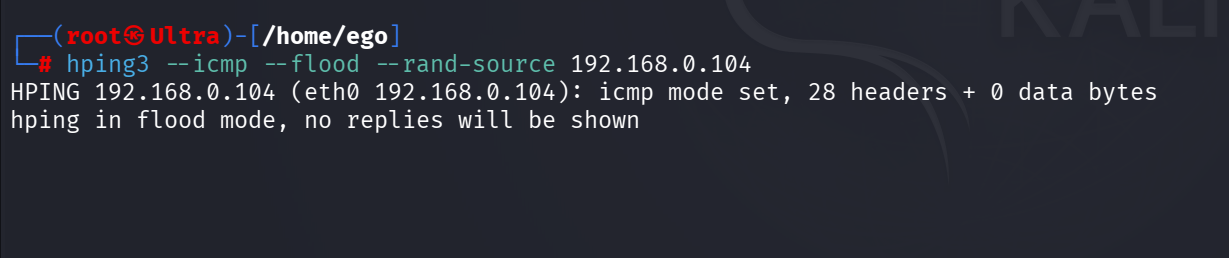
Launch an ICMP flood against the target machine.
hping3 --icmp --flood --rand-source 192.168.0.1042
Allow the attack traffic to run for approximately 30–60 seconds.
3
Observe that hping3 reports flood mode activity.
Task 3: Monitor ICMP Traffic on Target
1
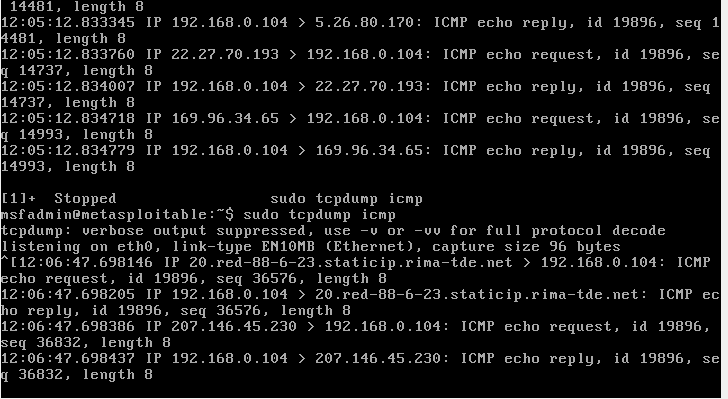
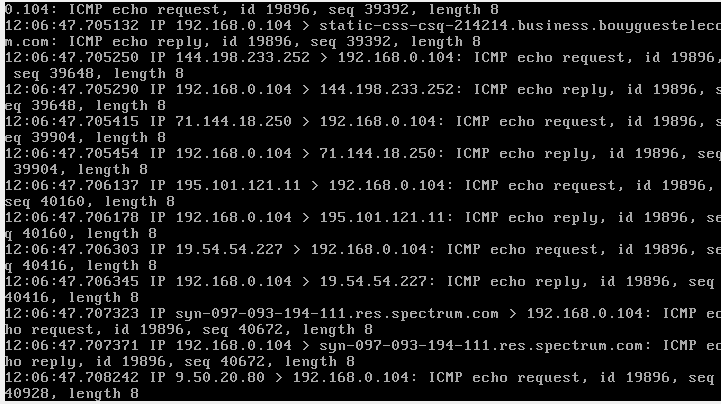
Launch an ICMP flood against the target machine.
sudo tcpdump icmp2
Start packet capture for ICMP traffic.
3
Observe incoming ICMP Echo Requests from multiple source addresses.
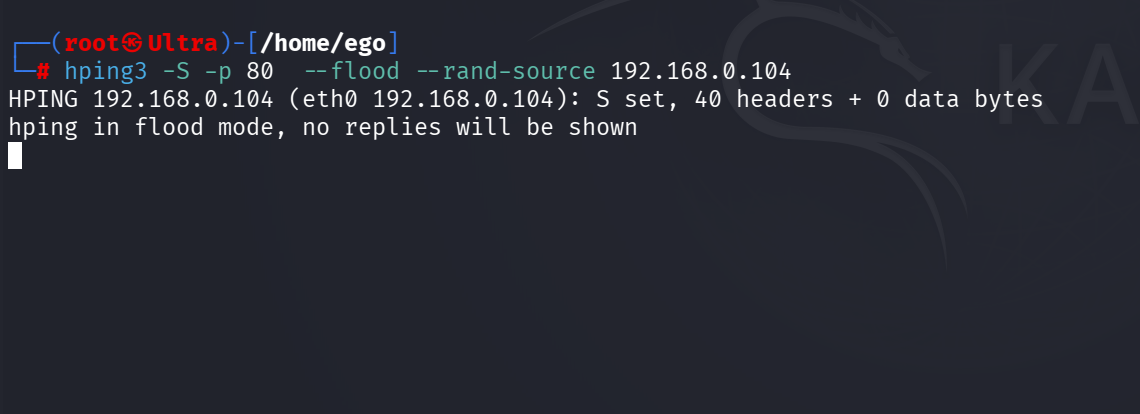
Task 4: Perform TCP SYN Flood Attack
1
Return to the attacker machine.
hping3 -S -p 80 --flood --rand-source 192.168.0.1042
Launch a SYN flood against TCP port 80.
3
Let the attack run briefly and observe the packet generation.
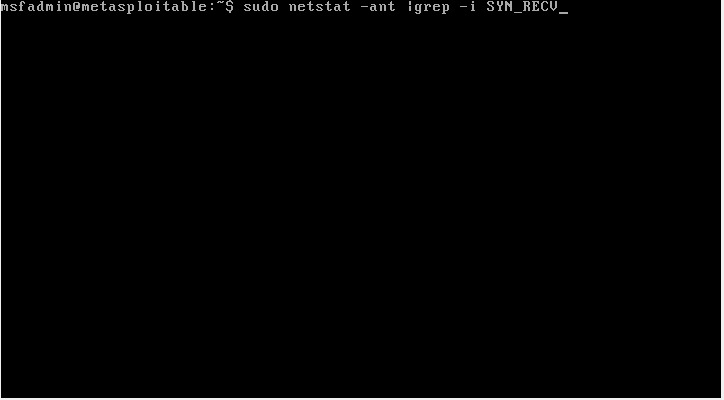
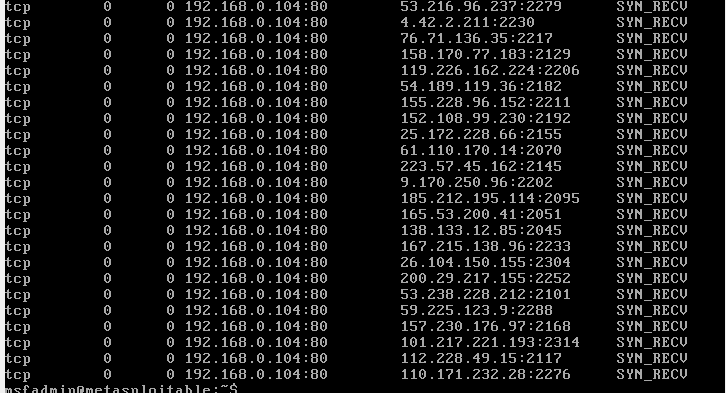
Task 5: Monitor ICMP Traffic on Target
1
On the target machine, open a terminal.
sudo netstat -ant | grep -i SYN_RECV2
Start packet capture for SYN traffic.
Observe the Flood on target machine Using
5
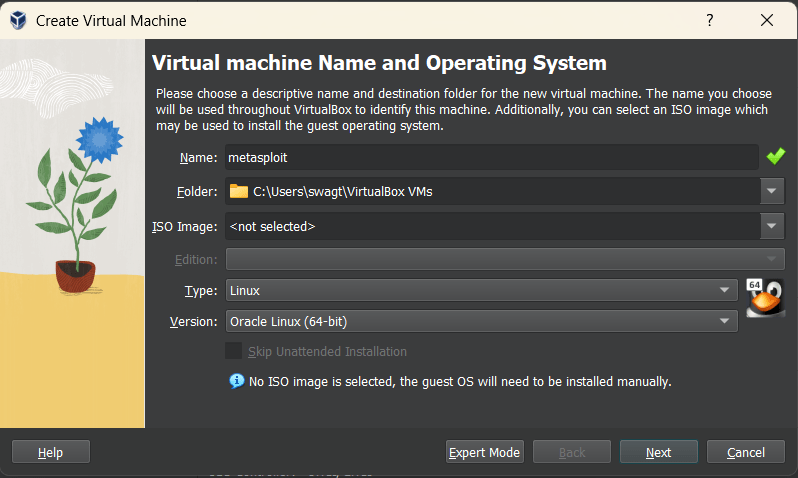
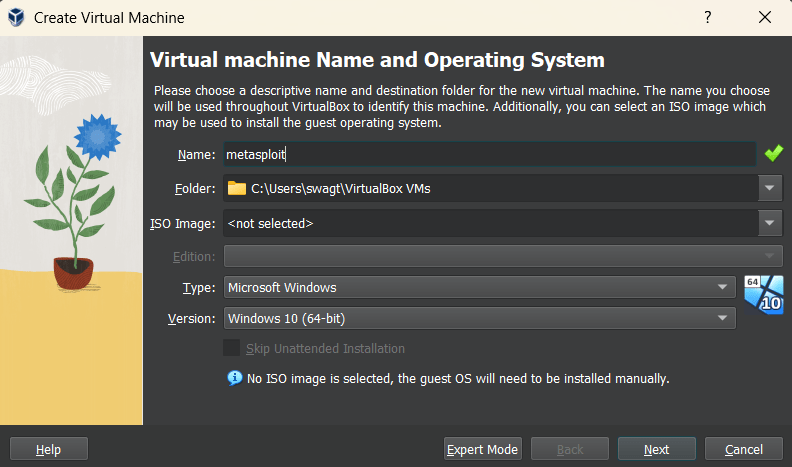
Configure the virtual machine type as Linux and select the appropriate version.
6
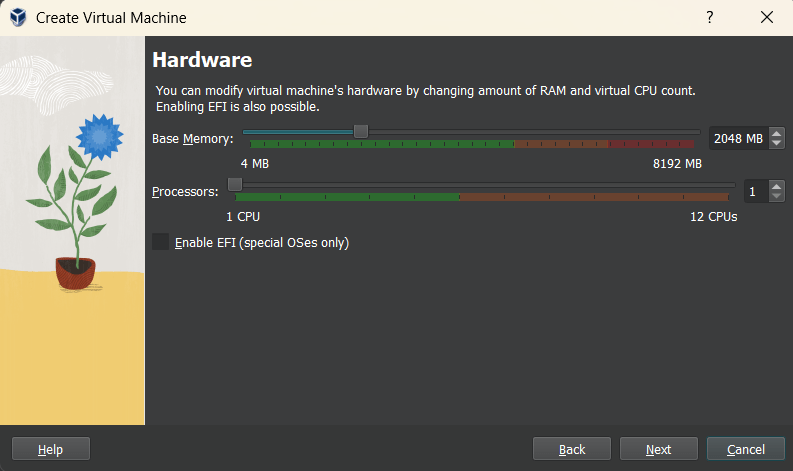
Allocate the required RAM size for the Metasploitable virtual machine.
7
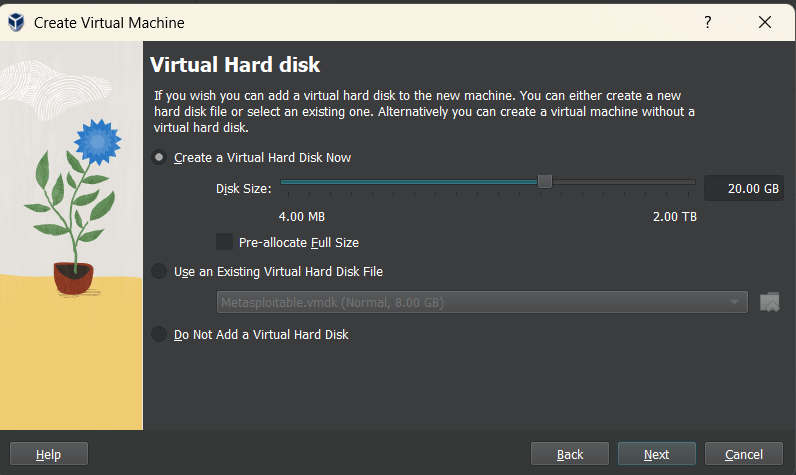
Create a new virtual hard disk for storing the virtual machine files.
8
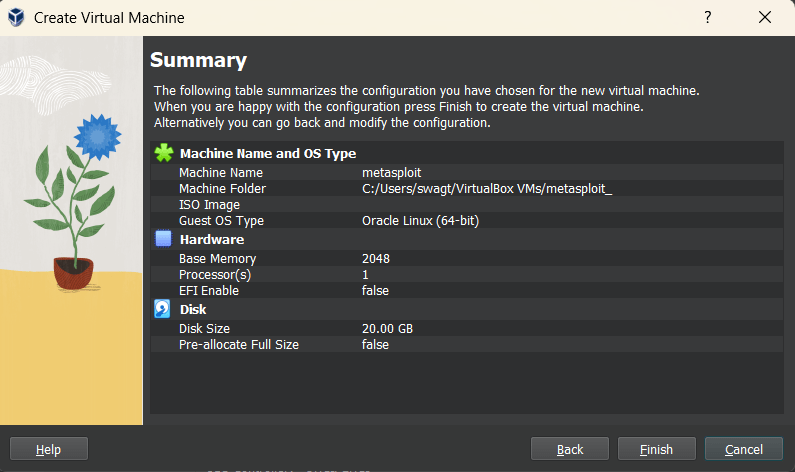
Review the VM configuration summary and click Finish to create the VM.
9
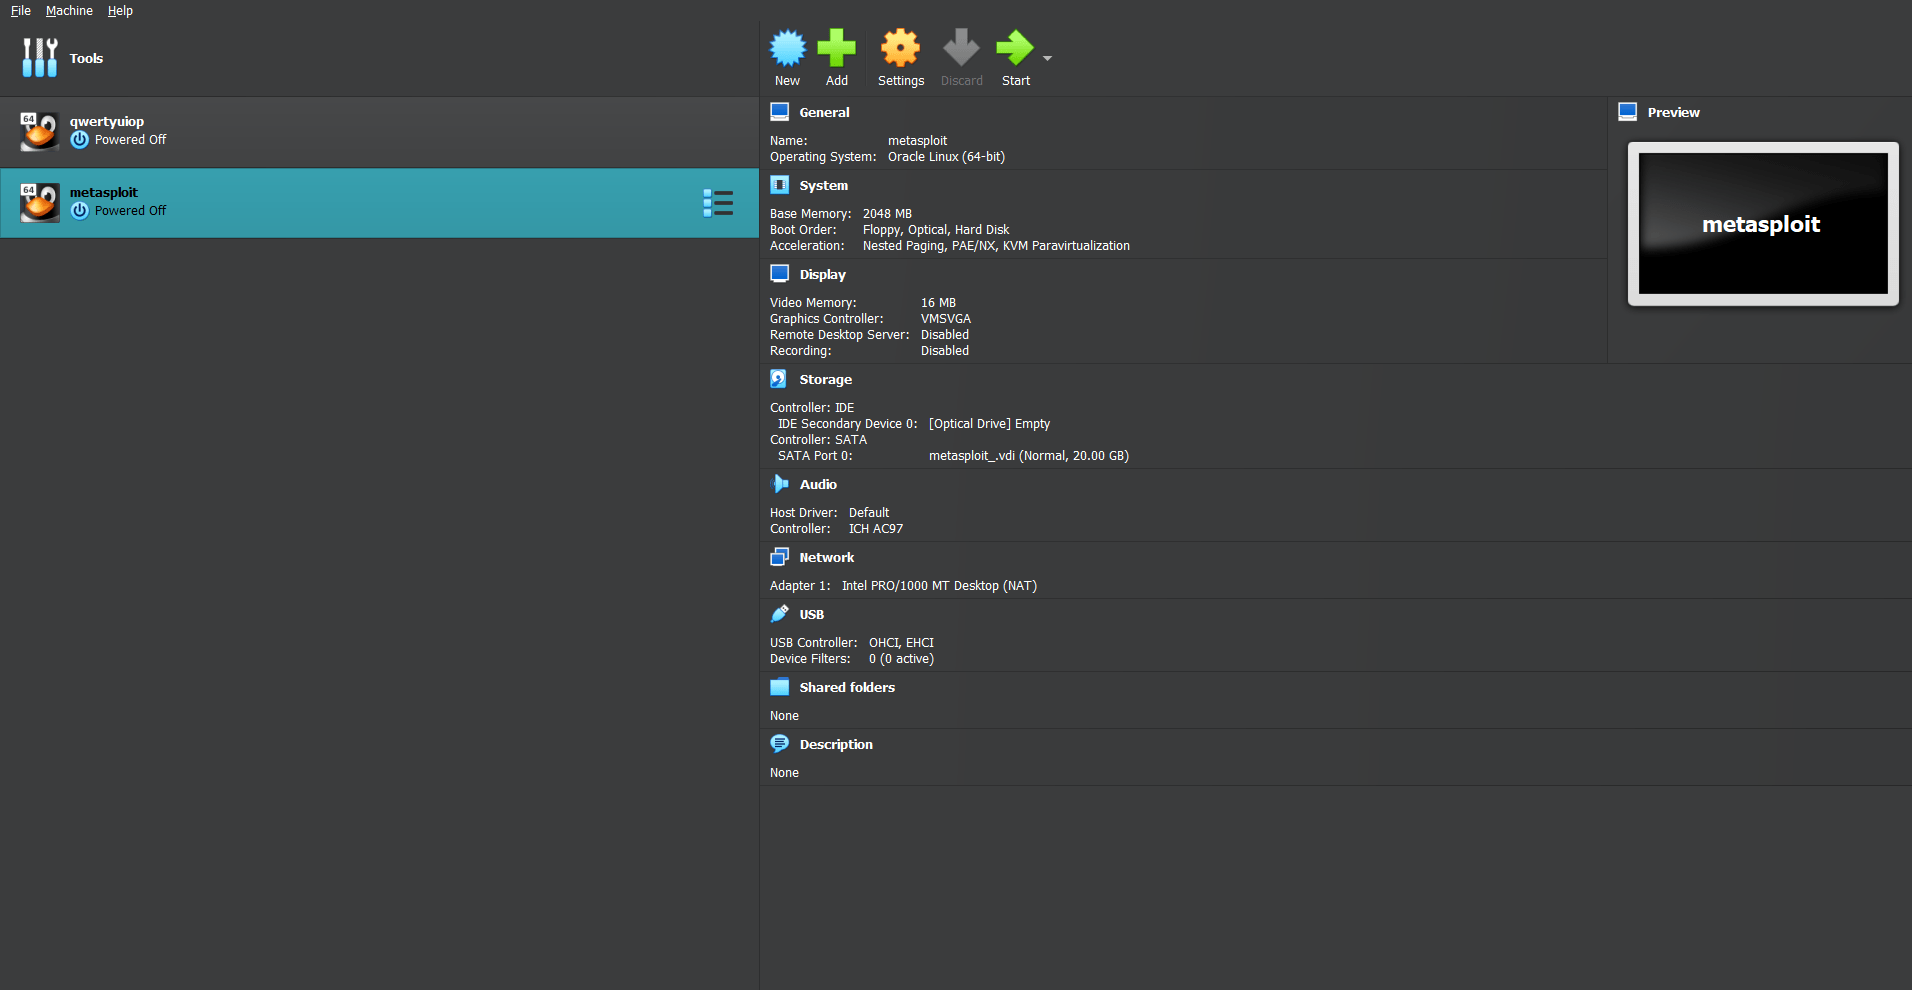
Open the newly created virtual machine.
10
Open the newly created virtual machine settings in VirtualBox.
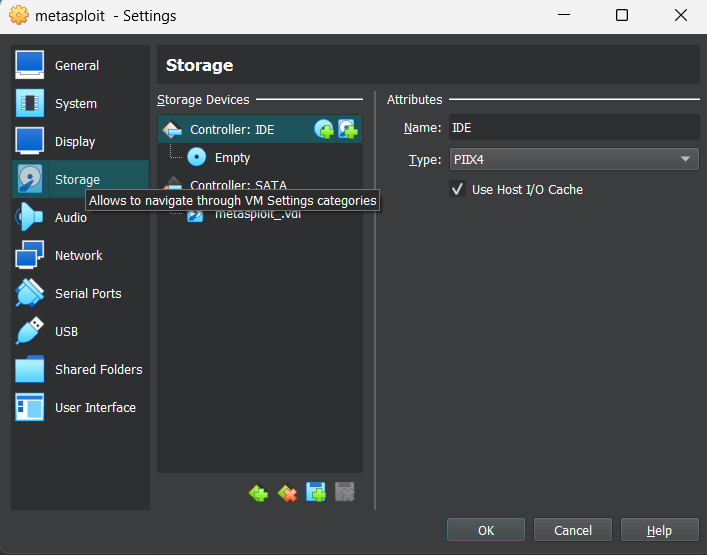
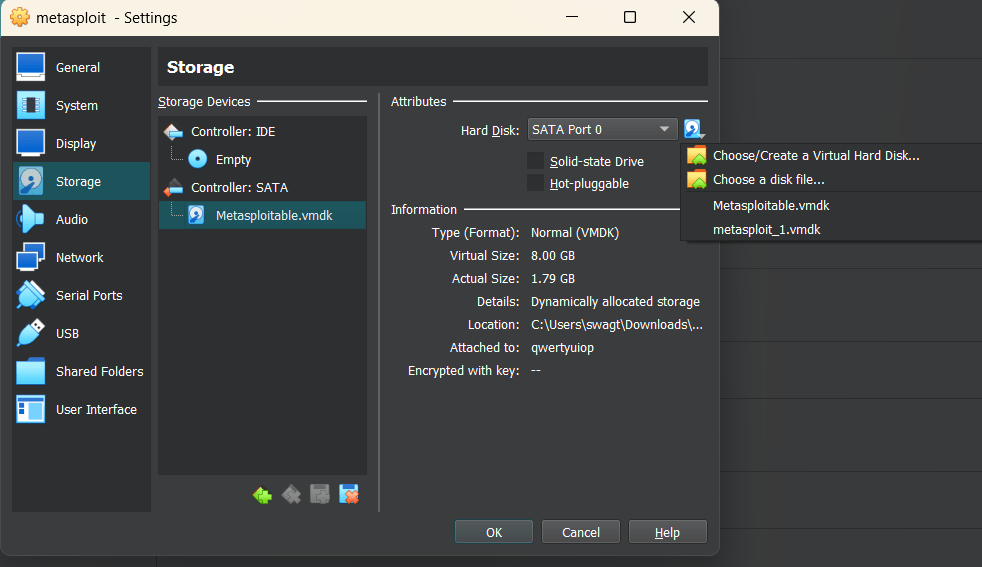
11
Open Storage Settings and attach the Metasploitable VMDK file to the VM.
12
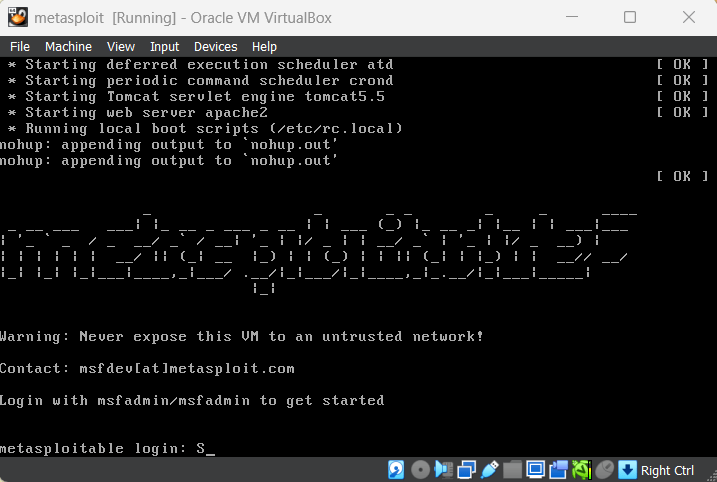
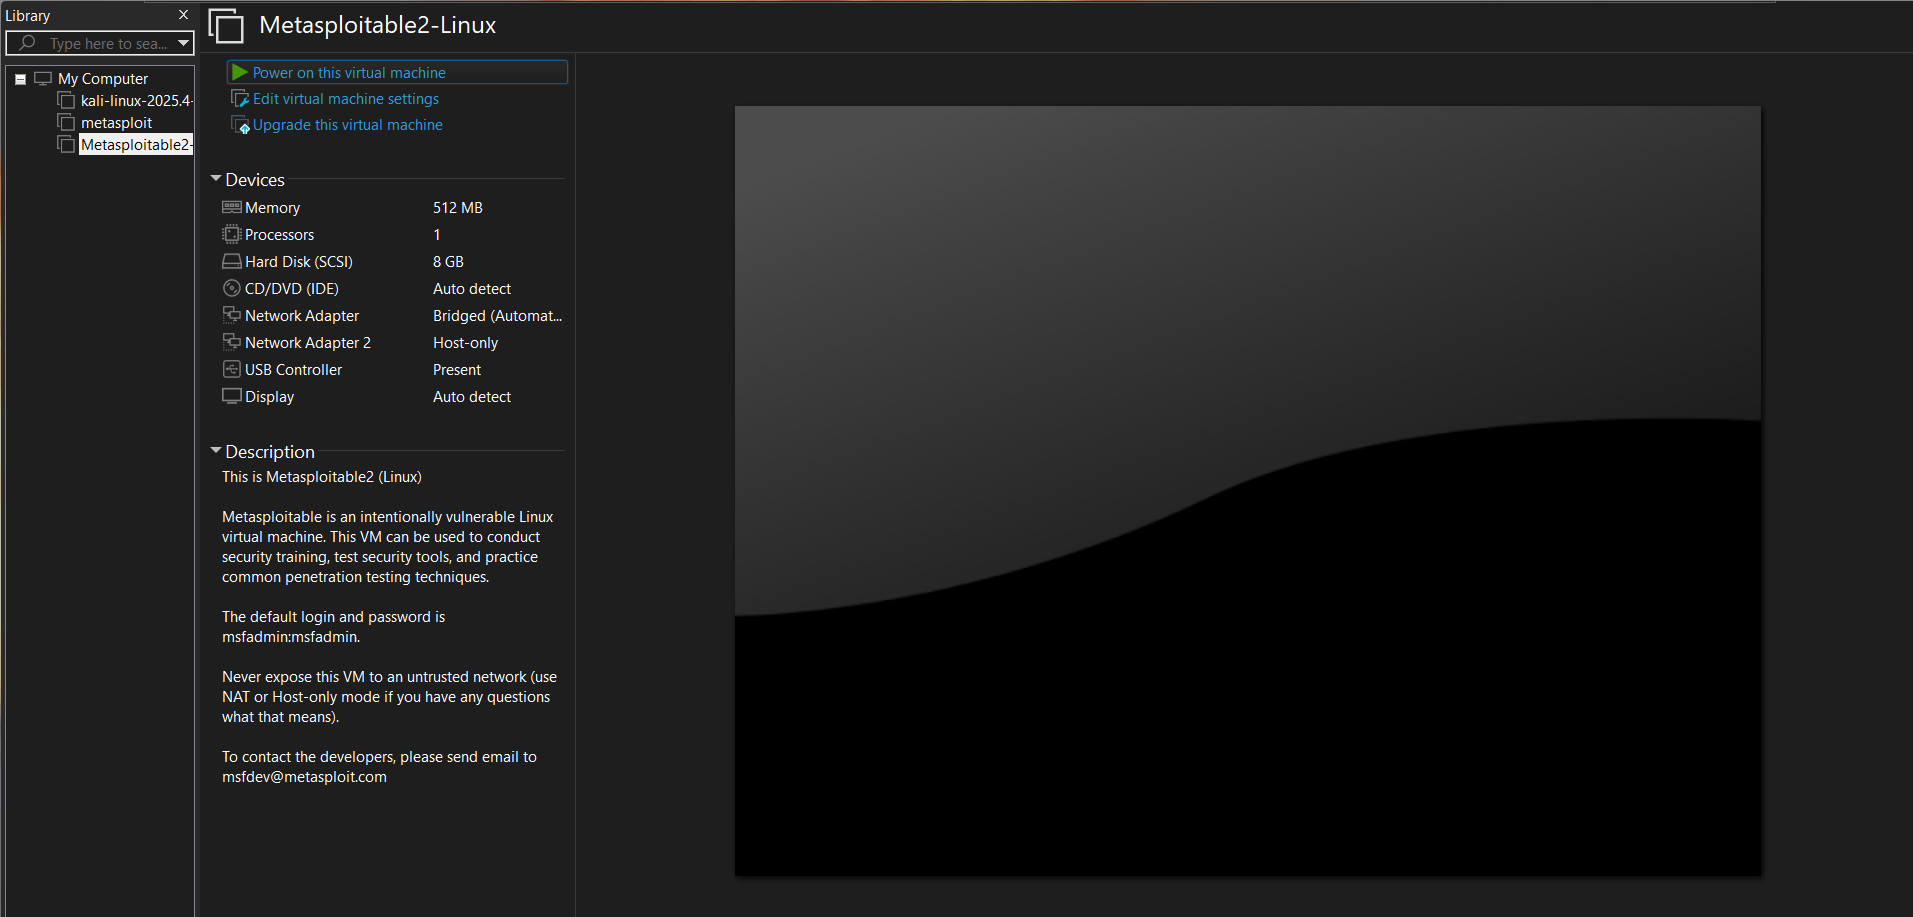
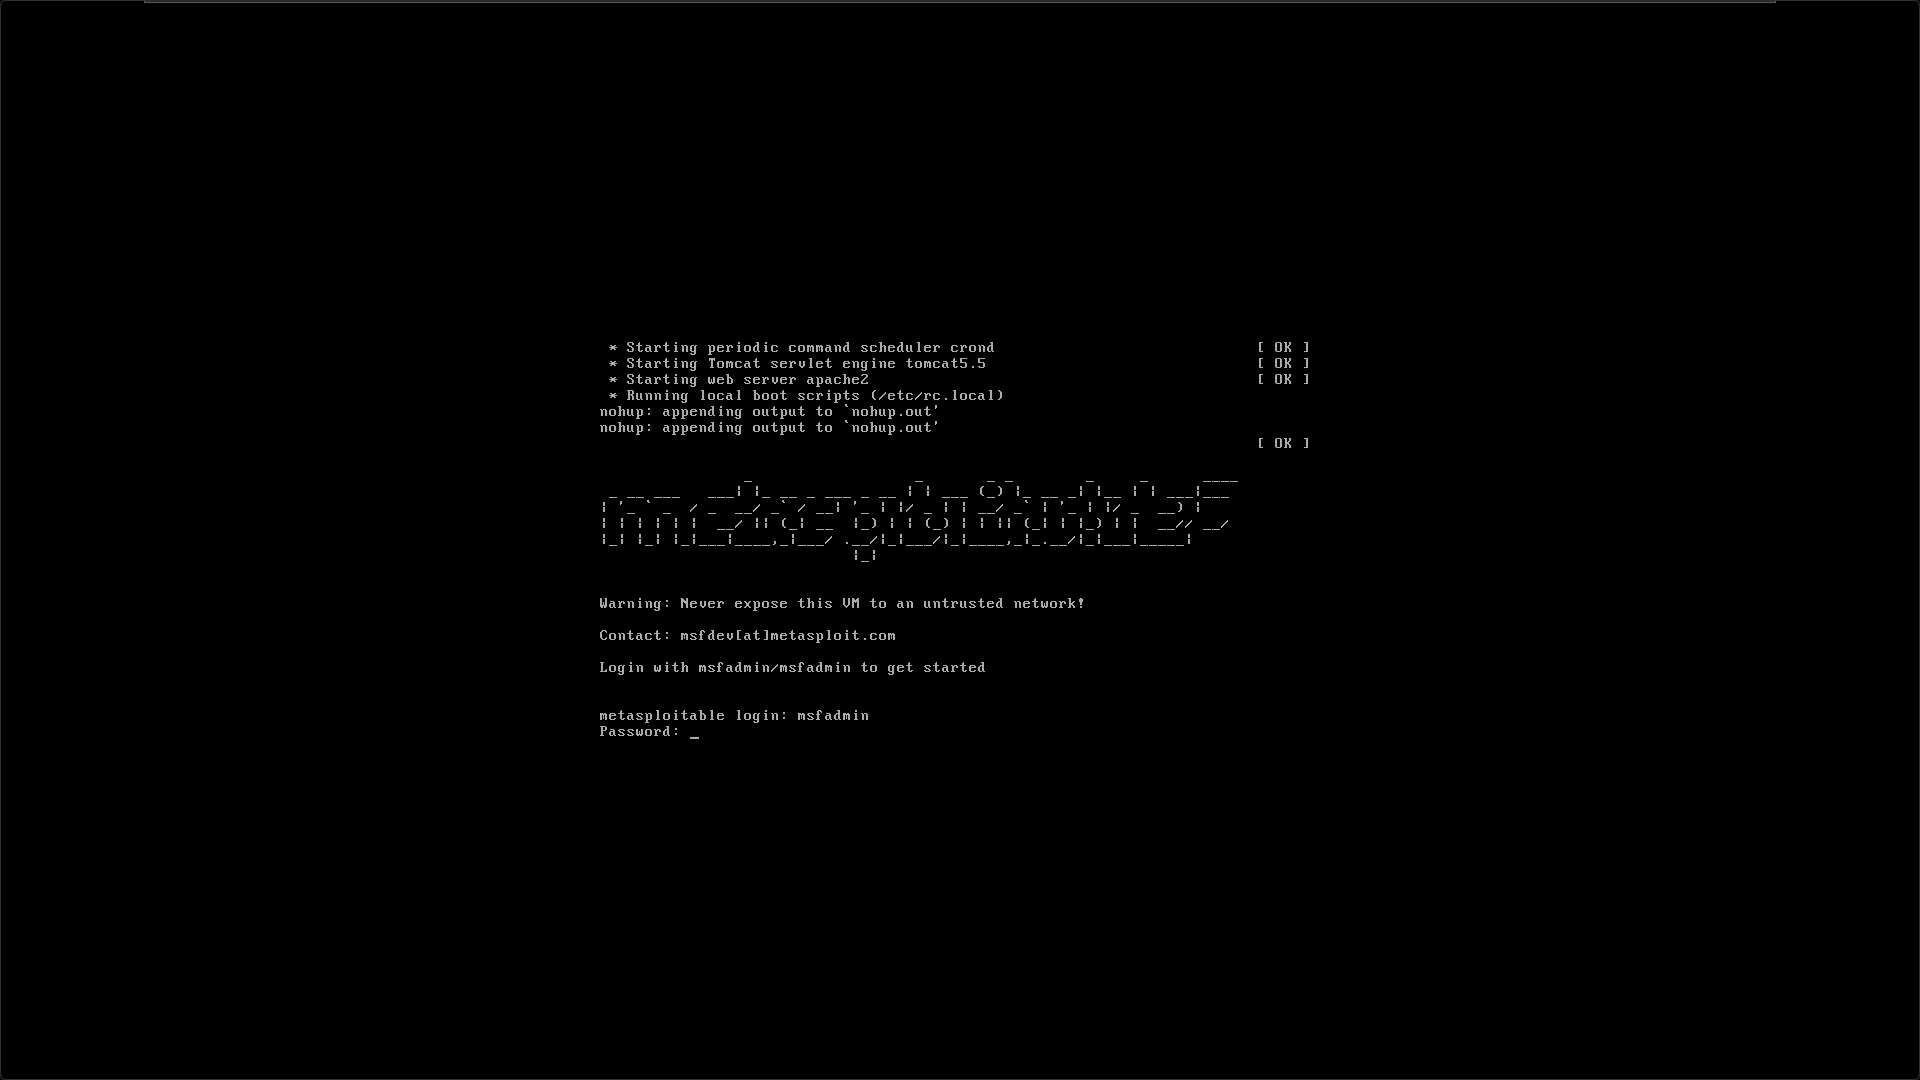
Start the virtual machine and allow Metasploitable Linux to boot successfully.
13
Log in to the Metasploitable system using the default credentials to complete the setup.
Task 2: Setup
1
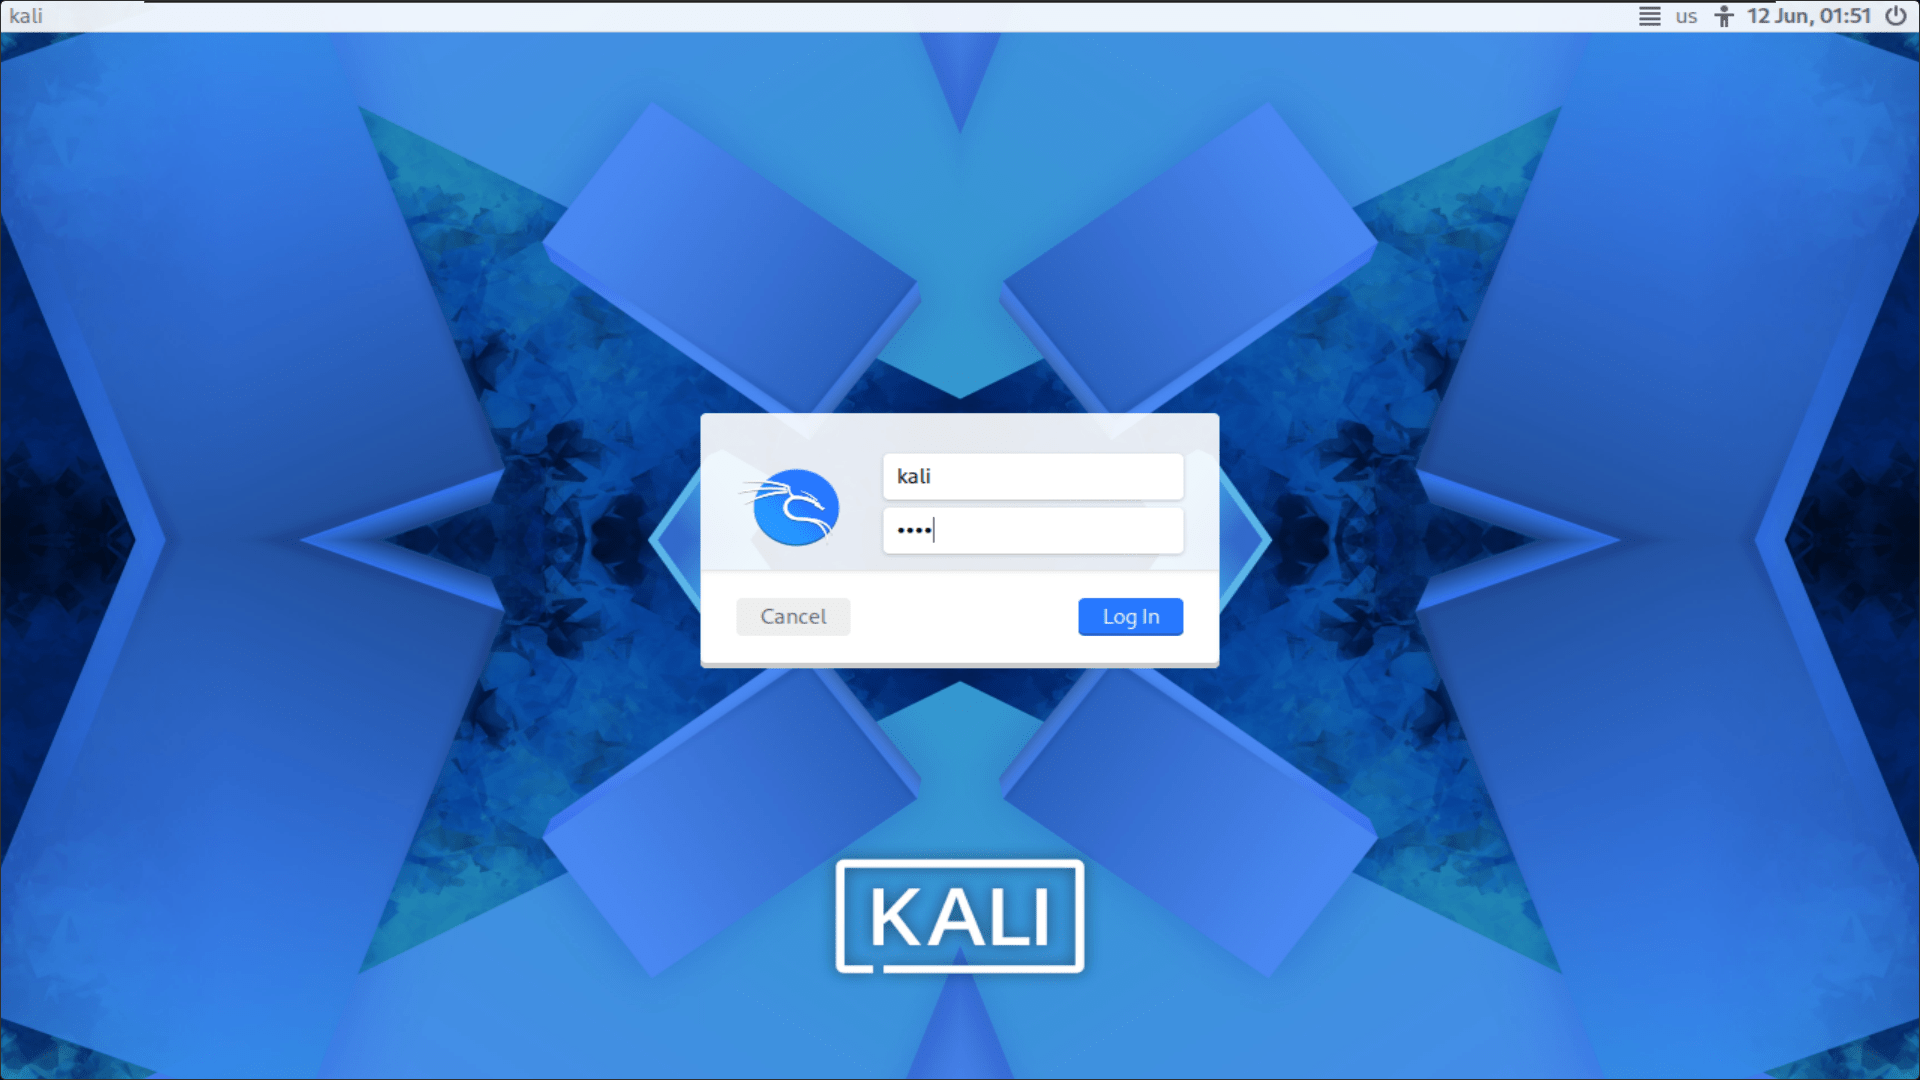
Start the Kali Linux virtual machine and log in using the username kali and the password kali.
2
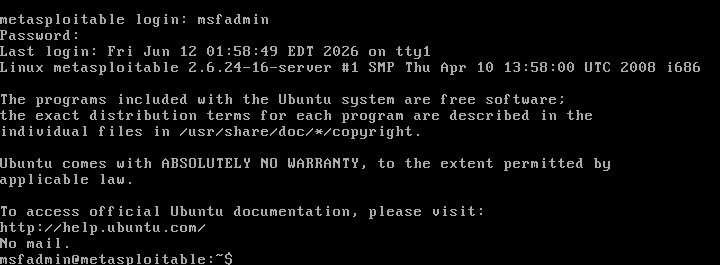
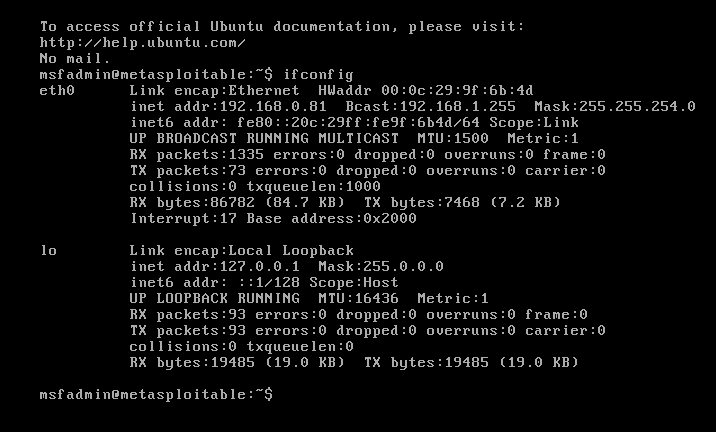
Start the Metasploitable 2 virtual machine and log in using the username msfadmin and the password msfadmin.
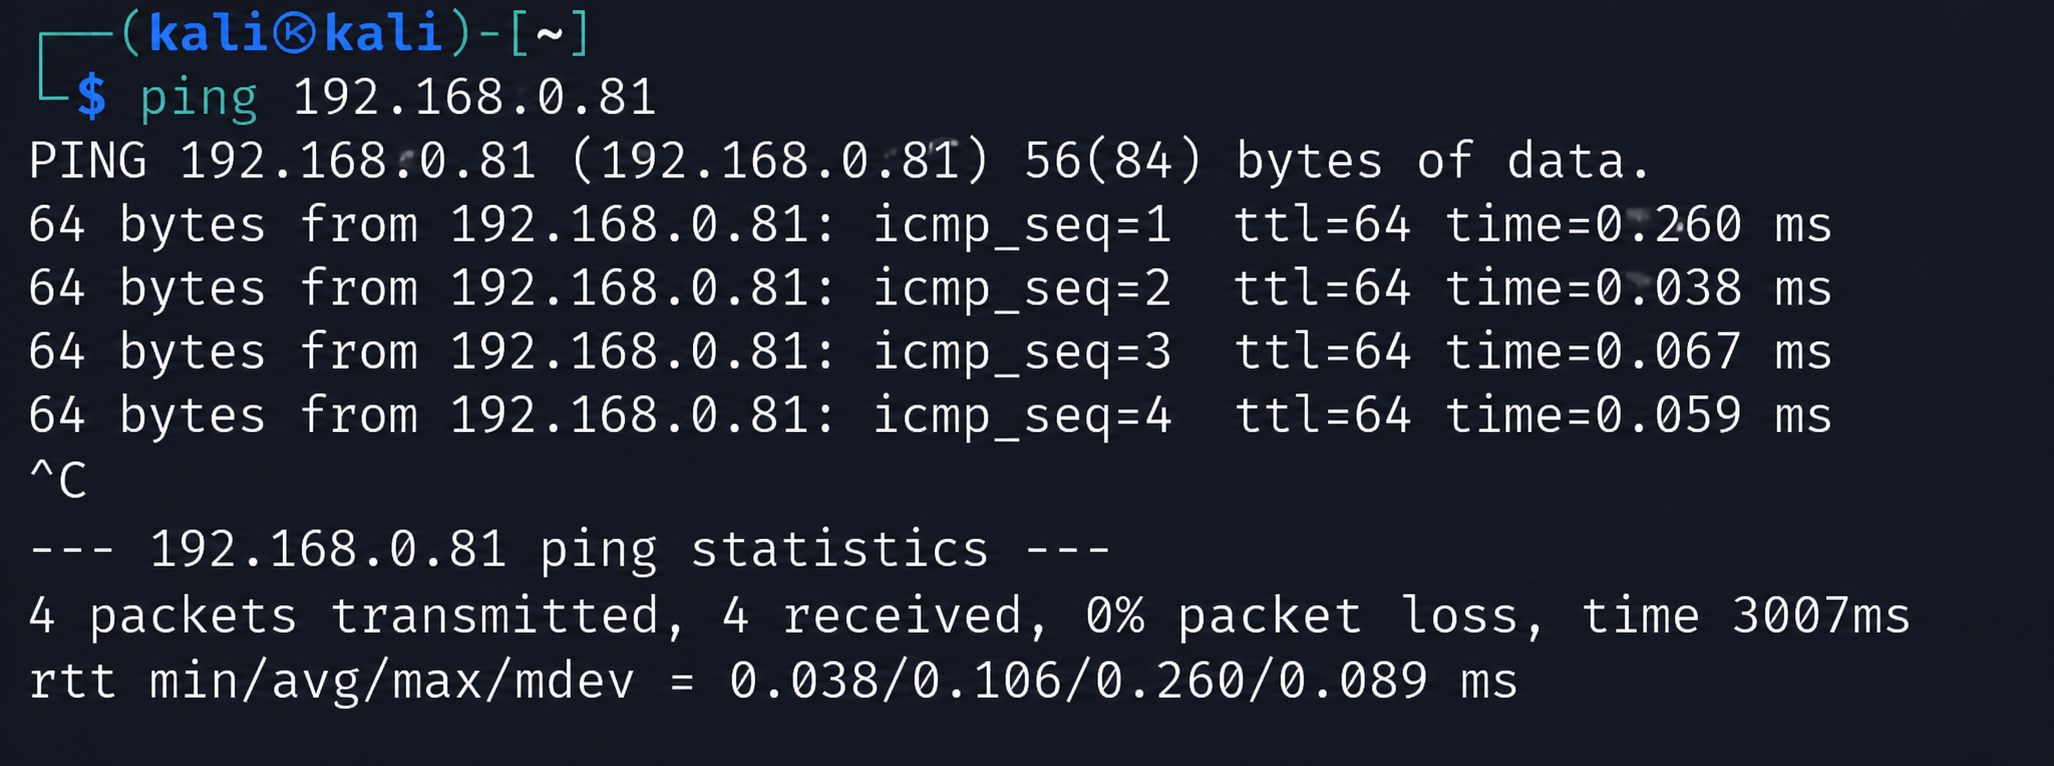
ifconfigping 192.168.0.813
Run the ifconfig command on Metasploitable 2 systems and verify network connectivity by sending a ping from one machine to the other. Ensure that both systems receive successful replies.
Task 3: Identifying Hosts and Open Ports
1
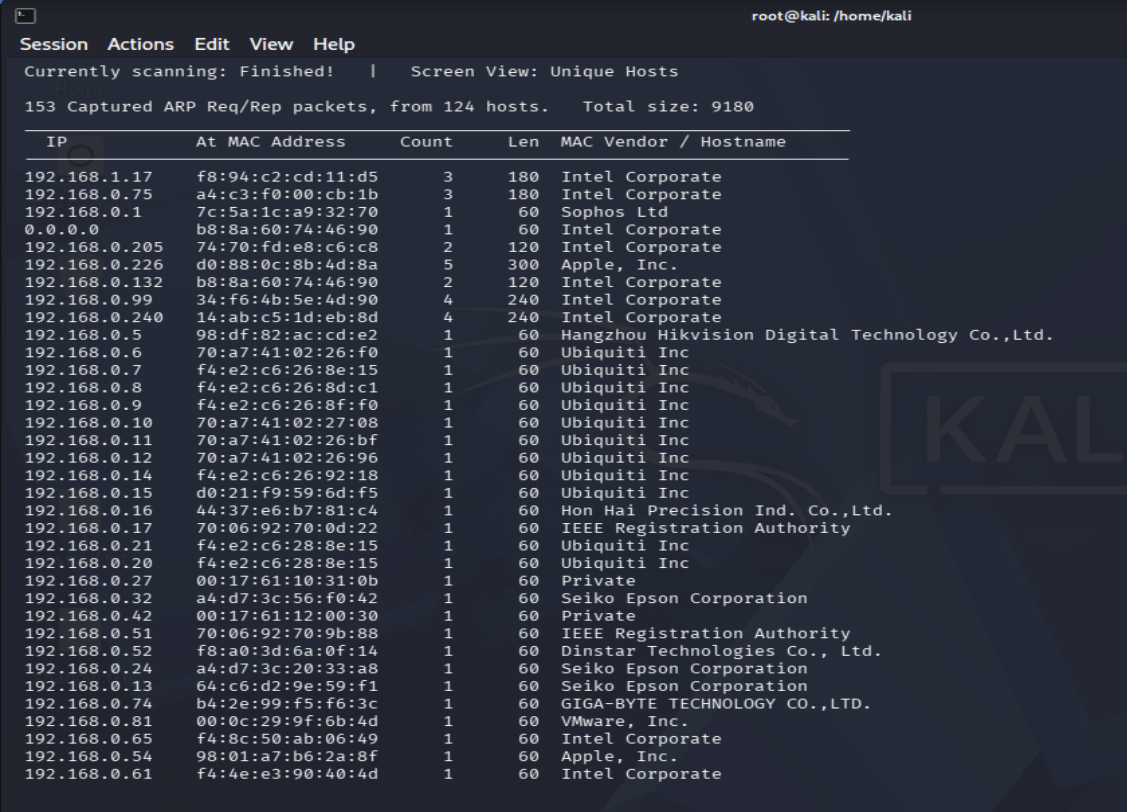
On the Kali Linux system, run the following command to discover all active hosts on your network:
netdiscover -r 192.168.0.81/24
To stop the scan and return to the terminal, press Ctrl+C.
2
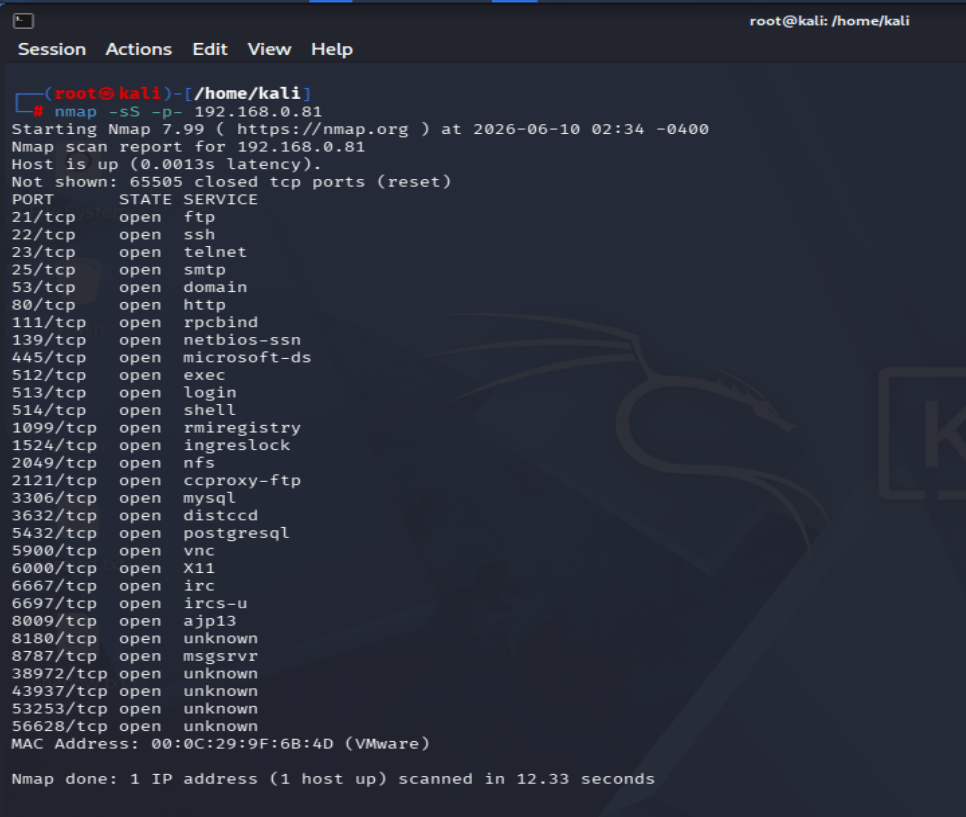
Run the following command to scan all 65,536 TCP ports on the target system.
nmap -sS -p- 192.168.0.81This scan performs a rapid search for open TCP ports on the target host. While it efficiently identifies open ports, it does not provide information about the versions of the services running on those ports.
3
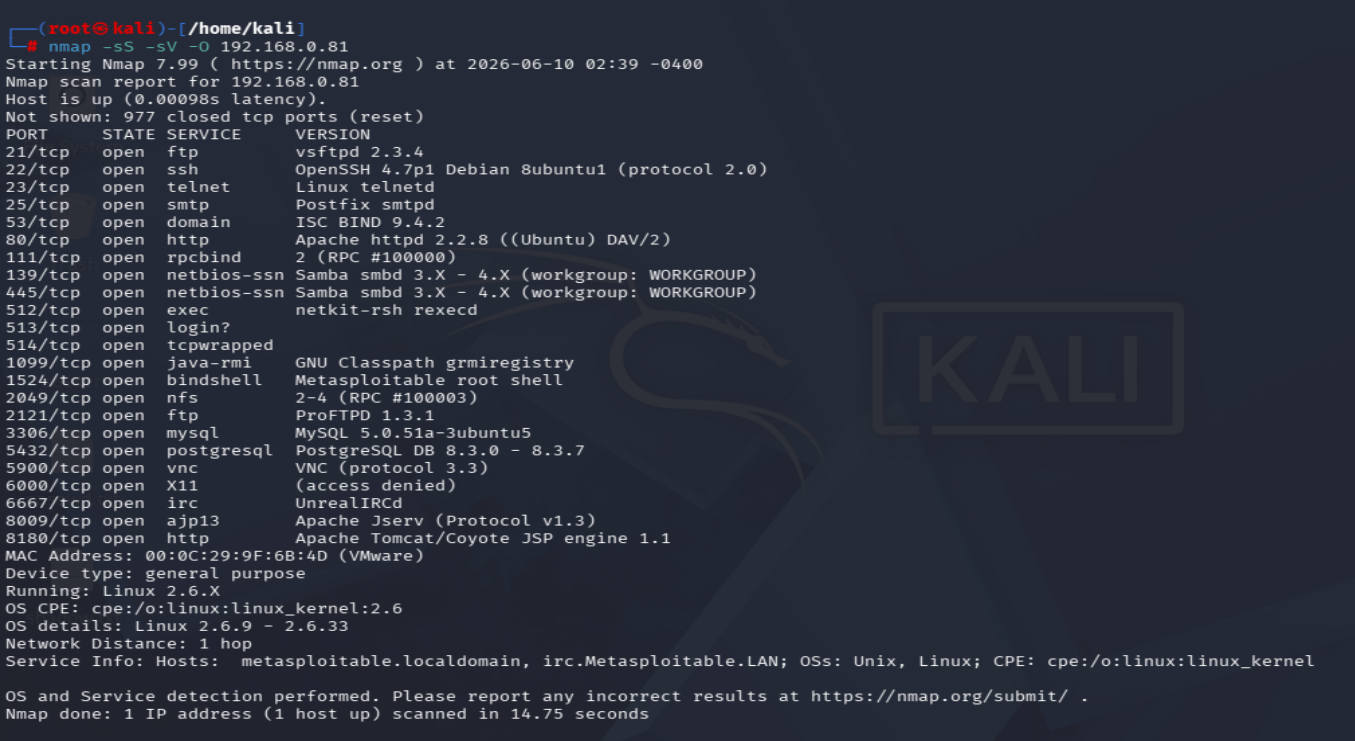
Run the following command to scan the 1,000 most common ports on the target system while also performing service version detection and operating system identification.
nmap -sS -sV -O 192.168.0.81This scan identifies many of the services running on the target host and attempts to determine their version numbers. It also performs OS detection to estimate the operating system in use.
4
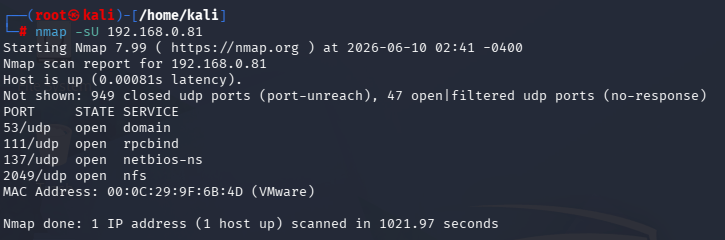
Run the following command to scan the UDP ports on the target system.
nmap -sU 192.168.98.134UDP scans generally take longer to complete than TCP scans. The process may take approximately 15 minutes, so you can leave it running and continue working in a separate terminal window.
Once the scan is complete, it will identify several UDP-based services that are active on the target system.
Task 4: Enumerating User with rpcclient
1
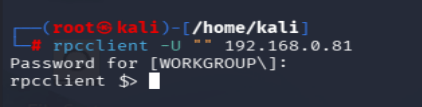
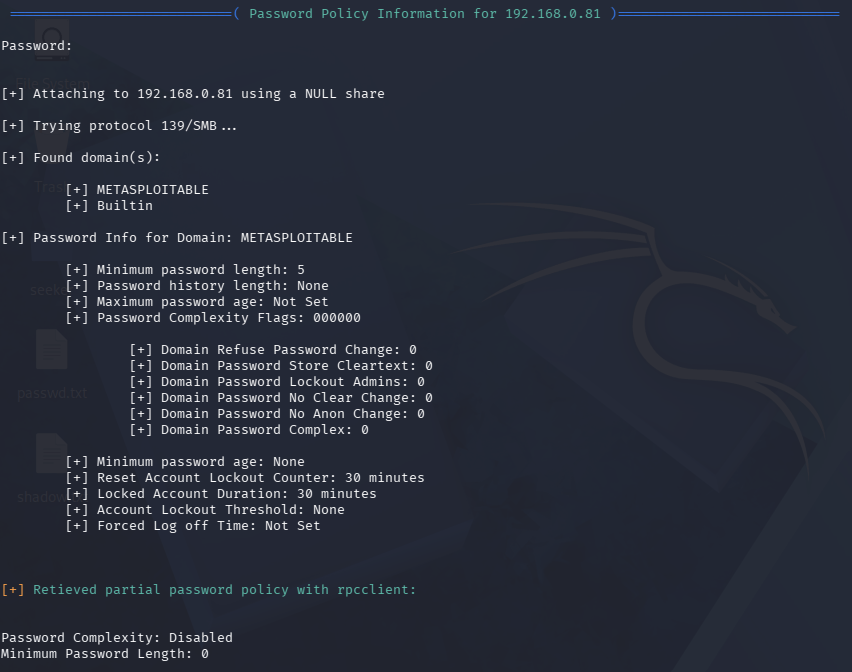
Enumerating Users with rpcclient
User accounts can also be enumerated through null sessions using the rpcclient utility.
a
Run the following command:
rpcclient -U "" 172.16.1.190When prompted for a password, simply press Enter.
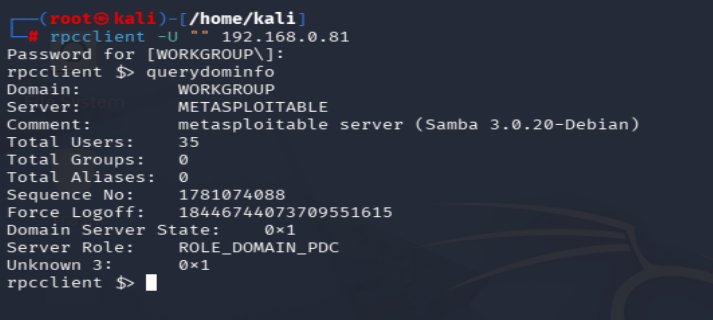
After connecting successfully, an rpcclient $> prompt will appear. At the prompt, execute the following command:
querydominfoThis command displays domain information, including the total number of user accounts present on the target system.
In this example, the output indicates that there are 35 users configured on the system.
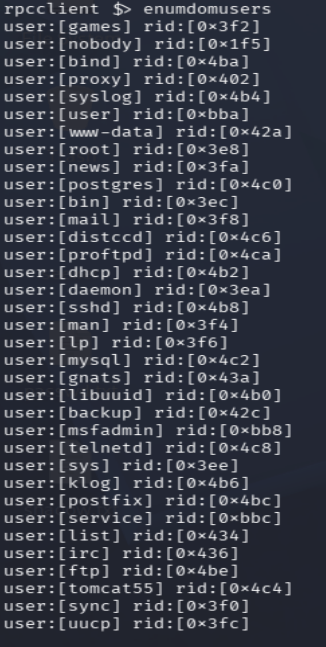
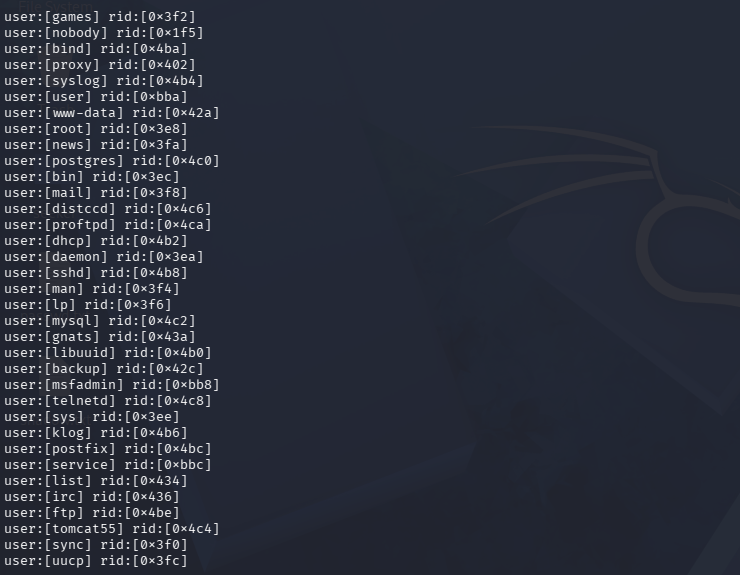
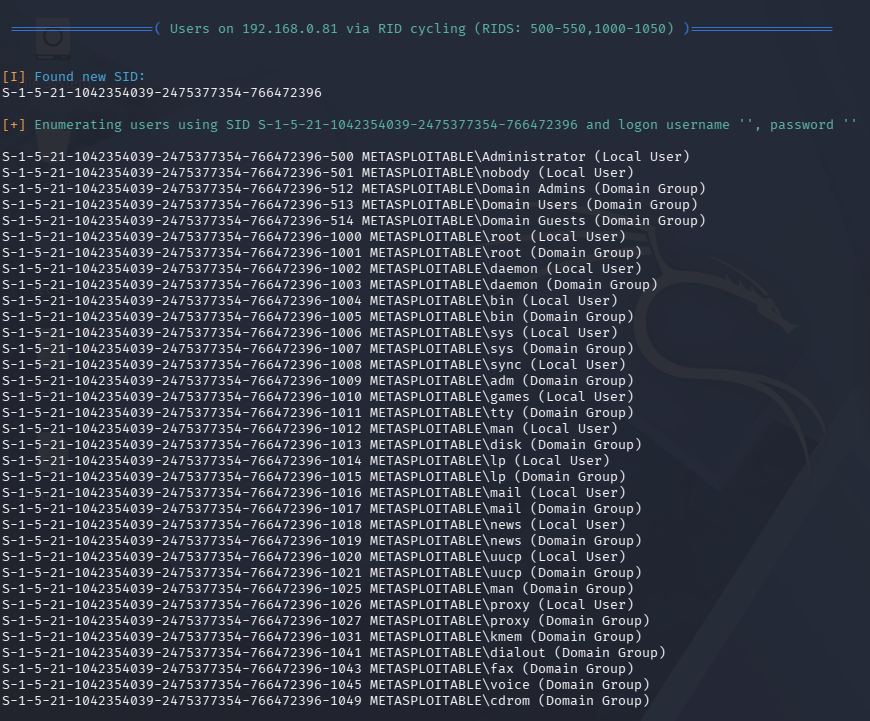
Run the following command to display all 35 user accounts:
enumdomusersThis command shows every user account along with its corresponding Relative Identifier (RID) number, as illustrated below.
b
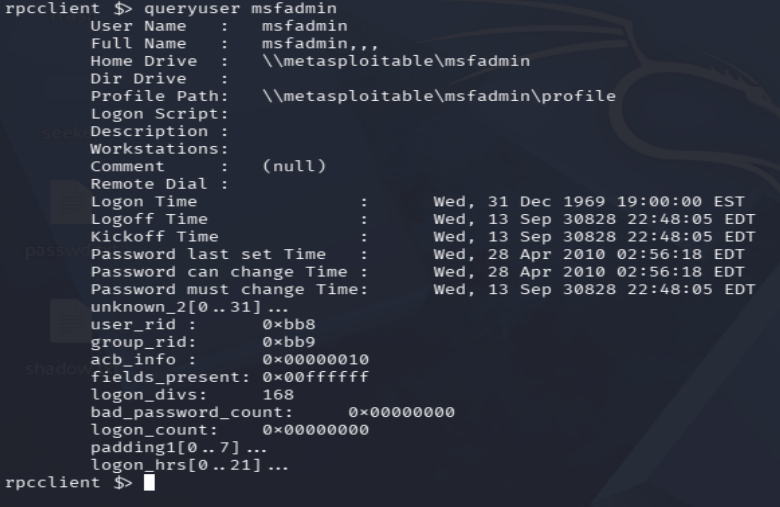
Run the following command to retrieve additional details about the "msfadmin" account:
queryuser msfadminThis command displays information about the user's account, including the profile path and other relevant details, as shown below.
c
Execute exit command to exit rpcclient
2
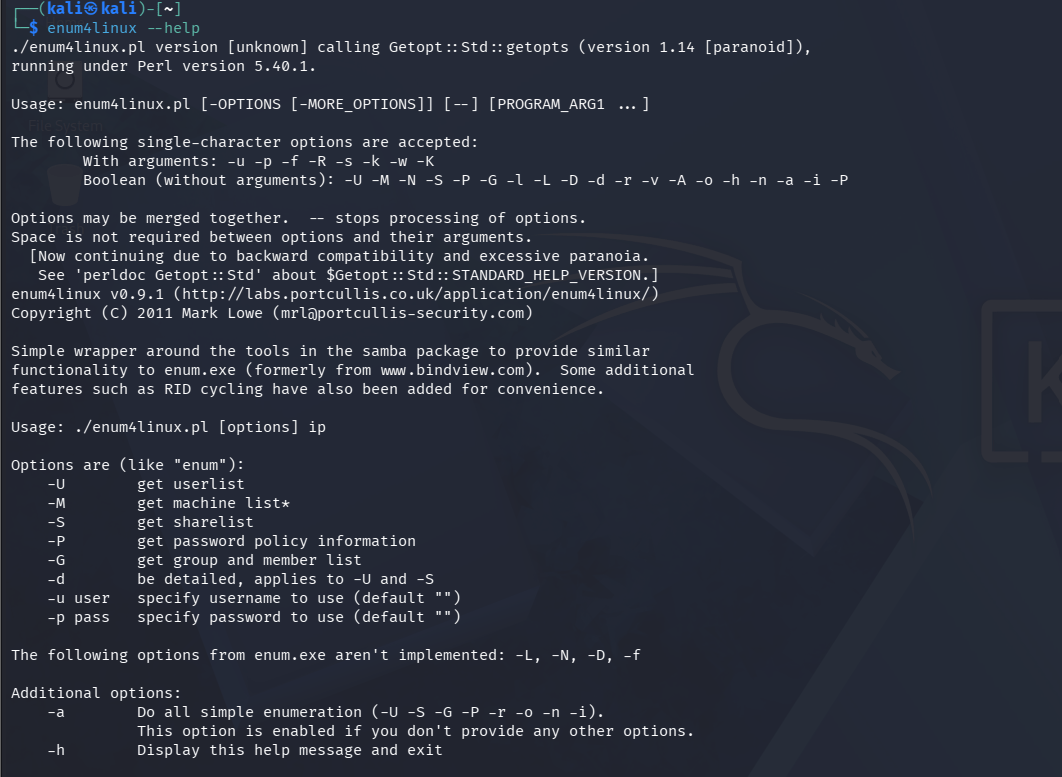
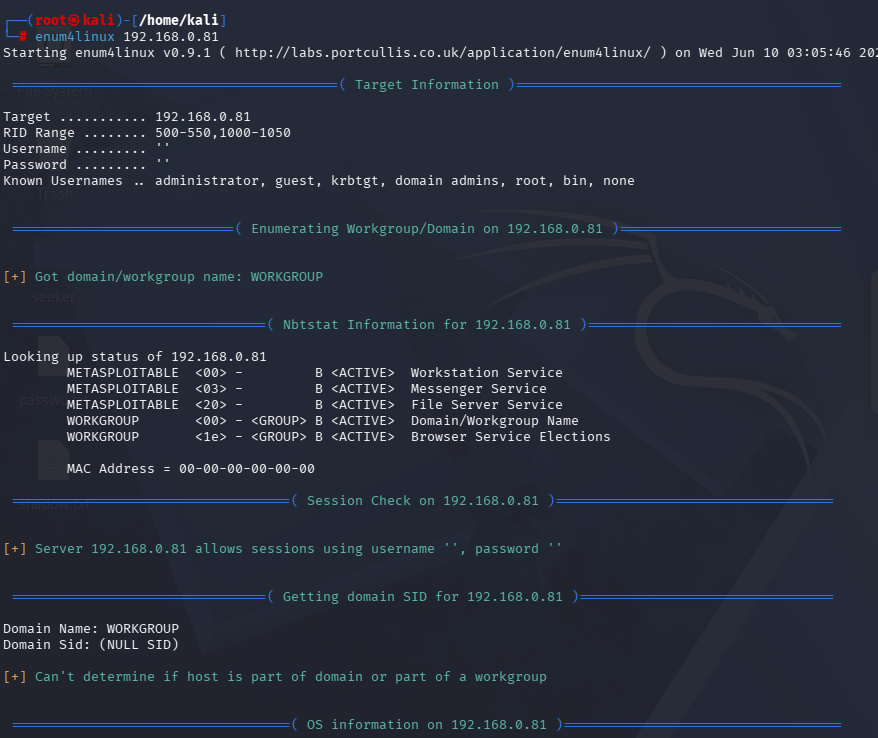
Enumerating with enum4linux
enum4linux is a Perl-based utility that leverages tools such as smbclient, rpcclient, net, and nmblookup to automatically gather enumeration data from a target system.
a
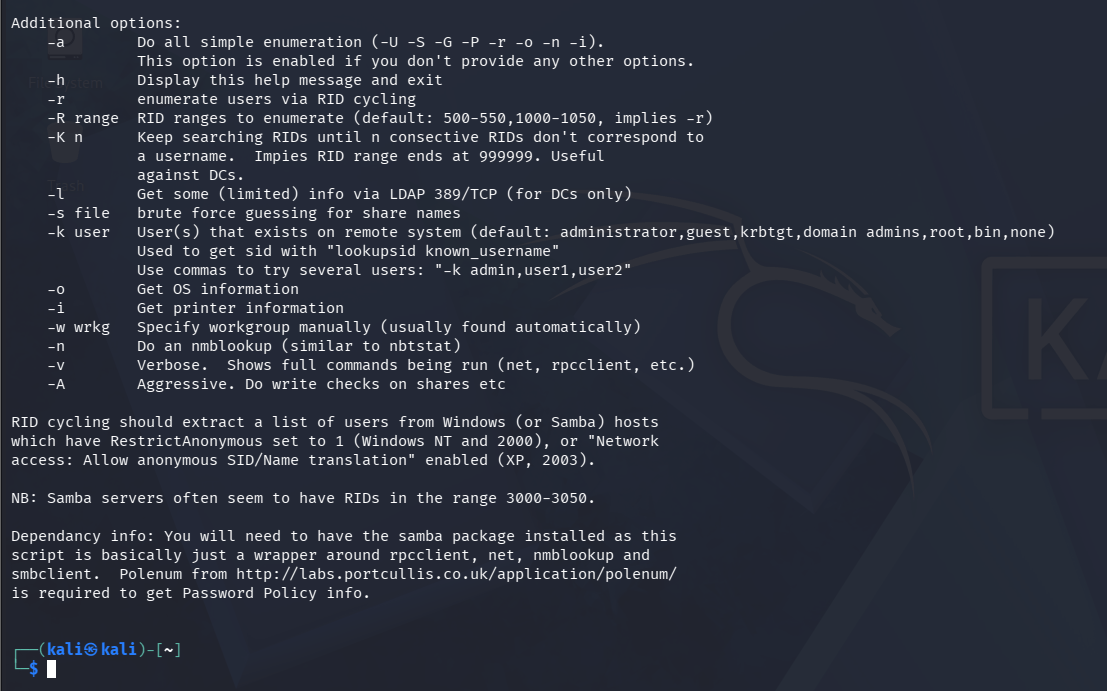
Run the following command to view the available options for enum4linux:
enum4linux --helpIf no options are specified, the tool executes all available enumeration checks. Use the following command to enumerate the target:
b
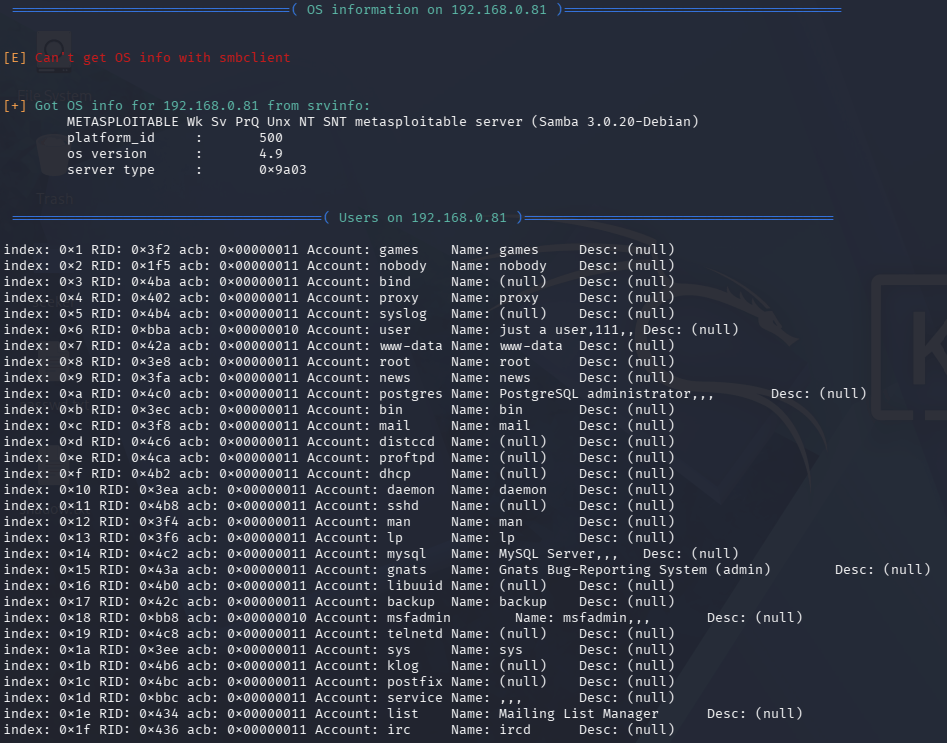
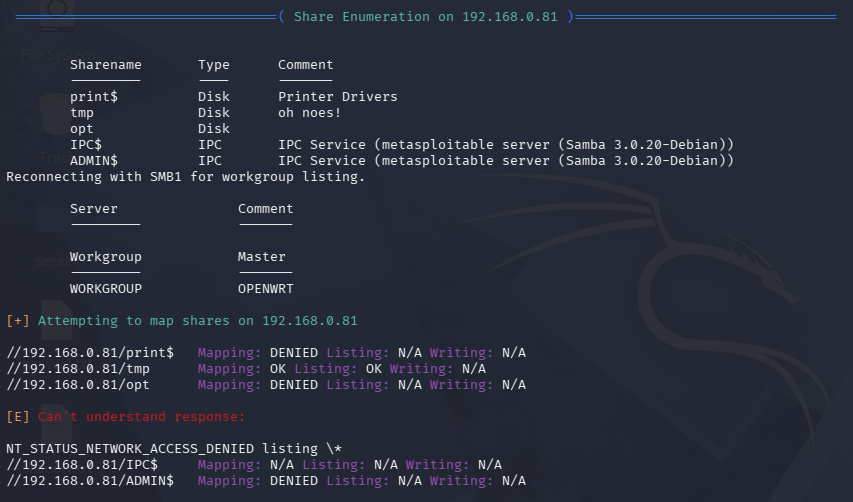
enum4linux 192.168.0.81The command generates a large amount of output. Initially, it displays several lists of usernames, similar to the information obtained earlier using other enumeration tools.
Next, a Share Enumeration section appears, indicating that the /tmp directory is shared, as shown below. The output includes a warning of "oh noes!" because /tmp is world-writable. This suggests that scripts could potentially be uploaded to that directory and executed.
Task 5: Enumerating using dig, nslookup, whois on website
1
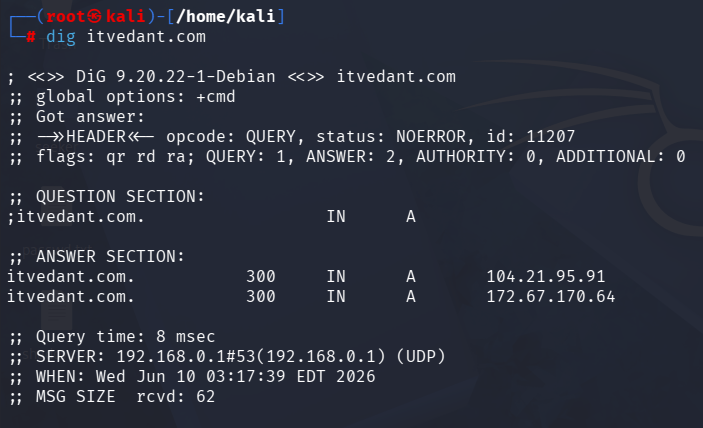
Enumerating using dig
Run the following command:
dig itvedant.com2
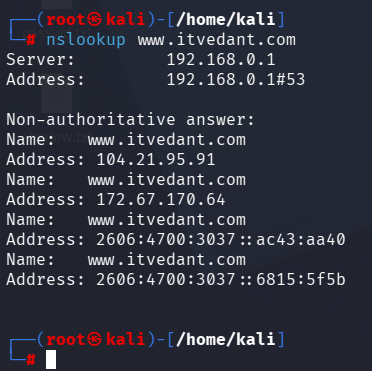
Enumerating website nslookup
Run the following command:
nslookup www.itvedant.com3
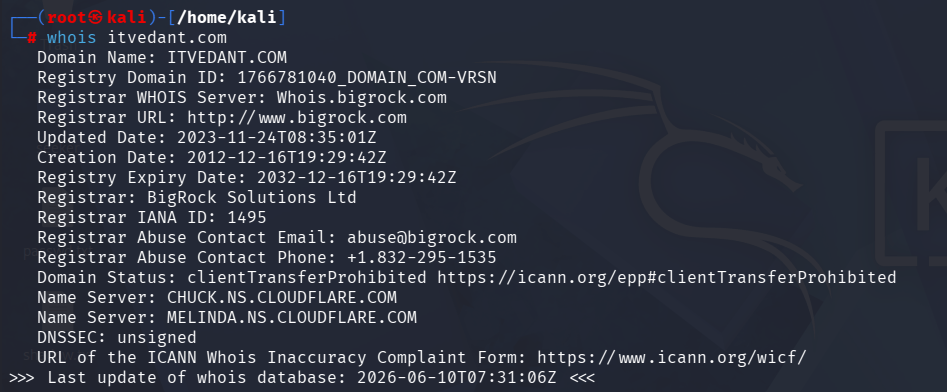
Enumerating using Whois
Run the following command:
whois itvedant.com
Great job!
You have successfully completed your lab on Extracting System Information Using Enumeration Techniques.
In this lab, you have: Discovered Active Hosts, Identified Open TCP/UDP Ports, Performed Service and OS Enumeration, Enumerated Users and Shared Resources, Gathered Information using rpcclient and enum4linux, and Conducted DNS and Domain Enumeration using dig, nslookup, and whois.
You are now ready to move to the next stage of Vulnerability Assessment and Security Testing.
Checkpoint
Next-Lab Preparation
Topic : Enumeration and Vulnerability Assessment
1) Enumeration techniques.
2) Identifying vulnerabilities.
By Content ITV


