RHEL7系统管理
回顾标准文件系统权限
使用ACL控制文件访问
SELinux安全的基本概念
权限
网络
使用nmcli配置网络
使用firewalld限制网络通信
使用hostnamectl配置主机名
存储
回顾磁盘分区和挂载文件系统
使用LVM配置存储
控制
控制服务和守护进程
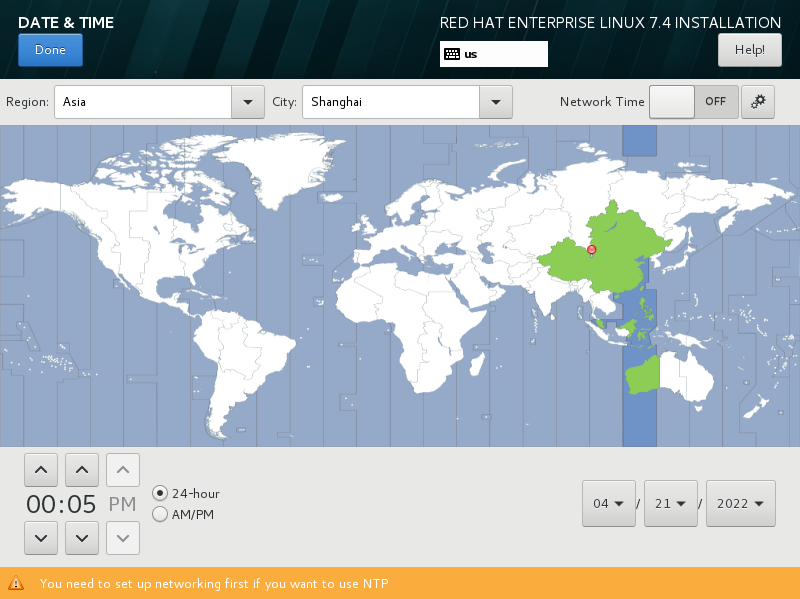
设置时区
RHEL 7 OS 安装要点
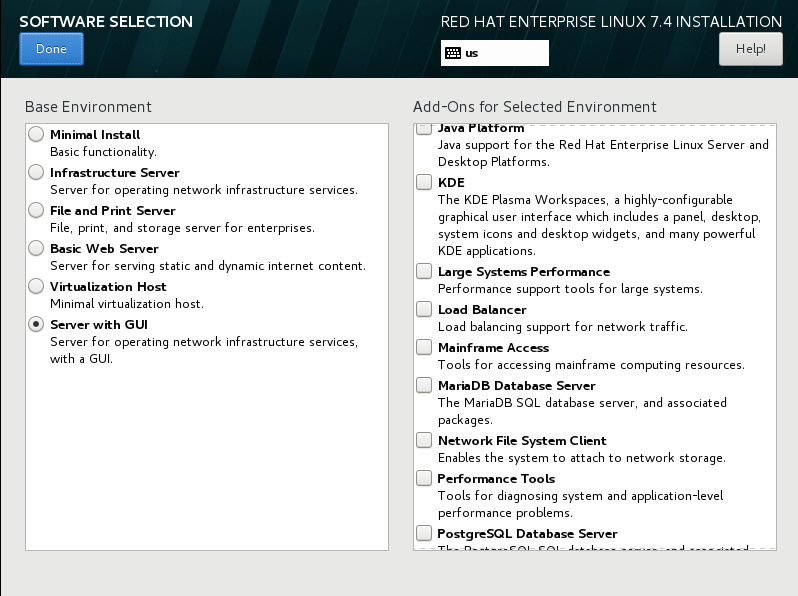
选择server with GUI安装
RHEL 7 OS 安装要点
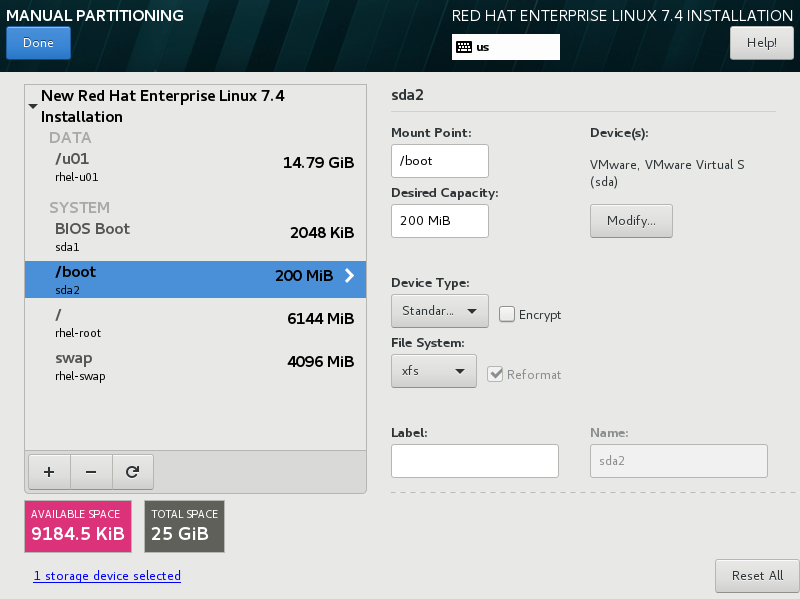
设置分区
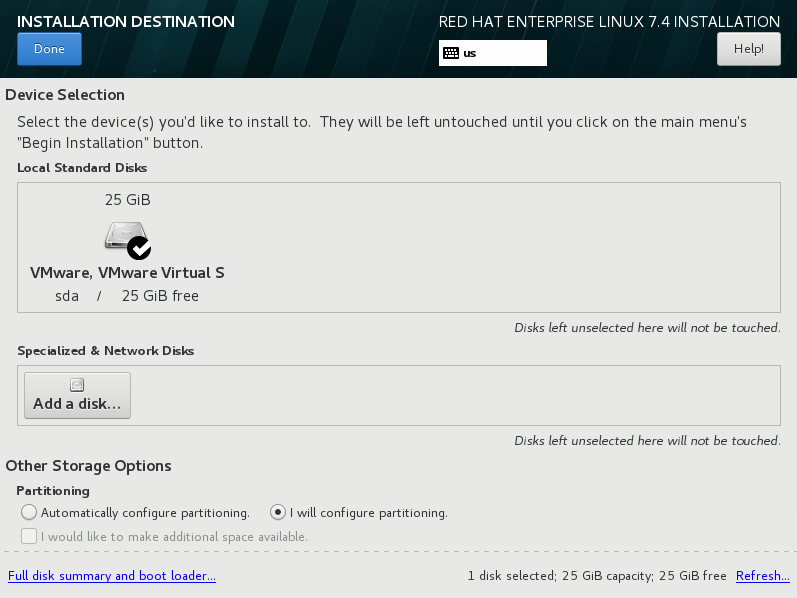
RHEL 7 OS 安装要点
回顾标准文件权限
回顾ugo权限
| 权限 | 对文件的影响 | 对目录的影响 |
|---|---|---|
| r (read) | 可以读取文件的内容 | 可以列出目录的内容(文件名列表和子目录列表) |
| w (write) | 可以更改文件的内容 | 可以创建或者删除目录中的任一文件 |
| x (exec) | 可以作为命令执行文件 | 可以访问目录的内容(文件权限、时间戳,进入工作目录,执行命令) |
注意:通常对只读目录赋予rx权限
回顾标准文件权限
chmod管理文件系统权限
符号法关键字
chmod WhoWhatWhich file|directory
Who是指u、g、o、a(代表用户、组、其他、全部)
What是指+、-、=(代表添加、删除、精确设置)
Which是指r、w、x(代表读取、写入、可执行)
数值法
chmod ### file|directory
每个数字代表一个访问级别:用户、组、其他
#是r=4、w=2和x=1的和
回顾标准文件权限
特殊权限
| 特殊权限 | 对文件的影响 | 对目录的影响 |
|---|---|---|
| u+s (suid) | 以拥有文件的用户身份,而不是以运行文件的用户身份执行文件 | 无影响 |
| g+s (sgid) | 以拥有文件的组身份执行文件 | 在目录中最新创建的文件将其组所有者设置为与目录的组所有者相匹配 |
| o+t (sticky) | 无影响 | 对目录具有写入权限的用户仅可以删除其所拥有的文件,而无法删除或强制保存到其他用户所拥有的文件, |
设置特殊权限
用符号表示:setuid = u+s;setgid = g+s;sticky = o+t
用数值表示(第四位):setuid = 4;setgid = 2;sticky = 1
回顾标准文件权限
默认文件权限umask
系统的每个进程都具有umask,它是一个八进制位掩码,用于清除由该进程创建的新文件和目录的权限。如果在umask中设置了一个位,则新文件中的对应的权限将被清除。
Bash shell用户的系统默认umask在/etc/profile和/etc/bashrc文件中定义。用户可以在他们的.bash_profile和.bashrc文件中覆盖系统默认值。
使用ACL控制文件访问
ACL概念
ACL允许向文件分配细化权限。除标准的文件所有者、组所有者和其他文件权限之外,还可向指定用户或指定组,以及由UID或GUID确定的用户和组授予权限。这些权限均应用相同的权限标志:r-读取、w-写入、x-执行(用于文件和搜索目录)。
使用ACL控制文件访问
getfacl file
注释条目
用户条目
组条目
掩码条目
其他条目
查看ACL权限
getfacl /directory
注释条目
标准条目
默认用户条目
默认组条目
默认掩码条目
默认其他条目
ACL掩码
定义可授予指定用户、组所有者和指定组的最大权限。它不限制文件所有者或其他用户的权限。所有实施ACL的文件和目录都将具有ACL掩码。
使用ACL控制文件访问
ACL权限应用优先级
文件所有者
指定用户
文件所有组或者
指定组
其他
使用ACL控制文件访问
ACL权限应用优先级
文件所有者
指定用户
文件所有组或者
指定组
其他
使用ACL控制文件访问
ACL采用普通的权限文件系统表示法:“r”表示读取权限,“w”表示写入权限,“x”表示执行权限。“-”(短划线)表示缺少相关权限。在(以递归方式)设置ACL时,大写字母“X”可用于表示:如果文件还没有相关的执行权限,则只应设置目录(而非常规文件)的执行权限。这一行为与chmod相同。
设置ACL权限
添加或修改所有者或指定用户ACL权限
setfacl -m u:name:perm file
添加或修改所有组或指定组ACL权限
setfacl -m g:name:perm file
添加或修改其他ACL权限
setfacl -m o::perm file
使用ACL控制文件访问
设置明确的ACL掩码
setfacl -m m::perm file
添加或修改目录的默认ACL权限
setfacl -m d:u:name:perm,d:g:name:perm,d:o::perm directory
getfacl中的输出可以用作setfacl的输入
getfacl file-A | setfacl --set-file=- file-B
--set-file接受文件或stdin中的输入,"-"(短划线)指定了stdin的使用。
删除ACL权限
setfacl -x u:name,g:name file
setfacl -b file
设置ACL权限
SELINUX安全的基本概念
SELinux是用于确定哪个进程可以访问哪些文件、目录和端口的一组安全规则。每个文件、进程和端口都具有特别的安全标签,称为SELinux上下文。上下文是一个名称,SELinux策略使用它来确定某个进程能否访问文件、目录或端口。除非显式规则授予访问权限,否则,在默认情况下,策略不允许任何交互。如果没有允许规则,则不允许访问。
Security Enhanced Linux(SELinux)是一个额外的系统安全层。SELinux的主要目标是防止已遭泄露的系统服务访问用户数据。大多数Linux管理员都熟悉标准的用户/组/其他权限安全模型。这种基于用户和组的模型称为自由决定的访问控制。SELinux提供另一层安全,它基于对象并由更加复杂的规则控制,称为强制访问控制。
Apache
/var/www/html
/tmp
/var/tmp
SELinux
Enforcing
SELINUX安全的基本概念
考虑以下SELinux相关概念:
- 主体
- 目标
- 策略
- 模式
当一个主体(如一个程序)尝试访问一个目标(如一个文件),SELinux安全服务器(在内核中)从策略数据库中运行一个检查。基于当前的模式,如果 SELinux 安全服务器授予权限,该主体就能够访问该目标。如果 SELinux 安全服务器拒绝了权限,就会在 /var/log/messages 中记录一条拒绝信息。
SELINUX安全的基本概念
SELinux 有三个模式:
- Enforcing:SELinux 策略强制执行,基于 SELinux 策略规则授予或拒绝主体对目标的访问
- Permissive:SELinux 策略不强制执行,不实际拒绝访问,但会有拒绝信息写入日志
- Disabled:完全禁用 SELinux
SELinux 策略有两种:
- Targeted:只有目标网络进程(dhcpd,httpd,named,nscd,ntpd,portmap,snmpd,squid,以及 syslogd)受保护
- Strict:对所有进程完全的 SELinux 保护
# This file controls the state of SELinux on the system.
# SELINUX= can take one of these three values:
#     enforcing - SELinux security policy is enforced.
#     permissive - SELinux prints warnings instead of enforcing.
#     disabled - No SELinux policy is loaded.
SELINUX=enforcing
# SELINUXTYPE= can take one of three two values:
#     targeted - Targeted processes are protected,
#     minimum - Modification of targeted policy. Only selected processes are protected.
#     mls - Multi Level Security protection.
SELINUXTYPE=targeted
[root@rac-node1 ~]# getenforce
Enforcing
[root@rac-node1 ~]# setenforce 0
[root@rac-node1 ~]# getenforce
Permissive
[root@rac-node1 ~]# vim /etc/selinux/config
SELINUX安全的基本概念
SELinux是用于确定哪个进程可以访问哪些文件、目录和端口的一组安全规则。每个文件、进程和端口都具有特别的安全标签,称为SELinux上下文。上下文是一个名称,SELinux策略使用它来确定某个进程能否访问文件、目录或端口。除非显式规则授予访问权限,否则,在默认情况下,策略不允许任何交互。如果没有允许规则,则不允许访问。
SELinux标签具有多种上下文:用户、角色、类型和敏感度。目标策略(Red Hat Enterprise Linux中启用的默认策略)会根据第三个上下文(即类型上下文)来制定自己的规则。类型上下文名称通常以_t结尾。Web服务器的类型上下文是httpd_t。通常位于/var/www/html中的文件和目录的类型上下文是httpd_sys_content_t。通常位于/tmp和/var/tmp中的文件和目录的类型上下文是tmp_t。Web服务器端口的类型上下文是http_port_t。
[root@rac-node1 ~]# semanage fcontext -l |grep -e '/var/www/html(/.*)?'
/var/www/html(/.*)?/uploads(/.*)?                  all files          system_u:object_r:httpd_sys_rw_content_t:s0
/var/www/html(/.*)?/wp-content(/.*)?               all files          system_u:object_r:httpd_sys_rw_content_t:s0
/var/www/html(/.*)?/wp_backups(/.*)?               all files          system_u:object_r:httpd_sys_rw_content_t:s0
/var/www/html(/.*)?/sites/default/files(/.*)?      all files          system_u:object_r:httpd_sys_rw_content_t:s0
/var/www/html(/.*)?/sites/default/settings\.php    regular file       system_u:object_r:httpd_sys_rw_content_t:s0

[root@rac-node1 ~]# semanage fcontext -l |grep -e '^/tmp'
/tmp/.*                                            all files          <<None>>
/tmp/\.X11-unix(/.*)?                              all files          system_u:object_r:user_tmp_t:s0
/tmp/\.ICE-unix(/.*)?                              all files          system_u:object_r:user_tmp_t:s0
/tmp/brltty\.log.*                                 regular file       system_u:object_r:brltty_log_t:s0
/tmp/\.font-unix(/.*)?                             all files          system_u:object_r:user_fonts_t:s0
/tmp/lost\+found/.*                                all files          <<None>>
/tmp                                               all files          system_u:object_r:tmp_t:s0
/tmp-inst                                          all files          system_u:object_r:tmp_t:s0
/tmp/\.X0-lock                                     regular file       system_u:object_r:user_tmp_t:s0
/tmp/\.journal                                     all files          <<None>>
/tmp/lost\+found                                   directory          system_u:object_r:lost_found_t:s0
/tmp/hsperfdata_root                               all files          system_u:object_r:user_tmp_t:s0

[root@rac-node1 ~]# semanage port -l |grep 22
freeipmi_port_t                tcp      9225
freeipmi_port_t                udp      9225
hplip_port_t                   tcp      1782, 2207, 2208, 8290, 8292, 9100, 9101, 9102, 9220, 9221, 9222, 9280, 9281, 9282, 9290, 9291, 50000, 50002
jabber_client_port_t           tcp      5222, 5223
mysqlmanagerd_port_t           tcp      2273
oa_system_port_t               tcp      8022
oa_system_port_t               udp      8022
pop_port_t                     tcp      106, 109, 110, 143, 220, 993, 995, 1109, 10993
ssh_port_t                     tcp      22
zented_port_t                  tcp      1229
zented_port_t                  udp      1229

# semanage port -a -t ssh_port_t -p tcp 9998

# semanage fcontext -a -t httpd_sys_content_t "/websites(/.*)?"
# restorecon -R -v /websites
SELINUX安全的基本概念
使用nmc1i配置网络
设备是网络接口。连接是供设备使用的配置,其由一组设置组成。同一设备可能存在多个连接,但一次只能有一个保持活动状态。例如,系统通常可以使用DHCP提供的设置与网络连接。该系统偶尔需要连接到实验室或数据中心网络,它们仅使用静态联网。除了手动更改配置外,每一配置可以存储为单独的连接。
[root@rac-node1 ~]# nmcli con show
NAME    UUID                                  TYPE            DEVICE
ens33   9c30f952-a463-4c2c-b426-db614fbcad5b  802-3-ethernet  ens33
ens38   bd25026a-0424-4f57-82d5-1799d33500a8  802-3-ethernet  ens38
virbr0  c18767de-7a28-4e2a-a8e2-53ccfe51f840  bridge          virbr0

[root@rac-node1 ~]# nmcli con show --active
NAME    UUID                                  TYPE            DEVICE
ens33   9c30f952-a463-4c2c-b426-db614fbcad5b  802-3-ethernet  ens33
ens38   bd25026a-0424-4f57-82d5-1799d33500a8  802-3-ethernet  ens38
virbr0  c18767de-7a28-4e2a-a8e2-53ccfe51f840  bridge          virbr0

[root@rac-node1 ~]# nmcli con show ens33
connection.id:                          ens33
connection.uuid:                        9c30f952-a463-4c2c-b426-db614fbcad5b
connection.stable-id:                   --
connection.interface-name:              ens33
connection.type:                        802-3-ethernet
connection.autoconnect:                 yes
connection.autoconnect-priority:        0
connection.autoconnect-retries:         -1 (default)
connection.timestamp:                   1650555263
connection.read-only:                   no
connection.permissions:                 --
connection.zone:                        --
connection.master:                      --
connection.slave-type:                  --
connection.autoconnect-slaves:          -1 (default)
connection.secondaries:                 --
connection.gateway-ping-timeout:        0
connection.metered:                     unknown
connection.lldp:                        -1 (default)
...
ipv4.method:                            manual
ipv4.dns:                               --
ipv4.dns-search:                        --
ipv4.dns-options:                       (default)
ipv4.dns-priority:                      0
ipv4.addresses:                         192.168.88.100/24
ipv4.gateway:                           192.168.88.254
ipv4.routes:                            --
ipv4.route-metric:                      -1
ipv4.ignore-auto-routes:                no
ipv4.ignore-auto-dns:                   no
ipv4.dhcp-client-id:                    --
ipv4.dhcp-timeout:                      0
ipv4.dhcp-send-hostname:                yes
ipv4.dhcp-hostname:                     --
ipv4.dhcp-fqdn:                         --
ipv4.never-default:                     no
ipv4.may-fail:                          yes
ipv4.dad-timeout:                       -1 (default)
...

[root@rac-node1 ~]# nmcli dev status
DEVICE      TYPE      STATE      CONNECTION
virbr0      bridge    connected  virbr0
ens33       ethernet  connected  ens33
ens38       ethernet  connected  ens38
lo          loopback  unmanaged  --
virbr0-nic  tun       unmanaged  --

[root@rac-node1 ~]# nmcli dev show ens33
GENERAL.DEVICE:                         ens33
GENERAL.TYPE:                           ethernet
GENERAL.HWADDR:                         00:0C:29:27:74:A9
GENERAL.MTU:                            1500
GENERAL.STATE:                          100 (connected)
GENERAL.CONNECTION:                     ens33
GENERAL.CON-PATH:                       /org/freedesktop/NetworkManager/ActiveConnection/8
WIRED-PROPERTIES.CARRIER:               on
IP4.ADDRESS[1]:                         192.168.88.100/24
IP4.GATEWAY:                            192.168.88.254
IP6.ADDRESS[1]:                         fe80::5022:3ef6:26a:e13e/64
IP6.GATEWAY:                            --

[root@localhost ~]# nmcli con mod ens33 ipv4.method manual ipv4.addr "192.168.88.100/24" ipv4.gateway "192.168.88.254"
[root@localhost ~]# nmcli con mod ens33 connection.autoconnect yes
[root@localhost ~]# nmcli con up ens33
Connection successfully activated (D-Bus active path: /org/freedesktop/NetworkManager/ActiveConnection/4)

[root@localhost ~]# nmcli con add con-name ens38 type ethernet ifname ens38 ipv4.addr "192.168.112.100/24" ipv4.method manual
Connection 'ens38' (bd25026a-0424-4f57-82d5-1799d33500a8) successfully added.
[root@localhost ~]# nmcli con mod ens38 connection.autoconnect yes
[root@localhost ~]# nmcli con up ens38
Connection successfully activated (D-Bus active path: /org/freedesktop/NetworkManager/ActiveConnection/11)
使用nmc1i配置网络
| 命令 | 用途 |
|---|---|
| nmcli dev status | 列出所有设备。 |
| nmcli con show | 列出所有连接。 |
| nmcli con up "<ID>" | 激活连接。 |
| nmcli con down "<ID>" | 取消激活连接。如果自动重新连接为是,则该连接将重新启动。 |
| nmcli dev dis <DEV> | 中断接口,并且暂时禁用自动连接。 |
| nmcli net off | 禁用所有管理的接口。 |
| nmcli con add ... | 添加新连接。 |
| nmcli con mod "<ID>" ... | 修改连接。 |
| nmcli con del "<ID>" | 删除连接。 |
使用hostnamectl配置主机名
可以在/etc/hostname文件中指定静态主机名。hostnamectl命令用于修改此文件,也可用于查看系统的完全限定主机名的状态。如果此文件不存在,则主机名在接口被分配了IP地址时由反向DNS查询设定。
[root@localhost ~]# hostnamectl set-hostname rac-node1
[root@localhost ~]# hostnamectl status
   Static hostname: rac-node1
         Icon name: computer-vm
           Chassis: vm
        Machine ID: a193e7903a0342eb99e5f1976dacafa8
           Boot ID: 3a5f1093fb0441d1b62d4c910fcce6ac
    Virtualization: vmware
  Operating System: Red Hat Enterprise Linux Server 7.4 (Maipo)
       CPE OS Name: cpe:/o:redhat:enterprise_linux:7.4:GA:server
            Kernel: Linux 3.10.0-693.el7.x86_64
      Architecture: x86-64
重要
静态主机名存储在/etc/hostname中。以前的Red Hat Enterprise Linux 版本将主机名作为变量存储在/etc/sysconfig/network文件中。
使用FIREWALLD限制网络通信
Linux内核包含一个强大的网络过滤子系统netfilter。netfilter子系统允许内核模块对遍历系统的每个数据包进行检查。这表示在任何传入、传出或转发的网络数据包到达用户空间中的组件之前,都可以通过编程方式检查、修改、丢弃或拒绝这些数据包。这是在Red Hat Enterprise Linux7计算机上构建防火墙的主要构建块
尽管系统管理员理论上可以编写自己的内核模块以与netfilter交互,但通常不会这样做。取而代之,会使用其他程序来与netfilter交互。这些程序中,最常见和最知名的是iptables。在先前的Red Hat Enterprise Linux 版本中,iptables是与内核netfilter子系统交互的主要方法。
iptables 命令是一个低级工具,使用该工具正确管理防火墙可能具有挑战性。此外,它仅能调整IPv4防火墙规则。为保证更完整的防火墙覆盖率,需要使用其他实用程序,例如用于IPv6的ip6tables和用于软件桥的ebtables。
Netfilter 概念
与netfilter交互
使用FIREWALLD限制网络通信
Red Hat Enterprise Linux 7 中引入了一种与netfilter交互的新方法:firewalld。firewalld是一个可以配置和监控系统防火墙规则的系统守护进程。应用可以通过DBus消息系统与firewalld通信以请求打开端口,此功能可以禁用或锁定。该守护进程不仅涵盖IPv4、IPv6,还可能涵盖ebtables设置。firewalld守护进程从firewalld软件包安装。此软件包属于base安装的一部分,但不属于minimal安装的一部分。
firewalld将所有网络流量分为多个区域,从而简化防火墙管理。根据数据包源IP地址或传入网络接口等条件,流量将转入相应区域的防火墙规则。每个区域都可以具有自己的要打开或关闭的端口和服务列表。
firewalld简介
使用FIREWALLD限制网络通信
对于传入系统的每个数据包,将首先检查其源地址。如果该源地址关联到特定区域,则将分析该区域的规则。如果该源地址未关联到某个区域,则将使用传入网络接口的区域。
如果出于某种原因,网络接口未与某个区域关联,则将使用默认区域。默认区域本身不是一个单独的区域;它是其他区域中的一个。默认情况下会使用public区域,但系统管理员可以更改此默认值。
firewalld简介
使用FIREWALLD限制网络通信
firewalld预定义区域
| 区域名称 | 默认配置 |
|---|---|
| trusted | 允许所有传入流量。 |
| home | 除非与传出流量相关,或与ssh、mdns、ipp-client、samba-client或dhcpv6-client预定义服务匹配,否则拒绝传入流量。 |
| internal | 除非与传出流量相关,或与ssh、mdns、ipp-client、samba-client或dhcpv6-client预定义服务匹配,否则拒绝传入流量(一开始与home区域相同)。 |
| work | 除非与传出流量相关,或与ssh、ipp-client或dhcpv6-client 预定义服务匹配,否则拒绝传入流量。 |
| public | 除非与传出流量相关,或与ssh或dhcpv6-client预定义服务匹配,否则拒绝传入流量。新添加的网络接口的默认区域。 |
| external | 除非与传出流量相关,或与ssh预定义服务匹配,否则拒绝传入流量。通过此区域转发的IPv4传出流量将进行伪装,以使其看起来像是来自传出网络接口的IPv4地址。 |
| dmz | 除非与传出流量相关,或与ssh预定义服务匹配,否则拒绝传入流量。 |
| block | 除非与传出流量相关,否则拒绝所有传入流量。 |
| drop | 除非与传出流量相关,否则丢弃所有传入流量(甚至不产生包含ICMP错误的响应)。 |
使用FIREWALLD限制网络通信
firewalld预定义服务节选
| 服务名称 | 配置 |
|---|---|
| ssh | 本地SSH服务器。到22/tcp的流量。 |
| dhcpv6-client | 本地DHCPv6客户端。到fe80::/64 IPv6网络中546/udp的流量 |
| ipp-client | 本地IPP打印。到631/udp的流量。 |
| samba-client | 本地Windows文件和打印共享客户端。到137/udp和138/udp的流量 |
| mdns | 多播DNS(mDNS)本地链路名称解析。到5353/udp指向224.0.0.251 (IPv4)或ff02::fb(IPv6)多播地址的流量。 |
使用FIREWALLD限制网络通信
系统管理员可通过三种主要方式与firewalld交互:
- 直接编辑/etc/firewalld/中的配置文件
- 使用firewall-config图形工具
- 从命令行使用firewall-cmd
配置防火墙设置
使用FIREWALLD限制网络通信
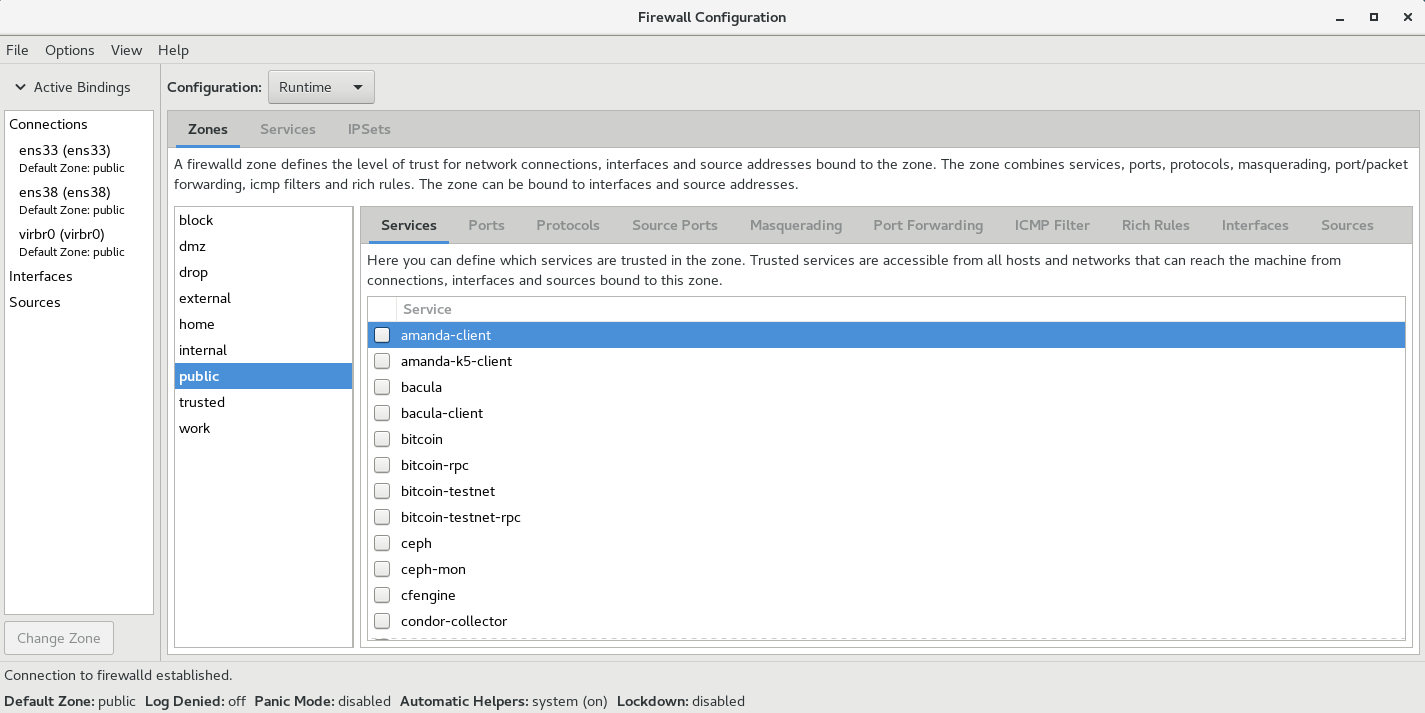
firewall-config图形工具
使用FIREWALLD限制网络通信
firewall-cmd命令行配置防火墙
对于更喜欢在命令行中操作或是出于某种原因无法使用图形环境的系统管理员,还有一个命令行客户端可以与firewalld交互,即firewall-cmd。
firewall-cmd作为主firewalld软件包的一部分安装。firewall-cmd可以执行firewall-config能够执行的相同操作。
使用FIREWALLD限制网络通信
firewall-cmd命令行配置防火墙
对于更喜欢在命令行中操作或是出于某种原因无法使用图形环境的系统管理员,还有一个命令行客户端可以与firewalld交互,即firewall-cmd。
firewall-cmd作为主firewalld软件包的一部分安装。firewall-cmd可以执行firewall-config能够执行的相同操作。
使用FIREWALLD限制网络通信
下表列出一些常用firewall-cmd命令及其说明。请注意,除非另有指定,否则几乎所有命令都作用于运行时配置,当指定--permanent选项时除外。列出的许多命令都采用--zone=<ZONE>选项来确定所影响的区域。
| firewall-cmd命令 | 说明 |
|---|---|
| --get-default-zone | 查询当前默认区域。 |
| --set-default-zone=<ZONE> | 设置默认区域。此命令会同时更改运行时配置和永久配置。 |
| --get-zones | 列出所有可用区域。 |
| --get-active-zones | 列出当前正在使用的所有区域(具有关联的接口或源)及其接口和源信息。 |
| --add-source=<CIDR> [--zone=<ZONE>] | 将来自IP地址或网络/子网掩码<CIDR>的所有流量路由到指定区域。如果未提供--zone=选项,则将使用默认区域。 |
| --remove-source=<CIDR> [--zone=<ZONE>] | 从指定区域中删除用于路由来自IP地址或网络/子网掩码<CIDR>的所有流量的规则。如果未提供--zone=选项,则将使用默认区域 |
使用FIREWALLD限制网络通信
| firewall-cmd命令 | 说明 |
|---|---|
| --add-interface=<INTERFACE> [--zone=<ZONE>] | 将来自<INTERFACE>的所有流量路由到指定区域。如果未提供--zone=选项,则将使用默认区域 |
| --change-interface=<INTERFACE> [--zone=<ZONE>] | 将接口与<ZONE>而非其当前区域关联。如果未提供--zone=选项,则将使用默认区域 |
| --list-all [--zone=<ZONE>] | 列出<ZONE>的所有已配置接口、源服务和端口。如果未提供--zone=选项,则将使用默认区域 |
| --list-all-zones | 检索所有区域的所有信息。(接口、源、端口、服务等) |
| --add-service=<SERVICE> [--zone=<ZONE>] | 允许到<SERVICE>的流量。如果未提供--zone=选项,则将使用默认区域 |
| --add-port=<PORT/PROTOCOL> [--zone=<ZONE>] | 允许到<PORT/PROTOCOL>端口的流量如果未提供--zone=选项,则将使用默认区域 |
| --remove-service=<SERVICE> [--zone=<ZONE>] | 从区域的允许列表中删除<SERVICE>。如果未提供--zone=选项,则将使用默认区域 |
| --remove-port=<PORT/PROTOCOL> [--zone=<ZONE>] | 从区域的允许列表中删除<PORT/PROTOCOL>端口。如果未提供zone=选项,则将使用默认区域 |
| --reload | 丢弃运行时配置并应用持久配置 |
使用FIREWALLD限制网络通信
firewalld配置文件存储在两个位置:/etc/firewalld和/usr/lib/firewalld。如果相同名称的配置文件同时存储在两个位置中,则将使用/etc/firewalld/中的版本。这允许管理员覆盖默认区域和设置,而不必担心其更改被软件包更新所擦除。
firewalld配置文件
使用FIREWALLD限制网络通信
富规则
firewalld富规则为管理员提供了一种表达性语言,通过这种语言可表达firewalld的基本语法中未涵盖的自定义防火墙规则;例如,仅允许从单个IP地址(而非通过某个区域路由的所有IP地址)连接到服务。
富规则可用于表达基本的允许/拒绝规则,但是也可以用于配置记录(面向syslog和auditd)以及端口转发、伪装和速率限制。
参考:firewalld.richlanguage(5) man page
General rule structure

           rule
             [source]
             [destination]
             service|port|protocol|icmp-block|icmp-type|masquerade|forward-port|source-port
             [log]
             [audit]
             [accept|reject|drop|mark]

   Rule
           rule [family="ipv4|ipv6"]

       If the rule family is provided, it can be either "ipv4" or "ipv6",
       which limits the rule to IPv4 or IPv6. If the rule family is not
       provided, the rule will be added for IPv4 and IPv6. If source or
       destination addresses are used in a rule, then the rule family need to
       be provided. This is also the case for port/packet forwarding.

   Source
           source [not] address="address[/mask]"|mac="mac-address"|ipset="ipset"

       With the source address the origin of a connection attempt can be
       limited to the source address. An address is either a single IP
       address, or a network IP address, a MAC address or an IPSet. The
       address has to match the rule family (IPv4/IPv6). Subnet mask is
       expressed in either dot-decimal (/x.x.x.x) or prefix (/x) notations for
       IPv4, and in prefix notation (/x) for IPv6 network addresses. It is
       possible to invert the sense of an address by adding not before
       address. All but the specified address will match then.

   Destination
           destination [not] address="address[/mask]"

       With the destination address the target can be limited to the
       destination address. The destination address is using the same syntax
       as the source address.

       The use of source and destination addresses is optional and the use of
       a destination addresses is not possible with all elements. This depends
       on the use of destination addresses for example in service entries.

   Service
           service name="service name"

       The service service name will be added to the rule. The service name is
       one of the firewalld provided services. To get a list of the supported
       services, use firewall-cmd --get-services.

       If a service provides a destination address, it will conflict with a
       destination address in the rule and will result in an error. The
       services using destination addresses internally are mostly services
       using multicast.

   Port
           port port="port value" protocol="tcp|udp"

       The port port value can either be a single port number portid or a port
       range portid-portid. The protocol can either be tcp or udp.

   Protocol
           protocol value="protocol value"

       The protocol value can be either a protocol id number or a protocol
       name. For allowed protocol entries, please have a look at
       /etc/protocols.

   ICMP-Block
           icmp-block name="icmptype name"

       The icmptype is the one of the icmp types firewalld supports. To get a
       listing of supported icmp types: firewall-cmd --get-icmptypes

       It is not allowed to specify an action here. icmp-block uses the action
       reject internally.

   Masquerade
           masquerade

       Turn on masquerading in the rule. A source and also a destination
       address can be provided to limit masquerading to this area.

       It is not allowed to specify an action here.

   ICMP-Type
           icmp-type name="icmptype name"

       The icmptype is the one of the icmp types firewalld supports. To get a
       listing of supported icmp types: firewall-cmd --get-icmptypes

   Forward-Port
           forward-port port="port value" protocol="tcp|udp" to-port="port value" to-addr="address"

       Forward port/packets from local port value with protocol "tcp" or "udp"
       to either another port locally or to another machine or to another port
       on another machine.

       The port value can either be a single port number or a port range
       portid-portid. The to-addr is an IP address.

       It is not allowed to specify an action here. forward-port uses the
       action accept internally.

   Source-Port
           source-port port="port value" protocol="tcp|udp"

       The source-port port value can either be a single port number portid or
       a port range portid-portid. The protocol can either be tcp or udp.

   Log
           log [prefix="prefix text"] [level="log level"] [limit value="rate/duration"]

       Log new connection attempts to the rule with kernel logging for example
       in syslog. You can define a prefix text that will be added to the log
       message as a prefix. Log level can be one of "emerg", "alert", "crit",
       "error", "warning", "notice", "info" or "debug", where default (i.e. if
       there's no one specified) is "warning". See syslog(3) for description
       of levels. See Limit section for description of limit tag.

   Audit
           audit [limit value="rate/duration"]

       Audit provides an alternative way for logging using audit records sent
       to the service auditd. Audit type will be discovered from the rule
       action automatically. Use of audit is optional. See Limit section for
       description of limit tag.

   Action
       An action can be one of accept, reject, drop or mark.

       The rule can either contain an element or also a source only. If the
       rule contains an element, then new connection matching the element will
       be handled with the action. If the rule does not contain an element,
       then everything from the source address will be handled with the
       action.

           accept [limit value="rate/duration"]

           reject [type="reject type"] [limit value="rate/duration"]

           drop [limit value="rate/duration"]

           mark set="mark[/mask]" [limit value="rate/duration"]

       With accept all new connection attempts will be granted. With reject
       they will not be accepted and their source will get a reject ICMP(v6)
       message. The reject type can be set to specify appropriate ICMP(v6)
       error message. For valid reject types see --reject-with type in
       iptables-extensions(8) man page. Because reject types are different for
       IPv4 and IPv6 you have to specify rule family when using reject type.
       With drop all packets will be dropped immediately, there is no
       information sent to the source. With mark all packets will be marked in
       the PREROUTING chain in the mangle table with the mark and mask
       combination. See Limit section for description of limit tag.

   Limit
           limit value="rate/duration"

       It is possible to limit Log, Audit and Action. A rule using this tag
       will match until this limit is reached. The rate is a natural positive
       number [1, ..] The duration is of "s", "m", "h", "d". "s" means
       seconds, "m" minutes, "h" hours and "d" days. Maximum limit value is
       "2/d", which means at maximum two matches per day.

   Example 1
       Enable new IPv4 and IPv6 connections for protocol 'ah'

           rule protocol value="ah" accept

   Example 2
       Allow new IPv4 and IPv6 connections for service ftp and log 1 per
       minute using audit

           rule service name="ftp" log limit value="1/m" audit accept

   Example 3
       Allow new IPv4 connections from address 192.168.0.0/24 for service tftp
       and log 1 per minutes using syslog

           rule family="ipv4" source address="192.168.0.0/24" service name="tftp" log prefix="tftp" level="info" limit value="1/m" accept

   Example 4
       New IPv6 connections from 1:2:3:4:6:: to service radius are all
       rejected and logged at a rate of 3 per minute. New IPv6 connections
       from other sources are accepted.

           rule family="ipv6" source address="1:2:3:4:6::" service name="radius" log prefix="dns" level="info" limit value="3/m" reject
           rule family="ipv6" service name="radius" accept

   Example 5
       Forward IPv6 port/packets receiving from 1:2:3:4:6:: on port 4011 with
       protocol tcp to 1::2:3:4:7 on port 4012

           rule family="ipv6" source address="1:2:3:4:6::" forward-port to-addr="1::2:3:4:7" to-port="4012" protocol="tcp" port="4011"

   Example 6
       White-list source address to allow all connections from 192.168.2.2

           rule family="ipv4" source address="192.168.2.2" accept

   Example 7
       Black-list source address to reject all connections from 192.168.2.3

           rule family="ipv4" source address="192.168.2.3" reject type="icmp-admin-prohibited"

   Example 8
       Black-list source address to drop all connections from 192.168.2.4

           rule family="ipv4" source address="192.168.2.4" drop
使用FIREWALLD限制网络通信
使用富规则
firewall-cmd有四个选项可用于处理富规则。所有这些选项都可以与常规的--permanent或--zone=<ZONE>选项组合使用。
| 选项 | 说明 |
|---|---|
| --add-rich-rule='<RULE>' | 向指定区域中添加<RULE>,如果未指定区域,则向默认区域中添加。 |
| --remove-rich-rule='<RULE>' | 从指定区域中删除<RULE>,如果未指定区域,则从默认区域中删除。 |
| --query-rich-rule='<RULE>' | 查询<RULE>是否已添加到指定区域,如果未指定区域,则为默认区域。如果规则存在,则返回0,否则返回1。 |
| --list-rich-rules | 输出指定区域的所有富规则,如果未指定区域,则为默认区域。 |
使用FIREWALLD限制网络通信
使用富规则示例
[rootoserverX ~]# firewall-cmd --permanent --zone=classroom --add-rich-rule='rule family=ipv4 source address=192.168.0.11/32 reject"

[rootoserverX ~]# firewall-cmd --add-rich-rule='rule service name=ftp limit value=2/m accept'

[rooteserverX ~]# firewa1l-cmd --permanent --add-rich-rule='rule protocol value=esp drop'
注意
reject与drop之间的区别在于,reject将发送回一个ICMP包,详细描述连接被拒绝以及原因。drop只是丢弃包,不进行任何其他操作。通常,管理员希望对于友好和中立网络使用reject,而仅对恶意网络使用drop。
使用FIREWALLD限制网络通信
使用富规则进行记录
调试或监控防火墙时,记录已接受或已拒绝的连接很有用。firewalld可以通过两种方法来实现此目的:记录到syslog,或者将消息发送到由auditd管理的内核audit子系统。
在这两种情况下,记录可能会受到速率限制。速率限制确保系统日志文件填充消息的速率不会使系统无法跟上或者填充其所有磁盘空间。
syslog基本语法:
log [prefix="<PREFIX TEXT>"] [level=<LOGLEVEL>] [limit value="<RATE/DURATION>"]
audit基本语法:
audit [limit value="<RATE/DURATION>"]
使用FIREWALLD限制网络通信
使用富规则进行记录示例
[root@serverX ~]# firewall-cmd --permanent --zone=work --add-rich-rule='rule service name="ssh" 1og prefix="ssh " level="notice" limit value="3/m" accept'

[root@serverX ~]# firewall-cmd --add-rich-rule='rule family=ipv6 source address="2001:db8::/64" service name="dns" audit limit value="1/h" reject'--timeout=300
使用FIREWALLD限制网络通信
直接规则
直接规则允许管理员将手动编码的{ip,ip6,eb}tables规则插入到firewalld管理的区域中。尽管这些规则很强大,并且暴露的内核netfilter子系统功能不会通过其他手段暴露,但可能难以管理。直接规则所提供的灵活性也低于标准规则和富规则。
参考:firewalld.direct(5) man page

回顾磁盘分区和挂载文件系统
磁盘分区可以将硬盘驱动器划分为多个逻辑存储单元,这些单元称为分区。
回顾磁盘分区
主启动记录(MBR)分区方案指定了在运行BIOS固件的系统上应如何对磁盘进行分区。此方案支持最多四个主分区。在Linux系统上,管理员可以使用扩展分区和逻辑分区来创建最多15个分区。由于分区大小数据以32位值存储,使用MBR方案分区时,最大磁盘和分区大小限制为2 TiB。
对于运行统一可扩展固件接口(UEFI)固件的系统,GPT是在物理硬盘上布置分区表的标准。GPT是UEFI标准的一部分,可以解决原有基于MBR的方案所带来的许多限制。根据UEFI规范,GPT默认情况下支持最多128个分区。MBR使用32位来存储逻辑块地址和大小信息;与此不同,GPT为逻辑块地址分配64位。这就使得GPT 可支持最多8泽字节(ZiB),即80亿太字节的分区和磁盘。
MBR
GPT
除解决MBR分区方案的限制以外,GPT 还可提供一些其他功能特性和优势。正如其名,GPT使用128位GUID 来唯一识别每个磁盘和分区。与MBR存在单一故障点不同,GPT提供分区表信息的冗余。主GPT位于磁盘头部,而备份副本(次要GPT)位于磁盘尾部。此外,GPT采用CRC校验和来检测GPT头和分区表中的错误与损坏。
回顾磁盘分区和挂载文件系统
磁盘分区可以将硬盘驱动器划分为多个逻辑存储单元,这些单元称为分区。
回顾磁盘分区
使用fdisk管理
MBR
GPT
使用gdisk管理
[root@localhost ~]# fdisk /dev/sdb
Device contains neither a valid DOS partition table, nor Sun, SGI or OSF disklabel
Building a new DOS disklabel with disk identifier 0x8c2e8e16.
Changes will remain in memory only, until you decide to write them.
After that, of course, the previous content won't be recoverable.

Warning: invalid flag 0x0000 of partition table 4 will be corrected by w(rite)

WARNING: DOS-compatible mode is deprecated. It's strongly recommended to
         switch off the mode (command 'c') and change display units to
         sectors (command 'u').

Command (m for help): p

Disk /dev/sdb: 451.0 GB, 450971566080 bytes
255 heads, 63 sectors/track, 54827 cylinders
Units = cylinders of 16065 * 512 = 8225280 bytes
Sector size (logical/physical): 512 bytes / 512 bytes
I/O size (minimum/optimal): 512 bytes / 512 bytes
Disk identifier: 0x8c2e8e16

   Device Boot      Start         End      Blocks   Id  System

Command (m for help): n
Command action
   e   extended
   p   primary partition (1-4)
p
Partition number (1-4): 1
First cylinder (1-54827, default 1):
Using default value 1
Last cylinder, +cylinders or +size{K,M,G} (1-54827, default 54827):
Using default value 54827

Command (m for help): t
Selected partition 1
Hex code (type L to list codes): 8e
Changed system type of partition 1 to 8e (Linux LVM)

Command (m for help): w
The partition table has been altered!

Calling ioctl() to re-read partition table.
Syncing disks.

Syncing disks.
[root@localhost ~]# partprobe
[root@serverX ~]# gdisk /dev/vdb
GPT fdisk (gdisk) version 0.8.6
Partition table scan:
MBR: not present
BSD: not present
APM: not present
GPT: not present
Creating new GPT entries.
Command(? for help): n
Partition number (1-128, default 1): 1
First sector (34-20971486, default = 2048) or (+-)size (KMGTP): 2048
Last sector (2048-20971486, default = 20971486) or +-] size (KMGTP): 1050623
Last sector (2048-20971486, default = 20971486) or (+-] size (KMGTP): +512M
Last sector (2048-20971486, default = 20971486) or (+-) size (KMGTP): -512M
Current type is 'Linux filesystem'
Hex code or GUID (L to show codes, Enter = 8300): 8e00
Changed type of partition to 'Linux LVM'
Command (? for help): w
Final checks complete. About to write GPT data. THIS WILL OVERWRITE EXISTING PARTITIONS!!
Do you want to proceed? (Y/N): y
OK; writing new GUID partition table (GPT) to /dev/vdb.
The operation has completed successfully.
[root@serverX ~]# partprobe /dev/vdb
[root@serverX ~]# gdisk /dev/vdb
GPT fdisk (gdisk) version 0.8.6
Partition table scan:
MBR: not present
BSD: not present
APM: not present
GPT: not present
Creating new GPT entries.
Command (? for help): p
Disk /dev/vdb: 20971520 sectors, 10.0 GiB
Logical sector size: 512 bytes
Disk identifier (GUID) : 8B181B97-5259-4C8F-8825-1A973B8FA553
Partition table holds up to 128 entries
First usable sector is 34, last usable sector is 20971486
Partitions will be aligned on 2048-sector boundaries
Total free space is 19922877 sectors (9.5 GiB)
Number Start (sector) End (sector) Size Code Name
1 2048 1050623 512.0 MiB 8E00 Linux LVM
Command (? for help): d
Using 1
Command (? for help): w
Final checks complete. About to write GPT data. THIS WILL OVERWRITE EXISTING PARTITIONS!!
Do you want to proceed? (Y/N): y
OK; writing new GUID partition table (GPT) to /dev/vdb.
The operation has completed successfully.
[root@serverX ~]# partprobe /dev/vdb回顾磁盘分区和挂载文件系统
mkfs命令可用于为块设备应用文件系统
mkfs -t xfs /dev/vdb1
手动挂载文件系统
mount /dev/vdb1 /mnt
查看当前已挂载的文件系统、挂载点和选项
mount | grep vdb1
/dev/vdb1 on /mnt type xfs (rw,relatime, seclabel,attr2, inode64, noquota)
回顾创建和挂载文件系统
回顾磁盘分区和挂载文件系统
永久挂载文件系统
通过将设备的列表添加到/etc/fstab文件中,管理员可以将设备配置为在系统启动时挂载到挂载点。
回顾创建和挂载文件系统
[root@rac-node2 ~]# cat /etc/fstab

#
# /etc/fstab
# Created by anaconda on Thu Apr 21 15:01:52 2022
#
# Accessible filesystems, by reference, are maintained under '/dev/disk'
# See man pages fstab(5), findfs(8), mount(8) and/or blkid(8) for more info
#
/dev/mapper/rhel-root   /                       xfs     defaults        0 0
UUID=a2175aef-371f-48b1-9d0d-8ce357466864 /boot                   xfs     defaults        0 0
/dev/mapper/rhel-u01    /u01                    xfs     defaults        0 0
/dev/mapper/rhel-swap   swap                    swap    defaults        0 0
第一个字段指定要使用的设备,可以使用UUID或者设备路径指定设备
第二个字段是设备应连接到目录层次结构中的挂载点
第三个字段包含已应用于块设备的文件系统类型
第四个字段是挂载时应该应用于设备以便自定义行为的选项列表。此字段是必需的,且有一组称为defaults的常用选项。其他选项记录在mount man page中。
最后两个字段是转储标志和fsck顺序
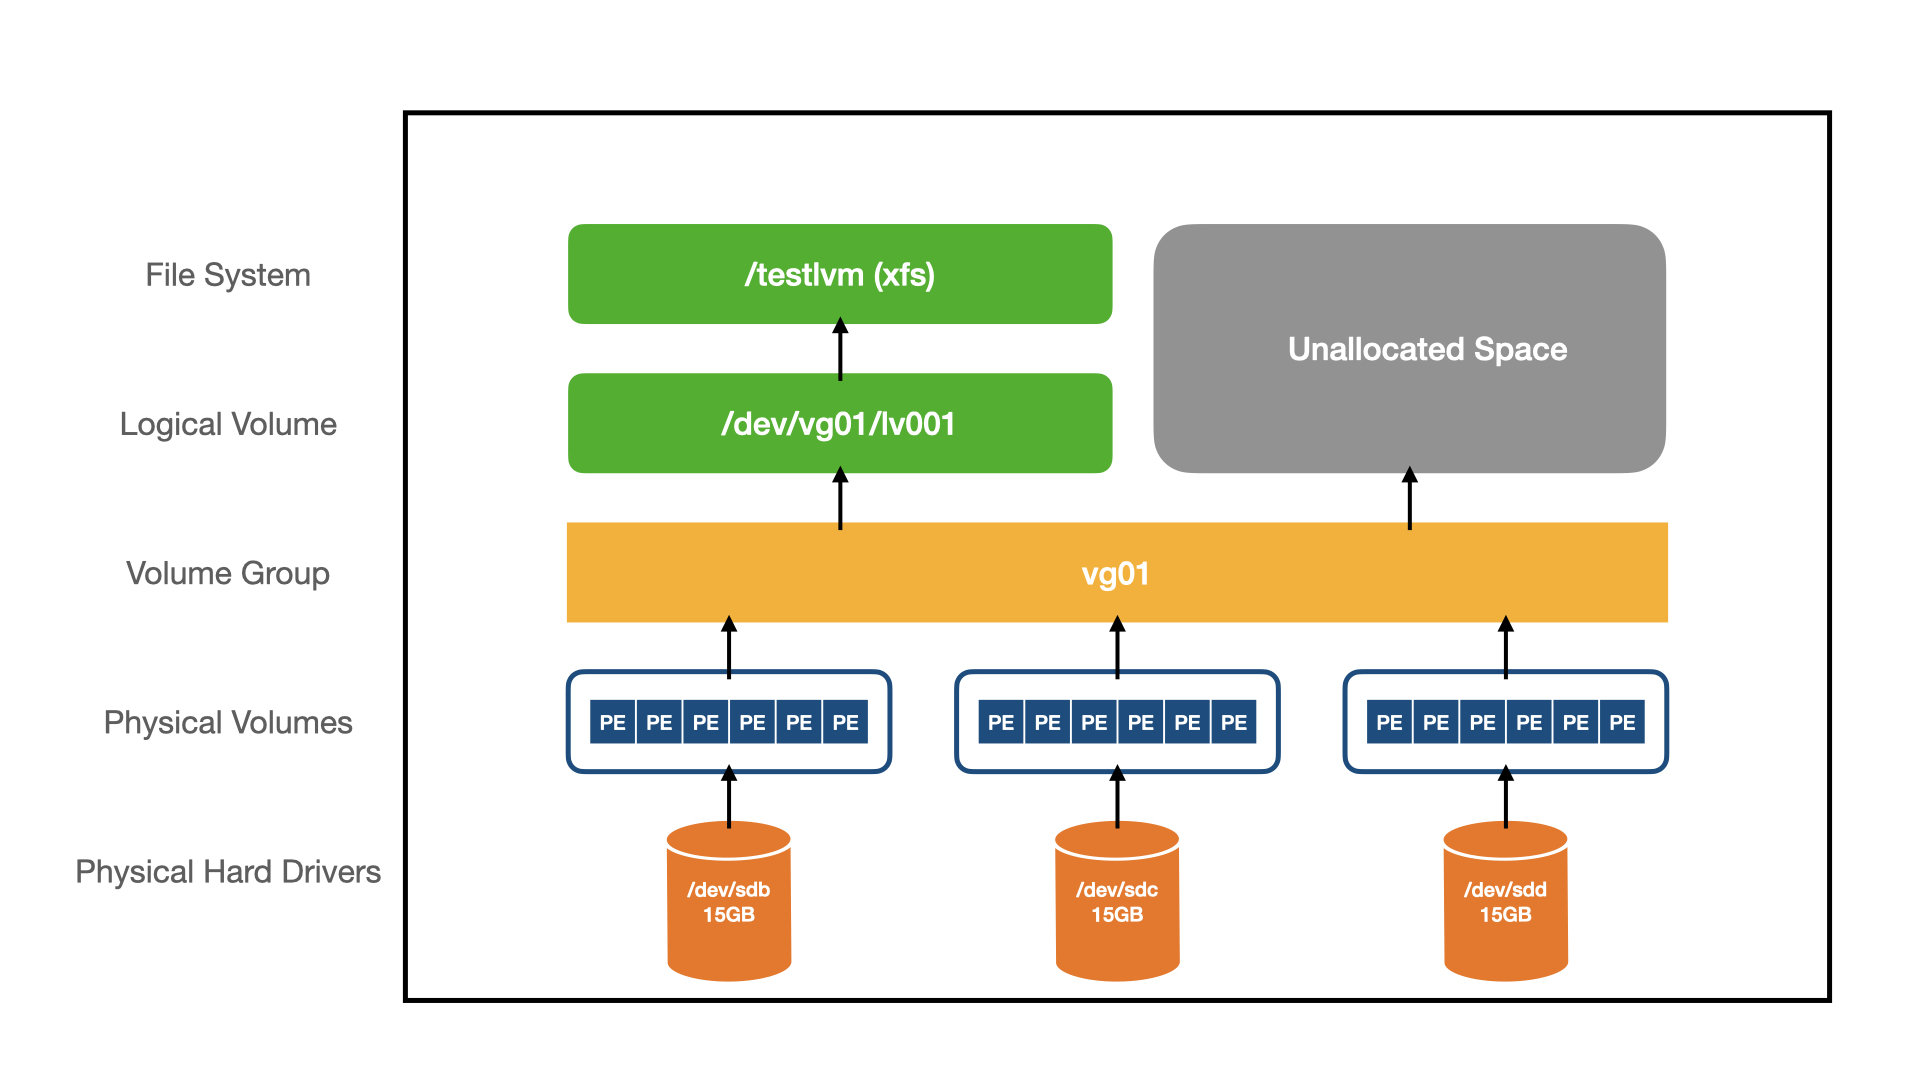
使用LVM配置存储
- 物理设备是用于保留逻辑卷中所存储数据的存储设备。它们是块设备,可以是磁盘分区、整个磁盘、RAID阵列或SAN磁盘。设备必须初始化为LVM物理卷,才能与LVM结合使用。整个“设备”将用作一个物理卷。
- 物理卷(PV)用于注册基础物理设备以便在卷组中使用。LVM自动将PV划分为物理区块(PE);它们是充当PV上最小存储块的小块数据。
- 卷组(VG)是存储池,由一个或多个物理卷组成。一个PV只能分配给一个VG。VG可以包含未使用的空间和任意数目的逻辑卷。
- 逻辑卷(LV)根据卷组中的空闲物理范围创建,提供应用、用户和操作系统所使用的“存储”设备。LV是逻辑区块(LE)的集合,LE映射到物理区块(PV的最小存储块)。默认情况下,每个LE将映射到一个PE。设置特定LV选项将会更改此映射;例如,镜像会导致每个LE映射到两个PE。
LVM概念
使用LVM配置存储
- 分区名称通常具有系统名称,例如 /dev/sda1。LVM 具有便于人们理解的名称,例如 home 或者 media。
- 分区的总大小受底层物理磁盘大小的限制。在 LVM 中,卷可以跨越多个磁盘,并且仅受 LVM 中所有物理磁盘总大小的限制。
- 分区通常只有在磁盘未使用且已卸载时才能调整大小、移动或删除。LVM 卷可以在系统运行时进行操作。
- 只能通过分配与分区相邻的可用空间来扩展分区。LVM 卷可以从任何地方占用可用空间。
- 扩展分区涉及移动数据以腾出可用空间,这非常耗时,并且可能会在断电期间导致数据丢失。LVM 卷可以从卷组中的任何地方占用可用空间,甚至可以在另一块磁盘上。
- 因为在 LVM 中创建卷非常容易,所以它鼓励创建不同的卷,例如创建单独的卷来测试功能或尝试不同的操作系统。对于分区,此过程将非常耗时并且容易出错。
- 快照只能在 LVM 中创建。它允许你创建当前逻辑卷的时间点镜像,即使在系统运行时也可以。这非常适合备份。
LVM特性
使用LVM配置存储
LVM配置存储示例
[root@localhost ~]# fdisk /dev/sdb
Device contains neither a valid DOS partition table, nor Sun, SGI or OSF disklabel
Building a new DOS disklabel with disk identifier 0x8c2e8e16.
Changes will remain in memory only, until you decide to write them.
After that, of course, the previous content won't be recoverable.

Warning: invalid flag 0x0000 of partition table 4 will be corrected by w(rite)

WARNING: DOS-compatible mode is deprecated. It's strongly recommended to
         switch off the mode (command 'c') and change display units to
         sectors (command 'u').

Command (m for help): p

Disk /dev/sdb: 451.0 GB, 450971566080 bytes
255 heads, 63 sectors/track, 54827 cylinders
Units = cylinders of 16065 * 512 = 8225280 bytes
Sector size (logical/physical): 512 bytes / 512 bytes
I/O size (minimum/optimal): 512 bytes / 512 bytes
Disk identifier: 0x8c2e8e16

   Device Boot      Start         End      Blocks   Id  System

Command (m for help): n
Command action
   e   extended
   p   primary partition (1-4)
p
Partition number (1-4): 1
First cylinder (1-54827, default 1):
Using default value 1
Last cylinder, +cylinders or +size{K,M,G} (1-54827, default 54827):
Using default value 54827

Command (m for help): t
Selected partition 1
Hex code (type L to list codes): 8e
Changed system type of partition 1 to 8e (Linux LVM)

Command (m for help): w
The partition table has been altered!

Calling ioctl() to re-read partition table.
Syncing disks.

Syncing disks.
[root@localhost ~]# partprobe
Warning: WARNING: the kernel failed to re-read the partition table on /dev/sda (Device or resource busy).  As a result, it may not reflect all of your changes until after reboot.
[root@localhost ~]#
[root@localhost ~]#
[root@localhost ~]# pvcreate /dev/sdb1
  Physical volume "/dev/sdb1" successfully created
[root@localhost ~]# pvs
  PV         VG     Fmt  Attr PSize   PFree
  /dev/sda2  rootvg lvm2 a--u  79.80g   3.80g
  /dev/sdb1         lvm2 ---- 420.00g 420.00g
[root@localhost ~]# vgs
  VG     #PV #LV #SN Attr   VSize  VFree
  rootvg   1   7   0 wz--n- 79.80g 3.80g
[root@localhost ~]# vgextend rootvg /dev/sdb1
  Volume group "rootvg" successfully extended
[root@localhost ~]# vgs
  VG     #PV #LV #SN Attr   VSize   VFree
  rootvg   2   7   0 wz--n- 499.79g 423.79g

扩容swap

[root@localhost ~]# lvs
  LV      VG     Attr       LSize  Pool Origin Data%  Meta%  Move Log Cpy%Sync Convert
  lv_home rootvg -wi-ao---- 10.00g
  lv_opt  rootvg -wi-ao---- 10.00g
  lv_root rootvg -wi-ao---- 10.00g
  lv_swap rootvg -wi-ao---- 16.00g
  lv_tmp  rootvg -wi-ao---- 10.00g
  lv_usr  rootvg -wi-ao---- 10.00g
  lv_var  rootvg -wi-ao---- 10.00g
[root@localhost ~]# swapoff -v /dev/rootvg/lv_swap
swapoff on /dev/rootvg/lv_swap
[root@localhost ~]# lvextend -L 32G /dev/rootvg/lv_swap
  Size of logical volume rootvg/lv_swap changed from 16.00 GiB (4096 extents) to 32.00 GiB (8192 extents).
  Logical volume lv_swap successfully resized.
[root@localhost ~]# mkswap /dev/rootvg/lv_swap
mkswap: /dev/rootvg/lv_swap: warning: dont erase bootbits sectors
        on whole disk. Use -f to force.
Setting up swapspace version 1, size = 33554428 KiB
no label, UUID=57dca5fb-4350-4367-83ef-36f4d863a990
[root@localhost ~]#
[root@localhost ~]#
[root@localhost ~]# swapon -va
swapon on /dev/mapper/rootvg-lv_swap
swapon: /dev/mapper/rootvg-lv_swap: found swap signature: version 1, page-size 4, same byte order
swapon: /dev/mapper/rootvg-lv_swap: pagesize=4096, swapsize=34359738368, devsize=34359738368
[root@localhost ~]# lvs
  LV      VG     Attr       LSize  Pool Origin Data%  Meta%  Move Log Cpy%Sync Convert
  lv_home rootvg -wi-ao---- 10.00g
  lv_opt  rootvg -wi-ao---- 10.00g
  lv_root rootvg -wi-ao---- 10.00g
  lv_swap rootvg -wi-ao---- 32.00g
  lv_tmp  rootvg -wi-ao---- 10.00g
  lv_usr  rootvg -wi-ao---- 10.00g
  lv_var  rootvg -wi-ao---- 10.00g
[root@localhost ~]# free -m
             total       used       free     shared    buffers     cached
Mem:         31902       1129      30773          4         29        580
-/+ buffers/cache:        519      31383
Swap:        32767          0      32767

规划并创建/u01和/backup的逻辑卷

[root@localhost ~]# vgs
  VG     #PV #LV #SN Attr   VSize   VFree
  rootvg   2   7   0 wz--n- 499.79g 407.79g
[root@localhost ~]# lvcreate -n lv_ora -L 20G rootvg
  Logical volume "lv_ora" created.
[root@localhost ~]#
[root@localhost ~]# mkfs -t ext4 /dev/rootvg/lv_ora
mke2fs 1.43-WIP (20-Jun-2013)
Filesystem label=
OS type: Linux
Block size=4096 (log=2)
Fragment size=4096 (log=2)
Stride=0 blocks, Stripe width=0 blocks
1310720 inodes, 5242880 blocks
262144 blocks (5.00%) reserved for the super user
First data block=0
Maximum filesystem blocks=4294967296
160 block groups
32768 blocks per group, 32768 fragments per group
8192 inodes per group
Superblock backups stored on blocks:
	32768, 98304, 163840, 229376, 294912, 819200, 884736, 1605632, 2654208,
	4096000

Allocating group tables: done
Writing inode tables: done
Creating journal (32768 blocks): done
Writing superblocks and filesystem accounting information: done

[root@localhost ~]# lvcreate -n lv_bak -L 300G rootvg
  Logical volume "lv_bak" created.
[root@localhost ~]# mkfs -t ext4 /dev/rootvg/lv_bak
mke2fs 1.43-WIP (20-Jun-2013)
Filesystem label=
OS type: Linux
Block size=4096 (log=2)
Fragment size=4096 (log=2)
Stride=0 blocks, Stripe width=0 blocks
19660800 inodes, 78643200 blocks
3932160 blocks (5.00%) reserved for the super user
First data block=0
Maximum filesystem blocks=4294967296
2400 block groups
32768 blocks per group, 32768 fragments per group
8192 inodes per group
Superblock backups stored on blocks:
	32768, 98304, 163840, 229376, 294912, 819200, 884736, 1605632, 2654208,
	4096000, 7962624, 11239424, 20480000, 23887872, 71663616

Allocating group tables: done
Writing inode tables: done
Creating journal (32768 blocks): done
Writing superblocks and filesystem accounting information: done

[root@localhost ~]# lvextend -L +80G /dev/rootvg/lv_ora
  Size of logical volume rootvg/lv_ora changed from 20.00 GiB (5120 extents) to 100.00 GiB (25600 extents).
  Logical volume lv_ora successfully resized.
[root@localhost ~]# resize2fs /dev/rootvg/lv_ora
resize2fs 1.43-WIP (20-Jun-2013)
Resizing the filesystem on /dev/rootvg/lv_ora to 26214400 (4k) blocks.
The filesystem on /dev/rootvg/lv_ora is now 26214400 blocks long.

[root@localhost ~]# lvs
  LV      VG     Attr       LSize   Pool Origin Data%  Meta%  Move Log Cpy%Sync Convert
  lv_bak  rootvg -wi-a----- 300.00g
  lv_home rootvg -wi-ao----  10.00g
  lv_opt  rootvg -wi-ao----  10.00g
  lv_ora  rootvg -wi-a----- 100.00g
  lv_root rootvg -wi-ao----  10.00g
  lv_swap rootvg -wi-ao----  32.00g
  lv_tmp  rootvg -wi-ao----  10.00g
  lv_usr  rootvg -wi-ao----  10.00g
  lv_var  rootvg -wi-ao----  10.00g
[root@localhost ~]#
[root@localhost ~]# vgs
  VG     #PV #LV #SN Attr   VSize   VFree
  rootvg   2   9   0 wz--n- 499.79g 7.79g

[root@localhost ~]# mkdir /u01
[root@localhost ~]# mkdir /backup
[root@localhost ~]# mount -a
[root@localhost ~]# df -h
Filesystem            Size  Used Avail Use% Mounted on
/dev/mapper/rootvg-lv_root
                      9.8G  591M  8.7G   7% /
tmpfs                  16G   80K   16G   1% /dev/shm
/dev/sda1             190M   85M   92M  48% /boot
/dev/mapper/rootvg-lv_home
                      9.8G   24M  9.2G   1% /home
/dev/mapper/rootvg-lv_opt
                      9.8G   23M  9.2G   1% /opt
/dev/mapper/rootvg-lv_tmp
                      9.8G   23M  9.2G   1% /tmp
/dev/mapper/rootvg-lv_usr
                      9.8G  3.6G  5.7G  39% /usr
/dev/mapper/rootvg-lv_var
                      9.8G  163M  9.1G   2% /var
/dev/mapper/rootvg-lv_ora
                       99G   60M   94G   1% /u01
/dev/mapper/rootvg-lv_bak
                      296G   63M  281G   1% /backup
控制服务和守护进程
systemd简介
进程ID 1属于systemd这一新的init系统。
systemd 几乎可以管理正在运行的 Linux 系统的各个方面。它可以管理正在运行的服务,同时提供比SystemV 多得多的状态信息。它还管理硬件、进程和进程组、文件系统挂载等。systemd 几乎涉足于现代 Linux 操作系统的每方面,使其成为系统管理的一站式工具。
在启动阶段并行地启动尽可能多的服务,加快整个的启动速度,使得主机系统比 SystemV 更快地到达登录屏幕。
进程ID 1属于init进程。
此进程负责激活系统上的其他服务。常用的守护进程在系统启动时通过SystemV和Linux Standard Base(LSB)init脚本启动。
每个启动脚本都被编了号,以便按特定顺序启动预期的服务。服务是串行启动的,一次只能启动一个服务。
历史版本RedHat Linux
RedHat Linux 7
systemd 是所有进程之母,负责将 Linux 主机启动到可以做生产性任务的状态。
控制服务和守护进程
systemctl和systemd对象
systemctl命令用于管理各种类型的systemd对象,它们称为单元。
systemctl -t help
- 服务单元具有.service扩展名,代表系统服务。这种单元用于启动经常访问的守护进程,如web服务器。
- 套接字单元具有.socket扩展名,代表进程间通信(IPC)套接字。套接字的控制可以在建立客户端连接时传递到守护进程或新启动的服务。套接字单元用于延迟系统启动时的服务启动,或者按需启动不常使用的服务。这原则上类似于使用xinetd超级服务器按需启动的服务。
- 路径单元具有.path扩展名,用于将服务的激活推迟到特定文件系统更改发生之后。这通常用于使用假脱机目录的服务,如打印系统。
控制服务和守护进程
使用systemctl列出单元文件
查询所有单元的状态,以验证系统启动。
systemctl
仅查询服务单元的状态
systemctl --type=service
列出所有已加载单元的活动状态。也可选择限制单元类型。--all选项可加入不活动的单元。
systemctl list-units --type=service
systemctl list-units --type=service --all
查看所有单元的已启用和已禁用设置。也可选择限制单元类型。
systemctl list-unit-files --type=service
仅查看失败的服务
systemctl --failed --type=service
控制服务和守护进程
systemd目标
systemd目标是一组应在启动后达到所需状态的systemd单元。
一个systemd目标target代表一个Linux系统当前的或期望的运行状态。与SystemV启动脚本十分类似,目标定义了系统运行必须存在的服务,以及处于目标状态下必须激活的服务
| systemd 目标 | SystemV 运行级别 | 描述 |
|---|---|---|
| default.target | 这个目标通常是一个符号链接,作为multi-user.target或graphical.target的别名。systemd总是用default.target启动系统。default.target不能作为halt.target、poweroff.target和reboot.target的别名。 | |
| graphical.target | 5 | 带有GUI的multi-user.target |
| 4 | 未使用 | |
| multi-user.target | 3 | 运行所有的服务,但是只有命令行界面(CLI) |
| 2 | 多用户,没有 NFS,但是运行其他所有的非 GUI 服务 | |
| rescue.target | 1 | 一个基本的系统,包括挂载文件系统,但是只运行最基础的服务,以及一个主控制台上的用于救援的命令行解释器 |
| emergency.target | S | 单用户模式 —— 没有服务运行;文件系统没有挂载。这是最基础级的操作模式,只有一个运行在主控制台的用于紧急情况的命令行解释器,供用户和系统交互。 |
| halt.target | 不断电的情况下停止系统 | |
| reboot.target | 6 | 重启 |
| poweroff.target | 0 | 停止系统并关闭电源 |
控制服务和守护进程
查看systemd目标
查看默认目标
systemctl get-default
查看当前加载的和激活的目标
systemctl list-units --type=target
查看启动graphical.target所依赖的目标
systemctl list-dependencies graphical.target | grep target
控制服务和守护进程
设置systemd目标
更改默认目标
systemctl set-default graphical.target
切换目标
systemctl isolate default.target
控制服务和守护进程
systemctl命令摘要
| 命令 | 任务 |
|---|---|
| systemctl status UNIT | 查看有关单元状态的详细信息 |
| systemctl stop UNIT | 在运行中的系统上停止一项服务 |
| systemctl start UNIT | 在运行中的系统上启动一项服务 |
| systemctl restart UNIT | 在运行中的系统上重新启动一项服务 |
| systemctl reload UNIT | 重新加载运行中服务的配置文件 |
| systemctl mask UNIT | 彻底禁用服务,使其无法手动启动或在系统启动时启动 |
| systemctl unmask UNIT | 使屏蔽的服务变为可用 |
| systemctl enable UNIT | 将服务配置为在系统启动时启动 |
| systemctl disable UNIT | 禁止服务在系统启动时启动 |
| systemctl list-dependencies UNIT | 列出指定单元需要的单元 |
回顾旧版本
启动、停止、查看服务状态:
service NAME start|stop|status
开机是否自启动:
chkconfig NAME on|off
使用CRON设置自动任务
Red Hat Enterprise Linux系统附带了特别针对周期性作业的crond守护进程且默认开机启用并启动。crond是由多个配置文件和系统范围内的文件控制的,每个用户对应一个配置文件(使用crontab命令进行编辑)。这些配置文件使用户和管理员拥有细微的控制权可以控制应执行周期性作业的确切时间。
| 命令 | 预期用途 |
|---|---|
| crontab -l | 列出当前用户的计划任务 |
| crontab -r | 删除当前用户的所有计划任务 |
| crontab -e | 编辑当前用户的计划任务 |
| crontab -u <username> | root 可以使用选项-u <username>来管理其他用户的作业 |
使用CRON设置自动任务
| * | 表示"无关紧要"/始终 |
| 数字 | 可用于指定分钟数或小时数、日期或者工作日。(对于工作日,0表示星期日,1表示星期一、2表示星期二,依此类推。7也表示星期日。) |
| x-y | 表示范围,x到y(含) |
| x,y | 表示列表。列表也可以包含范围,例如“分钟”列中的5,10-13,17表示作业应当在每小时过去5分钟、10分钟、11分钟、12分钟、13分钟和17分钟后运行 |
| */x | 表示x的时间间隔,例如分钟列中的*/7表示每七分钟运行一次作业 |
# For details see man 4 crontabs

# Example of job definition:
# .---------------- minute (0 - 59)
# |  .------------- hour (0 - 23)
# |  |  .---------- day of month (1 - 31)
# |  |  |  .------- month (1 - 12) OR jan,feb,mar,apr ...
# |  |  |  |  .---- day of week (0 - 6) (Sunday=0 or 7) OR sun,mon,tue,wed,thu,fri,sat
# |  |  |  |  |
# *  *  *  *  * user-name  command to be executed
前五个字段全部使用相同的语法规则:
使用CRON设置自动任务
CRON示例
0 9 2 2 * /usr/local/bin/yearly_backup
*/7 9-16 * Jul 5 echo "Chime"
58 23 * * 1-5 /usr/local/bin/daily_report
0 9 * * 1-5 mutt -s "Checking in" boss@example.com % Hi there boss,just checking in.
在每年2月2日上午9点准点执行命令/usr/local/bin/yearly_backup
在七月每周五的上午9点和下午5点间,每七分钟向该作业的所有者发送包含单词Chime的电子邮件。
在每个工作日午夜前的两分钟运行命令/usr/local/bin/daily_report
在每个工作日(星期一至星期五)的上午9点整,使用mutt向boss@example.com发送邮件。
THANK YOU FOR WATCHING
RHEL7系统管理
By cpanq
RHEL7系统管理
RHEL7系统管理


