IoT and Serverless
DinoJS 2017 workshop with Kas Perch
Kas Perch
@nodebotanist
Internet of Things
The Internet of things (IoT) is the inter-networking of physical devices... and network connectivity which enable these objects to collect and exchange data... a "thing" is "an object of the physical world (physical things) or the information world (virtual things), which is capable of being identified and integrated into communication networks"
Experts estimate that the IoT will consist of about 30 billion objects by 2020.
-Wikipedia
Materials
- CanaKit Raspberry Ultimate Starter Kit
- RaspberryPi (RPi)
- led and resistor
- button and resistor
- breadboard
- breadboard wires
- JBtek® WINDOWS 8 Supported Debug Cable for Raspberry Pi USB Programming USB to TTL Serial Cable
- really just need "access" to RPi shell
Software
- Raspbian OS for RPi
- Etcher - opt for flashing OS to SD
- Serial for Mac - opt for using serial cable to setup RPi for ssh from another computer
- Serverless Framework CLI
- Johnny-Five for communicating easier to RPi
Setup
- flash Raspbian to SD card from computer
- OPT - connect to RPi using serial cable:
- eject SD and insert back into computer
- SD card /boot/config.txt => add to bottom:
-
enable_uart=1
-
- eject SD and insert into RPi
- connect serial cable to RPi
- install serial cable chipset drivers
- connect to RPi using Serial for Mac
- OR - connect RPi to HDMI monitor, keyboard, mouse?
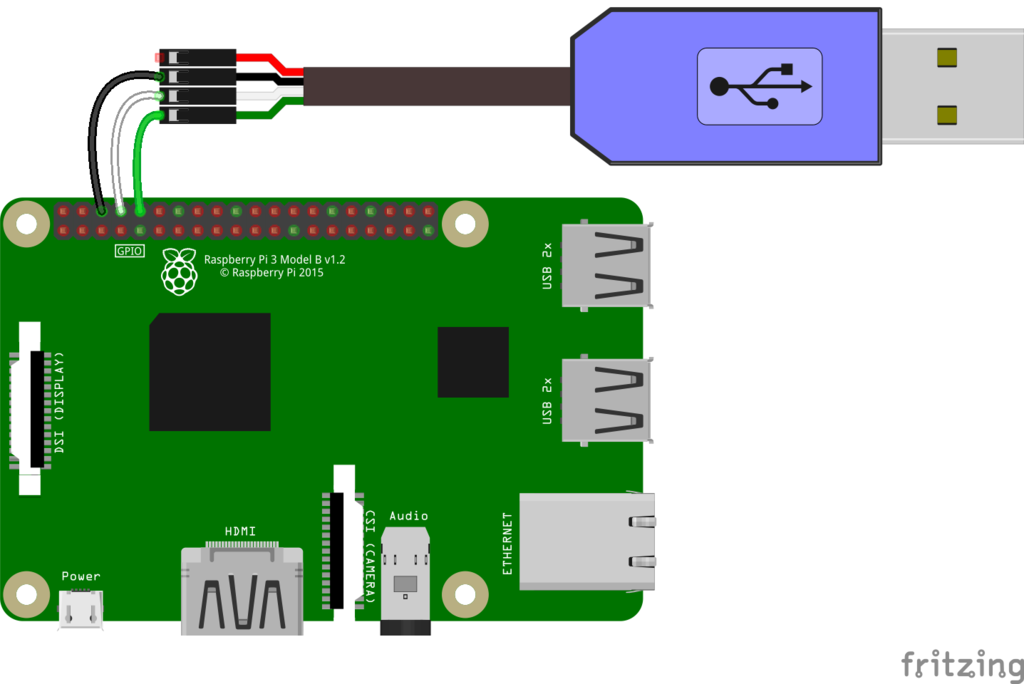
Serial TTL to Raspberry Pi

- black lead to GNR
- white lead to TXD
- green lead to RXD
Update default settings
-
login - defaults are username: `pi`, pw: `raspberry`
-
change your password
-
`passwd` and follow instructions
-
-
allow ssh, boot to config
-
`sudo raspi-config` and update settings
-
Connect to wifi
- `ifconfig`, find the `wlan0` in the list
-
`sudo nano /etc/wpa_supplicant/wpa_supplicant.conf`
-
network={
    ssid="Our SSID"
    psk="Our Password"
}
-
- `sudo reboot`
- rerun `ifconfig`, there should be a wlan0 with `inet addr`
- copy the inet addr
Whew!
Now we can ssh in
to the RPi
Switch to an SSH connection
- `ssh pi@{your ip address}` from your computer
- enter your new password
- Remove the Serial-TTL cable and close Serial (or unplug HDMI and keyboard)
Software updates
- update os
- `sudo apt-get update`
- `sudo apt-get upgrade`
- get node
- `curl -sL https://deb.nodesource.com/setup_7.x | sudo -E bash -`
- `sudo apt install nodejs`
- `sudo npm i -g npm`
- `vi` is installed... want `vim`? (yes you do.)
- `sudo apt-get vim`
Some references
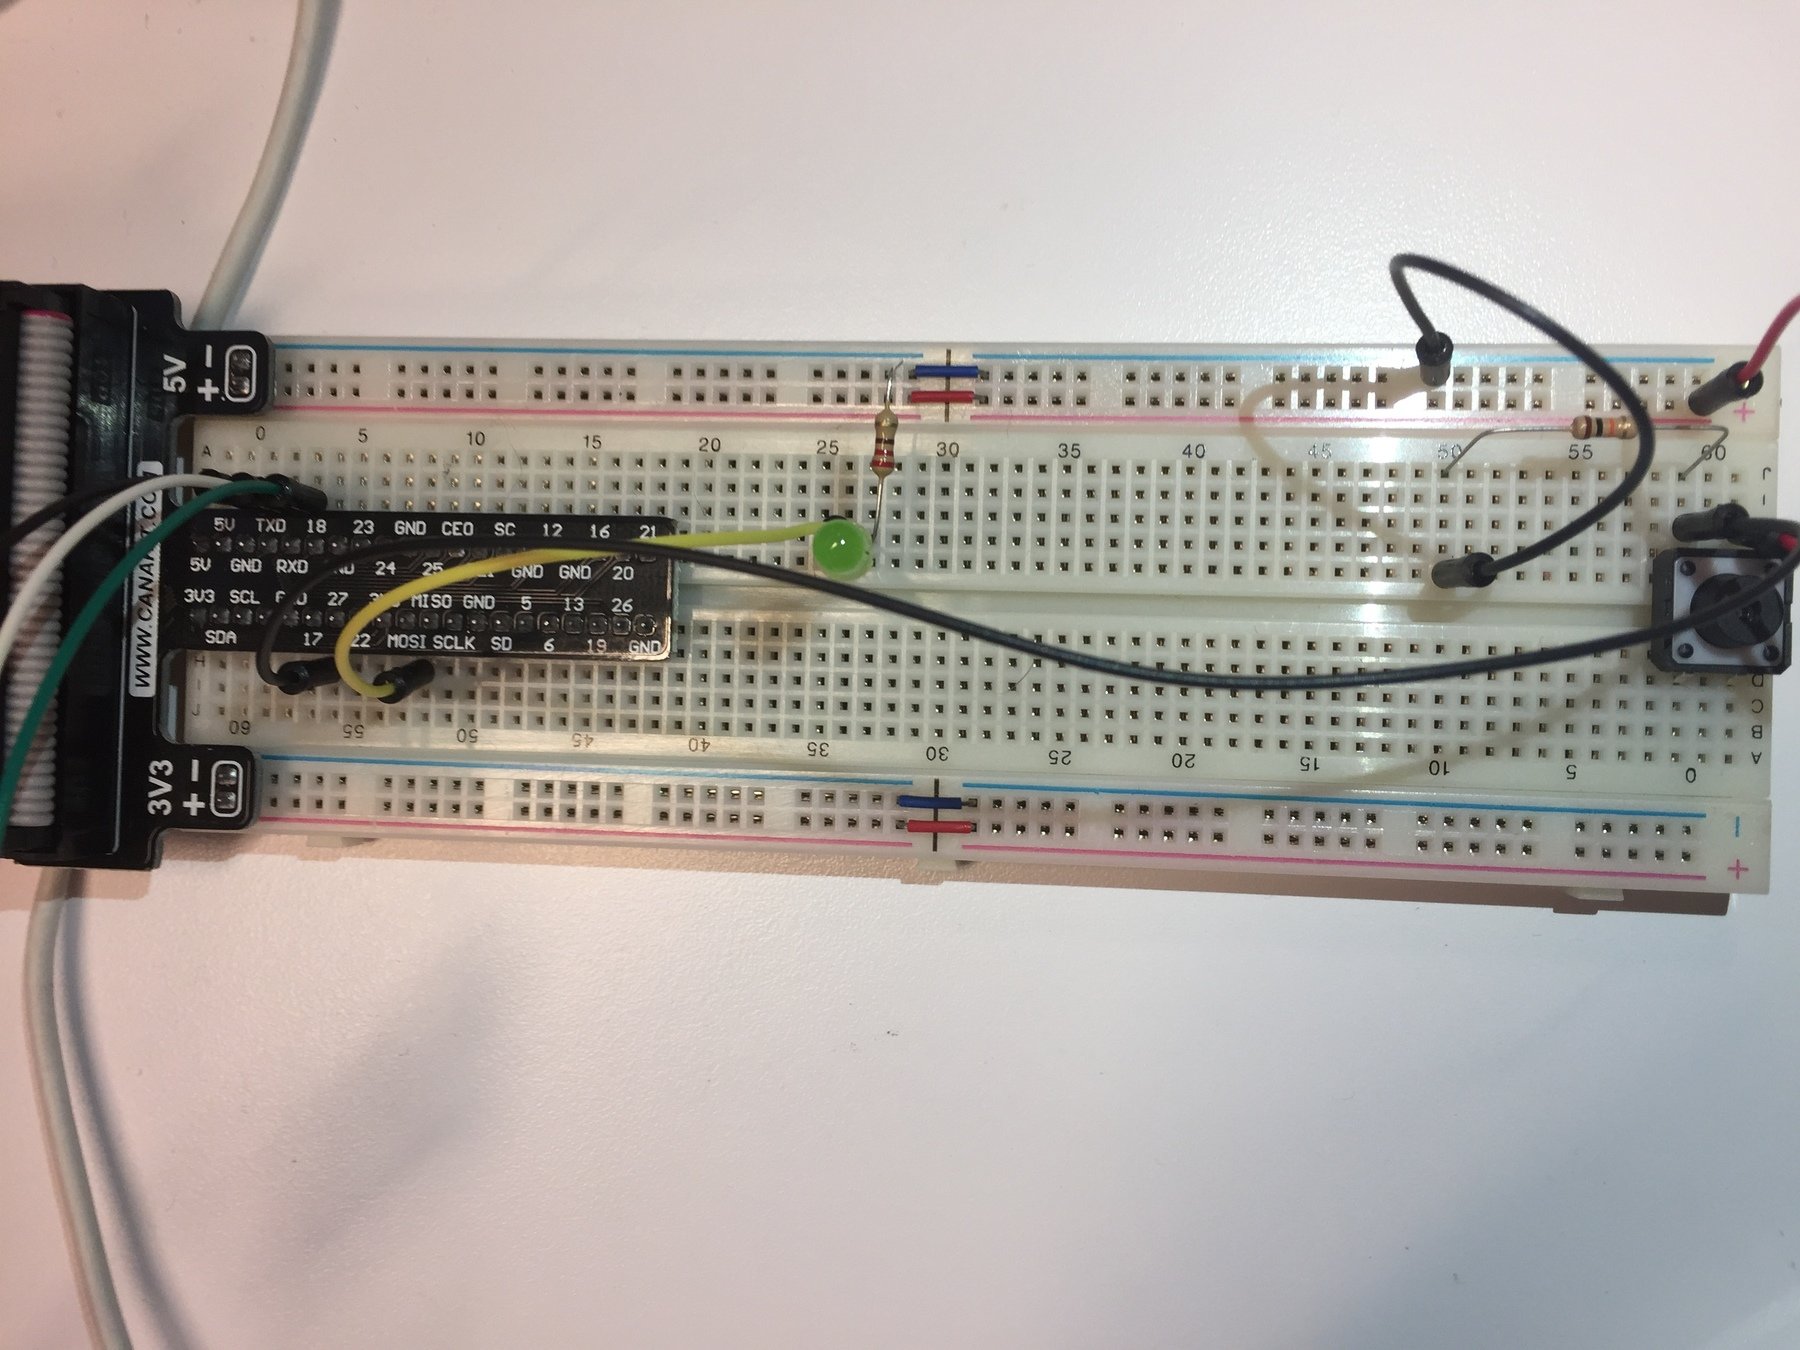
Hardware config
-
P1-19 MOSI to LED to resistor to - rail
-
P1-11 17 to button AND resistor to - rail, + power rail to same side other leg of button

Create new node repo
- make directory and cd into it
- `npm init -y`
- `npm i --save johnny-five rasp-io`
- `git init` for goodness sakes
Write some code
`vim exercise1.js`
const Raspi = require('raspi-io')
const five = require('johnny-five')
const board = new five.Board({
  io: new Raspi()
})
board.on('ready', () => {
  let led = new five.Led('P1-19')
  led.strobe()
  let strobing = true
  let button = five.Button('P1-11')
  button.on('press', () => {
    strobing ? led.stop().off() : led.strobe()
    strobing = !strobing
  })
});
BlinkyBot!
Debugging tip
Within board.on function, after button.on function close, add:
this.repl.inject({
  button,
  led
})
This allows interaction with the button and led while the program is running, so for example you could type in the console:
led.stop.off()
led.on()
BlinkyBot and console interaction
"Serverless" architecture
Serverless computing is a cloud computing execution model in which the cloud provider dynamically manages the allocation of machine resources. Pricing is based on the actual amount of resources consumed by an application, rather than on pre-purchased units of capacity...
Serverless computing still requires servers. The name "serverless computing" is used because the server management and capacity planning decisions are completely hidden from the developer or operator. Serverless code can be used in conjunction with code deployed in traditional styles, such as microservices. Alternatively, applications can be written to be purely serverless and use no provisioned services at all.
-Wikipedia
Serverless CLI & AWS lambda
Create serverless function and test
- move to a parent folder for projects on laptop
- `serverless create --template aws-nodejs --path dinojs-lambda`
- cd into the created directory `dinojs-lambda` and view created contents
- from this dir, add your envs from AWS in the console
- `export AWS_ACCESS_KEY_ID=<your-key-here>`
- `export AWS_SECRET_ACCESS_KEY=<your-secret-key-here>`
- `serverless deploy`
- `serverless invoke -f hello`
- you should get back a JSON object with 200 code and success message
Get the HTTP url
- log into the AWS Management Console and go to Lambda
- click on your function, click on triggers, select API Gateway, set security to "open", click submit.
- click the URL under API Gateway, it should have a success message
- copy the URL... we are going to use this with our robot... later...
Update the Lambda Function
change the handler.js to:
module.exports.hello = (event, context, callback) => {
  let randomNumber = Math.ceil(Math.random() * 9)

  const response = {
    statusCode: 200,
    body: JSON.stringify({
      numSeconds: randomNumber
    }),
  };

  callback(null, response);

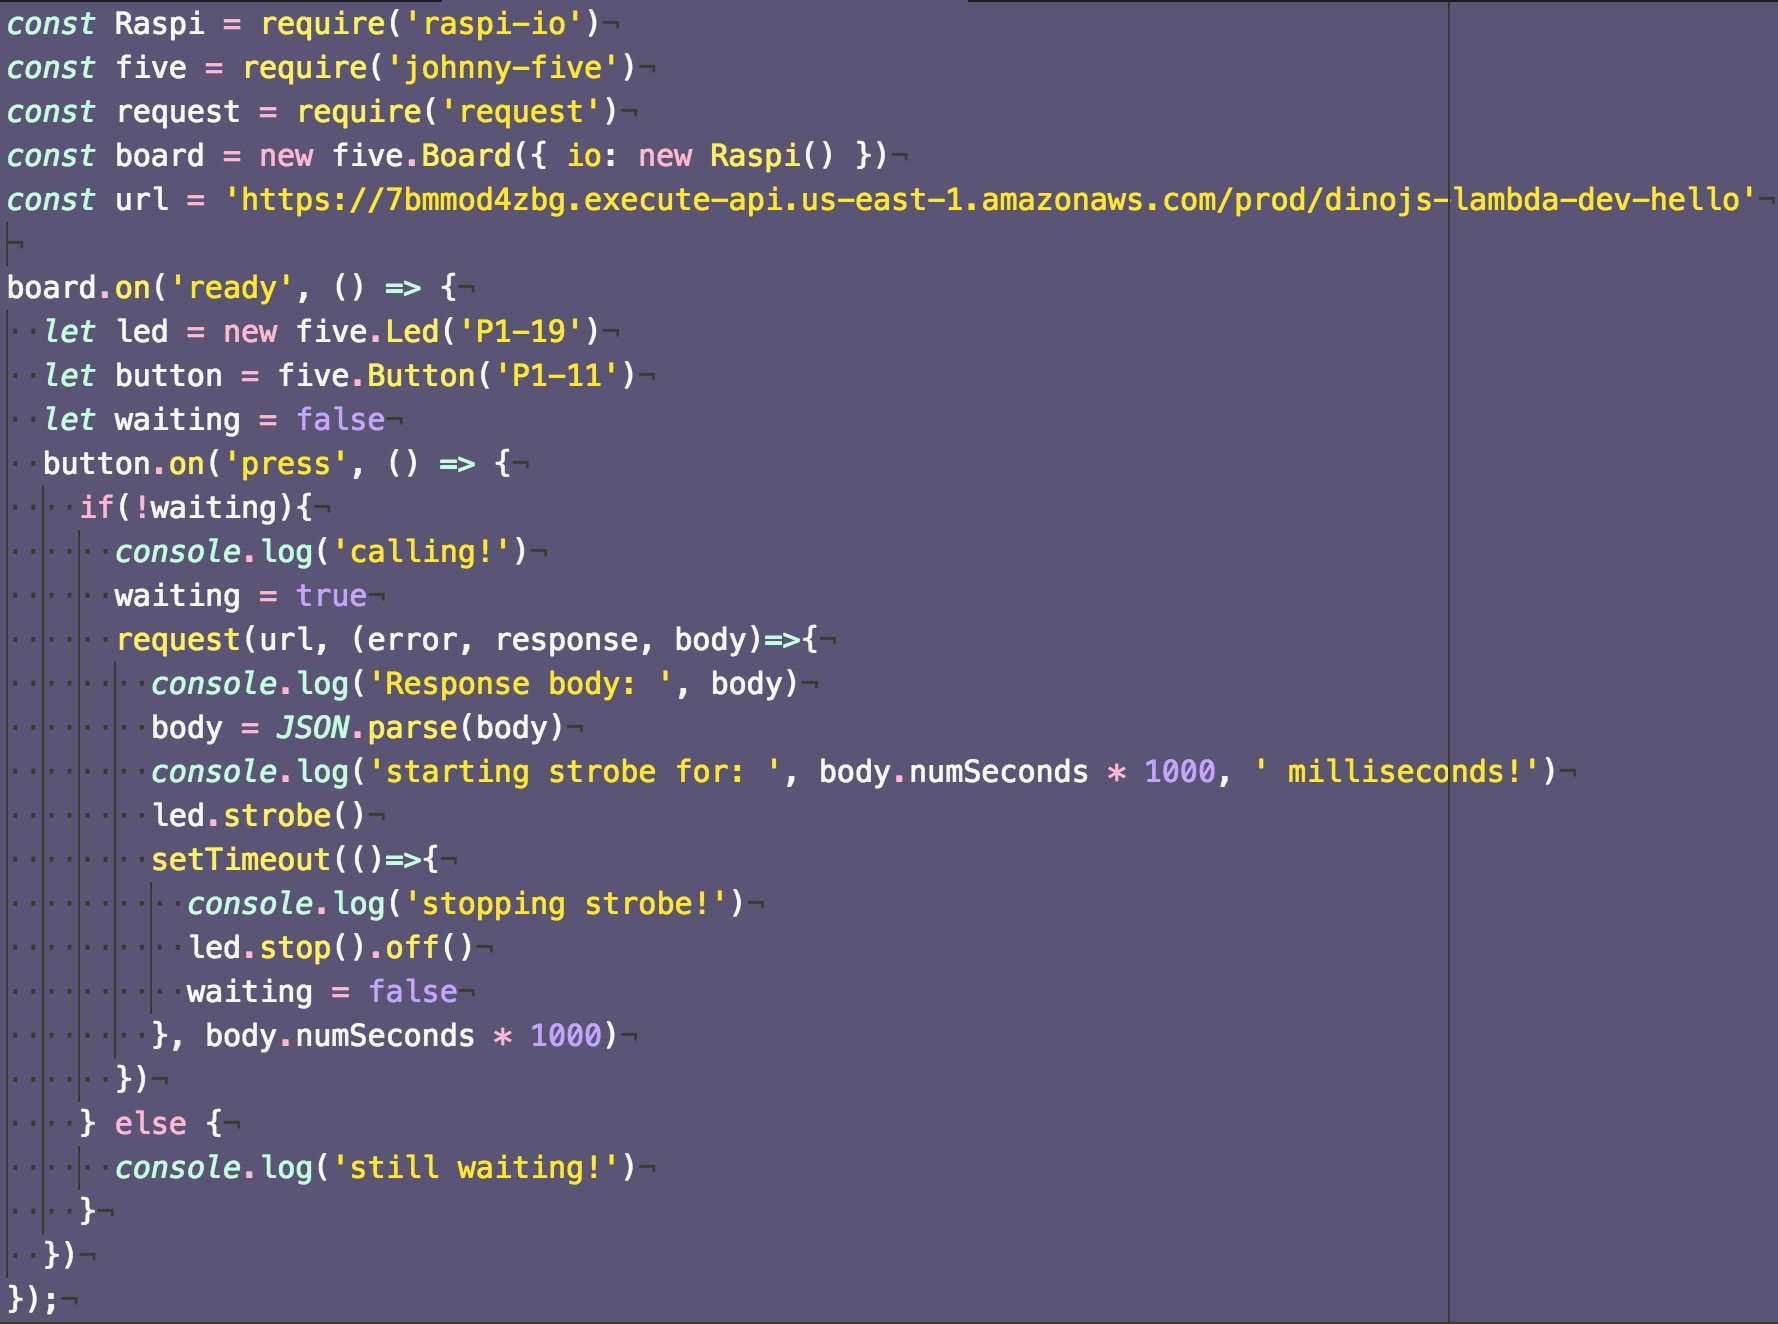
Create exercise2.js
OMG serverless bots dance party???
Emily Platzer
emilyplatzer.com
@emilyplatzer
github.com/craftninja
Source materials from @nodebotanist

IoT and Serverless
By Emily Platzer
IoT and Serverless
A Lunch and Learn at Cognizant Quick Left on July 21, 2017
- 412


