HTML/CSS Basic
EnYi
2016.12.11

架構、內容
外觀
事前準備
安裝Sublime Text 3
註冊evernote
mac安裝skich windows安裝picpick
筆記
編寫工具
安裝Sublime Text3 Package Ctrol
- SlideBar Enhancements
- HTML-CSS-JS-Prettify 自動縮排功能 安裝node.js
- emmet
- Autofilename
- fakeimg
- color highlighter
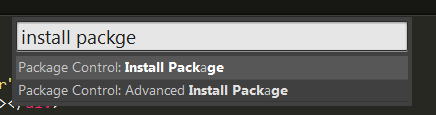
Ctrl+shift+P (Windows) / Command +shift+P (Mac)
輸入install packge
起手勢
先從HTML開始
HeperText Markup Language
index.html
<開始標籤>
<結束標籤>
內容
<!DOCTYPE html>

<html lang="en">

<head>
    <title>This is a Title</title>
</head>

<body>

    <p>Hello World</p>

</body>

</html>
HTML結構是長這樣......
html
head
body
title
p
巢狀式結構
<head></head>
提供給瀏覽器讀取,包含Title、metadata及導入css.js等不同的文件
<!DOCTYPE html>

<html lang="zh-TW">

<head>
    <title>This is a Title</title>
</head>

<body>

    <p>Hello World</p>

</body>

</html>
<body></body>
網頁主體內容的呈現,也就是給人看的
<!DOCTYPE html>向瀏覽器宣告html版本
<html></html>像漢堡一樣,包覆所有資料
lang="zh-TW"向瀏覽器說明內容所使用的語言為何
HTML element
<h1> 這是標題1 </h1>
開始標籤
結束標籤
內容
元素
<a href="http://google.com">連結到Google</a>
元素
開始標籤
結束標籤
內容
元素屬性 Atrributes
值 value
HTML element
常用的HTML標籤元素
<p>......</p>
paragraph 換行
<h1>我是標題1</h1>
Heading 標題
<h2>我是標題2</h2>
<h3>我是標題3</h3>
<h4>我是標題4</h4>
<h5>我是標題5</h5>
<h6>我是標題6</h6>
heading在SEO上具有權重的功能。
所以要謹慎使用。
<a href="#"> hyperlink </a>
超連結
<a href="#" target="_blank"> hyperlink </a>
<a href="#" target="_parent"> hyperlink </a>
在同一個瀏覽器開啟一個新的分頁
開啟一個新的瀏覽器頁面
在本來瀏覽器開啟,覆蓋原先的內容
相對路徑
範例
index.html路徑為c:/www/index.html
aaa.html路徑為c:/www/image/data/aaa.html
bbb.httml路徑為c:/www/image/bbb.html
ccc.html路徑為c:/www/ccc.html
連結同一層目錄底下文件,例如:index.html連結ccc.html
<a href="ccc.html">連結到ccc頁面</a>
連結同下一層目錄底下文件,例如:index.html連結bbb.html
<a href="image/bbb.html">連結到bbb頁面</a>
連結同上一層目錄底下文件,例如:bbb.html連結index.html
<a href="../index.html">連結到index頁面</a>
連結同上2層目錄底下文件,例如:aaa.html連結index.html
<a href="../../index.html">連結到index頁面</a>
www
index
ccc
image
data
bbb
aaa
Image
<img src="phone.jpg" alt="phone">

序列清單ul li
<ul>
	<li>牛奶</li>
	<li>巧克力</li>
	<li>冰淇淋</li>
	<li>乖乖</li>
</ul>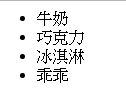
DIV 網頁區塊
This is a box
This is a box
讓我們在html中加上樣式
Style
<p style="color:blue;">我是藍色</p>
width:100px
height:100px
Table表格
        <table>
            <tr>
                <th></th>
                <th></th>
            </tr>
            <tr>
                <td></td>
                <td></td>
            </tr>
        </table>
tr = table row
td = table data cell
th = table header cell
table
tr
td
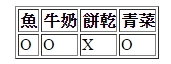
<table border="1px">
		<tr>
			<th>魚</th>
			<th>牛奶</th>
			<th>餅乾</th>
			<th>青菜</th>
		</tr>
		<tr>
			<td>O</td>
			<td>O</td>
			<td>X</td>
			<td>O</td>
		</tr>
	</table>
<table border="1px">
<tr>
<th>魚</th>
<th>牛奶</th>
<th>餅乾</th>
<th>青菜</th>
</tr>
<p>
<p>
<tr>
<td colspan="2" style="text-align: center;">O</td>
<td>X</td>
<td>O</td>
</tr>
</table>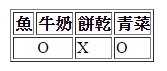
合併儲存格
colspan 橫向延伸
rowspan 垂直延伸
CSS
Cascading Style Sheets
副檔名為.css
CSS文件
例如:
style.css
template.css
element {
property : value;
}
h1 {
  color:blue;
}
CSS文件寫法
元素 {
屬性 : 值;
}
id選擇器
#
- 每個html檔只能使用一次
- id選擇器不能結合使用
- 一般應用在第一階層div
選擇器可以佈局在html標籤裡做樣式使用
class選擇器
.
- 可重覆使用
- 可以同時結合使用
<head>
<link rel="stylesheet" href="css/template.css">
</head>
將css文件導入index.html之中
<head>
	<meta charset="UTF-8">
	<title>Document</title>
	<link rel="stylesheet" href="css/template.css">
</head>
CSS屬性介紹
顏色
color
background
h1{
    color:blue;
    background:red;
}
字體顏色
背景顏色
大小
width 寬度
height 高度
font-size 字級
p{
	width: 100px;
	height:100px;
	font-size: 15px;
}
間距
padding 內間距
border 邊框
margin 外間距
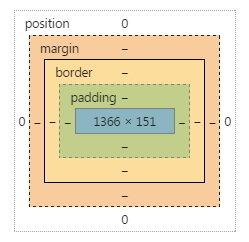
Box-sizing
自動計算元素本身的寬度
box-sizing : border-box;
div {
  -webkit-box-sizing: border-box;
     -moz-box-sizing: border-box;
          box-sizing: border-box;
}
字體
font-family 字體
搜尋(Chinese Traditional)
p {
    font-family: 'Noto Sans TC', sans-serif;
}line-height
文字行距與排列
text-align
float 浮動定位
最常使用時機
並列排版+clearfix一起服用
需在浮動元素的上一層元素加入clearfix
li{
    float:left;
}


.clearfix:after{
	content: "";
	display: table;
	clear:both;
}
<ul class="clearfix">
<li><a href="#">Project</a></li>
<li><a href="#">Download</a></li>
<li><a href="#">FAQ</a></li>
<li><a href="#">Sublime a new Project</a></li>
<li><a href="#">Contact</a></li>
<li><a href="#">Login</a></li>
</ul>絕對位置與相對位置
position的使用方式
left
top
right
bottom
定位改變方式
div {
position:relative
top:30px;
left:30px;
width:300px;
height:300px;
}
#
相對位置 relative
div {
position:absolute
top:70px;
left:70px;
width:300px;
height:300px;
}
絕對位置 absolute
.box2 {
position:absolute
top:30px;
left:70px;
width:100px;
height:100px;
}
absolute in relative
.box1 {
position:relative
top:70px;
left:70px;
width:300px;
height:300px;
}
<div class="box1">
<div class="box2"></div>
</div>
html
css
position:fixed
即使滑動滾軸,仍然固定在同一位置
擬態選擇器
hover 滑鼠移過時的狀態
a:hover{
....
}
body
#header
#sellon
#pages
.container
.container
ul
li
li
li
li
h1
p
p
選擇器更多的使用方法
後代選擇器
(Descendant Selectors)
ex: #pages li{ }
<body>
   <div id="header">
      <div id="pages">
         <div class="container">
            <ul>
               <li></li>
               <li></li>
               <li></li>
               <li></li>
            </ul>
         </div>
      </div>
   <div id="sellon">
      <div class="container">
          <ul>
               <li></li>
               <li></li>
               <li></li>
               <li></li>
            </ul>
      </div>
   </div>
   </div>
子選擇器
(Child selectors)
ex: h1 > strong{ }
<body>
<h1>This is
    <strong>very</strong>
    <strong>very</strong>
    important.
</h1>
</body>
相鄰選擇器
(Adjacent sibling selectors)
ex: h1 + p { }
<body>
<h1>This is a heading.</h1>
<p>This is paragraph.</p>
<p>This is paragraph.</p>
<p>This is paragraph.</p>
<p>This is paragraph.</p>
<p>This is paragraph.</p>
</body>
次序性選擇方式
li : first-child { }
li : nth-child(2) { }
li : last-child { }
li : nth-child(odd) { }
li : nth-child(even) { }
Background
background-color
background-images
background-repeat
background-attachment
background-position
shorthand:
background:#fff url(123.jpg) no-repeat right
background-size:cover
cover
讓背景圖佔滿整個畫面版面
background-size:container
container
當背景圖尺寸超出內容元素下,得以完整呈現
使用工具
假圖 http://lorempixel.com/
Display基本使用block
可自訂寬高、內距與外距
預設寬度會隨著螢幕的大小,以滿版方式改變
display: block;
預設元素有:<div> , <p> , <h1> ~ <h6> , <ul>
Display基本使用inline
無法自訂寬度、高度及上內距、上下外距,
但可自訂左右及下內距、左右外距
預設的高度與寬度會隨著內容物大小而改變
display: inline;
預設元素有:<a> , <img> , <span>
Display基本使用inline-block
具有block的屬性,可設定寬度、高度與內外距等屬性。
預設寬度、高度會隨著內容物改變
display: inline-block;
Display基本使用none
隱藏元素,常搭配js或RWD的設計使用
display: none;
Display
Display:block
元素可自訂寬度與高度、內距、外距
預設寬度會隨著螢幕大小以滿版方式呈現
Display:inline
無法自訂寬度、高度及上內距、上下外距,
但可自訂左右及下內距、左右外距
預設的高度與寬度會隨著內容物大小而改變
Display:inline-block
具有Block的特性,可自訂寬高及內外距
但預設的高度與寬度會隨著內容物大小而改變
Display:none
隱藏元素,常搭配js或RWD的設計使用
HTML/CSS切版流程
第1步:切版事前規劃
依視覺稿進行切版規劃
列印出視覺稿,以紙筆手繪方式,劃分網頁區域並完成html結構規劃。
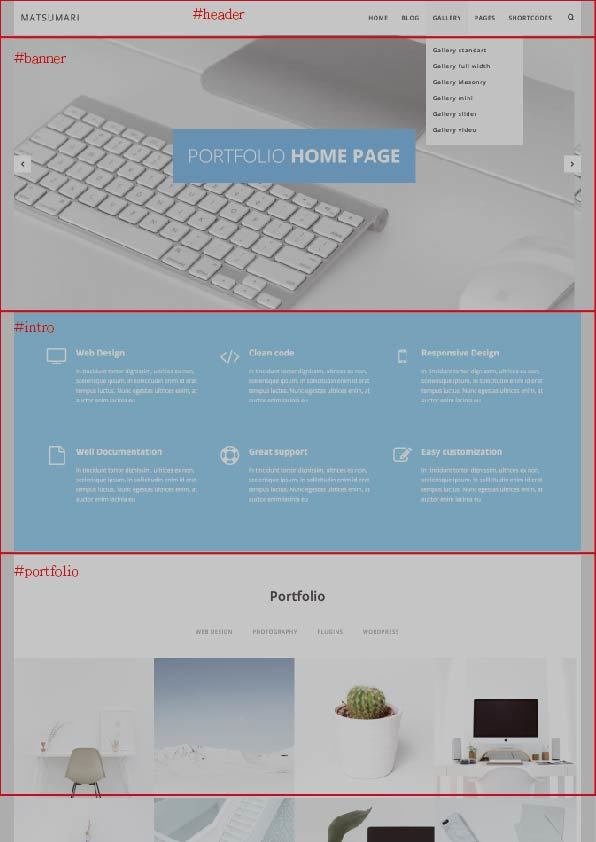
創建index.html並建立第一層HTML結構與內容
第一層html結構通常會以id選擇器來撰寫
<!DOCTYPE html>
<html lang="en">

<head>
    <meta charset="UTF-8">
    <title>Document</title>
</head>

<body>
    <div id="header"></div>
    <div id="banner"></div>
    <div id="intro"></div>
    <div id="content"></div>
    <div id="footer"></div>
</body>

</html>
第2步:建立第一層HTML結構
第3步:依序完成所有內層HTML結構
<body>
    <div id="header">
        <div class="container clearfix">
            <div id="logo">
                <img src="https://api.fnkr.net/testimg/350x100/00CED1/FFF/?text=logo">
            </div>
            <div id="nav">
                <ul>
                    <li><a href="#">product</a></li>
                    <li><a href="#">Download</a></li>
                    <li><a href="#">FAQ</a></li>
                    <li><a href="#">Submit a new Project</a></li>
                    <li><a href="#">Contact</a></li>
                    <li><a href="#">Login in</a></li>
                </ul>
            </div>
        </div>
    </div>
    <div id="banner">
        <img src="https://api.fnkr.net/testimg/1349x473/eeeeee/FFF/?text=banner">
        <div class="bacontent">
            <h2>Free Data</h2>
            <p>Lorem ipsum dolor sit amet, consectetur adipisicing elit. Ab, dicta!
            </p>
            <a href="#">Button</a>
        </div>
    </div>
    <div id="slide">
        <div class="container clearfix">
            <div class="col-4">
                <img src="https://api.fnkr.net/testimg/400x200/00CED1/FFF/?text=img+placeholder">
                <p>Lorem ipsum dolor sit amet, consectetur adipisicing elit. Ea, at culpa ipsam consequuntur delectus repellendus aliquam velit sed, neque placeat rem dolor cupiditate cum iure, rerum totam fugit. At, quos!</p>
                <a href="#">button</a>
            </div>
        </div>
        <div class="event">
            <div class="container">
                <h2>This is a event</h2>
                <p>Lorem ipsum dolor sit amet.</p>
            </div>
        </div>
    </div>
    <div id="footer">
        <div class="container clearfix">
            <div class="bottom">
                <ul clearfix>
                    <li><a href="#">content</a></li>
                    <li><a href="#">content</a></li>
                    <li><a href="#">content</a></li>
                    <li><a href="#">content</a></li>
                    <li><a href="#">content</a></li>
                </ul>
            </div>
        </div>
    </div>
</body>

</html>
第4步:開始撰寫CSS文件
建立css檔,並將index.html引入css文件,
包含:自行創建template.css及normalize.css
<head>
    <meta charset="UTF-8" />
    <title>Decor</title>
    <link rel="stylesheet" href="css/normalize.css" />
    <link rel="stylesheet" href="css/template.css">
</head>
第5步:依序完成CSS撰寫
HTML/CSS
By enyilio