Git(Hub) & Version control
Pssst, I'm going to ask for feedback at the end
Why is this important?
Version control is useful in many cases (some people are even tracking law changes using Git!)
- All programming companies are using some version control, most of them are using Git
- It's not language dependent - Java, HTML, C#... you name it, the programmers using these language most likely use GIT as well
- It also allows "Code Reviews", which is instrumental in improving software quality
And, last but not least:
- You will need to collaborate and share code in your team for your project - GitHub is the best way to do that!
What is Version Control?
Well, let's see an example of versioning:
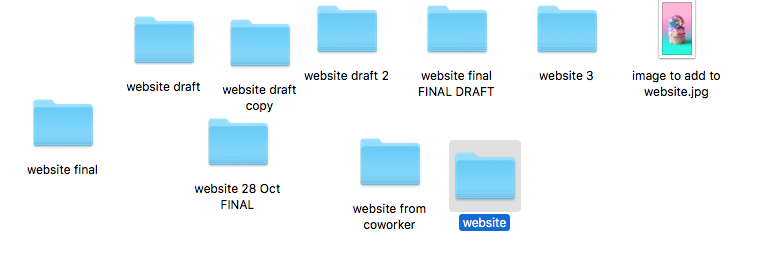
I need to add an image to that website...
A few problems...
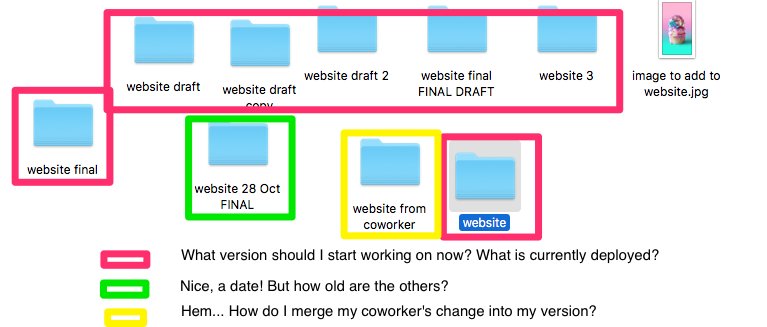

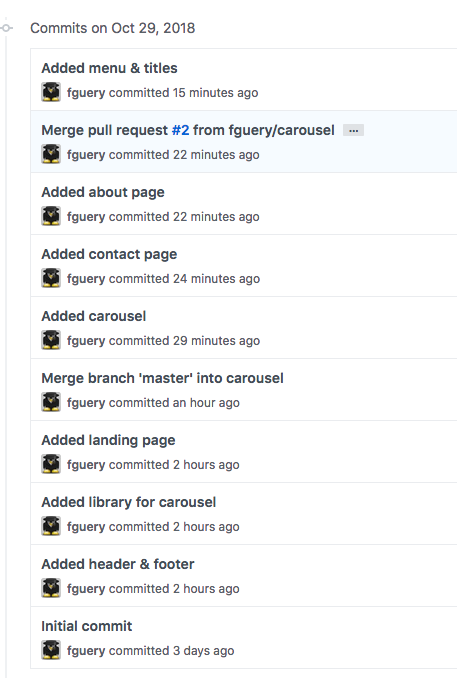
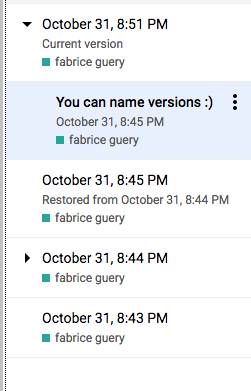
Here's some versioning examples:
GitHub
Google Doc
Repository
A repository is where you store your code on GitHub, along with all its version.
Technically, not only on GitHub: the code you have locally is ALSO a repository, a "clone" of the one that's on GitHub.
Commits
A commit is a set of changes on one or more files. It also has:
- All the changes on impacted files
- The date
- The author
- A description ("commit message")
- The previous commit

Time for a little exercise!
- Create a personal account on github.com
- Download and install GitHub Desktop
desktop.github.com - When you open the app, it should ask you for signing it. Do so
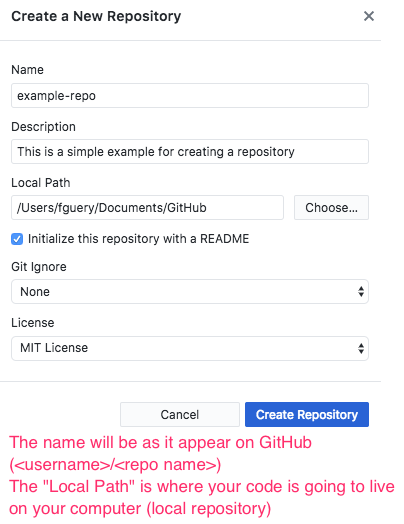
- Create a new repository from the app (Files -> New repository)

We will create a new repository with a couple of commits, and publish it to GitHub
- Open your new repository in Atom & add a file
- in the app, Repository -> Open in Finder/Explorer
- Drag the repository onto Atom
- Create a new file, README.md
- Commit the change
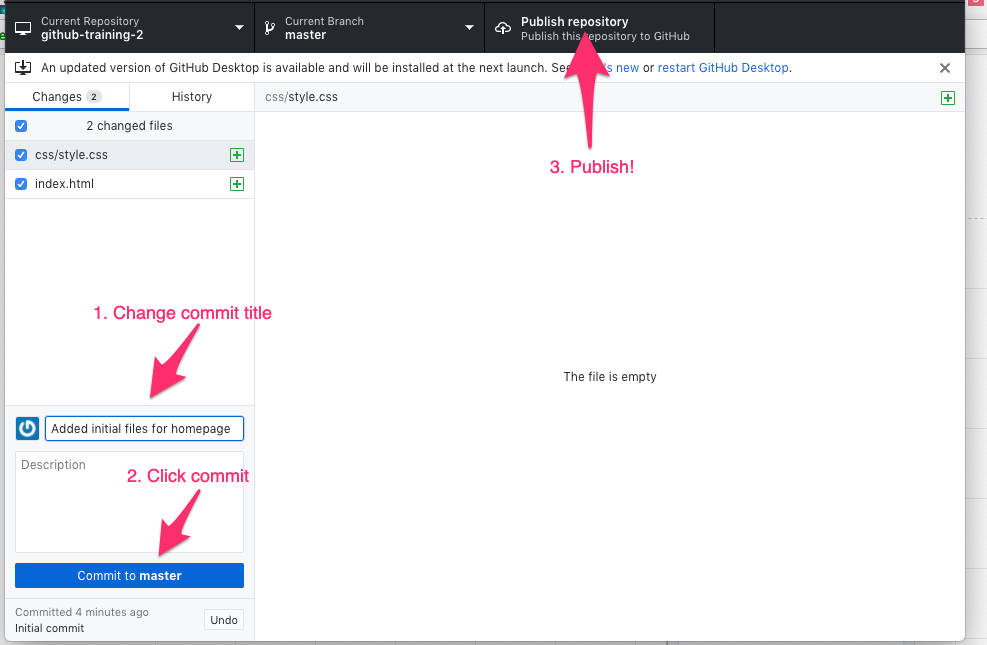
- In Github app
- Edit the title
- Select the new file
- Click "Commit to master"
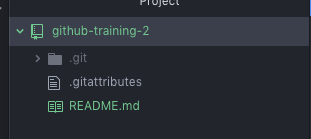

- Create in Atom the files index.html and css/style.css (you can keep them empty for now, it's OK).
- Commit that again, the commit title could be "Added initial files for homepage"
- Finally, push it all on GitHub ("Publish repository")

Still here?
Good. A bit more theory, then!

Forking
On the top right corner of every GitHub repository, you can create a Fork of any repository.
This will copy the whole repository, and you will own that copy.
It is very common in Open Source world to create a pull request from a fork into the original repository, so that the original owners don't have to add too many people to the collaborator list.
It's also a backup if the original owner decide to delete their repository.
Pull-request
A pull request is a request to "merge" a change into the main project.
The person owning the repository will have the choice of accepting or refusing the change.
It can be done in the same repository, using different branches, or across forks.
Branches
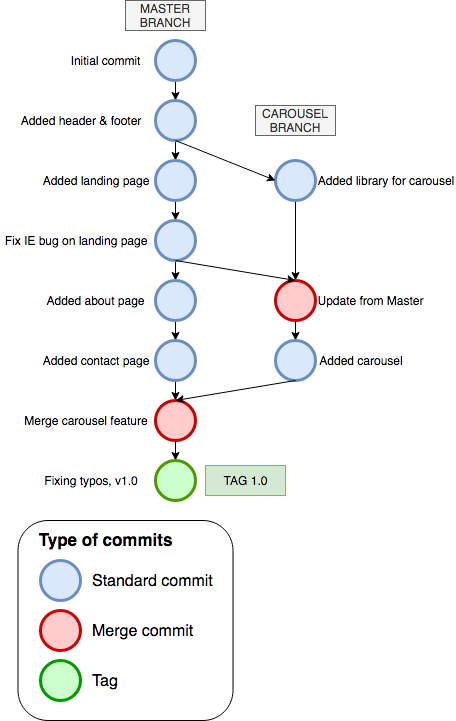
A branch helps to work in parallel with multiple people, or simply to work on multiple features in parallel.
Here you can see that the "carousel" branch was done in parallel of the rest of the work, done directly in master.
Merging
A merge is used to get the changes from one branch into another one.
Here you can see 2 merge commits: the 1st one is on the Carousel branch, to get the landing page changes from Master.
The second merge commit is to get the carousel into Master. This was done via a Pull Request (PR)

Did I lose you yet?
I know I know, the previous slides might be confusing.
Rejoice, it's again time for some EXERCISES!


Collaboration exercise (set-up)
- Form teams of 2
- Pick one of the repository (it doesn't matter much)
- The person who doesn't own the repo (the collaborator) has to "fork" the repository
- The owner can see their repo on GitHub through the app (Repository -> View on GitHub)
- Send the URL to the collaborator through Slack direct message for example, or just write it down
- The collaborator can now fork the repository by clicking the top right button
- The collaborator now needs to create a local copy
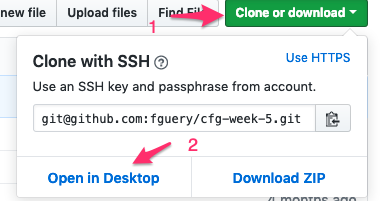
- Click on "Clone or download", then on "Open in Desktop" as pictured
- In the app, click "Clone"

Branching exercise (for real!)
Here you should work in pair, as you need to learn both sides (being the owner of the main repository & being a collaborator)
- On the the owner side, fill up the index.html page containing the page title and a reference to the css/style.css we created earlier. Commit & push this as soon as ready (push button replaces the "publish" one from earlier)
- Once this is done, create about.html and contact.html, with same content for now. Commit & push.
Hints: <link rel="stylesheet" href="css/style.css" />
<a href="index.html" title="homepage">Homepage</a>
The collaborator is in charge of adding navigation between all pages; this will be done by creating a menu of each of them.
- On the collaborator side, you need to fetch the latest changes made from the owner's repository.
- Click the "Fetch Origin" button
- in GitHub Desktop, click on the "Current branch" button, then in the opening menu click on "Choose a branch to merge into master"
- Select "upstream/master" and click on "Merge upstream/master into master".
- "Upstream" references the owner repository, while origin reference the collaborator repository (on the collaborator machine)
- Commit your changes with the menu.
- The collaborator should now open a Pull Request (Branches -> Create Pull Request)
- The owner should now approve the PR on GitHub web

This time let's split up - collaborator & owner can work separately
- The collaborator updates their repository using the method seen before (merge upstream/master into master)
- The collaborator decides to add a picture of a dog on all pages of the website, then commits & push it.
- The owner continues to work on their own repository.
- The owner adds a cat as background image on all the pages of the site, then commits & pushes it.
- The collaborator opens another Pull Request. Go to GitHub (the site!) to see what happens...
Branching exercise (the end!)
Hints: in css/style.css
body {background-image: url(...);}
Conflicts!


Conflict resolution
You can solve it on the Collaborator side by updating your local branch (branches -> merge into current branch -> upstream/master)
It will show a warning, proceed anyway. It should then show you something like this:

If you now open the file in Atom, it'll let you choose which version you want to use. Pick one, and got back to your GitHub app.
You should know be able to commit & push again. The PR merge button should now be available for the owner.
Publish your website!
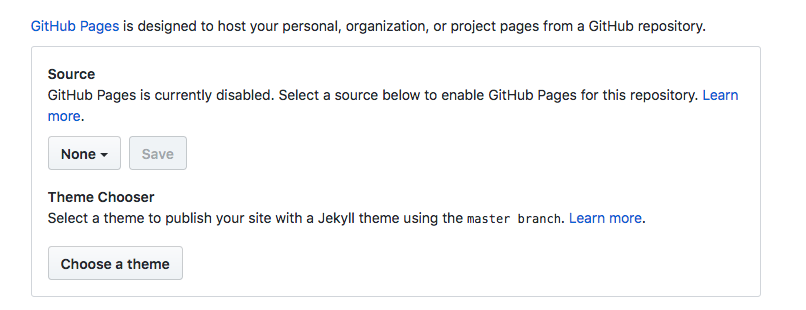
As a nice side thing, GitHub also allow you to host your webpages on its website. Here's how to do it:
In the setting tab of your repo on GitHub.com, you should see something like this. Set the "source" as your master branch - your website will be available in a few seconds at a URL like this: https://<username>.github.io/<repo-name>/.
A few other tips!
Tagging/Releasing
When you want to remember a particular commit as a point of reference, e.g. when you release your website the 1st time, you can create a "tag", or a release on GitHub.
You cannot do that through the app, but in the website you will find a tab under the repo name.


So... how does it solve our problems?


All changes have a date! And even a description, an author, ...
Use latest release (tag), or start from one of the branches - usually master
Merging is easy! Just update from GitHub, or push a pull request.
Feedback!
Resources
- The app! https://desktop.github.com/
- The app documentation: https://help.github.com/desktop/guides/contributing-to-projects/
- Github Hello world: https://guides.github.com/activities/hello-world/
- Git documentation (technical!) https://git-scm.com/
- GitFlow https://guides.github.com/introduction/flow/
- Very basic tutorial for command line (git add, commit, pull, push)
- Emergency fix (technical): http://www.ohshitgit.com/
Git tutorial
By fguery
Git tutorial
A beginner introduction to version control system, GIt & GItHub in particular
- 558


