

Filippo Matteo Riggio
CTO @ Kaleidoscope Srl
Teacher @ ITS Logistica
Performance Obsessed
Performance Obsessed
-
2011: Gardaland
Performance Obsessed
-
2011: Gardaland
-
2012: ***
Performance Obsessed
-
2011: Gardaland
-
2012: ***
-
2013: BMW
-
2014: Microsoft World Cup
Performance Obsessed
-
2011: Gardaland
-
2012: ***
-
2013: BMW
-
2014: Microsoft World Cup
-
2014: The Sun
-
2014: Future Learn
Performance Obsessed
-
2011: Gardaland
-
2012: ***
-
2013: BMW
-
2014: Microsoft World Cup
-
2014: The Sun
-
2014: Future Learn
-
2015: Oltreuomo
-
2016: Le Iene
Frontend
75%
Backend
25%
L'importanza delle performance

Il 47% degli utenti si aspetta che un sito si carichi in meno di 2 secondi
Il 40% degli utenti abbandona un sito se il tempo di caricamento è più di 3 secondi
+2% di conversione sullo store di Walmart per ogni secondo guadagnato
1.6 Miliardi di dollari persi per ogni secondo di rallentamento su Amazon.com
Conversioni

Impact Calculator

Gli ute(o)nti
L'esperienza degli utenti
< 100 millisecondi
- Il lobo occipitale si attiva entro questo lasso di tempo
- L'utente ha la percezione dell'azione e della reazione e l'illusione che la web app sia istantanea
- L'utente ha senso di soddisfazione
> 10 secondi
- Il lobo occipitale perde attrattiva su quello che sta facendo
- L'utente ha la sensazione di rottura tra azione e reazione della web app
- L'utente diventa frustrato e impaziente
- La percezione è che la web app sia di pessima qualità
Per ottimizzare sempre si consideri il modello RAIL (Response, Animation, Idle, Load)
Misurazione
DevTools


PageSpeed

Google Lighthouse

An open-source, automated tool for improving the quality of web pages
Cosa misura?
Accessibilità
SEO
- Attributi ARIA
- Tag title nel tag header
- Tag label collegate ad ogni elemento di un form
- Ogni immagine ha l'attributo alt
- Tag title nel tag header
- Meta description mancante
- hreflang mancante
- rel=canonical non valido
- robots.txt non valido
- ecc.
Cosa misura?
PWA
Performance
- Verifica il file manifest.json
- La connessione è sicura (HTTPS)
- Viene registrato un service worker
- Altri controlli propri delle PWA
https://developers.google.com/web/progressive-web-apps/checklist
- Critical Request Chains
- CSS minificato
- JS minificato
- Evitare le richieste Render-blocking
- ecc.
Installazione
- Chrome DevTools > Audits
- comando da CLI
- modulo NPM
- Lighthouse CI
# SUL TERMINALE
npm install -g lighthouse

# LANCIARE UN AUDIT

lighthouse <url>
Installiamo prima :
- Google Chrome
- Node.JS LTS
Installazione

Un esempio di audits

Installazione e setup
# SUL TERMINALE
yarn add webpack webpack-cli --dev

// package.json
"scripts": {
    "dev": "webpack --mode development --watch",
    "build": "webpack --mode production --watch"
}

# SUL TERMINALE
yarn dev
Configurazione
// webpack.config.js

module.exports = {
    entry: './src/index.js'
};
Entry
Suggerisce a webpack da quale modulo iniziare il bundling.
Output
Suggerisce a webpack dove salvare il bundle creato.
// webpack.config.js

const path = require('path');

module.exports = {
    entry: './src/index.js',
    output: {
        path: path.resolve(__dirname, 'dist'),
        filename: 'main.js'
    }
};
Configurazione
Entry e output multipli
Suggerisce a webpack da quale modulo iniziare il bundling.
// webpack.config.js

const path = require('path');

module.exports = {
    entry: {
        first: './src/one.js',
        second: './src/two.js',
    },
    output: {
        filename: '[name].bundle.js', // GENERA first.bundle.js, second.bundle.js, ecc.
        path: path.resolve(__dirname, 'dist')
    }
}
Loaders
Oltre che a creare bundle, con webpack è possibile effettuare altre operazioni in fase di bundling attraverso i loaders.
# TERMINALE
yarn add css-loader --dev

// webpack.config.js

module.exports = {
    [...],
    module: {
        rules: [{
            test: /\.css$/,
            use: 'css-loader'
        }]
    }
}
rules è un array di tutti le regole e dei loader da utilizzare a tutti i file che matchano la proprietà test.
use indica quale loader usare nel caso il file matchasse la regola
Concatenare Loader
# TERMINALE
yarn add node-sass sass-loader style-loader --dev

// webpack.config.js

module.exports = {
    [...],
    module: {
        rules: [{
            test: /\.(sass|scss)$/,
            use: [{
                loader: 'style-loader' // creates style nodes from JS strings
            }, {
                loader: 'css-loader' // translates CSS into CommonJS
            }, {
                loader: 'sass-loader', // compiles Sass to CSS
                options: {
                    includePaths: [
                        __dirname + '/resources/assets/sass/frontend/'
                    ]
                }
            }]
        }]
    }
}
Un esempio
// style.scss
body {
    background-color: $red;
}
// index.js
import './style.scss';
<!-- index.html -->
<!DOCTYPE html>
<html>
<head>
    <meta charset="UTF-8">
    <title>Webpack App</title>
    <style type="text/css">
        body {
            background-color:red;
        }
    </style>
</head>
<body>
    <script type="text/javascript" src="bundle.js"></script>
</body>
</html>- Webpack prova a risolvere style.scss
- Il nome del file matcha /\.(sass|scss)$/
- Il file viene interpretato dal loader "sass-loader", il risultato poi passato a css-loader
- Il risultato dal "css-loader" viene passato allo "style-loader"
- "style-loader" restituisce codice js e webpack continua la sua esecuzione
Babel Loader / TypeScript Loader
# TERMINALE
yarn add babel-core babel-loader babel-preset-env ts-loader --dev

// webpack.config.js

module.exports = {
    [...],
    module: {
        rules: [{
            test: /\.js$/,
            exclude: /(node_modules)/,
            use: {
                loader: 'babel-loader',
                options: {
                    presets: ['@babel/preset-env']
                }
            }
        },{
            test: /\.tsx?$/,
            use: 'ts-loader',
            exclude: [
                '/node_modules/',
                '/vendor/'
            ]
        }]
    }
}
Plugins
# TERMINALE
yarn add webpack-manifest-plugin mini-css-extract-plugin --dev

// webpack.config.js

const MiniCssExtractPlugin = require("mini-css-extract-plugin");
const ManifestPlugin       = require('webpack-manifest-plugin');

module.exports = {
    [...],
    module: {
        rules: [{
            test: /\.(sass|scss)$/,
            use: [
                "style-loader",
                MiniCssExtractPlugin.loader,
                "css-loader",
                "sass-loader"
            ]
        }]
    },
    plugins: [
        new ManifestPlugin(),
        new MiniCssExtractPlugin({
            filename: 'style.css',
        })
    ]
}
Caching e Hashing
// webpack.config.js

module.exports = {
    entry: {
        main: './src/index.js'
    },
    output: {
        path: path.resolve(__dirname, 'dist'),
        filename: '[name].[chunkhash].js'
    },
}
Optimization - Minification
// webpack.config.js
const config = {
    [...]
};

module.exports = (env, argv) => {

    config.mode = argv.mode;

    config.optimization = {
        minimize: true,
        minimizer: [
            new TerserPlugin()
        ]
    };

    return config;
};
Minimizer disponibili:
- UglifyJS
- Babel-minify
- Terser
Optimization - NoEmitsOnErrorsPlugin
// webpack.config.js
module.exports = {
    [...],
    plugins: [
        new webpack.NoEmitOnErrorsPlugin();
    ];
};
Se webpack, durante la compilazione, genera un errore, questo viene incluso del bundle.
Con il plugin NoEmitOnErrors, questo viene evitato.
Optimization - ModuleConcatenationPlugin
// webpack.config.js
module.exports = {
    [...],
    plugins: [
        new webpack.optimization.ModuleConcatenationPlugin()
    ];
};
Webpack, in modalità dev, wrappa ogni modulo in una closure, rendendo l'esecuzione più lenta.
Con questo plugin (ormai abilitato di default) è possibile evitare le generazione di ogni singola closure, diminuendo i tempi di esecuzione.
Split Chunks
//./utilities/users.js
export default [
    { firstName: "Adam", age: 28 },
    { firstName: "Jane", age: 24 },
    { firstName: "Ben",  age: 31 },
    { firstName: "Lucy", age: 40 }
];
// first.js
import _ from 'lodash';
import users from './users';
const adam = _.find(users, { firstName: 'Adam' });
// second.js
import _ from 'lodash';
import users from './users';

const lucy = _.find(users, { firstName: 'Lucy' });
// webpack.config.js
module.exports = {
    entry: {
        first:  "./src/first.js",
        second: "./src/second.js"
    },
    output: {
        filename: "[name].[chunkhash].bundle.js",
        path: __dirname + "/dist"
    }
};
WebPack genererà : first.[chunkhash].bundle.js e second.[chunkhash].bundle.js; entrambi contengono lodash e users.js
Split Chunks
// webpack.config.js
module.exports = {
    [...],
    optimization: {
        splitChunks: {
            chunks: "all"
        }
    },
};
WebPack genererà :
- vendors~first~second.[chunkhash].bundle.js
- first.[chunkhash].bundle.js
- second.[chunkhash].bundle.js
Entrambi first.[chunkhash].bundle.js e second.[chunkhash].bundle.js contengono users.js
Split Chunks
// webpack.config.js
module.exports = {
    [...]

    splitChunks: {
        chunks: "all",
        minSize: 30,
        cacheGroups: {
            vendors: {
                test: /[\\/]node_modules[\\/]/,
                priority: -10
            },
            default: {
                minChunks: 2,
                priority: -20,
                reuseExistingChunk: true
            }
        }
    }

}
Split Chunks
// webpack.config.js
module.exports = {
    [...],
    optimization: {
        splitChunks: {
            chunks: "all",
            minSize: 0 // Webpack genererà first~second.[chunkhash].bundle.js
        }
    },
};
WebPack genererà :
- vendors~first~second.[chunkhash].bundle.js
- first~second.[chunkhash].bundle.js
- first.[chunkhash].bundle.js
- second.[chunkhash].bundle.js
Google Lighthouse Webpack Plugin
Installazione e setup
# SUL TERMINALE
yarn add --save-dev webpack-lighthouse-plugin
// webpack.config.js

const WebpackLighthousePlugin = require('webpack-lighthouse-plugin');

module.exports = {
    [...]


	plugins: [
		new WebpackLighthousePlugin({
			url: 'http://localhost:9001'
		})
	]

}
API
// webpack.config.js

const WebpackLighthousePlugin = require('webpack-lighthouse-plugin');

module.exports = {
    [...]


	plugins: [
		new WebpackLighthousePlugin({
			url: 'http://localhost:9001',
			perf: true, // EFFETTUA L'AUDIT SOLO DELLE PERFORMANCE
			disableCPUThrottling: false, // DISABILITA LO STRESS TEST SULLA CPU
			disableNetworkThrottling: true, // DISABILITA LO STRESS TEST SULLA CONNESSIONE
			saveAssets: true, // SALVA SCREENSHOT, TRACE O REPORT
		})
	]

}
Un caso reale
www.kaleidoscope.it
Strumenti Utilizzati


Librerie usate


Performance pre-ottimizzazioni

Mobile
Bundle JS: 4.7 MB
Immagini: 445KB
Altro (html, css, fonts, ecc.): 30KB
Totale: 5.16 MB

Desktop
Bundle JS: 4.7 MB
Immagini: 3.7MB
Altro (html, css, fonts, ecc.): 30KB
Totale: 8.42 MB
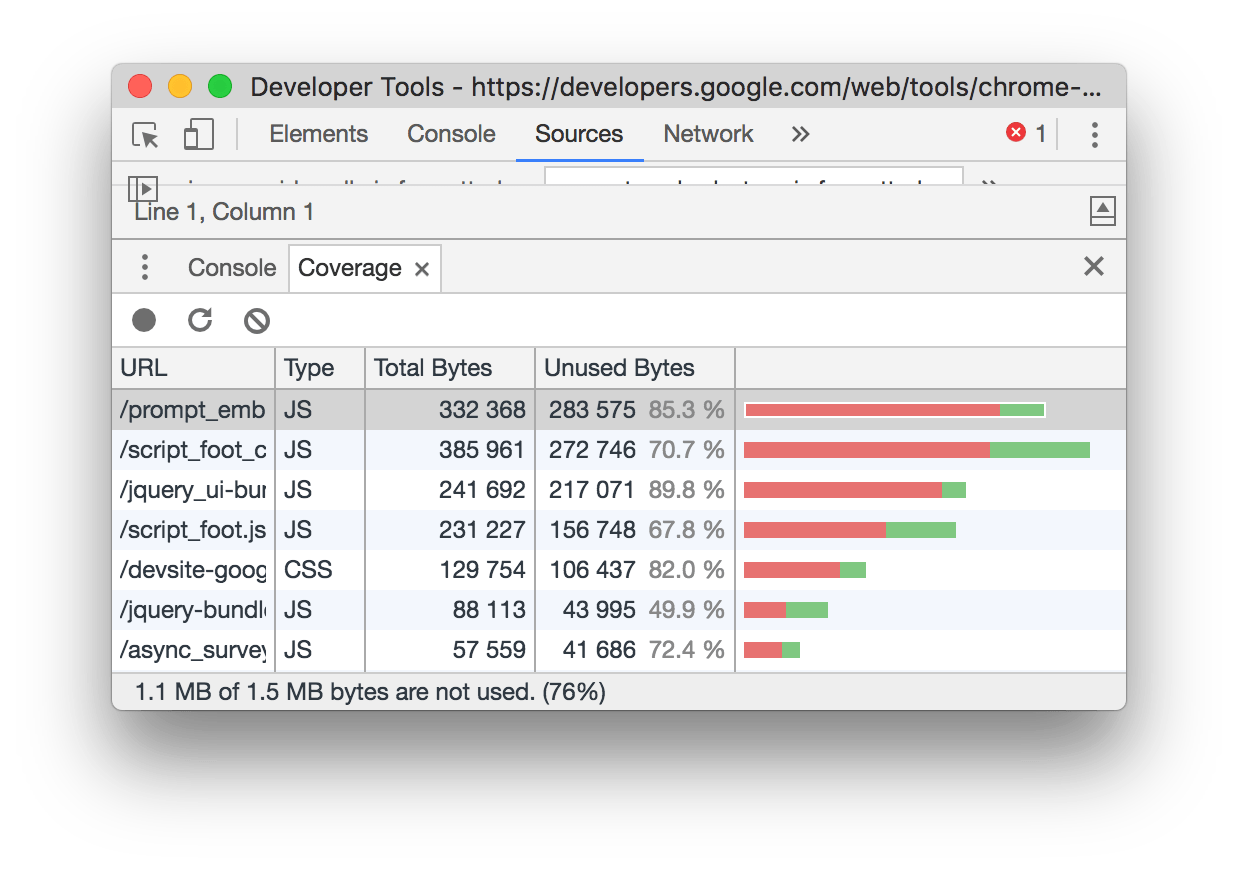
Coverage
Webpack Bundle Analyzer

Librerie usate
Ottimizzazioni
Above the fold

Problema: Render-blocking
<head>
    <link rel="stylesheet" href="/style.css">
    ...
</head>
<body>
    <p>Non visibile fino a che non ho caricato style.css!</p>
</body>
Soluzione: Critical CSS
# TERMINALE
yarn add html-critical-webpack-plugin -d

// webpack.config.js
module.exports = {
    [...],
    plugins: [
        new HtmlWebpackPlugin({ ... }),
        new MiniCssExtractPlugin({ ... }),
        new HtmlCriticalWebpackPlugin({
            base: path.resolve(__dirname, 'dist'),
            src: 'index.html',
            dest: 'index.html',
            inline: true,
            minify: true,
            extract: true,
            width: 375,
            height: 565,
            penthouse: {
                blockJSRequests: false,
            }
        })
    ],
    [...]
};- Viene letto il file definito in src
- Estrae il CSS definito "critico"
- Scrive il nuovo file con il CSS in linea, sul file definito in dest
Soluzione: Critical CSS
<!-- index.html -->
<head>
    <style type="text/css">
        /* Il CSS definito critico viene messo in linea nell'head. */
        body {
            font-family: Helvetica Neue,Helvetica, Arial,sans-serif;
            font-size: 14px;
            line-height: 1.42857;
            color: #333;
            background-color: #fff;
        }
    </style>
    <link href="/style.96106fab.css" rel="preload" as="style" onload="this.rel='stylesheet'">
    <noscript>
        <link href="/style.96106fab.css" rel="stylesheet">
    </noscript>
    <script>
        /* Uno script si occupa di caricare il CSS "non critico" */
    </script>
</head>
<body>
	[...]
    <script type="text/javascript" src="/build_main.js"></script>
</body>
</html>
Resource hinting
Tutta questione di priorità

Preload
<link rel="preload" as="script" href="super-important.js">
<link rel="preload" as="style" href="critical.css">
<link rel="preload" as="font" crossorigin="crossorigin" type="font/woff2" href="myfont.woff2">
rel="preload" : recupera questa risorsa il prima possibile
as="script" : suggerisco al browser già che tipo di risorsa è questa
crossorigin="crossorigin" : effettua questa richiesta come una CORS anonima, altrimenti il font viene caricato 2 volte
Preconnect
<link rel="preconnect" href="https://example.com">rel="preconnect" : suggeriamo al browser che probabilmente servirà una risorsa reperibile all'URL specificato, il browser eviterà roundtrip inutili
1 roundtrip = lookup del DNS + negoziazione TLS + handshake TCP
rel="preconnect" torna utile nell'uso delle CDN
DNS-prefetch
<link rel="dns-prefetch" href="https://example.com">rel="dns-prefetch" : suggeriamo al browser di fare già il DNS Lookup dell'URL
A differenza del preconnect, dns-prefetch effettua SOLO il lookup del DNS.
Prefetch
<link rel="prefetch" href="page-2.html">rel="prefetch" : suggeriamo al browser che probabilmente useremo la risorsa oppure no (a seconda di dinamiche dovute alle scelte dell'utente).
E' un modo per aiutare il browser a gestire le risorse in modo intelligente.
NON va usato, per specificare delle risorse come non prioritarie.
<head>
    <link rel="prefetch" href="optional.css"><!-- CARICATO CON PRIORITA BASSA, PROBABILE CACHE HIT -->
    <link rel="stylesheet" href="optional.css"><!-- CARICATO CON PRIORITA MASSIMA -->
</head>
Performance post-ottimizzazioni
Mobile
Bundle JS: 831 KB
Immagini: 450KB
Altro (html, css, fonts, ecc.): 30KB
Totale: 1.28 MB
Desktop
Bundle JS: 831 KB
Immagini: 3.7MB
Altro (html, css, fonts, ecc.): 30KB
Totale: 4.54 MB

Immagini
-
Usare i formati corretti: svg, gif
-
Usare i nuovi formati: WebP / JPEG2000
-
Usare le dimensioni corrette
-
Usare CDN: Akamai Image Manager / imgix / cloudinary
-
Comprimere, comprimere, comprimere
-
Sostituire icone con SVG
-
Lazy load delle immagini
Inserire in linea PNG, GIF e JPG di piccole dimensioni
// webpack.config.js

module.exports = {
    module: {
        rules: [{
            test: /\.(jpe?g|png|gif)$/,
            loader: 'url-loader',
            options: {
                // Inserisce in linea immagini fino a 10 KB di peso
                limit: 10 * 1024
            }
        }]
    }
};
Il loader converte le immagini in Base 64
Inserire in linea SVG di piccole dimensioni
// webpack.config.js

module.exports = {
    module: {
        rules: [{
            test: /\.svg$/,
            loader: 'svg-url-loader',
            options: {
                // Inserisce in linea immagini fino a 10 KB di peso
                limit: 10 * 1024,
                // Rimuove gli apici dall'URL codificato in base64
                noquotes: true,
            }
        }]
    }
};
Compressione delle immagini
// webpack.config.js

module.exports = {
    module: {
        rules: [{
            test: /\.(jpg|png|gif|svg)$/,
            loader: 'image-webpack-loader',
            enforce: 'pre'
        }]
    }
};
enforce applica il loader prima di url-loader/svg-url-loader
Pros & Cons
PRO
-
Webpack rende facile la gestione del bundling, il controllo degli assets e l'ottimizzazione di tutti i componenti di un progetto frontend
-
Ha già tante opzioni/funzionalità al suo interno
-
Webpack-dev-server con livereload e HMR
CONS
-
Curva di apprendimento
-
Difficoltà nel trovare la configurazione giusta
Approfondimenti
Modello RAIL:
https://developers.google.com/web/fundamentals/performance/rail
Resource Hinting:
https://medium.com/reloading/preload-prefetch-and-priorities-in-chrome-776165961bbf
https://developers.google.com/web/fundamentals/performance/resource-prioritization
Bundle Splitting:
https://medium.com/hackernoon/the-100-correct-way-to-split-your-chunks-with-webpack-f8a9df5b7758
Addy Osmani - Guida alle immagini:
Strumenti
Webpack Bundle Analyzer:
https://www.npmjs.com/package/webpack-bundle-analyzer
Critial CSS:
Credits

Marco Guarino
Full Stack Developer @KaleidoscopeSrl

Valentina Piacenza
Junior UX Designer @Fondazione Edulife
Grazie!

Google LightHouse e Webpack. Performance obsession.
By Filippo Matteo Riggio
Google LightHouse e Webpack. Performance obsession.
Il talk è incentrato su come ottimizzare un sito / web app in termini di performance usando al meglio WebPack e le ultime novità introdotte dal W3C. Per chi non conoscesse lo strumento, è previsto un mini crash course per imparare i concetti base dello strumento.


