JavaScript

Frank Merema
Lead Frontend developer @ FrontValue

Frontend development
HTML
CSS
JavaScript
JavaScript
What is JS?
JavaScript is a scripting language used primarily on the web to add interactivity to web pages. It is a high-level, interpreted programming language that is often used alongside HTML and CSS to create dynamic and responsive user interfaces.
Variables
In JavaScript, variables are used to store data values. There are three ways to declare a variable in JavaScript:
var -let -const
JS variables
The var keyword is used to declare a variable in JavaScript. Variables declared with
varhave function-level scope, meaning that they are only accessible within the function in which they are declared.
var
function example() {
  var x = 10;
  console.log(x);
}

example(); // Output: 10
console.log(x); // Uncaught ReferenceError: x is not defined
The let keyword is used to declare a block-scoped variable in JavaScript. Variables declared with let have block-level scope, meaning that they are accessible only within the block in which they are declared.
let
function example() {
  let x = 10;
  if (true) {
    let x = 20;
    console.log(x); // Output: 20
  }
  console.log(x); // Output: 10
}

example();
The const keyword is used to declare a constant variable in JavaScript. Variables declared with const cannot be reassigned or redeclared, and they have block-level scope.
const
const x = 'Hello world';

// Uncaught TypeError: Assignment to constant variable.
x = 'Hello world trainees!';
const product = {
title: 'Nice t-shirt',
price: 10
}
// Uncaught TypeError: Assignment to constant variable.
product = { title: 'Nicer t-shirt' };
product.title = 'Nicer t-shirt'; 👍Operators
Operators in JavaScript are symbols or keywords that perform operations on operands (values or variables) to produce a result. JavaScript includes various types of operators, such as arithmetic operators, assignment operators, comparison operators, logical operators, and more.
JS Operators

JS Operators
Arithmetic
Arithmetic operators perform mathematical calculations
JS Operators
Addition
Addition (+): Adds two operands together.
const result = 1 + 2;

console.log(result); // 3
JS Operators
Subtraction
Subtraction (-): Subtracts the second operand from the first operand.
const result = 2 - 1;

console.log(result); // 1
JS Operators
Multiplication
Multiplication (*): Multiplies two operands together.
const result = 5 * 2;

console.log(result); // 10
JS Operators
Division
Division (/): Divides the first operand by the second operand.
const result = 10 / 5;

console.log(result); // 2
JS Operators
Modulus
Modulus (%): Returns the remainder of the division of the first operand by the .second operand.
const result = 4 % 2;

console.log(result); // 0

const result1 = 13 % 5;

console.log(result1); // 3
JS Operators
Increment / Decrement
Increment (++) and Decrement (--): Increase or decrease the value of an operand by 1.
let result = 1;

console.log(result++); // 2

let result1 = 2;

console.log(result1--); // 1
JS Operators
Assignment
Assignment operators assign values to variables
JS Operators
Assignment
Assignment (=): Assigns a value to a variable.
const result = 1;JS Operators
Addition assignment
Addition assignment (+=): Adds the value of the right operand to the left operand and assigns the result to the left operand.
let result = 1;

result += 1;

console.log(result); // 2
JS Operators
Subtraction assignment
Subtraction assignment (-=): Subtracts the value of the right operand from the left operand and assigns the result to the left operand.
let result = 2;

result -= 1;

console.log(result); // 1
JS Operators
Multiplication assignment
Multiplication assignment (*=): Multiplies the value of the right operand by the left operand and assigns the result to the left operand.
let result = 2;

result *= 2;

console.log(result); // 4
JS Operators
Division assignment
Multiplication assignment (/=): Multiplies the value of the right operand by the left operand and assigns the result to the left operand.
let result = 2;

result /= 2;

console.log(result); // 1
JS Operators
Modulus assignment
Modulus assignment (%=): Assigns the remainder of the division of the left operand by the right operand to the left operand.
let result = 3;

result %= 2;

console.log(result); // 1
JS Operators
Comparison
Comparison operators compare values
JS Operators
Equality
Equality (==): Returns true if the operands are equal in value.
const num = 0;
const str = "0";
const obj = new String("0");

console.log(num == str); // true
console.log(str == big); // true

console.log(num == obj); // true
console.log(str == obj); // true
JS Operators
Inequality
Inequality (!=): Returns true if the operands are not equal in value.
const num = 0;
const str = "0";
const obj = new String("0");

console.log(num != str); // false
console.log(str != big); // false

console.log(num != obj); // false
console.log(str != obj); // false
JS Operators
Strict equality
Strict equality (===): Returns true if the operands are equal in value and data type.
const num = 0;
const obj = new String("0");
const str = "0";

console.log(num === num); // true
console.log(obj === obj); // true
console.log(str === str); // true

console.log(num === obj); // false
console.log(num === str); // false
console.log(obj === str); // false
console.log(null === undefined); // false
console.log({} === null); // false
console.log({} === undefined); // falseconst a = {};
const b = {};
console.log(a === b); // falseJS Operators
Strict inequality
Strict inequality (!==): Returns true if the operands are not equal in value or data type.
const num = 0;
const obj = new String("0");
const str = "0";

console.log(num !== num); // false
console.log(obj !== obj); // false
console.log(str !== str); // false

console.log(num !== obj); // true
console.log(num !== str); // true
console.log(obj !== str); // true
console.log(null !== undefined); // true
console.log({} !== null); // true
console.log({} !== undefined); // trueJS Operators
Greater / Less than
Greater than (>), Less than (<): Compare the values of the operands and return a boolean result.
const greater = 1 > 2;

const smaller = 1 < 2;

console.log(greater); // false
console.log(smaller); // true
JS Operators
Greater / Less than or equal to
Greater than or equal to (>=), Less than or equal to (<=): Compare the values of the operands and return a boolean result.
const greater = 1 >= 2;
const smaller = 1 <= 2;
const equal = 2 <= 2; // same as 2 >= 2;

console.log(greater); // false
console.log(smaller); // true
console.log(equal); // true
JS Operators
Logical
Logical operators perform logical operations
JS Operators
AND
Logical AND (&&): Returns true if both operands are true.
const result = true && true;
const result1 = false && true;
const result2 = false && false;

console.log(result); // true
console.log(result1); // false
console.log(result2); // false
JS Operators
OR
Logical OR (||): Returns true if either operand is true.
const result = true || true;
const result1 = false || true;
const result2 = false || false;

console.log(result); // true
console.log(result1); // true
console.log(result2); // false
JS Operators
NOT
Logical NOT (!): Returns the opposite boolean value of the operand.
const result = !true;
const result1 = !false;

console.log(result); // false
console.log(result1); // true
Functions
Functions in JavaScript are reusable blocks of code that perform a specific task. They allow you to group code into a single entity and execute it whenever needed. Functions can take input parameters (arguments) and return a value.
JS Functions

JS Functions
Declaration
To declare a function in JavaScript, you can use the function keyword followed by the function name, a list of parameters (enclosed in parentheses), and the function body (enclosed in curly braces).
function greet(name) {
  console.log(`Hello ${name}!`);
  console.log('Hello ' + name + '!');
  console.log("Hello " + name + "!");
}
greet('Trainees');
// Hello Trainees!
// Hello Trainees!
// Hello Trainees!JS Functions
Return statement
Functions can return a value using the return statement.
function multiply(a , b) {
  return a * b;
}

const result = multiply(2, 3);

console.log(result); // 6
JS Functions
Arrow functions
An arrow function expression is a compact alternative to a traditional function expression, with some semantic differences and deliberate limitations in usage.
function multiply(a , b) {
  return a * b;
}
const multiplyArrow = (a, b) => a * b;const multiplyAndAddArrow = (a, b, c) => {
const multiply = a * b;
return c + multiply;
}JS Functions
Arrow functions vs functions
Arrow functions don't have their own bindings to this, arguments, or super. Arrow functions can't be used before initialisation while regular functions can.
const product = {
  price: 10,
  logPriceArrow: () => console.log(this.price, this),
  logPrice() {
    console.log(this.i, this);
  },
};

obj.logPriceArrow(); // logs undefined, Window { /* … */ }
obj.logPrice(); // logs 10, Object { /* … */ }
class Product {
price = 1;
logPrice = () => {
console.log(this.price);
};
}
const p = new Product();
p.logPrice(); // 1Arrays
Arrays in JavaScript are used to store multiple values in a single variable. They can hold values of any type and can dynamically grow or shrink as needed. Array elements are accessed using numeric indices starting from 0.
JS Arrays
JS Arrays
Declaration
To declare an array in JavaScript, you can use either the [] bracket notation or the Array object constructor.
const arr = [];
const fruits = ['apple', 'banana', 'pear'];
const objects = [{ name: 'test' }, { name: 'test2' }];
const numbers = new Array(1, 2, 3, 4, 5);
JS Arrays
Length
length: Returns the number of elements in the array.
const fruits = ['apple', 'banana', 'pear'];

console.log(fruits.length); // 3
JS Arrays
Push
push(): Adds one or more elements to the end of an array and returns the new length.
const fruits = ['apple', 'banana', 'pear'];

console.log(fruits.push('watermelon')); // 4
console.log(fruits); // ['apple', 'banana', 'pear', 'watermelon']
JS Arrays
Pop
pop(): Removes the last element from an array and returns that element.
const fruits = ['apple', 'banana', 'pear'];

console.log(fruits.pop()); // pear
JS Arrays
Concat
concat(): Combines two or more arrays and returns a new array.
const fruits = ['apple', 'banana', 'pear'];

const result = fruits.concat(['watermelon']);

console.log(result); // ['apple', 'banana', 'pear', watermelon]
JS Arrays
IndexOf
indexOf(): Returns the first index at which a given element can be found in the array, or -1 if it is not present.
const fruits = ['apple', 'banana', 'pear'];

const resultFound = fruits.indexOf('banana');
const resultNotFound = fruits.indexOf('watermelon');

console.log(resultFound); // 2
console.log(resultNotFound); // -1
JS Arrays
Slice
slice(): Extracts a section of an array and returns a new array.
const fruits = ['apple', 'banana', 'pear', 'watermelon'];

console.log(fruits.slice(2)); // ['pear', 'watermelon']
console.log(fruits.slice(1, 3)); // ['banana', 'pear']
console.log(fruits.slice(-1)); // ['watermelon']
console.log(fruits.slice(1, -2)); // ['banana']
JS Arrays
ForEach
forEach(): Executes a provided function once for each array element.
const fruits = ['apple', 'banana', 'pear', 'watermelon'];

fruits.forEach(function(fruit, index) {
  console.log(index, fruit);
  // 0 'apple'
  // 1 'banana'
  // 2 'pear'
  // 3 'watermelon'
});
JS Arrays
Map
map(): Creates a new array with the results of calling a provided function on every element in the array.
const fruits = ['apple', 'banana', 'pear'];

const result = fruits.map(function(fruit, index) {
  return `${index}, ${fruit}`;
});

console.log(result);// 0, 'apple' // 1, 'banana' // 2, 'pear'
JS Arrays
Filter
filter(): Creates a new array based on the result of a provided function.
const fruits = ['apple', 'banana', 'pear'];

const result = fruits.filter(function(fruit, index) {
  return fruit.length > 5
});

console.log(result); // ['banana']
JS Arrays
findIndex
findIndex(): Returns the index of the first element that satisfies the provided function. If no elements satisfy, -1 is returned.
const fruits = ['apple', 'banana', 'pear'];

const result = fruits.findIndex(function(fruit, index) {
  return fruit === 'banana';
});

console.log(result); // 1
JS Arrays
Reducer
const numbers = [1, 2 ,3, 4];

const result = fruits.reduce(function(accumulator, nextValue) {
	return accumulator + nextValue;
}, 0);

console.log(result); // 1 + 2 + 3 + 4 = 10
reducer(): The reducer walks through the array element-by-element, at each step adding the current array value to the result from the previous step — until there are no more elements to add.
JS Arrays
Chaining
const numbers = [1, undefined ,3, 4, undefined, 6];

const result = fruits
  .filter(fruit => fruit !== undefined)
  .reduce((acc, cur) => acc + cur, 0);

console.log(result); // 1 + 3 + 4 + 6 = 14
Array chaining is using multiple operators on the same array in one go.
Array assignments
Loops
Loops in JavaScript are used to repeatedly execute a block of code until a specified condition is met. JavaScript provides several loop constructs, including the for loop, while loop, and do…while loop.
JS Loops
JS Loops
For
The for loop is used to iterate over a sequence of values or elements. It consists of three optional parts: initialisation, condition, and iteration statement.
for (let i = 0; i < 3; i++) {
  console.log(i);
  // 0
  // 1
  // 2
}
JS Loops
While
The while loop repeatedly executes a block of code as long as a specified condition is true. It only consists of the condition statement.
let i = 0;

while (i < 3) {
  console.log(i); // 0 // 1 // 2
  i++;
}
JS Loops
Do ... While
The do…while loop is similar to the while loop, but it executes the code block at least once before checking the condition.
let i = 0;

do {
  console.log(i); // 0 // 1 // 2
  i++;
} while (i < 3);
Document Object Model
The Document Object Model (DOM) is a programming interface for web documents. It represents the page so that programs can change the document structure, style, and content. The DOM represents the document as nodes and objects; that way, programming languages can interact with the page.
DOM
DOM
<html>
  <head>
    <script>
      // Get the element with the ID "my-element"
      const myElement = document.getElementById("my-element");
      // Change the text content of the element
      myElement.textContent = "Hello, world!";
    </script>
  </head>
  <body>
    <div id="my-element"></div>
  </body>
</html>
DOM
// Get the element with the ID "my-element"
const myElement = document.getElementById("my-element");
// Change the text content of the element
myElement.textContent = "Hello, world!";
// Add a click event listener to the element
myElement.addEventListener("click", function() {
  alert("You clicked the element!");
});
DOM navigation refers to the process of navigating the structure of the DOM to access and manipulate elements. There are several methods in JavaScript that you can use to navigate the DOM, including parentNode, previousSibling, nextSibling, firstChild, and lastChild.
DOM Navigation
DOM Navigation
parentNode
Get the parent element of the selected element
// Get the parent element of an element with the ID "my-element"
const myElement = document.getElementById("my-element");
const parentElement = myElement.parentNode;
DOM Navigation
previousSibling
Get the previous sibling of the selected element
// Get the previous sibling of an element with the ID "my-element"
const myElement = document.getElementById("my-element");
const previousSiblingElement = myElement.previousSibling;
DOM Navigation
nextSibling
Get the next sibling of the selected element
// Get the next sibling of an element with the ID "my-element"
const myElement = document.getElementById("my-element");
const nextSiblingElement = myElement.nextSibling;
DOM Navigation
firstChild
Get the first child
of the selected element
// Get the first child of an element with the ID "my-element"
const myElement = document.getElementById("my-element");
const firstChildElement = myElement.firstChild;
DOM Navigation
lastChild
Get the last child
of the selected element
// Get the last child of an element with the ID "my-element"
const myElement = document.getElementById("my-element");
const lastChildElement = myElement.lastChild;
Selectors in JavaScript are used to select elements from the DOM based on certain criteria, such as their ID, class, or tag name. There are several selector methods in JavaScript that you can use to select elements from the DOM, including querySelector, getElementById, getElementsByClassName, and getElementsByTagName.
DOM Selectors
DOM Selectors
querySelector
The querySelector method is used to select the first element in the DOM that matches a specified CSS selector. This method returns a reference to the selected element, or null if no element is found.
// Get the first element with the class "my-class"
const myElement = document.querySelector(".my-class");
DOM Selectors
getElementById
The getElementById method is used to select an element from the DOM based on its ID. This method returns a reference to the selected element, or null if no element is found.
// Get the element with the ID "my-element"
const myElement = document.getElementById("my-element");
DOM Selectors
getElementsByClassName
The getElementsByClassName method is used to select all elements in the DOM that have a specified class. This method returns a collection of references to the selected elements, or an empty collection if no elements are found.
// Get all elements with the class "my-class"
const myElements = document.getElementsByClassName("my-class");
DOM Selectors
getElementsByTagName
The getElementsByTagName method is used to select all elements in the DOM that have a specified tag name. This method returns a collection of references to the selected elements, or an empty collection if no elements are found.
// Get all elements with the tag name "p"
const myElements = document.getElementsByTagName("p");

// Loop through the selected elements and modify their content
for (let i = 0; i < myElements.length; i++) {
  myElements[i].textContent = "Hello, world!";
}
Events in JavaScript are actions or occurrences that happen in the browser, such as a user clicking a button or a page finishing loading. You can use JavaScript to listen for these events and execute code in response to them.
DOM Events
DOM Events
addEventlistener
addEventListener is a method in JavaScript that allows you to listen for events on an element and execute code in response to those events. The addEventListener method takes two arguments: the type of event to listen for, and a function to execute when the event is triggered.
DOM Events
onClick
onClick is an event in JavaScript that is triggered when a user clicks an element. You can use addEventListener to listen for the click event on an element and execute code in response to that event.
// Get the element to add the click event to
const myElement = document.getElementById("my-element");
// Add a click event listener
myElement.addEventListener("click", function() {
  alert("You clicked the element!");
});
DOM Events
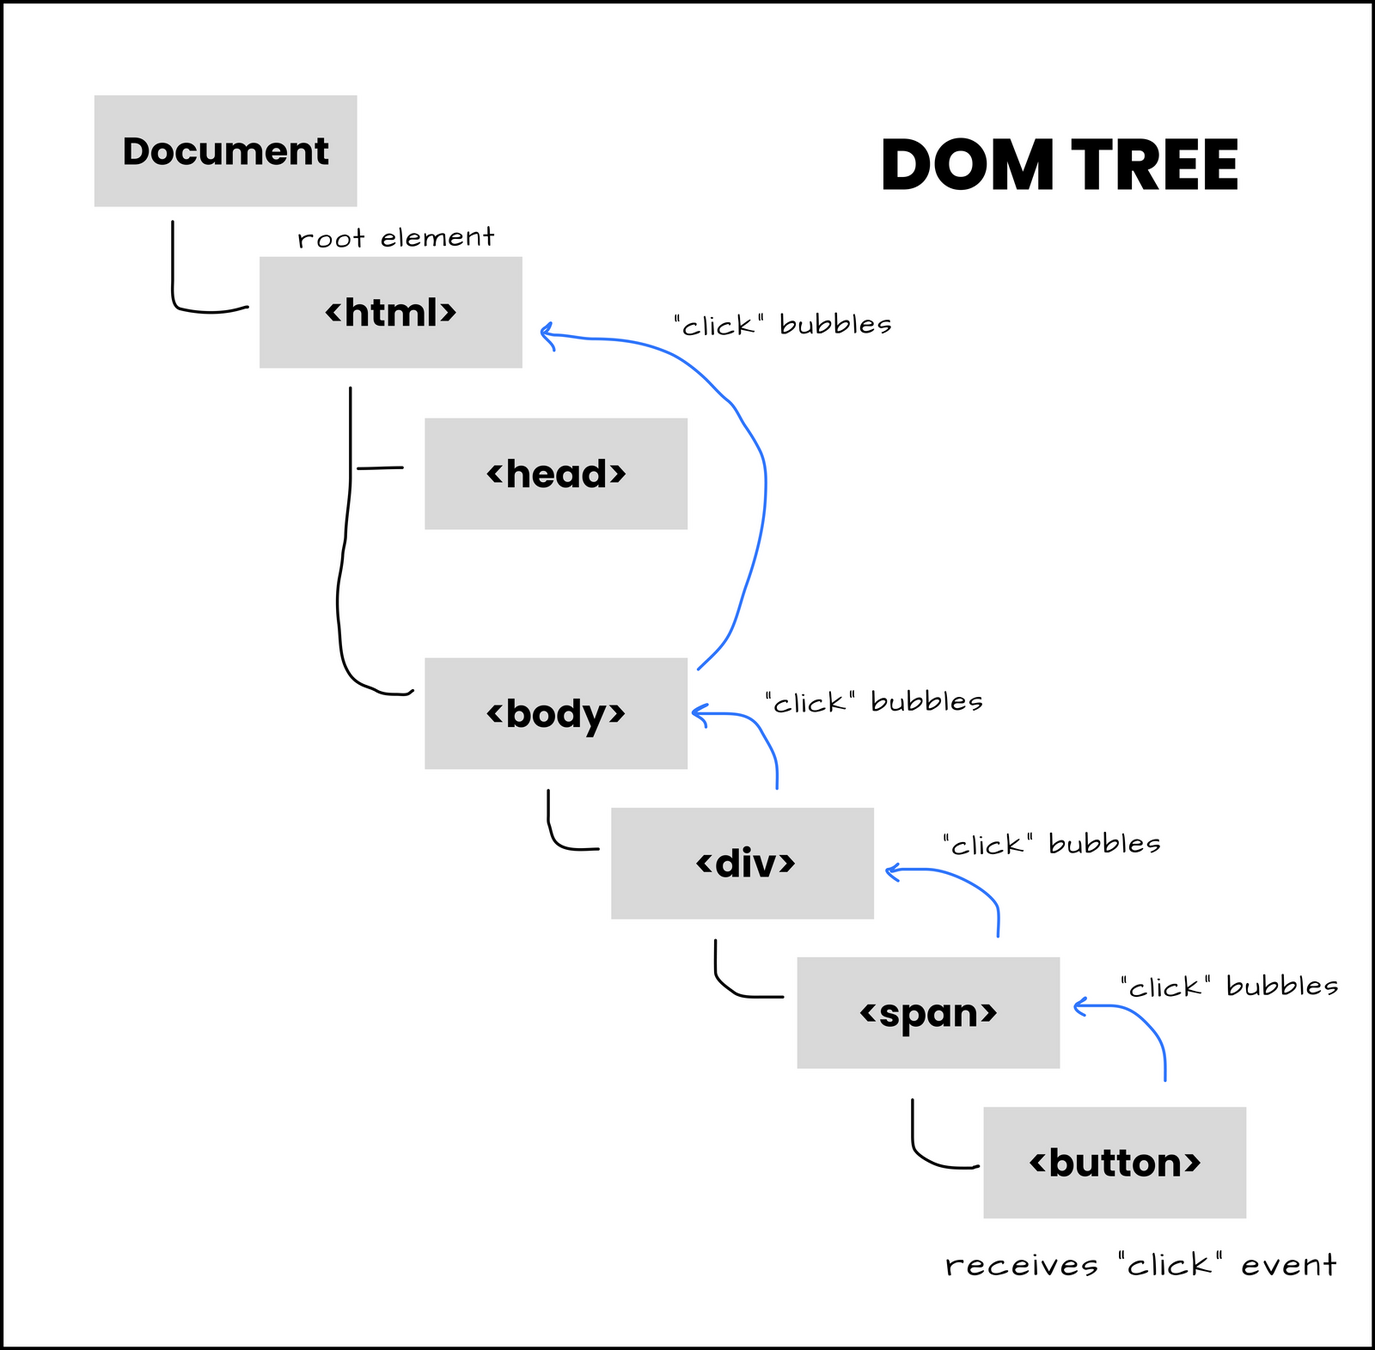
Bubbling
Event bubbling happens when an element receives an event. That event bubbles up to its parent and ancestor elements in the DOM tree, until it gets to the root element.
Assignment
Wishlist assignment 1
Classes
Classes are a template for creating objects. They encapsulate data with code to work on that data. Classes in JS are built on prototypes but also have some syntax and semantics that are unique to classes.
Classes
Classes
Constructor
The constructor method is a special method for creating and initialising an object created with a class. There can only be one special method with the name "constructor" in a class
class Rectangle {
  constructor(height, width) {
    this.height = height;
    this.width = width;
  }
}
Classes
Fields
Class fields are similar to object properties, not variables, so we don't use keywords such asconstto declare them. Modifier keywords likepublicandprivateshould not be used either.
class Rectangle {
  height = 0;
  width;

  constructor(height, width) {
    this.height = height;
    this.width = width;
  }
}
Classes
Methods
Methods are defined on the prototype of each class instance and are shared by all instances. Methods can be plain functions, async functions, generator functions, or async generator functions.
class Rectangle {
  constructor(height, width) {
    this.height = height;
    this.width = width;
  }

  calcArea() {
    return this.height * this.width;
  }
}
Classes
Private
private (# in Javascript) declares a member's access as private. Private fields can only be read or written within the class body.
class Rectangle {
  #height = 0;
  #width;

  constructor(height, width) {
    this.#height = height;
    this.#width = width;
  }
}

const r = new Rectangle(5,5);
console.log(r.#height); // Error: Private field '#height'
            // must be declared in an enclosing class
Classes
Static
The static keyword defines a static method or field for a class. Static methods are often used to create utility functions for an application, whereas static fields are useful for caches, fixed-configuration.
class Rectangle {
  static displayName = "Rectangle";

  constructor(height, width) {
    this.height = height;
    this.width = width;
  }

  static calcSquare(height, width) {
    return height * width;
  }
}

const r1 = new Rectangle(5, 5);
r1.displayName; // undefined
console.log(Rectangle.displayName); // Rectangle
console.log(Rectangle.calcSquare(2, 2)); // 4
Classes
Inheritance
Inheritance in JavaScript is a concept that acquires all the properties from one class to other classes.
class Animal {
  constructor(name) {
    this.name = name;
  }

  speak() {
    console.log(`${this.name} makes a noise.`);
  }
}

const a = new Animal("Trainee");
a.speak(); // Trainee makes a noise.
class Dog extends Animal {
  constructor(name) {
    super(name);
    // call the super class constructor
    // and pass in the name parameter
  }

  speak() {
    console.log(`${this.name} barks.`);
  }
}

const d = new Dog("Trainee");
d.speak(); // Trainee barks.
Assignment
Wishlist assignment 2
File seperation
File separation is used to split up the Javascript in more readable / reusable files
File seperation
File seperation
folder structure
-
index.html: This file will generally contain all your homepage content -
imagesfolder: This folder will contain all the images that you use on your site. -
stylesfolder: This folder will contain the CSS code used to style your content. -
scriptsfolder: This folder will contain all the JavaScript code.
File seperation
<script>
The
<script>HTML element is used to embed executable code or data; this is typically used to embed or refer to JavaScript code. It will block rendering and start fetching the code.
<html>
  <head>
    ...
    <script src="scripts/javascript.js"></script>
  </head>
  <body>
    <script>
      alert('hi 👋')
    </script>
  </body>
</html>
<html>
<head>
...
<script src="scripts/javascript.js"></script>
<script src="scripts/other.js"></script>
<script src="scripts/secret.js"></script>
</head>
<body>
...
</body>
</html>File seperation
<script> attributes
- async: For classic scripts, the script will be fetched in parallel to parsing and evaluated as soon as it is available.
-
defer: Boolean attribute to indicate that the script is meant to be executed after the document has been parsed, but before firing
DOMContentLoaded.
<html>
  <head>
    ...
    <script defer src="scripts/beforeRendering.js"></script>
    <script async src="scripts/parallel.js"></script>
  </head>
...
File seperation
<script> module
- Module : Mechanism for splitting JavaScript programs up into separate modules that can be imported when needed. Browsers can optimise loading of modules, making it more efficient
<html>
  <head>
    ...
    <script type="module" src="scripts/main.js"></script>
  </head>
...
File seperation
Export
-
Export: The
exportdeclaration is used to export values from a JavaScript module. Exported values can then be imported into other programs with theimportdeclaration
// Exporting declarations
export const name1 = 1;
export function functionName() {}
export class ClassName { }

// Export list
export { name1, nameX };
export { variable1 as name1, nameN };
export { variable1 as "string name" };
export { name1 as default };

// Default exports
export default expression;

// Aggregating modules
export * from "module-name";
export * as name1 from "module-name";
export { name1, /* …, */ nameN } from "module-name";
File seperation
Import
- Import: The static import declaration is used to import read-only live bindings which are exported by another module. The bindings are called live bindings because they are updated by the module that exported it, but cannot be re-assigned by the importing module.
import defaultExport from "module-name";
import * as name from "module-name";
import { export1 } from "module-name";
import { export1 as alias1 } from "module-name";
import "module-name";
Assignment
Wishlist assignment 3
Debugging
Debugging is a routine process of identifying and solving issues in the source code of a program. Issues can be bugs, errors or abnormalities.
Debugging
Debugging
console.log
All time favourite debugging tool is the console.log() everywhere. It logs a value to the console which gives the developer a snapshot of the value.
let value = 1;

const methodWithBug = () => {
  console.log(value); // 1
  // code we think is the issue / buggy
  value = 2;

  console.log(value); // 2
}

methodWithBug();
Debugging
console.log
Be aware that information about an object is lazily retrieved. This means that the log message shows the content of an object at the time when it's first viewed, not when it was logged.
let value = {
  id: 1;
};

const methodWithBug = () => {
  console.log(value); // { id: 1 }
  // code we think is the issue / buggy
  value.id = 2;

  console.log(value); // { id: 2 }
}

// The first log also shows { id: 2 }
methodWithBug();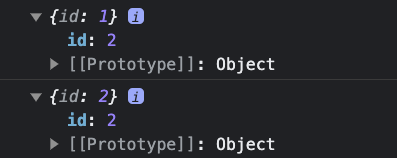
Debugging
Breakpoints
In a debugger window, you can set breakpoints in the code. At each breakpoint, it will stop executing, and let you examine all values. After examining values, you can resume the execution of code.
Debugging
Breakpoints - Debugger window
To open the debugger window you can do multiple things: Right mouse → inspect or Press F12


Debugging
Debugger
The debugger statement invokes any available debugging functionality, such as setting a breakpoint. If no debugging functionality is available, this statement has no effect.
const methodWithBug = () => {
  // ...
  // code we think is the issue / buggy
  debugger;
  // ...
}

methodWithBug();
Assignment
Form validation
Assignment
Wishlist assignment bonus
Javascript basics
By FrontValue

