Guix Package Updates
Updating a package in the Guix archive and sending the contribution

Guix Packaging Series
- Blog posts and video series covering Guix packaging
-
The main scenarios are:
- Using an older package (downgrading)
- Rebuilding an existing package
- Modifying an existing package - Updating it
- Creating a new package (with and without source)
- Contributing a package to the distribution
Package update:
- borgmatic a backup application
- Update from version 1.8.13 to 1.8.14
- Contribute (send) the updated package to the Guix developers
Learning Path
Inputs & native-inputs
Build system
Build phases
Stacked Git
(stgit)
Modified Package Contribution
Git
worktrees
send-email
Package
Structure
Source &
Origin
Advanced References
Building Guix from Source
Tools
bts & b4
Package Patch
Review
Shell
Command
Build
Command
Package
Transforms
Learning Path
Manifests
Transforms in Manifests
1
Build Guix from source
3
Send the updated package
Modified Package Contribution in 3 Easy Steps
2
Alter the package we want to change
1
Build Guix from source
23
A series of
manual steps
Modified Package Contribution in 3 Easy Steps
2
Alter the package we want to change and verify to project standards
3
Send the updated package as a patch by email
1
Build Guix from source
23
A series of involved
manual steps
Modified Package Contribution in 3 23 Easy involved Steps 😰
2
Alter the package we want to change and verify to project standards
3
Send the updated package as a patch by email
1. Pre-requisites
-
Guix source
-
Ability to send email using git send-email
-
guix package: git:send-email
-
-
Tool - Stacked Git
-
Deals with patches in git as a stack
-
How we develop and how a Maintainer applies the patches is the same with the system
-
guix package: stgit@2.4.0
-
-
Tool - bts
-
Tool for interacting with Guix's Issues tracker
-
guix package: debian-devscripts-bts
-
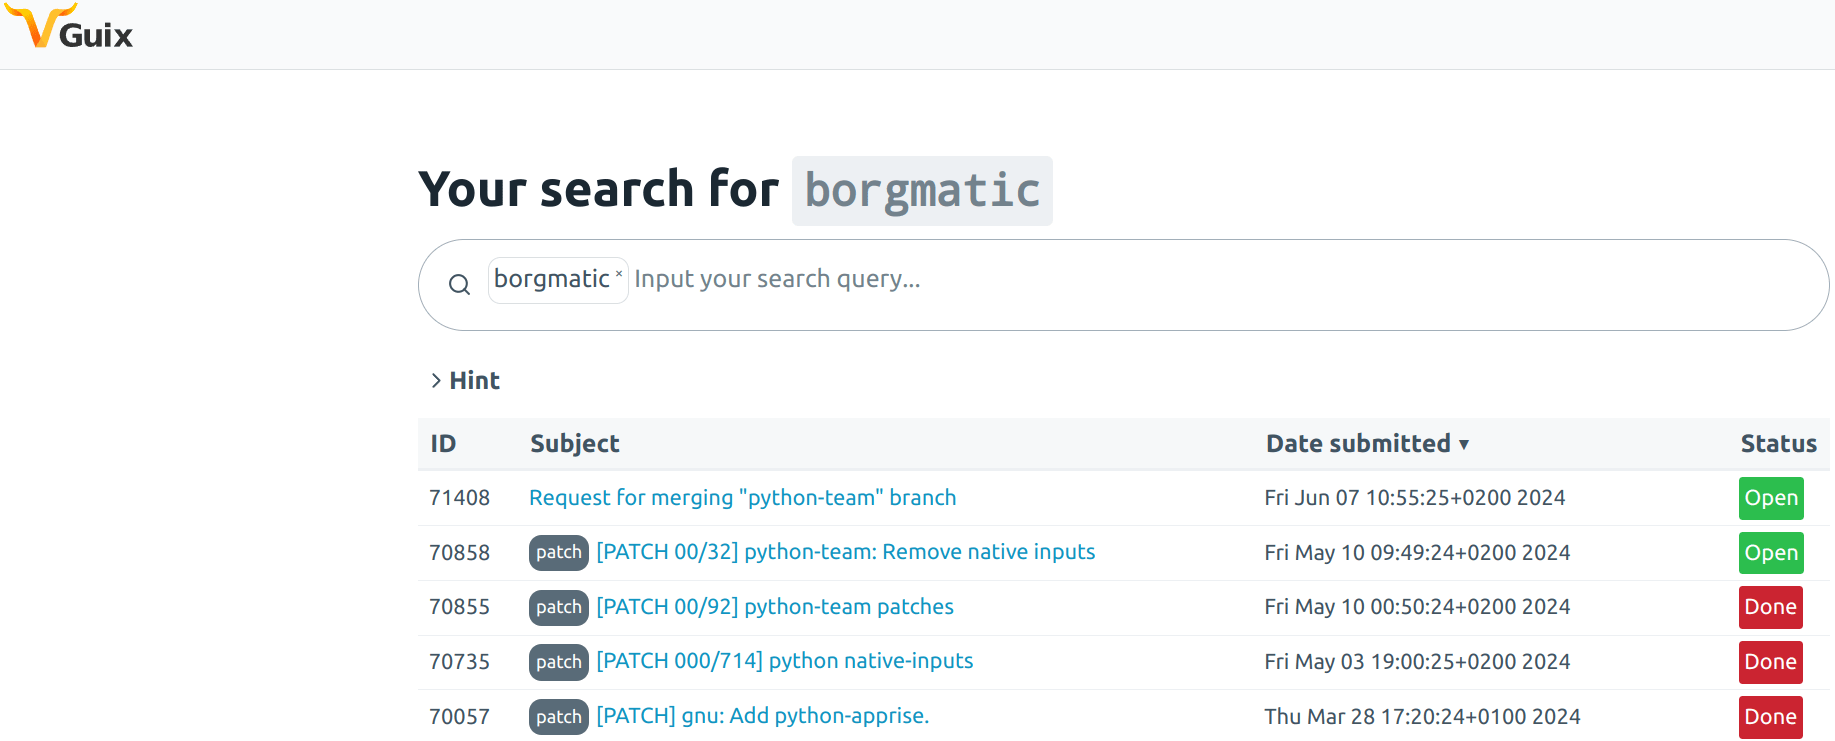
2. Check for updates
-
First check if the package is already being updated
- Updates can take a while to show up - review their patch to help!
-
Check Guix's Git repository
- Search for the package (right hand side)
-
Check the issues / bug-tracker
- Guix uses GNU Projects shared Debbugs
- Two Web interfaces - uses Guix Issues for simplicity
2. Check for updates
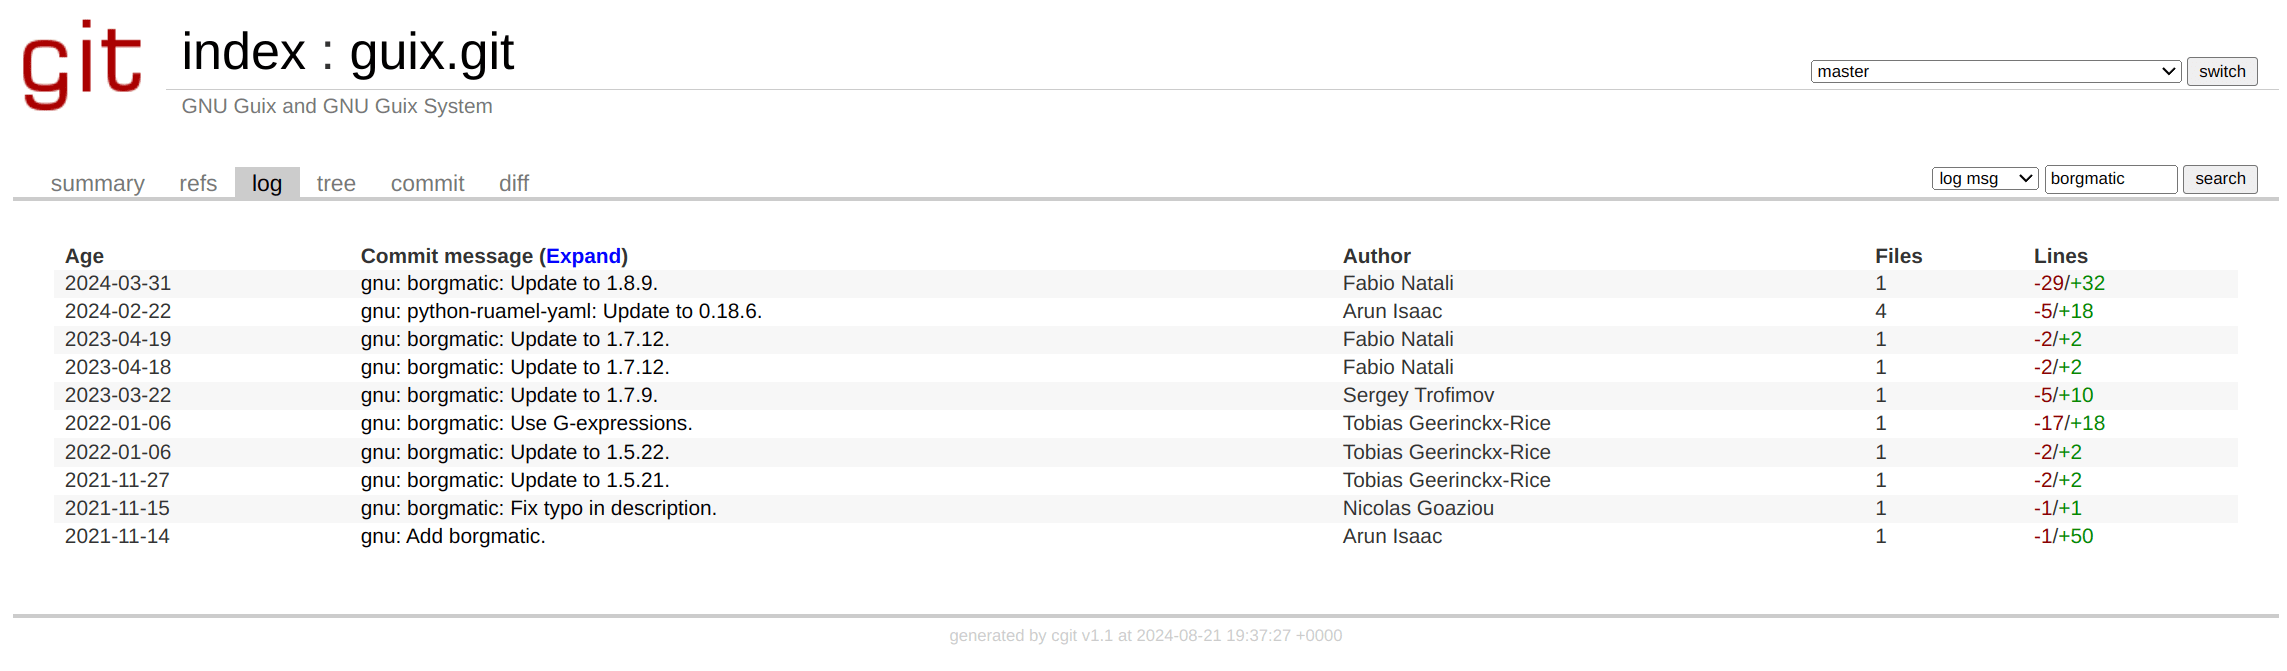
No update in progress
3. Check the complexity
-
Altering a package can vary in complexity:
- Upstream source may change their inputs (Rust packages!)
- Upstream source may change build system (Python)
- A quick check is to use a Transformation
-
Some modifications look easy but impact many other packages
- Use guix graph to see the graph of packages in the archive
- It can visually show various parts of the package tree including - packages that use the one we're trying to update
3. Check the complexity
- reverse-bag checks for packages in the archive that use borgmatic as one of it's inputs.
- xdot shows there are no other packages using borgmatic as an input
# all my guix code is in this location:
$ cd ~/workspace/guix-packages
$ git clone https://git.savannah.gnu.org/git/guix.git guix
$ cd guix
$ guix shell --development guix graphviz
[env] $ ./pre-inst-env guix graph --type=reverse-bag borgmatic > borgmatic-reverse-bag.dot
[env] exit
$ xdot borgmatic-reverse-bag.dotClone the Guix archive:
Use graphviz to check package references:

4. Create a new worktree
- Using git worktrees allows me to work on more than one package at a time - optional
Switch to master and update:
$ git fetch origin keyring:keyring
$ guix git authenticate
Check new commits are authentic:
$ cd ~/workspace/guix-packages/guix
$ git switch master
$ git pull
Create a new worktree for this update:
$ mkdir ~/workspace/guix-packages/worktrees
$ git worktree add ~/workspace/guix-packages/worktrees/borgmatic-1.8.14 \
    -b borgmatic-1.8.14 origin/master --track
$ cd ../worktrees/borgmatic-1.8.14- done using standard guix that is in the default profile - and not in a shell
- all worktrees are in the same place
- creates a branch at the same time and sets it to track origin/master
5. Initialise StackeGit
- StackedGit (stgit) makes git commits feel like patches
- All patches are in a stack and can be moved up and down within it
Configure git on the worktree:
$ stg init
$ stg branch --describe "Update borgmatic to 1.8.14"

# check the branch is correctly tracking origin/master
$ stg branch --list
Initialise stgit on the worktree
$ cd ~/workspace/guix-packages/worktrees/borgmatic-1.8.14
$ git config user.name "Your Name"
$ git config user.email "your@email.com"- all StackedGit commands are stg <something>
- there are some convenience commands like stg branch
- see stg --help for more
6. Build the Guix source
- Build the source that's in the worktree
Create a guix shell to build the source in:
[env]$ ./bootstrap
[env]$ ./configure --localstatedir=/var --sysconfdir=/etc

[env]$ make
[env]$ exit
Bootstrap, configure and build the guix source:
$ cd ~/workspace/guix-packages/worktrees/borgmatic-1.8.14
$ guix shell --container --nesting --development guix --pure
    --manifest=../../scm/guix-dev-env.scm --verbosity=3
Manifest has some basic tools:
- building will take a while!
- if it's successful exit from the environment
(specifications->manifest (list "glibc-locales" "gcc-toolchain" "autoconf" "automake" "texinfo"
                                "coreutils" "inetutils" "findutils" "which" "lesspipe" "help2man"
                                "git" "strace"))
7. Create packaging envs
-
For packaging need multiple separate terminal environments:
- build: guix shell env with development guix
- test: guix shell env with development guix and testing packages
- dev & hash: normal environment to run code editor guix hash in
- I use Tmux with four separate splits so I can have them all on the screen easily
Create build env in a Tmux split:
$ guix shell --development guix --container --network --nesting --preserve=^TERM$
    coreutils nss-certs man-db ncurses
export PS1='[test-env]$ '
Create test env in a Tmux split:
$ guix shell --development guix --container --network --nesting --share=/var/log/guix
    --preserve=^TERM$ coreutils
$ export PS1='[build-env]$ '
Another Tmux split for using an editor - not in guix shell:
$ export PS1='[dev-env]$ 'ensures guix build writes logs
installs all package inputs
installs packages for guix lint (nss-certs) and testing
8. Calculate the hash
- Each package has a SHA256 hash of the source files - this prevents someone MITM attacking
- To update the package the new hash needs to be checked
- From looking at the package with guix edit we know the source is from PyPi
- Pypi provides hashes in hexadecimal that we can check
- Guix uses the format nix-base32 for its own package source hashes
In the dev env:
[dev-env]$ cd ~/tmp

[dev-env]$ wget \
https://files.pythonhosted.org/packages/0a/c5/b7237226724951d7aad79dc24d49b661e5aaad671b43f076beb6f6a4e647/ \
borgmatic-1.8.14.tar.gz

[dev-env]$ guix hash --hash=sha256 --format=hex borgmatic-1.8.14.tar.gz
598b3bc22c19d53bd375e5295afec56d111759f74671845aacfe055c539fa746

[dev-env]$ guix hash borgmatic-1.8.14.tar.gz
0im7kx9mq1gymid88wa6yxcif4bdqpz5lag5fp9kpm8r5k13p2sr
lines separated like this to fit in the slide!
- The guix hash command will work with a file or a git repository
- Use format=hex to create a hash that's the same as PyPi's
- The default format is nix-base32 which is used in the package definition
9. Update the package definition
- Use guix edit borgmatic to discover which file the package definition is in
- Edit the package in your favourite editor - Vim of course!
In the dev env:
[dev-env]$ cd ~/workspace/guix-packages/worktrees/borgmatic-1.8.14

[dev-env]$ vim gnu/packages/backup.scm
(define-public borgmatic
(package
(name "borgmatic")
(version "1.8.14")
(source
(origin
(method url-fetch)
(uri (pypi-uri "borgmatic" version))
(sha256
(base32 "0im7kx9mq1gymid88wa6yxcif4bdqpz5lag5fp9kpm8r5k13p2sr"))))
[... rest of the package definition ...]
Change the package definition:
change the version
use the hash
10. Build the updated package
- Check the source downloads correctly first
- Build the package
- Check the build log for issues
In the build env build the source:
[build-env]$ ./pre-inst-env guix build --source --no-substitutes borgmatic@1.8.14
Build the package:
[build-env]$ ./pre-inst-env guix build --no-substitutes --no-grafts borgmatic@1.8.14
Inspect the build log:
[build-env]$ ./pre-inst-env guix build --log-file --no-grafts borgmatic@1.8.14
- The guix build --source command downloads the origin - it will show an error if the version or hash is wrong.
- Using --no-substitutes prevents downloading the binary substitute from Guix
- Using --no-grafts for development builds makes builds faster - a final test build without this option is needed - as grafts provide security updates
- Access to the build log from guix shell --container requires sharing /var/log/guix
11. Test install the package
- Building the package doesn't mean it's working!
- Install and (at least) run it in a test environment
In the test env install the built package:
[test-env]$ ./pre-inst-env guix package --install borgmatic@1.8.14
[test-env]$ GUIX_PROFILE="/home/steve/.guix-profile"
[test-env]$ . "$GUIX_PROFILE/etc/profile"


[test-env]$ borgmatic --version
12. Check build determinism
- Building the package repeatedly tests that it's fully deterministic
- Check both the source (origin) and the build itself
In the build env - check the source downloads:
[build-env]$ ./pre-inst-env guix build --no-substitutes --check --source borgmatic@1.8.14Build the package and compare it to the previous build:
[build-env]$ ./pre-inst-env guix build --no-substitutes --check borgmatic@1.8.14
- Build determinism is covered in the manual in the Submitting Patches section:
https://guix.gnu.org/manual/en/html_node/Submitting-Patches.html
13. Create the patch (using stg)
- StackedGit lets us treat a commit as a patch
- We see the same patch we'll eventually send to the Guix developers
In the dev env create a new StackedGit patch:
[dev-env]$ stg new borgmatic-1.8.14Create a commit message - there's a set format:
gnu: borgmatic: Update to 1.8.14.

* gnu/packages/backup.scm (borgmatic): Update to 1.8.14.- To create a new patch in a series: stg new (each patch is one git commit)
- To add changes from the working tree into the patch: stg refresh <path>
- To show the contents of the current patch: stg show
- To see the series of patches (commits): stg series --reverse --description
- Other commands to move patches in the stack, and to pull in commits
Add the changes we've made into the patch:
[dev-env]$ stg refresh gnu/packages/backup.scm
[dev-env]$ stg series --reverse --description
[dev-env]$ stg show
14. Check for dependant packages
- If there are dependant packages they need to be rebuilt to make sure everything works
- We tested this earlier with guix graph
- Alternative way is to use guix refresh
In the test env check for dependants:
[test-env]$ ./pre-inst-env guix refresh --list-dependent borgmatic@1.8.14
No dependents other than itself: borgmatic@1.8.14
- Recommended as part of Submitting Patches section:
https://guix.gnu.org/manual/en/html_node/Submitting-Patches.html
- The guix refresh command is great for finding packages that need updates
15. Check the formatting
- Formatting the code with Emacs (I know) is the easiest way for changes to meet the "expected style" that maintainers will check
- For Vim users Spacemacs is great - highlight the code and use :indent-region
- Packages can use guix style for standardised formatting - many older ones don't use this style - decide how intrusive you want to be
- Use guix lint to check that a package meets packaging standards and that there are no known security issues
Format the code in the dev env:
[dev-env]$ emacs -nw gnu/packages/backup.scmRun the styler in the test env:
[test-env]$ ./pre-inst-env guix style --dry-run borgmatic@1.8.14[test-env]$ ./pre-inst-env guix lint --dry-run borgmatic@1.8.14Run the linter in the test env:
16. Check list for contribution
- Each patch contains one discrete change only: changes to one package
- Package source has no bundled libraries (e.g. vendored libraries)
- Verify the source and ensure the Package hash is correct (Step 8)
- Package builds correctly (Step 10 & 12): check the source is downloading and that it builds deterministically
- Package works (Step 11): test it in a guix shell
- Package builds on other architectures: Guix's CI does this
- Patch commit message meets the standard (Step 13): look at previous commit messages
- Package only references other packages it needs (Step 14): also guix size
- Package is styled correctly (Step 15): guix style
- Package Synopsis and Description are adequate: some maintainers want factual text (a bit subjective!). Guix lint checks things like spacing and no use of definitive article
- Package passes lint (Step 15): guix lint
- Patch goes to the topic branch of a team if possible: e.g. rust-team or python-team
- Packages for the master branch don't involve substantial rebuilds: new branch potentially
17. Update the patch
- Update the patch with any changes
- Diff between working copy and commit: stg diff
- Update the patch: stg refresh <path>
- Show the current patch: stg show
Check if there are any changes in the dev env:
[dev-env]$ stg statusDo a diff:
[dev env]$ stg diff[dev-env]$ stg refresh gnu/packages/backup.scm
[dev-env]$ stg showIf there are changes update the patch:
18. Export patches & test apply (pt 1)
- Format the patch as an email and test it by applying it to a new branch
- Format the patch for email: stg email format
- Specific to my set-up is my email passwords are locked inside GPG: keychain
Start a shell in the dev env:
[dev-env]$ guix shell --development guix guile git:send-email stgit@2.4.0 debian-devscripts-bts
[dev-env]$ export PS1='[email-env]$ '

# email passwords are locked - I use keychain
[email-env] keychain --agents ssh,gpg
Use stg email format in the email env:
[email-env]$ stg email format --output-directory ../stg-out --numbered --base=auto --thread=shallow \
                      --cover-letter --all
[email-env]$ vim ../stg-out/0000-cover-letter.patchEdit the cover letter email:
- stg email format: --output-directory <dir> - where the patches are placed - in ../stg-out directory
- stg email format: --numbered will number the patch files and in the Subject
- stg email format: --base=auto
- stg email format: --thread=shallow - all subsequent emails are a reply to the cover letter
- stg email format: --cover-letter - create a cover letter (which needs to be edited)
- stg email-format: --all means the entire stack, can also use 1..4 to export part of a stack
18. Export patches & test apply (pt 2)
- Check the patches cleanly apply on a new branch
- List branches with: stg branch --list
- Apply the patch: git am
Get the base commit from the cover letter:
[email-env]$ view ~/workspace/guix-packages/worktrees/stg-out/0000-cover-letter.patchCreate a new branch:
[email-env]$ cd ~/workspace/guix-packages/guix
[email-env]$ stg branch --list
[email-env]$ stg branch master

[email-env]$ git branch borgmatic-test-apply <base-commit-from-cover-letter>
[email-env]$ git switch borgmatic-test-apply
[email-env]$ git log
[email-env]$ git am --ignore-whitespace --ignore-space-change --no-scissors
~/workspace/guix-packages/worktrees/stg-out/0001-*
[email-env]$ git log
[email-env]$ git log --patchApply the patch:
- git am: maximise applying with --ignore-whitespace and --ignore-space-change
- git am: ignore scissors
19. Check for CC's
- If there is an active Maintainer for a package a patch is more likely to be reviewed
- There are some teams that look after whole package areas e.g. python-team
- The Guix source has some git settings (etc/git) which will automatically cc teams when using git send-email if we're within the source tree
- We have to manually add them as CC's when sending a cover-letter
Run the etc/teams.scm get-maintainer command:
[email-env]$ cd ~/workspace/guix-packages/guix/worktrees/borgmatic-1.8.14
[email-env]$ ./pre-inst-env etc/teams.scm get-maintainer \
                  ~/workspace/guix-packages/worktrees/stg-out/0001-gnu-borgmatic-Update-to-1.8.14.patch

# check it ran correctly as it doesn't output anything if there's no applicable maintainer
[email-env]$ echo $?
Other useful commands:
# list all the teams
[email-env]$ ./pre-inst-env list-team #list all teams

# print the cc's for any team (e.g. rust)
[email-env]$ ./pre-inst-env etc/teams.scm cc rust
20. Create a new bug
- If we send multiple emails to the bug tracker (debbugs) it will create multiple bugs. When we want a single bug with multiple patches attached to it.
- To avoid this - send the cover letter to guix-patches mailing list first - this email list is watched by the bug tracker and it will create a new bug number
- CC any Maintainer that we discovered earlier so they're included
- Then send the patch(es) to this bug number so they're all grouped correctly
Send the cover-letter:
[email-env]$ git send-email --to=guix-patches@gnu.org --annotate --dry-run 0000-cover-letter.patch

# now rm the cover letter so there's no chance it's sent again!
[editor-split] rm 0000-cover-letter.patch
To add a Maintainer:
[editor-split]$ git send-email --to=guix-patches@gnu.org --cc="Some Person <maintainer@some.email>"
                               --annotate --dry-run 0000-cover-letter.patch
- git send-email: use cc=<email> not X-Debbugs-cc for the cover letter as this is going to the mail list, not directly to Debbugs
- git send-email: uses options that we added using stg email format (e.g. threading)
- git send-email: --annotate will open up the email in an editor
- git send-email: --dry-run takes no action but shows what it would have done
21. Thread & send the patches
- Debbugs replies with an email specifying the new bug number
- So the patch(es) are threaded as replies to the cover-letter we use the cover letters' Message-ID when we send the rest of the patches
- To get the Message-ID use the Guix Issues site or the bts tool
- The python-apprise patch is within a file that python-team focuses on. Guix's git config will automatically send this patch to them. The other is not - if we want the series to go to the python team we need to manually add them using X-Debbugs-CC special header
Use bts to query the bug number:
[email-env]$ bts --bts-server https://debbugs.gnu.org/ --mbox show NNNNRe-export the patches with the reply-to header set to the Message-ID:
[email-env]$ rm ~/workspace/guix-packages/worktrees/stg-out/*

[email-env]$ stg email format --output-directory ../stg-out --numbered --base=auto
    --add-header="X-Debbugs-Cc: Jane Maintainer <jane@maintainer.email>, Bob Maintainer <bob@maintainer.email>"
    --to NNNN@debbugs.gnu.org --in-reply-to <message-id-we-grabbed> --thread=shallow --all
[email-env]$ git send-email --to=NNNN@debbugs.gnu.org --no-thread --no-chain-reply-to
--dry-run ../stg-out/*Send the patch with:
22. Check patches pass QA
- Check the patches successfully go to the bug-tracker
- The QA system builds every patch that it sees
- Builds can take a while: https://qa.guix.gnu.org/patches
- Re-roll the patch if there is feedback or to re-trigger QA
An example of a re-roll:
[email-env]$ stg email format --output-directory ../stg-out --numbered --base=auto \
                --to NNNN@debbugs.gnu.org --in-reply-to <original-cover-letter-message-id> --thread=shallow \
                --cover-letter
                --reroll-count=2
--all- stg email format: --reroll-count=N marks the series as the n-th iteration of the topic. So the first time we send the patch series it's 1st time, if we need to re-roll the count starts at 2.
- Send the patches directly to the bug number - no need to CC as debbugs will automatically do this due to the X-Debbugs-Cc header that was used earlier
23. Close the branch when complete
- Waiting for someone to review and apply your patch is hard - and who knows when someone will look at it!
- Make sure it passes QA so that it's easy for a Maintainer to apply
- If no-one is looking at it after a few weeks try asking on IRC
- Generally the maintainer will email to the bug confirming when it's applied - delete the worktree and branch when it's in the archive
Delete the worktree and the git branch:
$ cd ~/workspace/guix-packages/guix
$ git worktree list
$ git worktree remove ~/workspace/guix-packages/worktrees/test-borgmatic-1.8.14
$ stg branch --list
$ stg branch --delete borgmatic-1.8.14
What we've seen 🎉
Altering a package is pretty simple
1
Modifying packages
Quite involved ... but tools like worktrees and StackedGit can help
2..
Contributing changes
Meeting all the quality standards is a lot of steps and we need patience!
..23
Quality!
Taking it further
To learn more:
- Futurile blog: https://www.futurile.net/resources/guix
- Guix Manual: https://guix.gnu.org
- Come along to the Guix.social online meet-up!
Next steps from here:
- More complex modifications of packages and services
- Add new packages to Guix
- Run a channel with our own packages
Thank You!
VIDEO
Guix Build
2:40 minutes
Contributing Guix Package Updates
By futurile
Contributing Guix Package Updates
How to update a Guix package and contribute the new version to the main Guix repository


