
Presentado por
GoTouch
Taller: Desarrollo de
Backend: Loopback
Fundamentals
Loopback
Intruduction
Loopback

Loopback
Intruduction
Loopback is a framework to create server API's.

more about this!
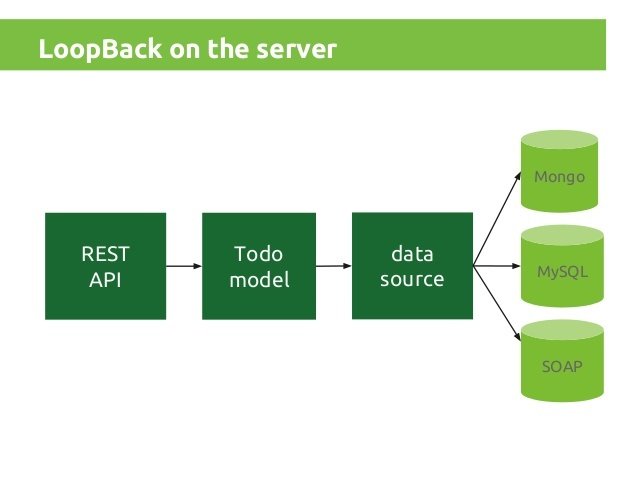
Loopback API servers provide information using REST API standard.
Using built-in functions like POST, PUT, PATCH and DELETE, Loopback offers a tool to make CRUD operations over the the data saved in the Loopback application.
Loopback
Intruduction
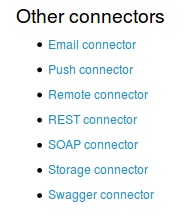
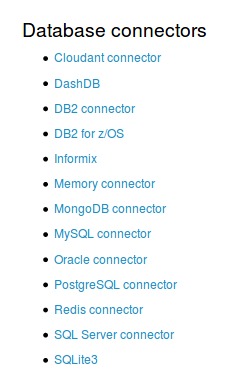
Powerful tools to provide connectors to databases (local or remote).
more about this!

Loopback provides plugins to connect and interact with the most common data bases engines.
Examples: MSQL, MongoDB, MariaDB, Postgres
Loopback
Intruduction
more about this!

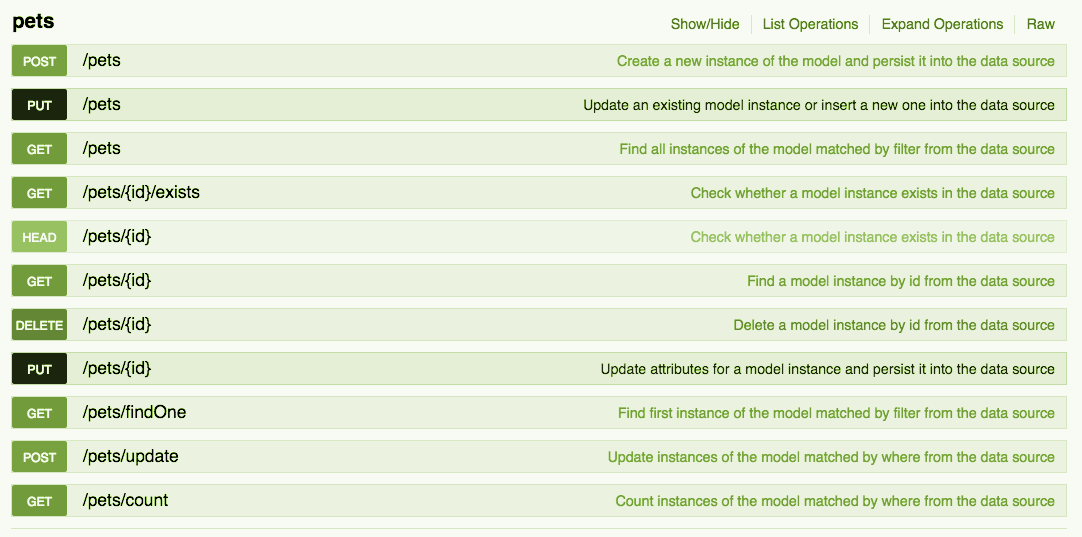
API Explorer: to see the results of our work.
API Explorer runs locally on your favorite web server and provides a tool to check the URI's made by Loopback and it is posible to check and test those methods given its parameter, if that is needed.
Loopback
Intruduction
Support different types of data base engines.
more about this!

On this example
We are gonna use Mongo DB as a local DB to create our API server.
Loopback
Intruduction
CLI: "Command line interface"
more about this!
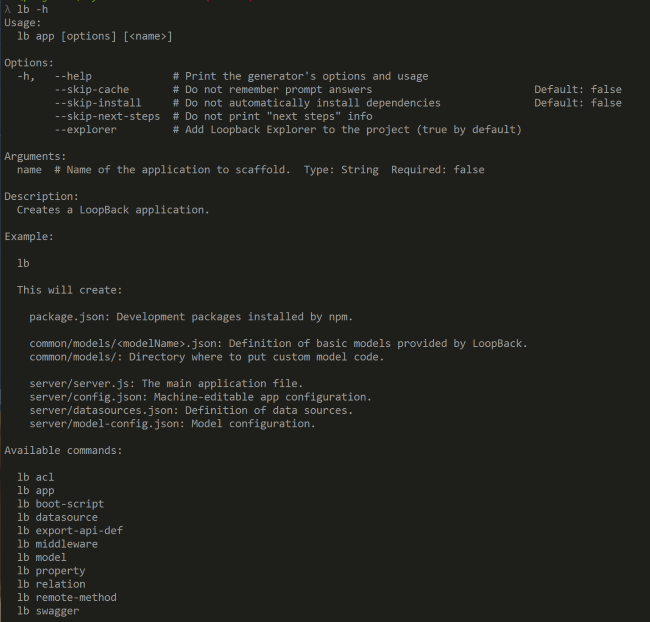
This tool lets you create a loopback app:
1. Model definition.
2.DataSources creation.
3. Set relationships between the models.
4. More.
Installation
Loopback
Intruduction
Framework
Loopback
Intruduction
more about this!
Install the environment.
1. Install
Mongo DB
(Our database).
//Import the public key used by the package management system.
$ sudo apt-key adv --keyserver hkp://keyserver.ubuntu.com:80 --recv 0C49F3730359A14518585931BC711F9BA15703C6

//Create a list file for MongoDB. Ubuntu 16.04
$ echo "deb [ arch=amd64,arm64 ] http://repo.mongodb.org/apt/ubuntu xenial/mongodb-org/3.4 multiverse" | sudo tee /etc/apt
/sources.list.d/mongodb-org-3.4.list

//Update and Install
$ sudo apt-get update
$ sudo apt-get install -y mongodb-org


//Start Mongo DB
sudo service mongod start

//Stop Mongo DB
sudo service mongod stop

//Restart Mongo DB
sudo service mongod restar
Loopback
Intruduction
more about this!
Install the environment.
2. Install
GIT.
//Install Git using APT
    sudo apt-get update
    sudo apt-get install git
//Setting some features features
    git config --global user.name "Your Name"
    git config --global user.email "youremail@domain.com"
//Check features
    git config --list

//result will be:
    user.name=Your Name user
   .email=youremail@domain.com
Loopback
Intruduction
more about this!
Install the environment.
3. Install Node.js.
//Install Git using APT
    sudo apt-get update
    sudo apt-get install git
//Setting some features features
    git config --global user.name "Your Name"
    git config --global user.email "youremail@domain.com"
//Check features
    git config --list

//result will be:
    user.name=Your Name user
   .email=youremail@domain.com
Loopback
Intruduction
more about this!
Install the environment.
4. Install Loopback.
//Install Loopback
     $ npm install -g loopback-cli
//Init the app
     $ lb
//Set a project name
     ? What's the name of your application? hello-world
     ? Enter name of the directory to contain the project: hello-world
//Set a version
     ? Which version of LoopBack would you like to use? 3.x (current)
     ? What kind of application do you have in mind? api-aerver
     ...
     I'm all done. Running npm install for you to install the required dependencies.
     If this fails, try running the command yourself.
Loopback
Intruduction
more about this!
Loopback
5. Set the datasource.
LoopBack data sources represent backend systems such as databases, external REST APIs, SOAP web services, and storage services. Data sources provide create, retrieve, update, and delete (CRUD) functions through the DataSource and PersistedModel APIs.
Setting Environment
Loopback
Intruduction
Framework
Loopback
Intruduction
more about this!
LoopBack
5.1 Loopback: Setting a model
Setting a Person model that extends the Loopback built-in User model.
Properties: Phone Number, Address, Country, Complete name.
Loopback
Intruduction
more about this!
Install the environment.
6. Loopback: Setting a model Product and its relation
Setting a Person model that extends the Loopback built-in User model.
Properties: Phone Number, Address, Country, Complete name.
Now we will set the relationship Person has many Products.
The result: The web api sever will provide URI's to manage the Products related to one Person
Loopback
Intruduction
more about this!
Loopback Usage
1. Create Persona
Loopback
Intruduction
more about this!
Loopback Usage
3. CRUD Products
This example will show the CRUD operations over a Product model. It will describe filtering examples when fetch Products is needed.
Loopback
Intruduction
more about this!
Loopback Usage
4. ACL
This example will set a business rule: Only logged user can access to the products
Loopback
Intruduction
more about this!
Loopback Usage
2. Edit data using loopback API explorer.
This example will edit a Persona instance, this Object extends User Object so it is needed to provide a token to edit the personal information.
Loopback
Intruduction
more about this!
Loopback Usage
5. Data control
This example will show how to check the length of a address. if it less than 3 characters, reject then reject the post.
Introducción Loopback
By Proyecto GoTouch
Introducción Loopback
This project describes a simple way to implement an API server using Loopback and Mongo DB on a Linux environment.


