LESS - CSS Preprocessors

Why use a css preprocessor?
- Keep things DRY
- Saves time
- Code that's Easier to maintain
- Turns CSS into it's own programming language
- It's easier than you'd think.
What's the general idea?
CSS is a pretty dumb language on it's own. It doesn't offer any features that allow you to keep things DRY (Don't Repeat Yourself) so you end up writing the same things over and over again.
By the time you reach the end of a project you realize your css is 5x as large as it should be and you have 15 versions of the color blue....That's where LESS comes in, you write LESS code (that looks surprisingly like CSS) and then a processor converts that to CSS that you can include into your project.
Getting Started
Before we can begin writing LESS, we need a way of converting the LESS to CSS. Lets install the dependencies that we will need to do that.
- Download Node JS
- Use npm to install the less compiler
- Setup your IDE to do the compiling for you
Installing
Installation on windows is really straightforward, just download the windows .msi installer and you should be good to go. You don't want the .exe as the installer will give you other tools we'll need.
Talk to me if you want to install node on linux, there is a little different process.

Use npm to install LESS
- Open a command prompt as administrator
-
Run: npm install -g less
-
To ensure it installed, run: lessc
-
The command line should output a lot of text on how to use less from the command line. Lets give it a try...
Using LESS on the command line
- Create a new directory in your projects folder
- Using the editor of your choice, create a new file called "style.less"
- Add the following code:
body {
    background-color: #FF2200;

    .header {
        background-color: #FFFFFF;
    }
}
Notice the funky css syntax we have going on there...
Using LESS on the command line
- Now return to the command line in the same directory you created your less file in. (run the dir command to ensure you are in the same directory as your less file)
- The LESS command is run with "lessc" and the arguments look like:
> lessc target.less destination.cssThis invokes the less command and tells it to convert target.less into destination.css. Use whatever names are appropriate for your css files. The end result will be a new file called destination.css.
Setting up LESS in Webstorm
- Install then open WebStorm
- Open the project we previously created in WebStorm
- Open the style.less file we created previously.
- WebStorm may display a green bar at the top of the editor window stating "a file watcher is available for this file type...
Setting up LESS in Webstorm
- Press Ctrl + Alt + S to open the settings dialog (Or just File -> settings)
- Under "Tools" select "File Watchers"
- Click the green "+" on the right hand side and select "LESS"
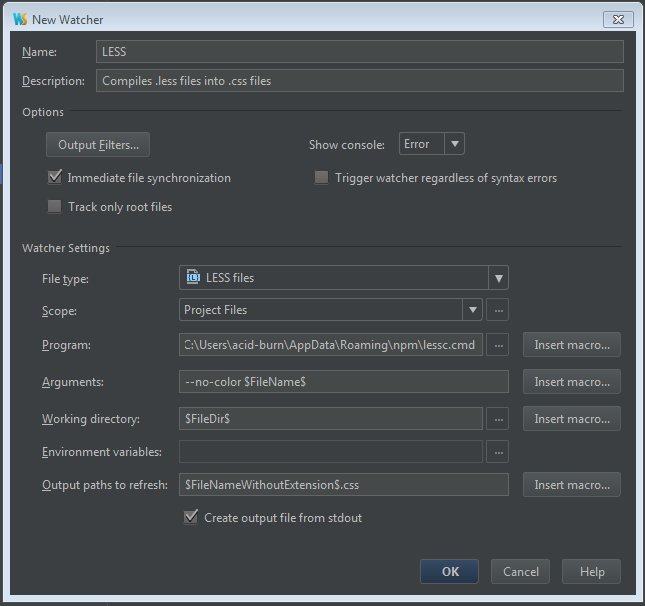
- A dialog box will appear, in here you need to enter some details about how you want to do the compiling of LESS to CSS.

Compile as
you type
Should be the path to lessc on your computer, likely similar to this.
Setting up LESS in Webstorm
- Click OK on that dialog and the LESS watcher will be setup. This means that anytime a .less file is opened, it will be auto compiled into .css file with the same name.
- Lets test it out...
- Create a new .less file (alt + insert or File -> New)
- Add the same less code we added before. Notice, an arrow appears next to the less file, this indicates that a css file has been created.
Nesting Selectors
You can nest your LESS code so it becomes easier to see how things in your html actually relate to things in your markup. Lets take this markup for example.
<header>

    <h1>This is the main heading</h1>

</header>

<header class='sub'>

    <h1>This is the sub-heading</h1>

</div>
Nesting Selectors
<header>

    <h1>This is the main heading</h1>

</header>

<header class='sub'>

    <h1>This is the sub-heading</h1>

</div>
CSS
header {
    Color: red;
}

header h1 {
    background-color: blue;
}

header.sub {
    font-size: 16px;
}

header.sub h1 {
    background-color: purple;
}
LESS
header {
    color: red;

    h1 {
        background-color: blue;
    }

    &.sub {
        font-size: 16px;

        h1 {
            background-color: purple;
        }
    }
}
Style Replacements
.big-red-text {
    color: red;
    font-size: 5em;
}

h1 {
    .big-red-text;
}
Create a style in one place, and use it over and over again.
Mixins
Create reusable styles and import them into your current css file for use.
/** File name: mixins.less **/

.big-green-text {
    font-size: 5em;
    color: green;
}
/** File name: style.less **/
@import "mixins.less";
body {
.big-green-text;
}Variables
Create reusable variables and use throughout your project.
@green: #2aff00;
@red: #ff0000;

h1 {
    color: @red;

    span {
        color: @green;
    }
}
Custom Functions
Create reusable functions.
@green: #10ff00;

.border-with-radius(@borderWidth, @color, @radius) {
    border: @borderWidth solid @color;
    border-radius: @radius;
}

h1 {
    .border-with-radius(10px, @green, 3px);
}
Built-in Functions
LESS Comes with lots of cool built in functions.
@green: #10ff00;

h1 {
    color: lighten(@green, 20%);
}

h2 {
    color: darken(@green, 20%);
}
Do math?
It's actually pretty handy sometimes.
@numCols: 4;

.containers {
    float: left;
    width: 100% / @numCols;
}
LESS (CSS Preprocessor)
By Greg Goforth
LESS (CSS Preprocessor)
- 987


