
Outline
- Motivation
- Pyodide's features
- How Pyodide works
- How to use Pyodide
-
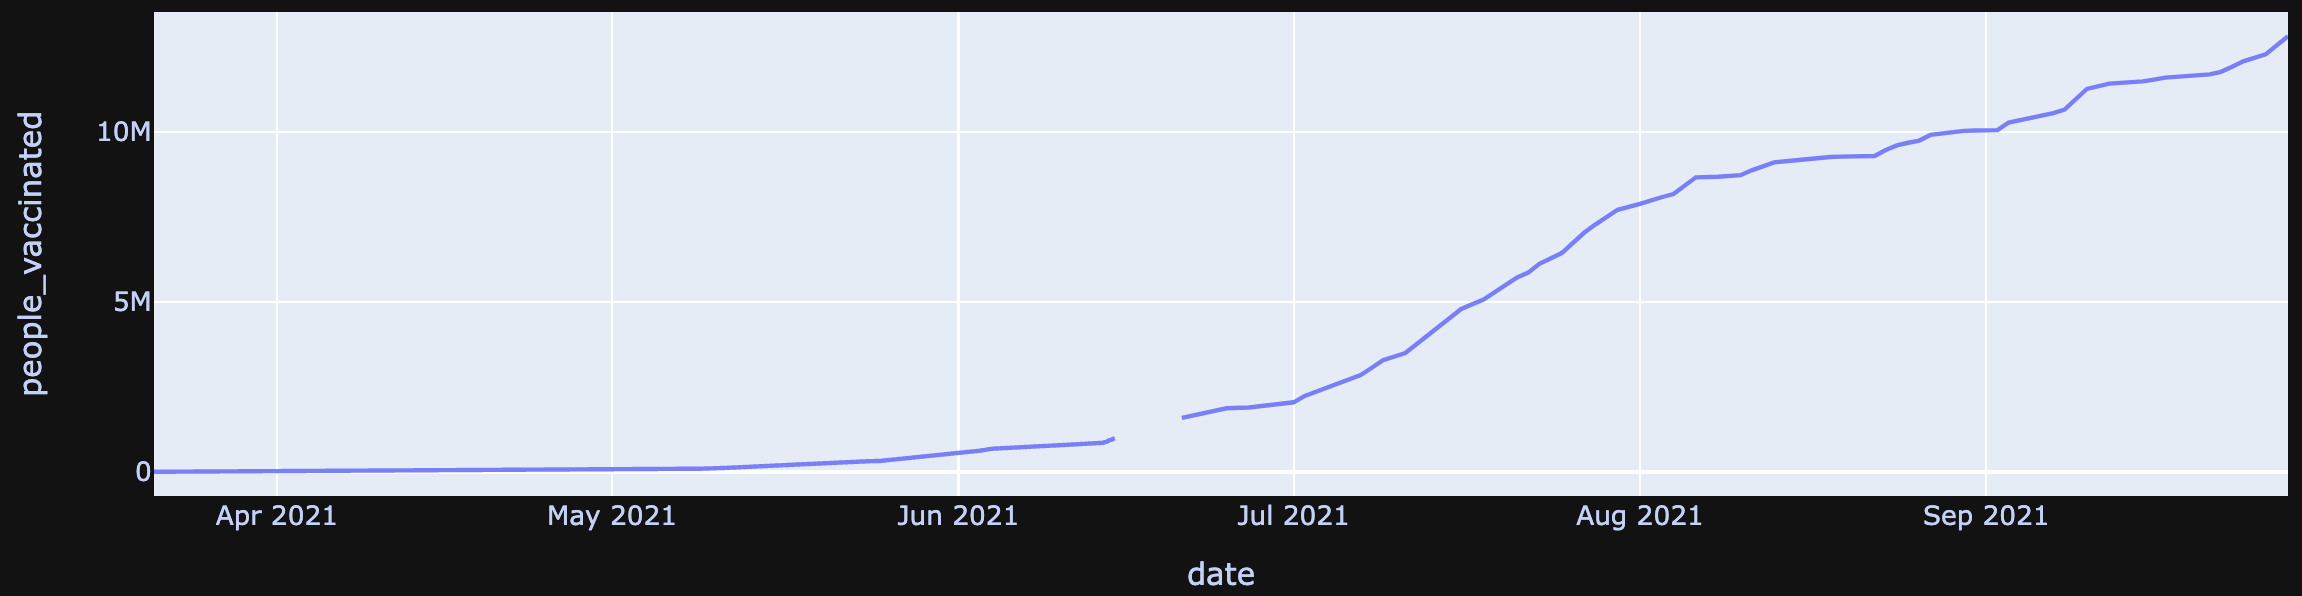
Embedded Pydicom React Viewer
- What is DICOM
- Features
- Implementation
- Usage notes & tips
- Conclusion
Motivation
-
Used JavaScript DICOM parser library in is not maintained
-
Others are too heavy to use or less documented
Chrome extension: DICOM image viewer
Comparison of visualization + parsing solutions
| Pure JS (JavaScript) | JS + Py Server | Pure Py - Jupyter | JS + Pyodide | |
|---|---|---|---|---|
| Pros | - strong interactive - high customizable UI - easy distribution |
- strong interactive - high customizable UI - extensibility (any Python package) |
fast prototyping | - strong interactive - high customizable UI - easy distribution - scientific Python stack & any Python wheel package installable - offload Python server CPU loading (serverless) |
| Cons | - possibly no suitable JS data/scientific libraries - JS libraries may have different implementations with Python's |
- heavier: more effort on data move, API and distribution | - download size (30~150MB) - downloading + loading time (3~4s) - Python in WebAssembly is slower than local Python, using NumPy to speed up for compensation |
So I tried to switch to use Pyodide with Pydicom lib
Pyodide's features
Support
-
JavaScript can access Python objects, methods, and functions
-
Python can access JavaScript objects, methods, and functions
-
Python Packages:
-
Pyodide package: Scientific stack:, e.g. NumPy, Pandas, Matplotlib, SciPy, and scikit-learn, etc.
-
any purePython wheel
-
-
web worker compatible
Not support yet
-
native Python web: urllib.request /http.client. Instead, use JavaScript XMLHttpRequest/fetch in Python
Need effort
-
import your own Python files one by one
-
config interactive debugger
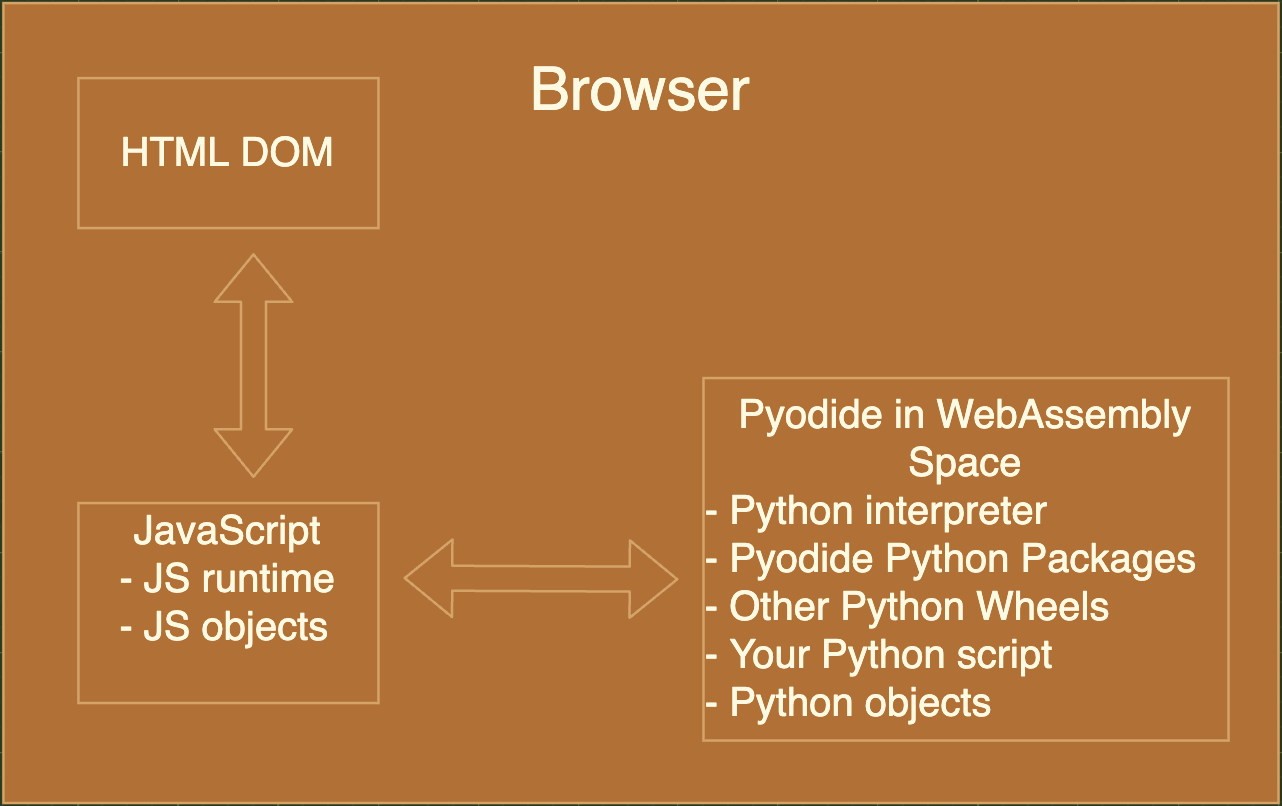
How Pyodide works
import js

div = js.document.createElement("div")
div.innerHTML = "<h1>This element was created from Python</h1>"
js.document.body.prepend(div)
Even Python can operate HTML DOM via JavaScript: append text example
How to use Pyodide
download Pyodide main js from URL or *NPM
 <!-- <script src="pyodide/pyodide.js"></script> -->
 <!-- <script src="https://cdn.jsdelivr.net/pyodide/dev/full/pyodide.js"></script> -->
<script src="https://cdn.jsdelivr.net/pyodide/v0.18.1/full/pyodide.js"></script>
load Pyodide main WebAssembly build:
/* download followings
   package.json, pyodide.asm.data, pyodide.asm.js,  distutils.js, distutils.data */
// use globalThis.pyodide or local variable
const pyodide = await loadPyodide({ indexURL: baseURL + "pyodide/" });
// OR
// execute `npm install pyodide` first, then
const pyodide_pkg = await import("pyodide/pyodide.js");minimal example
1
2
// OR use pyodide_pkg from npm
const pyodide = await pyodide_pkg.loadPyodide({
  indexURL: "https://cdn.jsdelivr.net/pyodide/v0.18.1/full/",
});
load Pyodide python packages imported in your Python code
// it will download pillow.js pillow.data
await pyodide.loadPackagesFromImports(pythonCode);
run Python code: "hello world" will be printed in your browser console,
then return value to JavaScript
const pythonVer = await pyodide.runPythonAsync(pythonCode);
console.log(pythonVer) // 3.9.5 (default, Sep 16 2021, 15:37:13)...
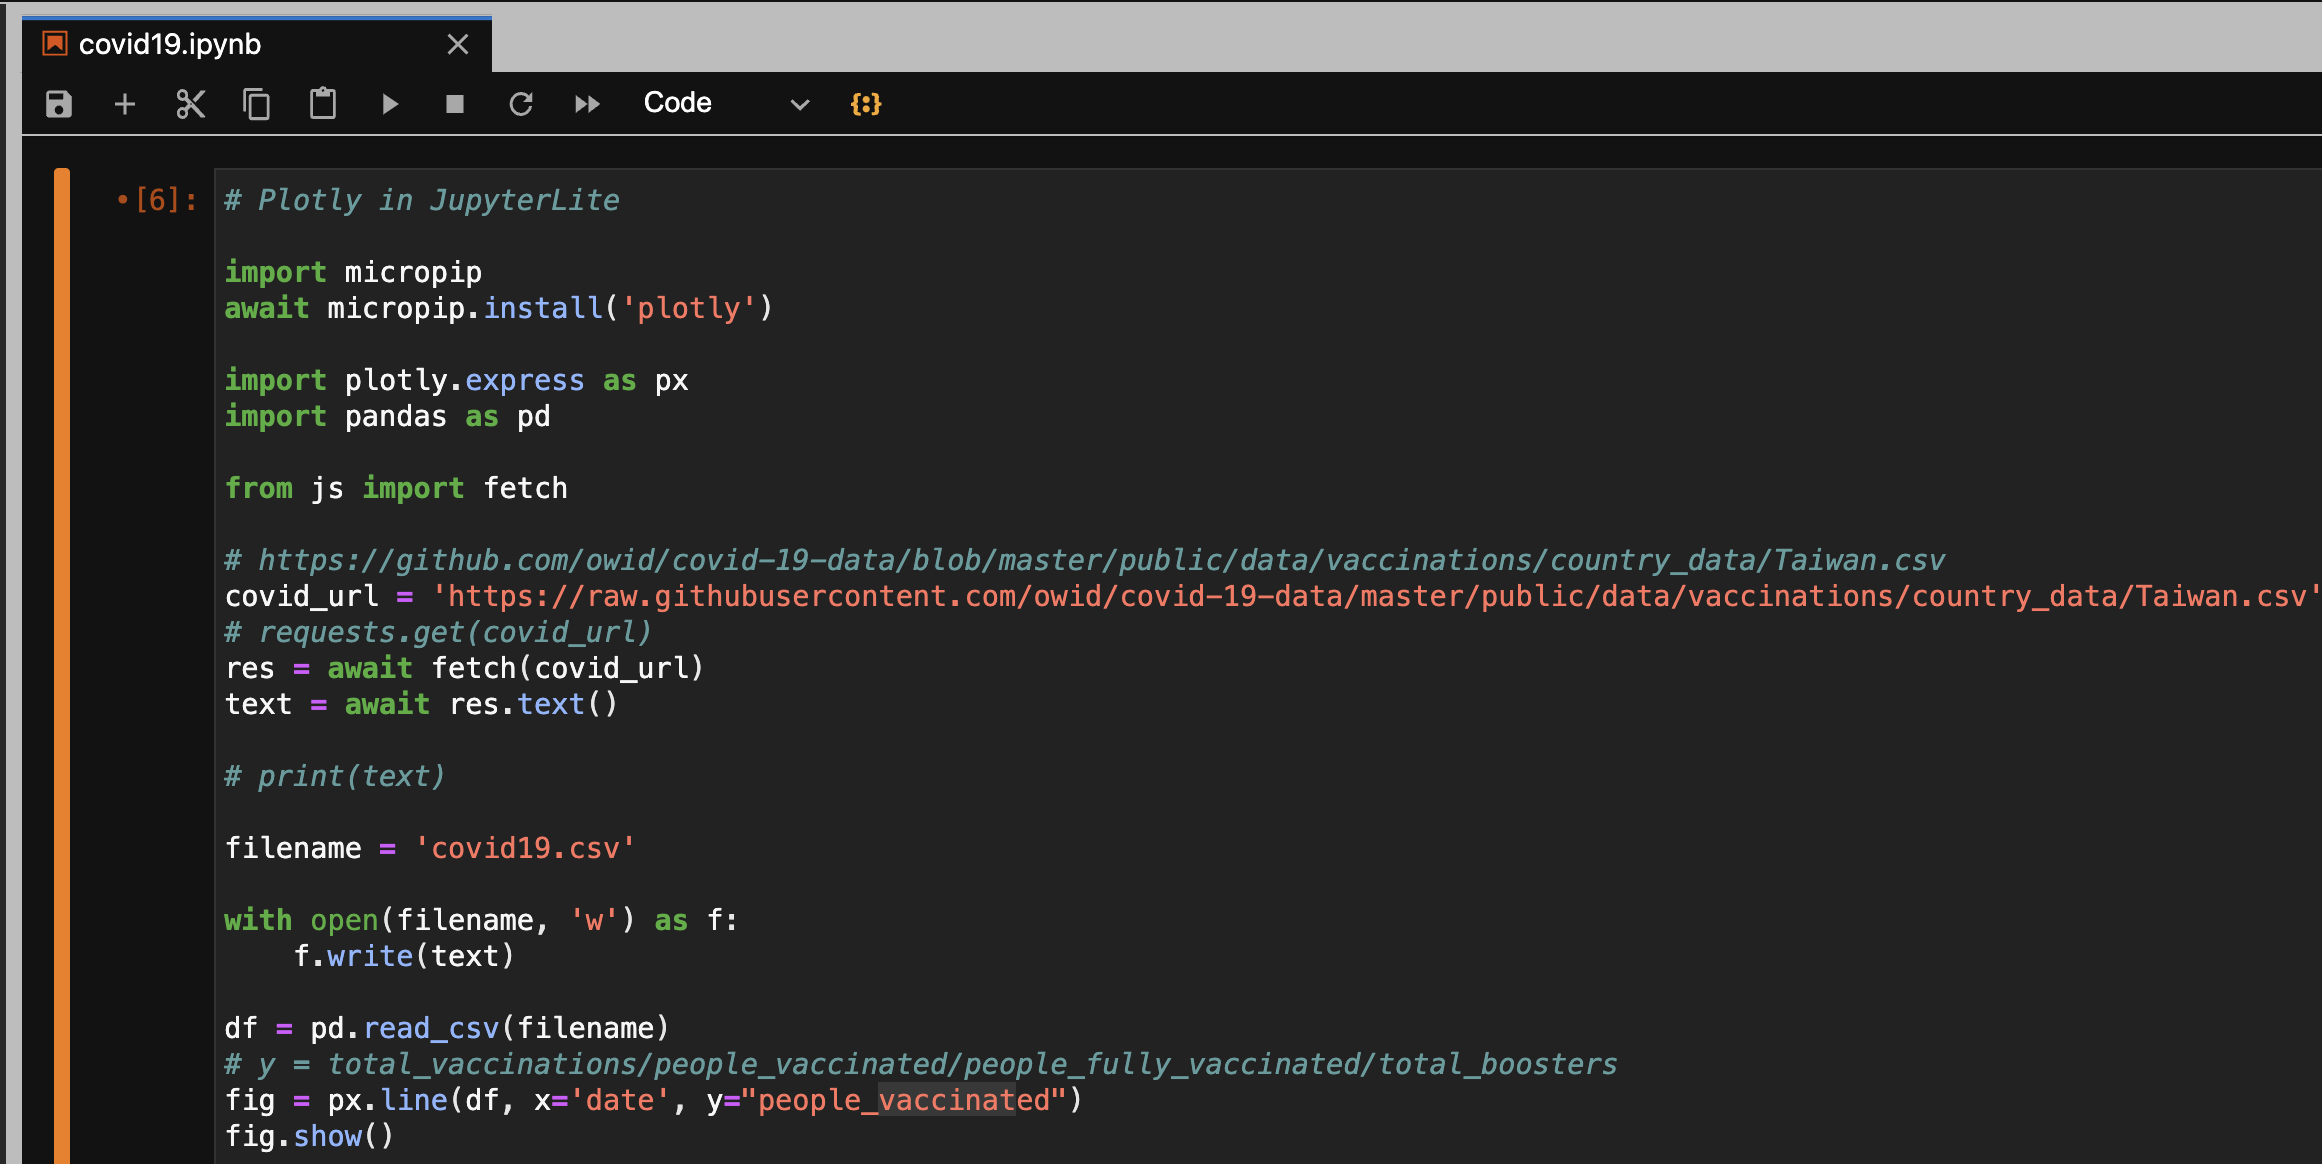
get your Python scripts, either embed them in JavaScript string
const pythonScript = `
    from PIL import Image
    import micropip
    await micropip.install('pydicom') # install wheel package. could be self hosted wheel url
    print("hello world")
    import sys
    sys.version
`
or put them in external .py file(s), then fetch
// if omit "https://localhost://"" means fetching from same original
const url = 'python/hello_world.py'
const pythonCode = await (await fetch(url)).text();
3
4
5
Lifetime
Pyodide is working as REPL or Jupyter, once it's loaded, the added script can load previous memory
# Python_code_1
num = 1
num
# Python_code_2
print(num) # 1
num += 1
num # 2/* JS_1 */
const num = await pyodide.runPythonAsync(python_code_1);
console.log(num); // 1/* JS_2 */
const num = await pyodide.runPythonAsync(python_code_2);
console.log(num); // 21
2
4
3
JavaScript access Python
-
Convert Python objects
-
immutable object:
-
int, float, str, bool, None (->undefined) -> memory copied to JS value
-
tuple, bytes/bytearray -> PyProxy object in JS
-
-
mutable object: function, dict, set, your own class, etc -> PyProxy
-
-
Access ways
-
get PyProxy/value from pyodide.runPythonAsync last line
-
call a PyProxy Python function, get PyProxy/value from a function's return.
-
access a mutable object (get/set) via its PyProxy, e.g. list element
-
directly access object (get/set)
-
global namespace: pyodide.globals.get('num') & pyodide.globals.set('num', 2)
-
custom namespace, example JS code:
-
-
const my_namespace = pyodide.globals.dict();
pyodide.runPython(`y = 4`, my_namespace);
console.log(my_namespace.get("y")); // ==> 4
Python access JavaScript
-
Convert JavaScript Data
-
primitive value: number, string, boolean, null, undefined -> memory copied to Python immutable object
-
object: built-in objects, function, ArrayBuffers, ArrayBuffer View (Int8Array) and your own class, etc -> JsProxy
-
- Access ways
-
call a JsProxy JavaScript function, get object from a function's return.
-
access an object (get/set) via its JsProxy
-
direct access object:
-
global: import js
-
module scope example:
-
-
from my_js_module import num
print(num) # read

import my_js_module
my_js_module.num = 10 # write
const my_js_module = {num: 3}
pyodide.registerJsModule("my_js_module", my_js_module);
JS
Py
if an accessed data is not JsProxy & PyProxy, get/set is straightforward, same as the normal way in that language. Done by implicit conversion of Pyodide.
JsProxy & PyProxy
in Python: use JsProxy
-
get/set: obj dot notation (a.b) supported. Subscript x[y] on array/object
-
for-in on array
-
- proxy.new(...) = new X(...)
-
deep conversion (copy): to_py. e.g. JS array [1,2,3] to Python list [1,2,3]
-
pyodide.to_js
-
pyodide.create_proxy & destory()
in JavaScript: use PyProxy
-
get/set: obj dot notation (a.b) supported. Use proxyObj.get/set on list/dict
-
for-of on list
-
- deep conversion (copy): toJs
-
pyodide.toPy
-
use destroy() to avoid memory leak
print(obj) & console.log(obj) will auto trigger to_py()/toJs()
Why PyProxy needs destroy()
PyProxy needs the destroy method because even if all references to the PyProxy are removed, the PyProxy can hang around for a very long time because of the way the browser garbage collector work
const test_fun = pyodide.globals.get('test_fun')
// count + 1 for the memory
// in WebAssembly Python heap
const list = test_fun()

// Python list in WASM memory is 1
// even not use list anymore
// need some way to decrease 1

// Either
// 1. explictly call list.destory()
// 2. Pyodide register destory() in FinalizationRegistr
// when Browser finally recycles it
list.destory()
def test_fun():
  # count + 1, allocate memory
  # in WebAssembly heap
  list_ = [1,2,3]
  # count -1 when leaving this fun
  return list_
Python
JavaScript
+1
-1
+1
-1
JS code of round trip1:
Python Object -> PyProxy in JS -> same Python Object
const pyProxyObj = pyodide.runPython(`
    import sys
    sys.version
    class TestObject:
        num = 10
    def test_object_type(test_obj):
        print(type(test_obj)) # <class 'TestObject'>
        print(test_obj.num) # 10
        if test_obj is obj:
            print("same object")
    obj = TestObject()
    obj
`);
console.log(pyProxyObj) // Proxy
const testFun = pyodide.globals.get("test_object_type")
testFun(pyProxyObj)
const obj = {
"num": 20
}
pyodide.runPython(`
def echo_obj(obj):
print(type(obj)) # <class 'pyodide.JsProxy'>
return obj
`);
const echoFun = pyodide.globals.get("echo_obj")
const obj2 = echoFun(obj);
console.log(obj2) // {num: 20}
if (obj2 == obj) {
console.log("same object2")
}JS code of round trip2:
Js Object -> JsProxy in Python -> same Js Object
Roundtrip of Proxy
JavaScript ArrayBuffer & Python Buffer
-
Using Python Buffer objects from JavaScript
-
PyProxy.toJs (copy)
-
1920 x 4 x 1080: copying speed is not slow, maybe acceptable
-
Typically the innermost dimension won’t matter for performance
-
-
1920 x 1080 x 4: copying this bitmap buffer is not fast, could use getBuffer)
-
-
PyProxy.getBuffer (no copy, fast) !!
-
Accessing element: for-of or pyProxyObject.get()
-
What is DICOM
Digital Imaging and Communications in Medicine, includes
-
file format (p10 image, video, DICOM-ECG...)
-
network protocol (picture archiving and communication system (PACS))
-
store information: study, series, patent info., orientation, DICOM RT (radiation therapy)...
Need to handle below DICOM tags about image:
-
transferSyntax: uncompressed, jpeg baseline, jpeg lossless ...
-
modality: CT, MR, CR (x-ray), US...
-
photometric: MONOCHROME1/2, RGB, YBR_FULL, PALETTE...
-
transforms / LUT: VOI (e.g. window center + window width (level), Modality, Palette ...
-
bits_allocated, bits_stored, pixel_representation
-
planar. 0: RGBRGBRGB..., 1:RRR...GGG...BBB...
So many => We need a good Parser library
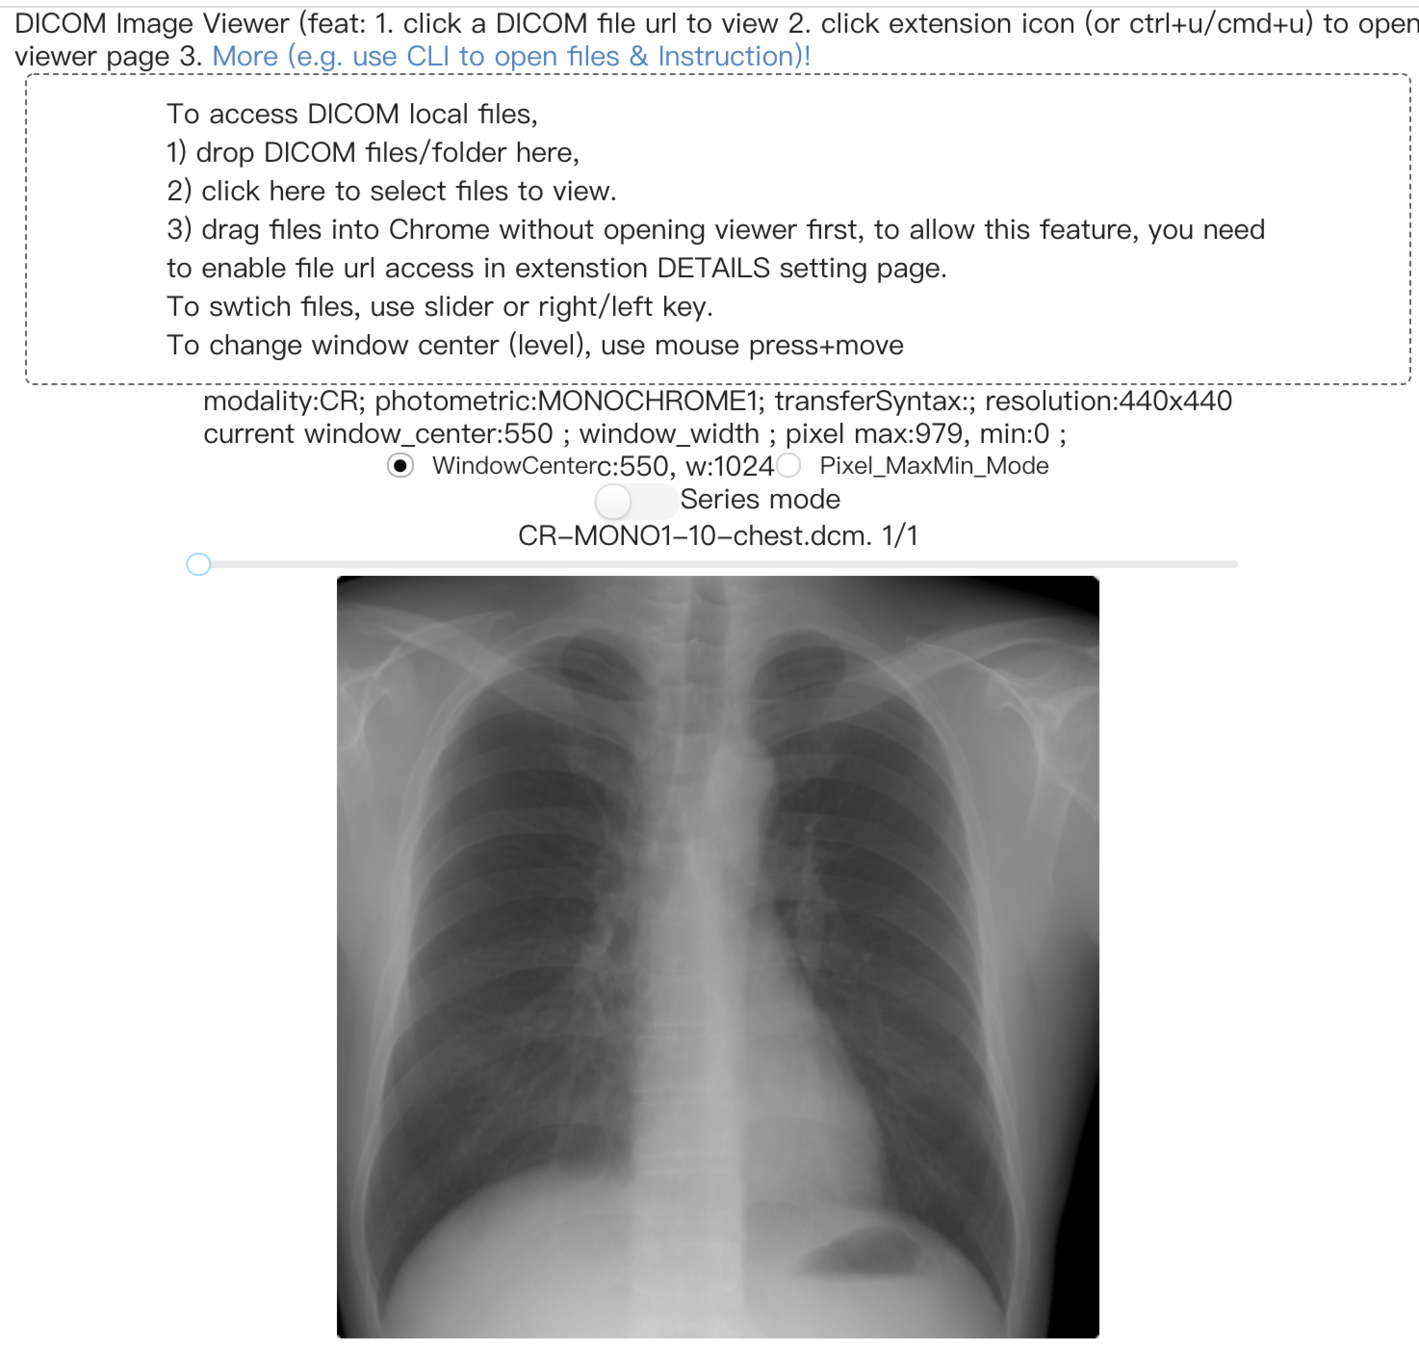
Features
-
View online DICOM files by clicking DICOM urls
-
View offline DICOM by dragging files onto Chrome, or use built-in file browser to select files.
-
In terminal, use https://www.npmjs.com/package/cli-open-dicom-with-chrome to open DICOM files via this extension.
-
Shortcut (ctrl+u/cmd+u) to open extension viewer page. Or click extension icon.
-
Support adjustable window center mode.
-
Support multi-frame, uncompressed, RGB & JPEG DICOM files
-
Support different plane views mode
-
Show basic DICOM information
-
Web & Chrome extension
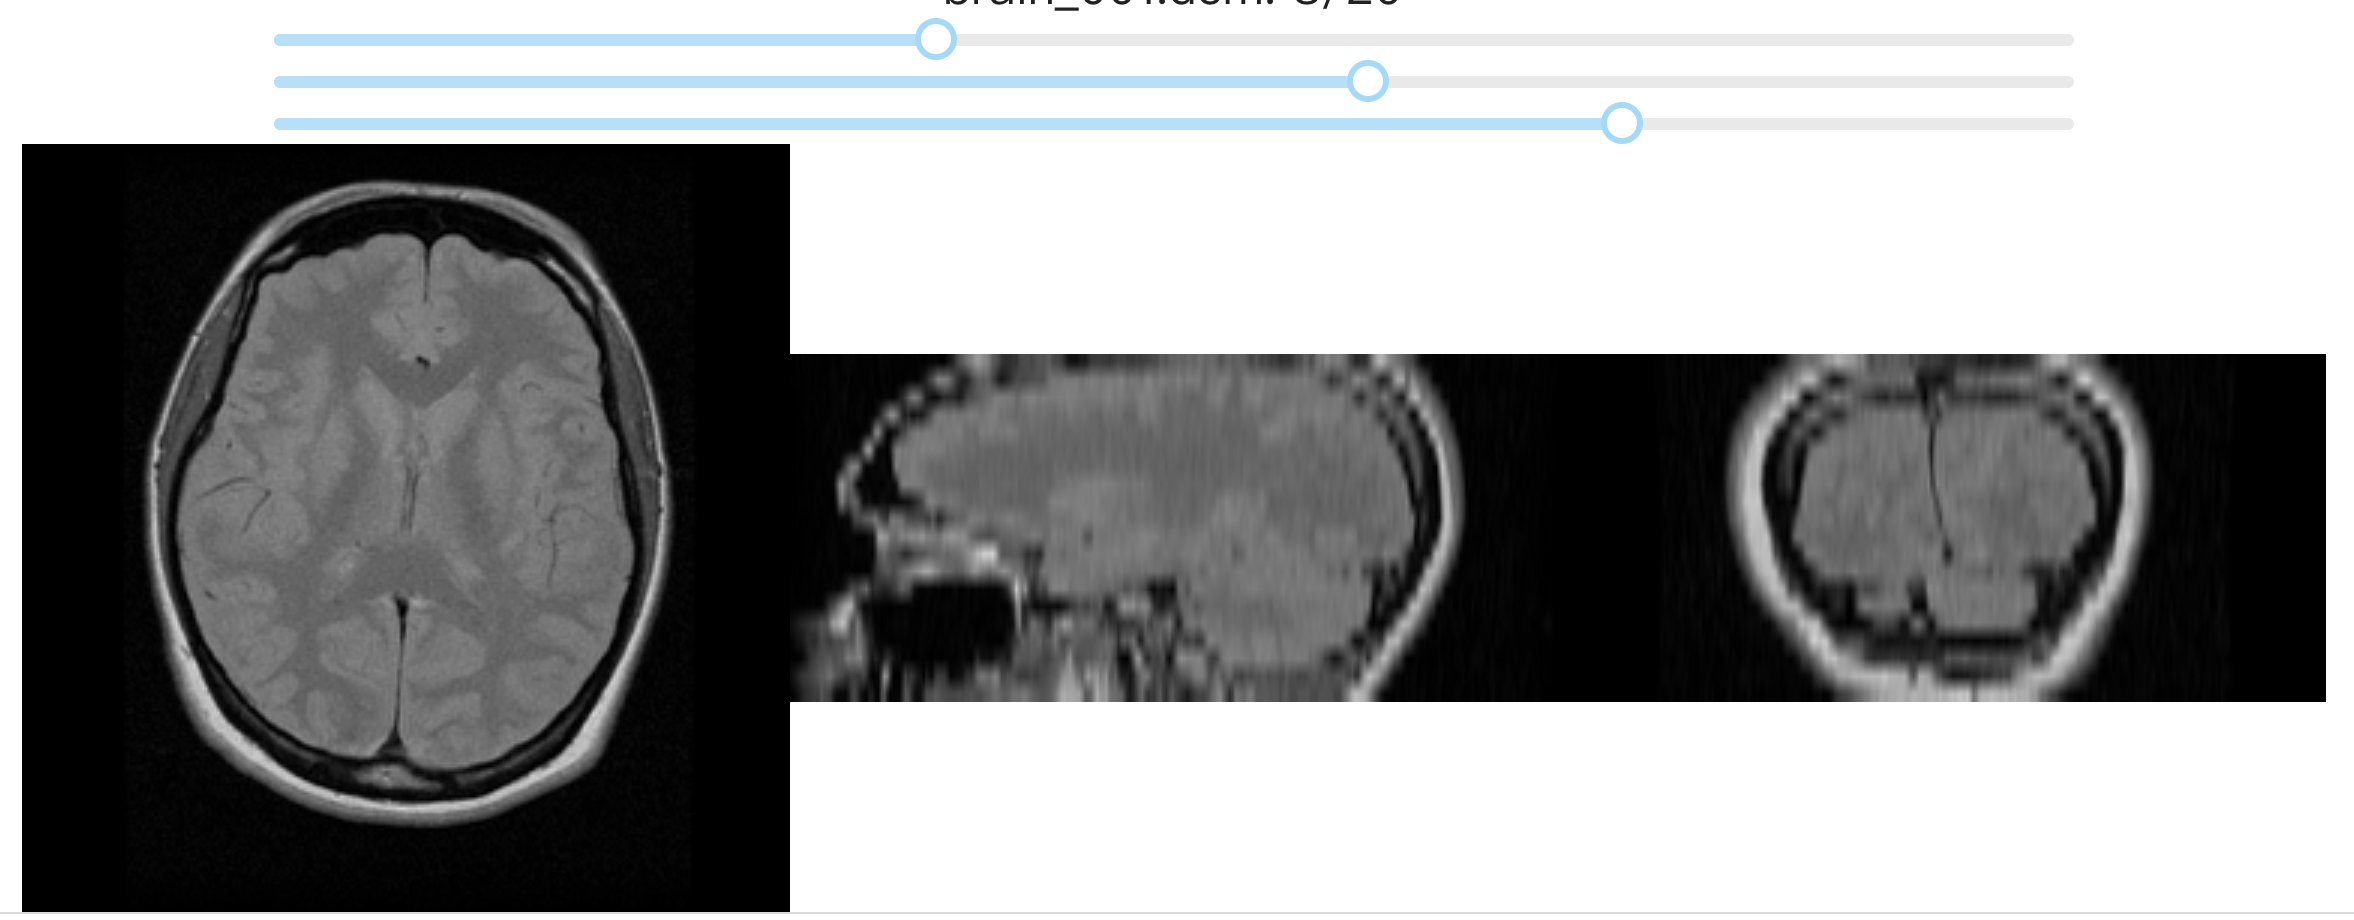
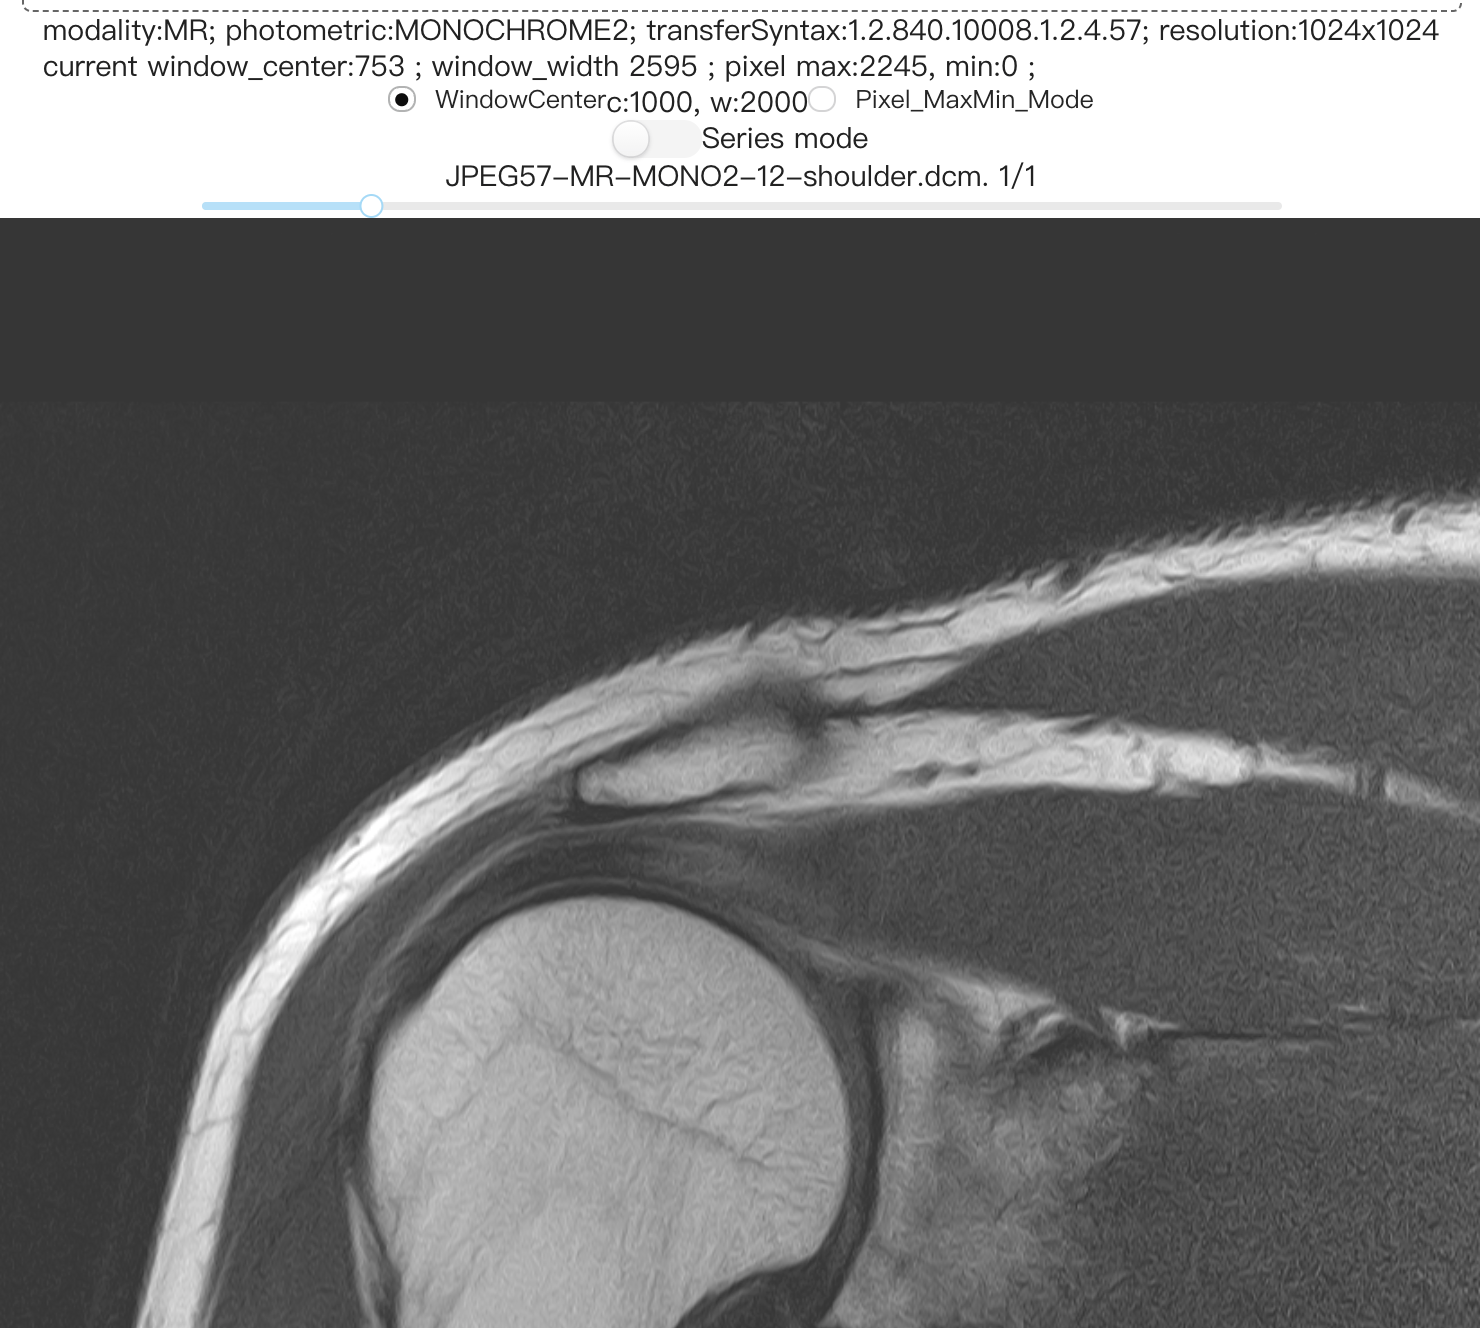
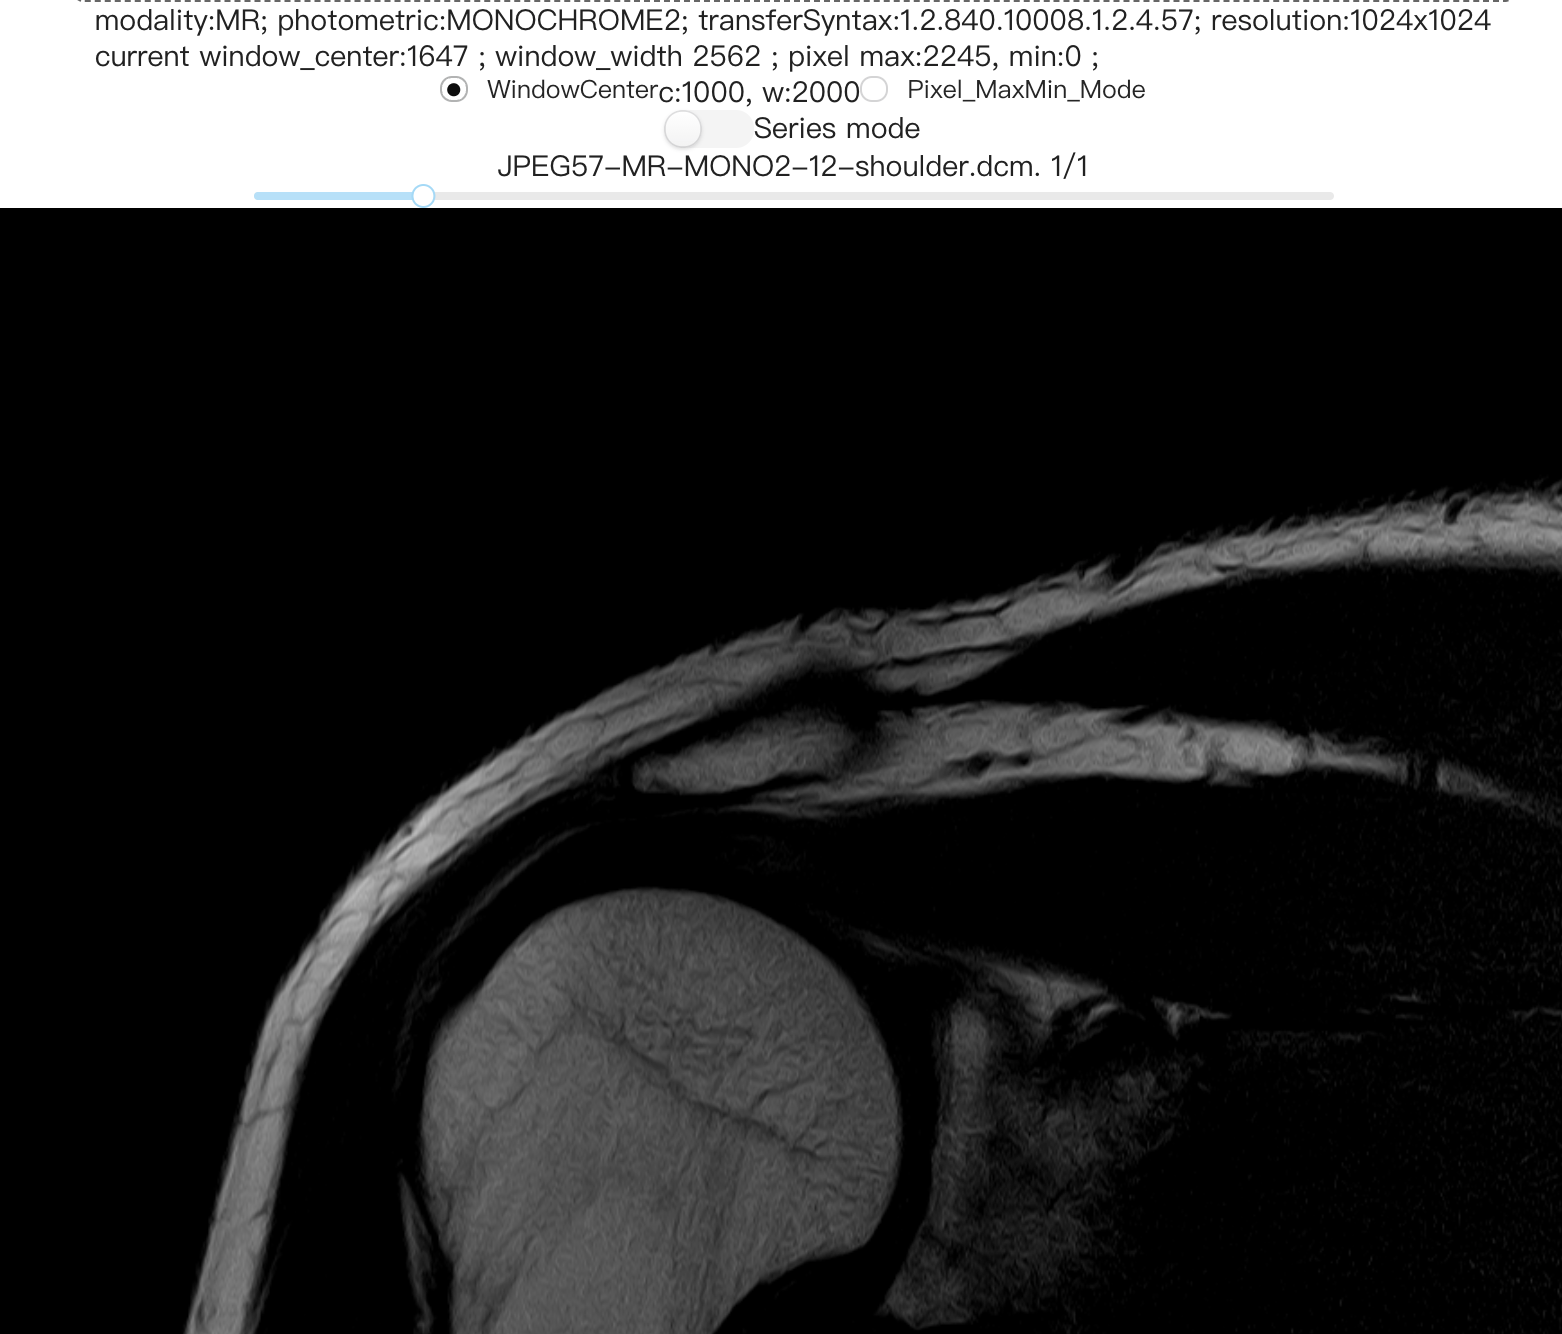
Adjust window
center/ width via mouse move, 20~30+ fps
3 plane views, use slider to switch sections
Show Information
Demo Video
-
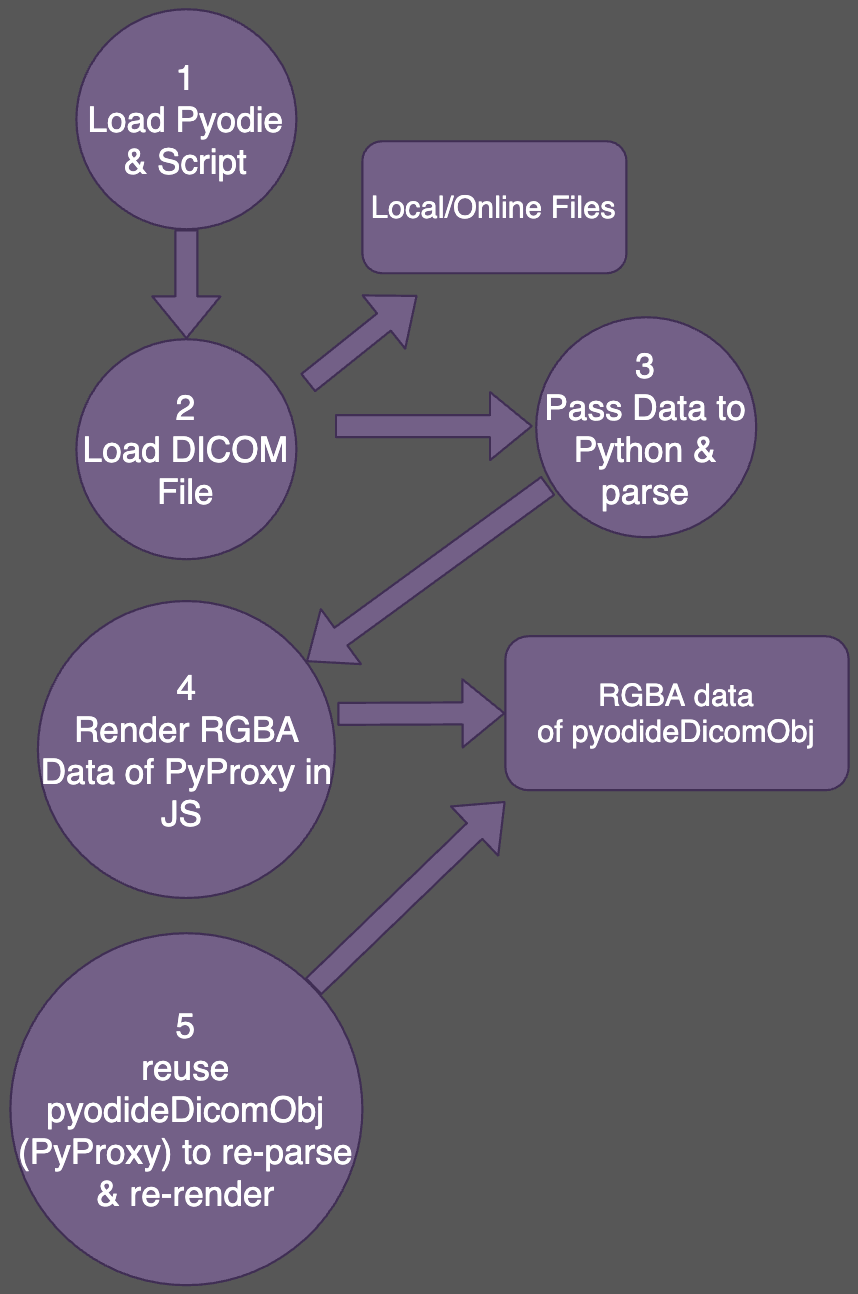
In TypeScript, load Pyodide and dicom_parser.py to get class PyodideDicom constructor function
-
Read local files / fetch online files
-
In TypeScript, call PyodideDicom(buffer, buffer_list, jpegDecoder) and store the returned PyProxy object, in __init__, do
-
parse & store basic DICOM info. and pixel_data
-
use NumPy to do calculations and store results to RGBA_1D_ndarray
-
-
In TypeScript, access pyodideDicomObj (PyProxy) attributes to show DICOM info. and draw on Canvas.
-
In TypeScript, reuse pyodideDicomObj (PyProxy) object for re-rendering
Implementation
Use TypeScript React app & Python type annotations
const jpegDecoder = {
  // baseline, jpeg2000, jpegls and this
  lossless: (bytes: PyProxyBuffer) => {
    const buffer = bytes.getBuffer() // PyBufferData
    const decoder = new jpegLossless.lossless.Decoder();
    const data = buffer.data; // Uint8Array
    const decoded = decoder.decode(data, data.byteOffset, data.byteLength);
    buffer.release()
    return decoded.buffer // ArrayBuffer
  },
}
const dicomObj = PyodideDicom(buffer, bufferList, jpegDecoder)
@dataclass
class PyodideDicom:
jpeg_decoder: Any = None # JsProxy
final_rgba_1d_ndarray: Optional[np.ndarray] = None
def __init__(
self,
buffer: Any = None, # JSProxy of JS ArrayBuffer
buffer_list: Any = None,
jpeg_decoder: Any = None,
): # step1: buffer.to_py() result in memoryview, ds is DICOM object
ds = self.get_pydicom_dataset_from_js_buffer(buffer.to_py())
# setp2: do some pydicom parsing, after that, we call below function
# step3: calling self.render_frame_to_rgba_1d() which will call below method initailly
def decompress_compressed_data(self, dicom_pixel_data: bytes): # dicom file's pixel_data
jsobj = pyodide.create_proxy(dicom_pixel_data)
uncompressed_jsproxy = jpeg_decoder.lossless( # ArrayBuffer's JsProxy
jsobj,
)
jsobj.destroy()
uncompressed = uncompressed_jsproxy.to_py() # memoryview
## .. skip the code using DICOM tags to detect it is uint16/int16/int8/uint8
image: np.ndarray = np.frombuffer(uncompressed, dtype=np.uint16) Flow 3: instantiate Python class with injected JS decoder object
In Typescirpt
In Python
def render_frame_to_rgba_1d(): # total: 0.09 ~ 0.009s
    # do
    # 1. compressed jpeg: decompress & apply_modality_lut ~ 0.05. uncompressed: already uses apply_modality_lut before
    # 2. get ndarray min/max
    # 3. inverse color for MONOCHROME1 case
    # 4  if window center/width mode: apply np.clip
    # 5. normalization to canvas 0~255, either use window center & width as min/max or original min/max
    # 6. convert to rgba_1d_image_array, cases:
    #    1. rgb_image1d: reshape to rgb_image2d first (~0.03s), then use 2.
    #       using np.insert approach is 2~3 times slower
    #    2. rgb_image2d: similar to 3. just np.dstack((image2d, alpha)) different
    #    3. grey_image2d #### 0.002s
    #    4. grey_image1d which use 3. function

# case 3
def flatten_grey_image_to_rgba_1d_image_array(self, image: np.ndarray):
    alpha = np.full(image.shape, 255)
    stacked = np.dstack((image, image, image, alpha))
    image = stacked.flatten()
    image = image.astype("uint8")
    return image

# old slow way of case 3
def flatten_grey_image2d_to_rgba_1d_image_array_iterate_ndarray_way():
    # 2d -> 1d -> 1d *4 (each array value -copy-> R+G+B+A)
    for i_row in range(0, height):
        for j_col in range(0, width):
Flow 3-2 use NumPy and its Performance
NumPy efficient usage VS NumPy slow usage
NumPy efficient usage VS NumPy ndarray iteration usage
DICOM visualization flow
Speed test: NumPy efficient usage VS NumPy ndarray iteration usage,
using OT-MONO2-8-hip.dcm on https://barre.dev/medical/samples/.
- numpy + efficient usage (np.dstack) in Pyodide (0.02s) >
-
numpy.ndarray + manual iteration calculation in local python (0.65s) >>
-
numpy.ndarray + manual iteration calculation in Pyodide. (4s)
Flow 4: After instantiating, use Python object in TypeScript
/* get PyProxy obj of a PyodideDicom Python instance */
const image = PyodideDicom(buffer, bufferList, decompressJPEG)

/* directly access Python object's attributes */
setModality(image.modality)


/* get ndarray as canvas suitable data */
// image.final_rgba_1d_ndarray <- will leak: pyodide/pyodide#1853. Fixed in main branch.
const ndarray = image.get_rgba_1d_ndarray()
const buffer = (ndarray as PyProxyBuffer).getBuffer("u8clamped"); // PyBufferData
(ndarray as PyProxyBuffer).destroy();
const uncompressedData = buffer.data as Uint8ClampedArray
buffer.release()

// draw on canvas
const imgData = new ImageData(uncompressedData, image.width, image.height);
const ctx = c.getContext("2d");
ctx.putImageData(imgData, 0, 0);
/* adjust windoe center/width & ask Python to update its ndarray */
// case1
const ndarray = image.render_frame_to_rgba_1d(newWindowCenter, newWindowWidth)
// case2
const ax_ndarray = image.render_axial_view.callKwargs({
normalize_window_center: newWindowCenter, normalize_window_width: newWindowWidth
});to Python Keyword argument
Flow 5: reuse PyProxy object to do re-rendering in TypeScript
An experiment code about my Python code calls JSProxy of a JS function, and pass bytes as PyProxy. In JS function, for-of is working since it is iterable.
const decompressJPEG = {
  lossless: (bytes: PyProxyBuffer) => {
    console.log("first byte:", bytes[0], bytes.get(0)); // undefined, 255
    /* PyProxyBuffer of Python "bytes" can be accessable via get & for-of in JavaScript
       so the below decoder function is working, although the function requires a ArrayBuffer parameter
       the reason is that it willy iterates each byte to ocpy internally (if only one argument)*/
    // slow way: copy
    // const decoded = decoder.decode(bytes); !!!!!!!!

    // fast way: no copy
    const buffer = bytes.getBuffer()
    const decoder = new jpegLossless.lossless.Decoder();
    const data = buffer.data;
    const decoded = decoder.decode(data, data.byteOffset, data.byteLength);
    buffer.release()
    return decoded.buffer
  },
}
Usage notes & tips
Pyodide may affect Web UI thread updating due to the invoked long CPU calculation loading or frequent call
-
Even if the Python part only consumes some milliseconds, but it may still affect UI event update FPS. The FPS is Ok when the mouse moves + Python + canvas rerender. But the FPS of DICOM viewer obviously decreases if Chrome console is opened (since it uses UI main thread too)
Solution: Web workers! But Keep in mind:
- no web worker: FPS may become low in some cases but no serious UI update delay happens.
- web worker: Better Performance. But it may result in a part of UI being updated on time but the other part will be enqueued and delayed more and more (e.g. 5s) as time pass if your request calculation is more than the performance bottleneck.
- Apply some throttle on main/worker thread to drop if need. See d4c-queue
Summary: three tips to use Pyodide
- REPL like Jupyter.
- A group of functions, usually stateless.
- Define a Main Class and instantiate in JavaScript, for resuing and keeping internal states, like a program.
Thank you! Q & A
Conclusion
-
Pyodide might be useful and please evaluate if it fits your requirements.
-
It's a good community. I've submitted PRs, issues and been involved in discussions. Possible enhancements: debugger, module system, loading time, OpenCV, documentation, etc.
-
-
Embedded Pydicom React Viewer welcome contributions too.
-
new Chrome extension is published, bundle with Pyodide core 20Mb + NumPy 10MB.
- To enhance the UX experience of waiting for Pyodide loading, use d4c-queue to allow loading Pyodide, dragging files (reading files & using Pyodide) running at the same time (partial concurrency and partial enqueue await functions).
-
grimmer0125


tckang
PyConAPAC 2021 - Use Pyodide to run Python in browsers - rendering medical DICOM files
By Grimmer


