
Michael Hueter
Instructor at Rithm School and Full-Stack Software Developer
React can be imported and run in the browser via the <script> tag!
However, most people run React from Node.js with a webpack server, which create-react-app sets up for you.
A super helpful tool for writing React code is prettier. This tool automatically formats your JavaScript code and can make writing React code easier.
You can then configure your editor to automatically format the code for you.
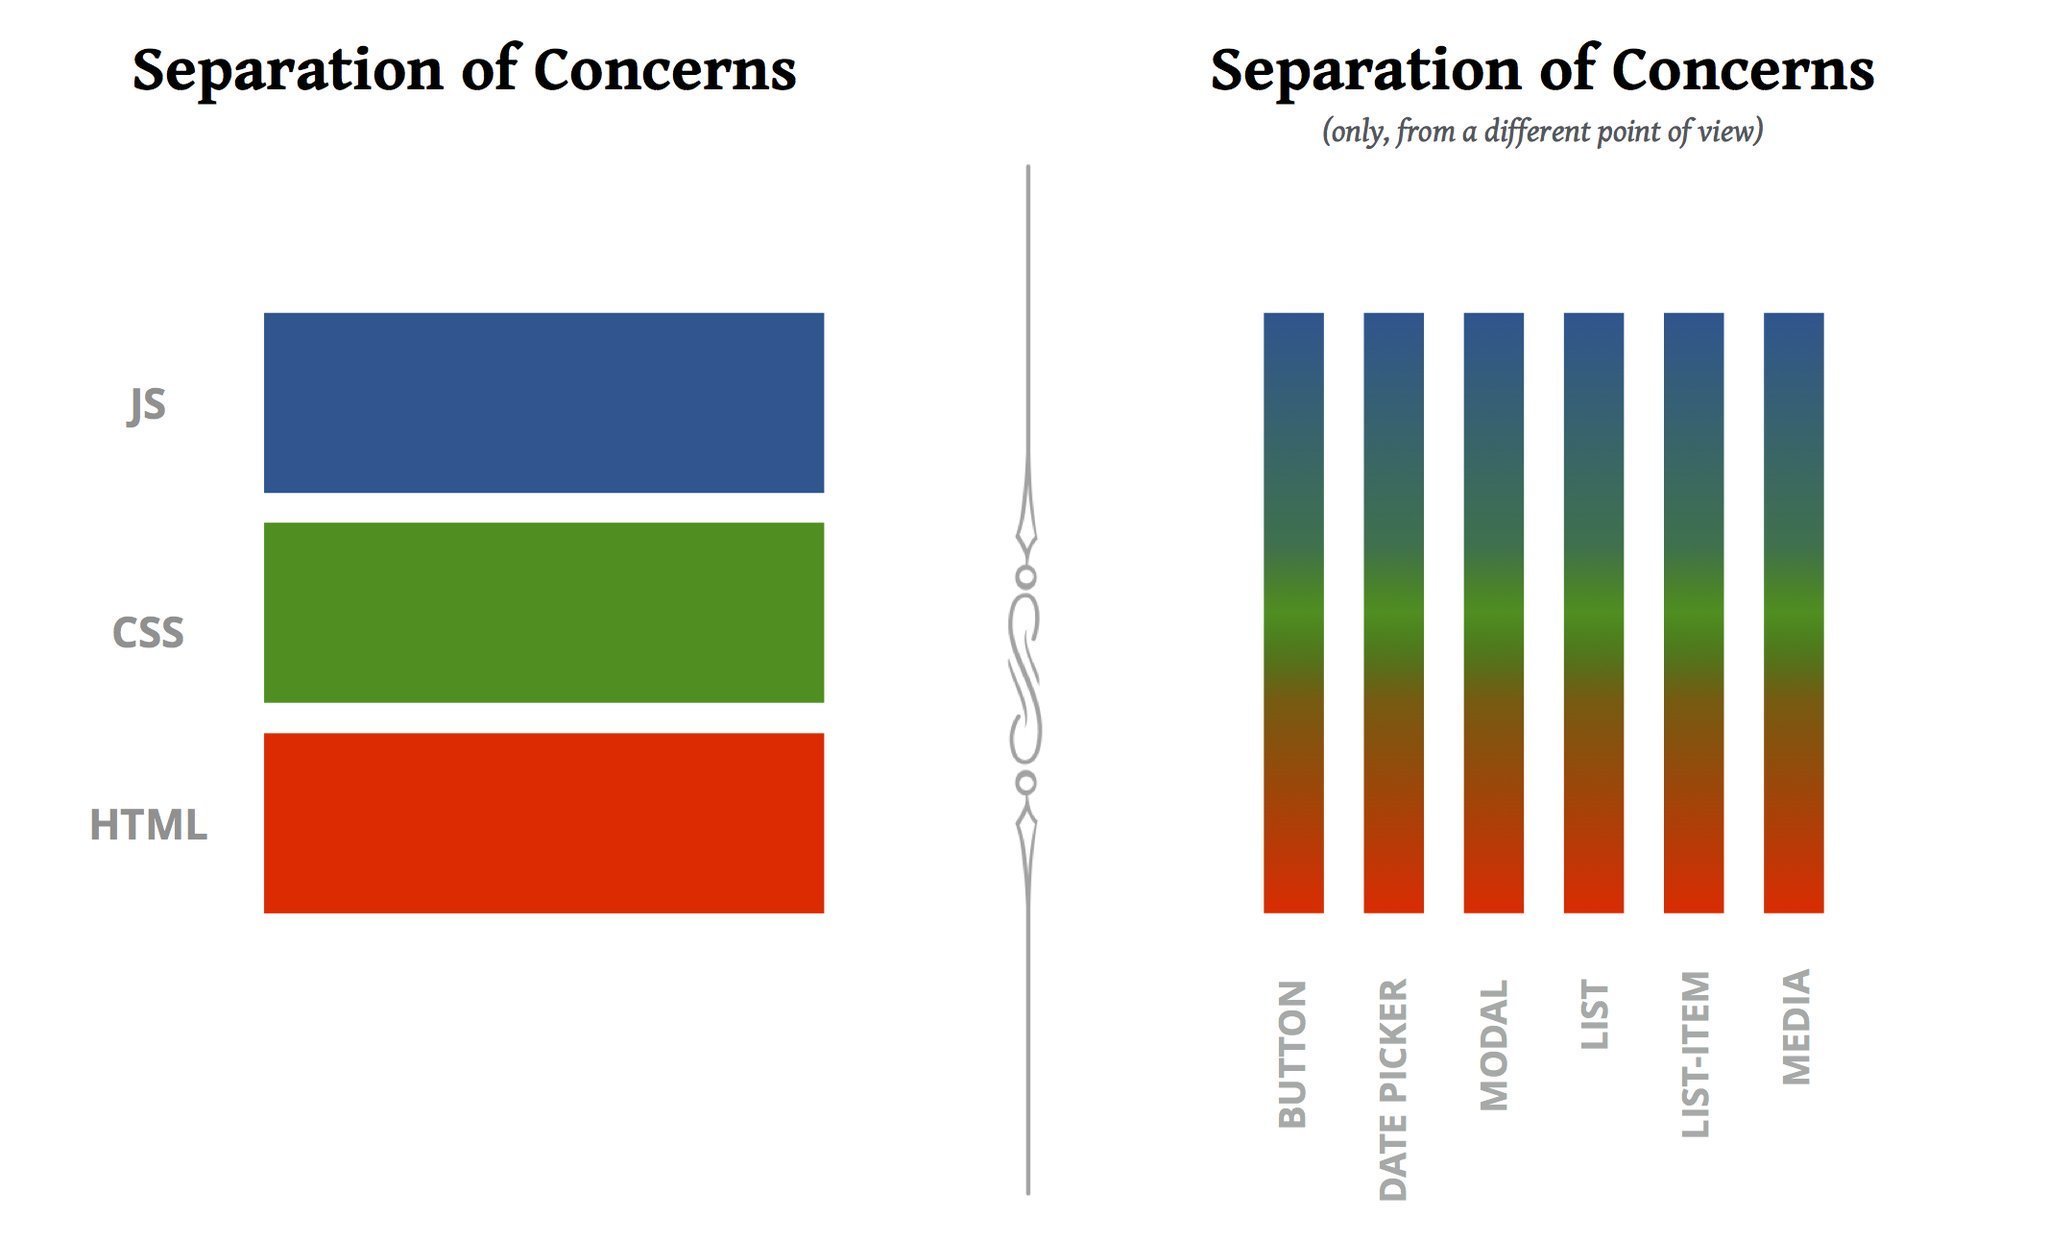
One of the key concepts in React is the use of components.
A component is a reusable element that can be displayed on the web page, consisting of markup (HTML), style (CSS), behavior (JavaScript).
When you use React, you are ultimately creating components that are modular enough to be reused many times and potentially in many places in your application
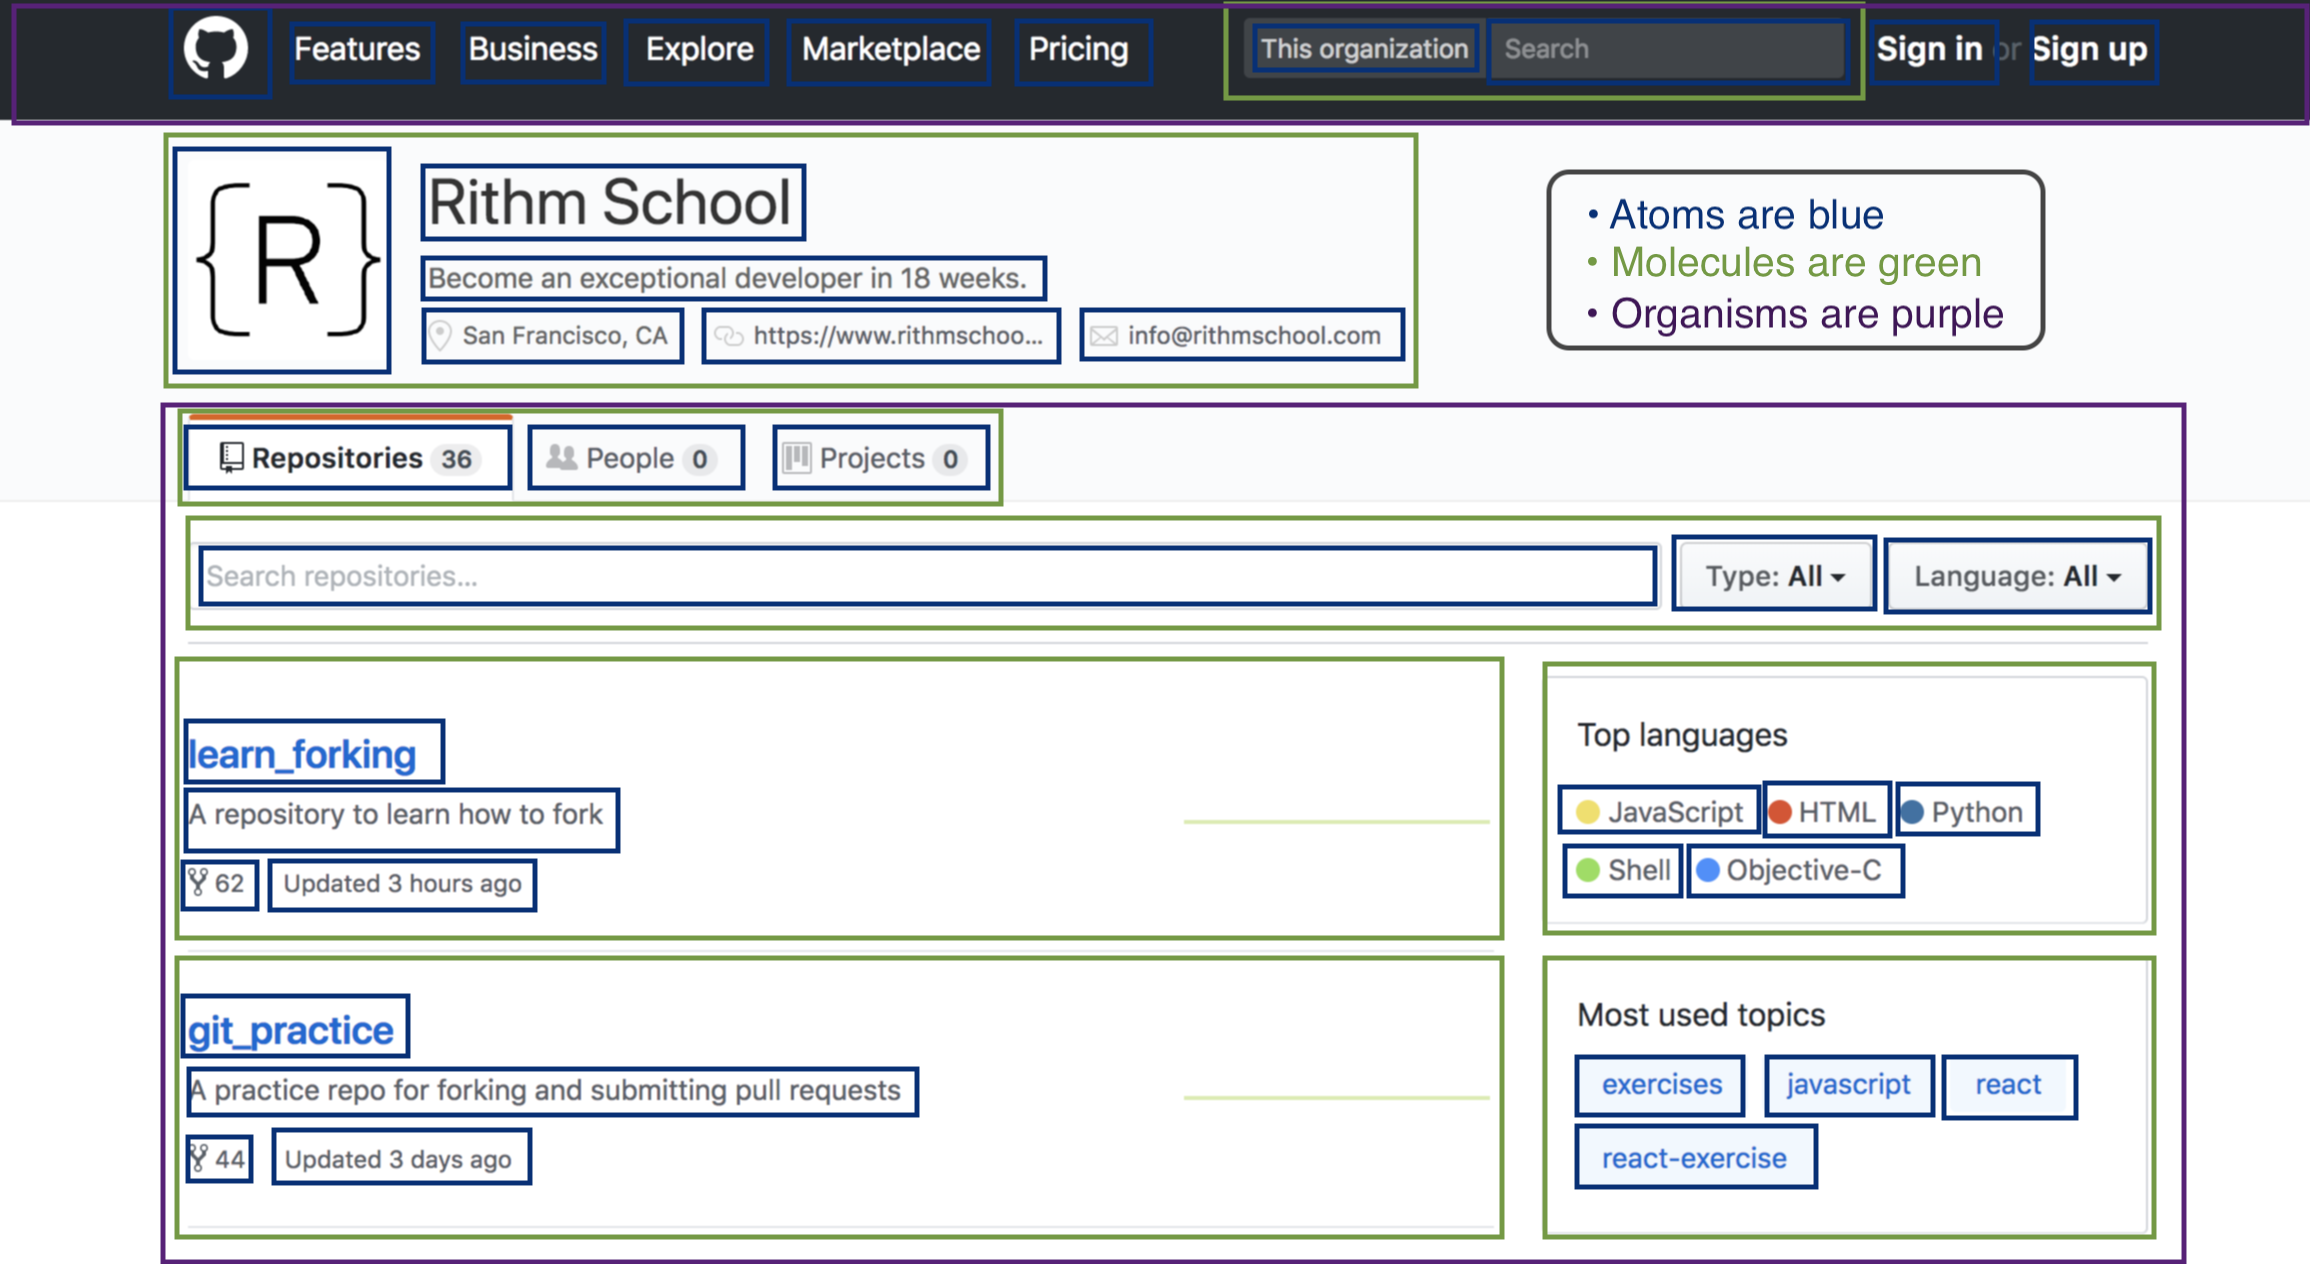
Web app example: GitHub
GitHub with components
JSX allows you to write HTML in your JavaScript.
Built-in DOM elements are lowercase, and custom components are uppercase:
<div id="container" >
  <MainHeader>
    <nav>
     <Navbar />
    </nav>
  </MainHeader>
  <MainContent />
</div>
We use ES6 Class Syntax to create our first React component
import React, { Component } from 'react';

class MyFirstComponent extends Component {
  constructor(props) {
    super(props);
  }
  render() {
    return <h1>Hello World</h1>;
  }
}

export default MyFirstComponent;
Any component that you create can accept props, which are data attributes, from a parent component.
Props are read only: they cannot be changed from within the component itself. In other words, props are immutable.
import React, { Component } from 'react';

class BusinessCard extends Component {
  render() {
    return (
      <div>
        <h2> {this.props.name} </h2>
        <h3> {this.props.title} </h3>
        {this.props.links.map(link => <li>{link}</li>)}
      </div>
    );
  }
}

class MyProfile extends Component {
  render() {
    return (
      <div>
        <h1> Profile </h1>
        <hr />
        <BusinessCard
          name="Michael Hueter"
          title="Lead Instructor"
          links={[
            'http://github.com/hueter',
            'http://linkedin.com/in/michael-hueter'
          ]}
        />
      </div>
    );
  }
}

export default MyProfile;
const names = [
  'Ernesto Garner',
  'Mitchell Rice',
  'Travis Freeman',
  'Jenny Lane',
  'Viola Baldwin',
  'Donna Alvarado',
  'Kelly Guzman',
  'Kirk Paul',
  'Edna Jordan',
  'Juana Bates'
];import React, { Component } from 'react';
class ListItem extends Component {
render() {
return <li>{this.props.name}</li>;
}
}
const names = [
'Ernesto Garner',
'Mitchell Rice',
'Travis Freeman',
'Jenny Lane',
'Viola Baldwin',
'Donna Alvarado',
'Kelly Guzman',
'Kirk Paul',
'Edna Jordan',
'Juana Bates'
];
class MyList extends Component {
render() {
return names.map(name => <ListItem name={name} />);
}
}
export default MyList;
import PropTypes from 'prop-types';

class Greeting extends React.Component {
  render() {
    return (
      <h1>Hello, {this.props.name}</h1>
    );
  }
}

Greeting.propTypes = {
  name: PropTypes.string
};
One way to describe the props that a component accepts is PropTypes. Using PropTypes also has the added benefit of doing some basic type checking (e.g. "I expect this prop to be a string").
class Greeting extends React.Component {
  render() {
    return (
      <h1>Hello, {this.props.name}</h1>
    );
  }
}

// Specifies the default values for props:
Greeting.defaultProps = {
  name: 'Stranger'
};
We can utilize defaultProps if we're not sure if the parent component is going to pass anything down!
When building dynamic web applications, we often want to be able to change our data.
In React, we store dynamic data as state in the app.
class Greeting extends Component {
  constructor(props) {
    super(props);
    this.state = {
      name: 'Michael'
    };
  }
  render() {
    return <h1>Hello, {this.state.name}</h1>;
  }
}
import React, { Component } from 'react';

export default class Greeting extends Component {
  state = {
    name: 'Michael'
  };

  changeName = () => {
    const newName = this.state.name === 'Michael' ? 'Not Michael' : 'Michael';
    this.setState({ name: newName });
  };

  render() {
    return (
      <div>
        <h2>Hello, {this.state.name}!</h2>
        <button onClick={this.changeName}>
          Change my name, change my name
        </button>
      </div>
    );
  }
}
1. State should be owned by only one component. This simple rules makes React components much easier to debug and understand.
2. When state is changed inside of a component, the render method will eventually be invoked by React. The key word here is eventually. Changes to state do not always show up right away (in practice they happen very quickly).
import React, { Component } from "react";
import Coin from "./Coin";

class CoinGame extends Component {
  state = {
    flipValue: Math.random()
  };

  flip = () => {
    this.setState({
      flipValue: Math.random()
    });
  };

  render() {
    return (
      <div>
        <Coin side={this.state.flipValue} />
        <button onClick={this.flip}>Flip!</button>
      </div>
    );
  }
}

export default CoinGame;
import React, { Component } from "react";
import heads from "./heads.jpg";
import tails from "./tails.jpg";

class Coin extends Component {
  render() {
    const coinObj = { heads, tails };
    const key = this.props.side < 0.5
                ? "heads"
                : "tails";
    return (
      <div>
        <img src={coinObj[key]} />
        <p>The coin came up {key}!</p>
      </div>
    );
  }
}

export default Coin;
1. Build a stateful component called MoodChanger that cycles through an array of moods by clicking a button, and renders an ASCII emoji. Starter code:
class MoodChanger extends Component {
  state = {
    currentMood: 'happy',
    face: ':-)',
    currentMoodIdx: 0,
    moods: ['happy', 'sad', 'angry', 'neutral']
  };

  changeMood = e => {
    // fill me in
  };

  render() {
    return (
      <div>
        <h1>{this.state.face}</h1>
        <button onClick={this.changeMood}> Change Mood </button>
      </div>
    );
  }
}
Check out the completed code on GitHub
By Michael Hueter
A brief introduction to React, featuring props and state.


