Learn Vue.js
By Overflow Club
Instructor: Mohamed Mansour
2.1
Section II
Getting Started with Vue (part 1)
Outline
- Vue Instance
- Components
- Anatomy of a Vue Component
- Template Syntax
- The Virtual DOM
- Reactivity
- Docs references
Understanding Vue.js Fundamentals
Vue Instance
In your initial Vue project, you'll notice this code in main.js:
import { createApp } from 'vue'
import App from './App.vue'

const app = createApp(App)
app.mount('#app')
Understanding Vue.js Fundamentals
Vue Instance
In your initial Vue project, you'll notice this code
in main.js:
import { createApp } from 'vue'
import App from './App.vue'

const app = createApp(App)
app.mount('#app')
We use createApp function to start a new Vue app instance, and pass the root component of our app to it.
Components
Components
- Components are reusable building blocks in Vue.js applications.
- They encapsulate HTML, CSS, and JavaScript logic into self-contained units.
- They also promote code reusability, maintainability, and scalability by breaking down the user interface into smaller, modular pieces.
Understanding Vue.js Fundamentals
Vue Instance
In your initial Vue project, you'll notice this code in main.js:
import { createApp } from 'vue'
import App from './App.vue'

createApp(App).mount('#app')
We use createApp function to start a new Vue app instance, and pass the root component of our app to it.
We use createApp function to start a new Vue app instance, and pass the root component of our app to it. This root component is what contains all other components in our app.
Components
- Components are reusable building blocks in Vue.js applications.
- They encapsulate HTML, CSS, and JavaScript logic into self-contained units.
- They also promote code reusability, maintainability, and scalability by breaking down the user interface into smaller, modular pieces.
Now back to our app
createApp returns the app instance, which we can then use to configure the app, use plugins, register components or custom directives, or render the app.
We can render it somewhere in the main HTML document, using .mount(), it can take an HTML element or a selector as an argument. In our case, we gave it the element with the id of "app" ('#app'). Which means that the whole Vue app will be rendered inside that element.
For the full list of things you can do with the app instance, take a look at the docs:
Anatomy of a Vue Component
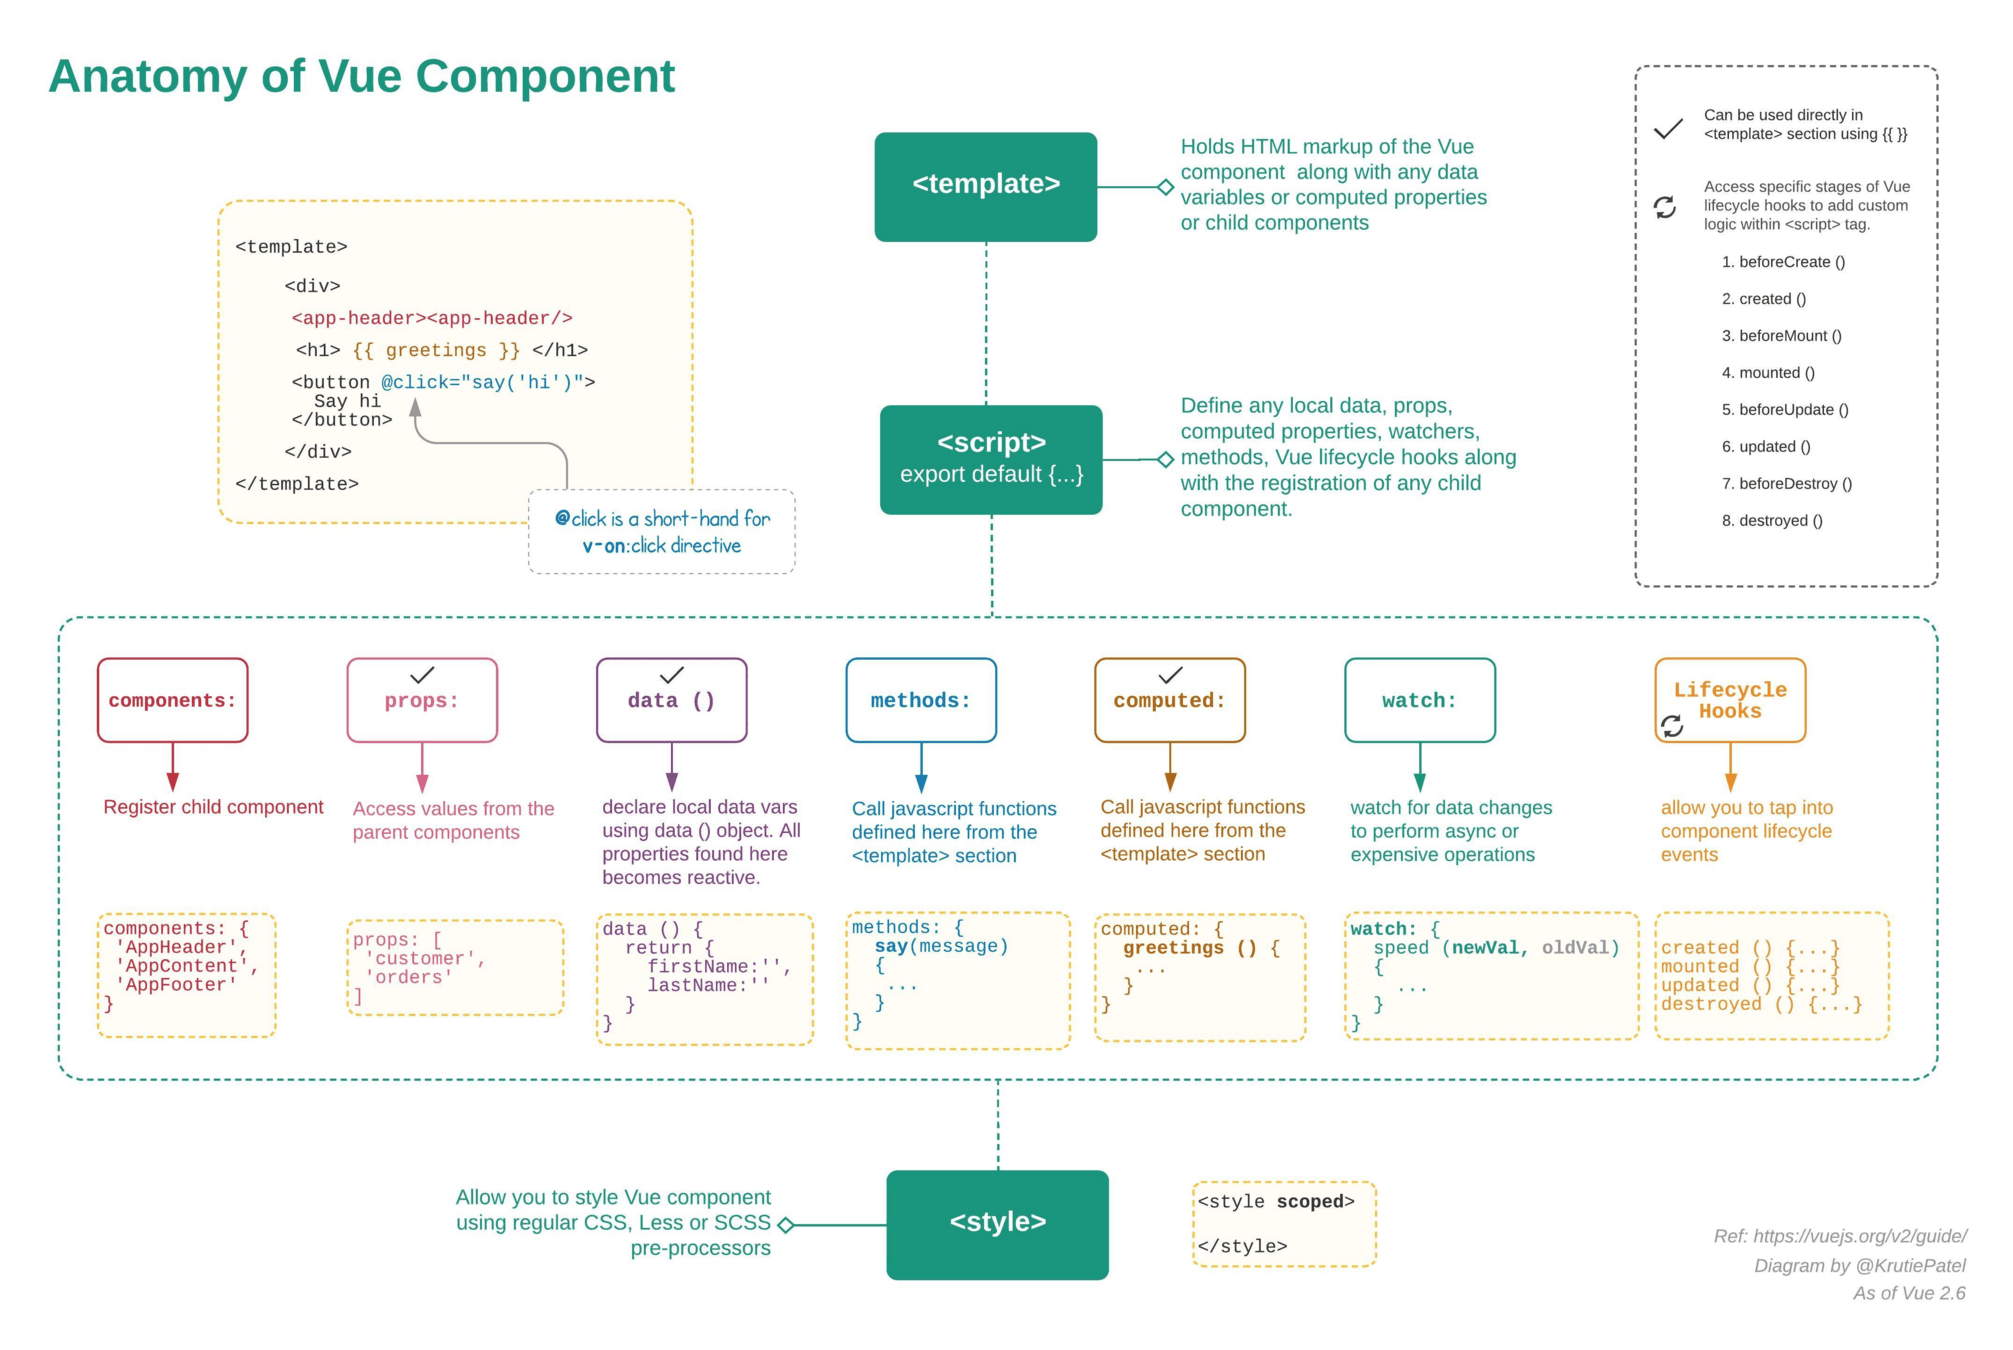
Anatomy of a Vue Component
Template
The template is the part that contains the HTML structure of the component.
It utilizes Vue's templating syntax to bind data and render dynamic content — We'll get into this syntax shortly.
Script
The script is what contains the JavaScript logic for the component. It's also where we define data, methods, computed properties, and lifecycle hooks.
Style
This part contains the component's CSS styles.
Scoped styles use the scoped attribute to prevent styles from leaking to other components.
We can also use CSS preprocessors with it, like PostCSS, Sass, etc...
Template Syntax
The Vue template syntax is similar to HTML, and in fact, is completely valid HTML syntax. In simple words, this is a way for Vue to parse the DOM and figure out where and what should be updated.
Text Interpolation
<span>Hello, {{ name }}</span>The double curly braces syntax inside any HTML element can contain any value from the component instance. So in this example, Vue will look for a variable called name in the same instance and will replace {{name}} with its value as plain text.
Template Syntax
The Vue template syntax is similar to HTML, and in fact, is completely valid HTML syntax. In simple words, this is a way for Vue to parse the DOM and figure out where and what should be updated.
Text Interpolation
<span>Hello, {{ name }}</span>Attribute Bindings
<div v-bind:class="someDynamicClass"></div>We can use v-bind:<any html attribute> to dynamically choose the value of the selected attribute.
So in the above example, Vue will look for a variable in the instance called someDynamicClass and will replace it with its actual value.
This is a way for us to dynamically update the inner text content of any element. But how about attributes?
The double curly braces syntax inside any HTML element can contain any value from the component instance. So in this example, Vue will look for a variable called name in the same instance and will replace {{name}} with its value as plain text.
Attribute Bindings
<div v-bind:class="someDynamicClass"></div>We can use v-bind:<any html attribute> to dynamically choose the value of the selected attribute.
So in the above example, Vue will look for a variable in the instance called someDynamicClass and will replace it with its actual value.
This is a way for us to dynamically update the inner text content of any element. But how about attributes?
There's a shorthand for v-bind which is just a colon followed by the attribute name ":<attribute>".
So the previous example can be written as:
<div :class="someDynamicClass"></div><div v-bind:class="someDynamicClass"></div>We can use v-bind:<any html attribute> to dynamically choose the value of the selected attribute.
So in the above example, Vue will look for a variable in the instance called someDynamicClass and will replace it with its actual value.
There's a shorthand for v-bind which is just a colon followed by the attribute name ":<attribute>".
So the previous example can be written as:
<div :class="someDynamicClass"></div>Dynamically Binding Multiple Attributes
const objectOfAttrs = {
  id: 'container',
  class: 'wrapper'
}
If you have a JavaScript object representing multiple attributes that looks like this
You can bind them to a single element by using v-bind without an argument:
<div v-bind="objectOfAttrs"></div><div :class="someDynamicClass"></div>Dynamically Binding Multiple Attributes
const objectOfAttrs = {
  id: 'container',
  class: 'wrapper'
}
If you have a JavaScript object representing multiple attributes that looks like this
You can bind them to a single element by using v-bind without an argument:
<div v-bind="objectOfAttrs"></div>Directives
Directives are special attributes with the v- prefix, they can change the behavior of the HTML element or the component that they're used on.
They expect a JS expression as a value, and apply updates to the DOM reactively whenever the value of their expression changes.
Examples:
v-if
<div v-if="isShown">This div is visible</div><div v-bind="objectOfAttrs"></div>Directives
Directives are special attributes with the v- prefix, they can change the behavior of the HTML element or the component that they're used on.
They expect a JS expression as a value, and apply updates to the DOM reactively whenever the value of their expression changes.
Examples:
v-if
<div v-if="isShown">This div is visible</div>v-if takes a boolean value or expression, and acts like the usual if statement in programming, where the element that it's applied to will be rendered only if the boolean value is true. Additional to v-if, Vue also has v-else and v-else-if with their obvious jobs. The only difference here is that v-else does not take a value, because well, it doesn't need it.
v-for
<div v-for="fruit in ['orange', 'banana', 'apple']">{{ fruit }}</div>v-if
<div v-if="isShown">This div is visible</div>v-if takes a boolean value or expression, and acts like the usual if statement in programming, where the element that it's applied to will be rendered only if the boolean value is true. Additional to v-if, Vue also has v-else and v-else-if with their obvious jobs. The only difference here is that v-else does not take a value, because well, it doesn't need it.
v-for
<div v-for="fruit in ['orange', 'banana', 'apple']">{{ fruit }}</div>We can use the v-for directive to render a list of items based on an array. So in the above examples, 3 divs will be rendered as the following:
<div>orange</div>
<div>banana</div>
<div>apple</div>
v-if takes a boolean value or expression, and acts like the usual if statement in programming, where the element that it's applied to will be rendered only if the boolean value is true. Additional to v-if, Vue also has v-else and v-else-if with their obvious jobs. The only difference here is that v-else does not take a value, because well, it doesn't need it.
v-for
<div v-for="fruit in ['orange', 'banana', 'apple']">{{ fruit }}</div>We can use the v-for directive to render a list of items based on an array. So in the above examples, 3 divs will be rendered as the following:
<div>orange</div>
<div>banana</div>
<div>apple</div>
The v-for directive requires a special syntax in the form of item in items, where items is the source data array and item is an alias for the array element being iterated on and can be used inside the scope of the element (the element itself and its children).
We can also access the index of the current item in the iteration like this:
We can use the v-for directive to render a list of items based on an array. So in the above examples, 3 divs will be rendered as the following:
<div>orange</div>
<div>banana</div>
<div>apple</div>
The v-for directive requires a special syntax in the form of item in items, where items is the source data array and item is an alias for the array element being iterated on and can be used inside the scope of the element (the element itself and its children).
We can also access the index of the current item in the iteration like this:
<div v-for="(fruit, index) in ['orange', 'banana', 'apple']">
  {{index}}: {{ fruit }}
</div>
This is pretty much similar to using forEach() in JS.
You can also iterate over a range of numbers, like this:
<div v-for="n in 100">{{ n }}</div>This will render your div 100 times.
So many things you can do with the conditional and loop directives in Vue, I encourage you to take a look at the docs experiment in your project.
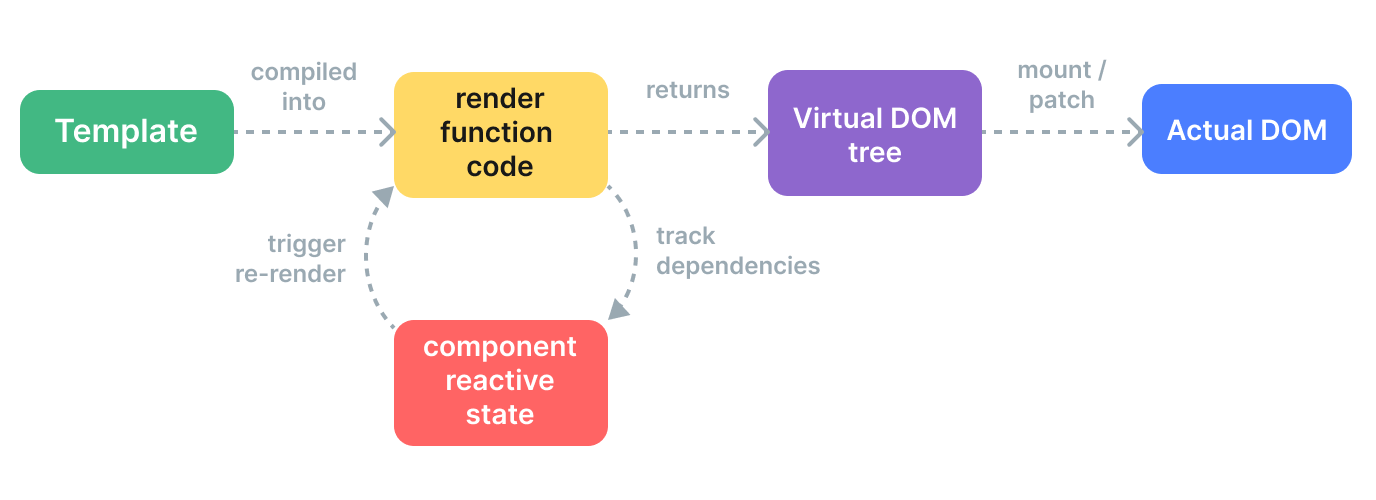
The Virtual DOM
As we've seen, the template in a Vue component, will update your HTML whenever there's an update, and it'll only update the component where it needs to.
But how does this work?
The virtual DOM (or VDOM) is a representation of the DOM in memory. This concept was first introduced by React, and then was adopted by many other frameworks including Vue.
Mounting is when Vue runtime goes through the virtual DOM tree the first time and construct a real DOM as HTML from it.
When there's any update on the reactive data, it'll trigger re-rendering and will update the virtual DOM, then compares it to the real DOM, finds the difference, and only apply the changes to the updated part.
This is called patching or reconciliation.
During the mount step, Vue keeps track of all reactive dependencies that were used. (we'll understand reactivity in a bit).
Reactivity
Reactivity in Vue enables automatic UI updates based on changes in data, to keep the UI and the data that it depends on in sync. It's one of the key strengths of Vue.
Vue uses a reactive system to track dependencies between data properties and the corresponding DOM elements. When a data property changes, Vue automatically re-renders only the affected components to reflect the updated state in the user interface.
Reactivity in Vue is similar to passing variables by reference in C/C++. When a data property changes in Vue, all components referencing it are automatically updated.
For example, if a Vue component's "count" data property changes, any UI elements bound to it instantly reflect the new value.
Reactivity in Practice: The Basics
In Vue, reactivity can be achieved using mainly 2 functions: ref() and reactive().
ref()
The recommended way to declare reactive state is using the ref() function:
import { ref } from 'vue'
const count = ref(0)

// accessing the value
console.log(count.value)

// updating the value
count.value++
Reactivity in Practice: The Basics
In Vue, reactivity can be achieved using mainly 2 functions: ref() and reactive():
ref()
The recommended way to declare reactive state is using the ref() function:
import { ref } from 'vue'
const count = ref(0)

// accessing the value
console.log(count.value)

// updating the value
count.value++
This is similar to defining a normal variable, but you pass the value to ref() to make your data reactive.
You can then update or access the value of your ref using .value.
To access the reactive property inside your component's view, simply just call it:
<template>
  <div> {{ count }} </div>
</template>
This way, the value inside your div will automatically update once the value of count is updated.
More reactivity methods will be explained in the next lessons.
Docs Reference
- https://vuejs.org/guide/essentials/reactivity-fundamentals
- https://vuejs.org/api/reactivity-core.html
- https://vuejs.org/guide/extras/reactivity-in-depth.html
- https://vuejs.org/guide/essentials/template-syntax.html
- https://vuejs.org/guide/essentials/conditional.html
- https://vuejs.org/guide/essentials/list.html
Thank you
Overflow Vue Course - 2.1
By Mo Mansour


