Tech Presentation
Selenium
Selenium Testing
What is Graphic User Interface Testing?
GUI is what a user sees. When you visit this website, all the text and images are the GUI. A normal user does not see the source code with html and javascript. This interface is visible to the user.
GUI testing involves checking screens with controls such as menus, buttons, icons, bars, boxes, windows, and etc. For example, images should be checked to be completely visible in different browsers, and a button should work when clicked.
Is GUI Testing Important?
First, imagine you are a user. You use a website and not all of the buttons or links are properly functioning; images do not load, and the whole experience feels very uncomfortable and clunky. You are probably never going to visit that website again. This is why GUI is important, and proper testing should be carried out to make sure it is free of bugs.


What is Selenium?
All Selenium does is automate browsers. It is primarily used to automate web applications for testing, but it isn't limited to that. Monotonous and routine web administration tasks can be automated as well. For this tutorial, we will be discussing Selenium for UI testing specificially.
What you will need
Unless otherwise specified, the Selenium tools used in this tutorial are:
- Selenium IDE 1.0.8
- Selenium RC 1.0.3
You will also need test cases written in many popular languages including:
- C#
- Groovy
- Java
- Perl
- PHP
- Python
- Ruby
- Scala
Selenium Overview
- One of the most popular testing frameworks for web applications as of today
- First open-source test framework using an user-centric point of view
- Supports javascript
- Unintrusive and doesn’t need any modifications of your app to test it
Selenium Overview
Selenium, as of today, is composed of several projects :
-
Selenium Core: The JavaScript framework that provides Selenium the ability to drive the browser and execute the tests
-
Selenium IDE: The Firefox plugin used to build test-cases and test-suites directly on top of your web-app. You can also export your tests to Selenium RC.
-
Selenium RC: A client/server system that allows you to execute tests written in a variety of languages on a local or remote computer and on all major browsers.
-
Selenium Grid: Selenium Grid leverages Selenium RC to provide a test environment that spans on multiple machines at once, reducing the testing time.
-
Selenium on Rails: A framework that is built especially to test applications running on the Rails framework.
-
CubicTest: An Eclipse plugin which purpose is to conceive and execute tests using the pageObjects pattern.
-
Bromine: A simple web-based QA tool targeting the single tester that doesn’t want/can’t invest in complex corporate QA solutions.
Selenium Overview
While being very popular, Selenium is not the ultimate all-in-one testing tool and you should NOT rely on Selenium only to test your applications. The following chart helps you situate Selenium among the web-testing stack.
| Code/Process | Testing |
| Overall app | Acceptance testing: Selenium Fully rendered browser testing views, executing Javascript on page closest to the user, farthest from code |
| Integration | Multi-controller tests : htmlunit, webrat, cucumber |
| Views | View testing in isolation : rspec, Selenium (see Section 9.1.2, “Unit testing”) |
| Controllers> | Functional Testing/Controller testing |
| DB/Models | Unit testing/Model Testing : server side, depends on backend technology |
IDE
Why use IDE
1. easier to setup the test by simply clicking mouse and pressing keyboard
2. do not need any to write any code
3. easily export to test cases in different language like Java, python, PHP


Installation
HowTo
1. Open Firefox, go to osu cse website. Then, open Selenium IDE (‘Tools’ → ‘Selenium IDE’).

HowTo
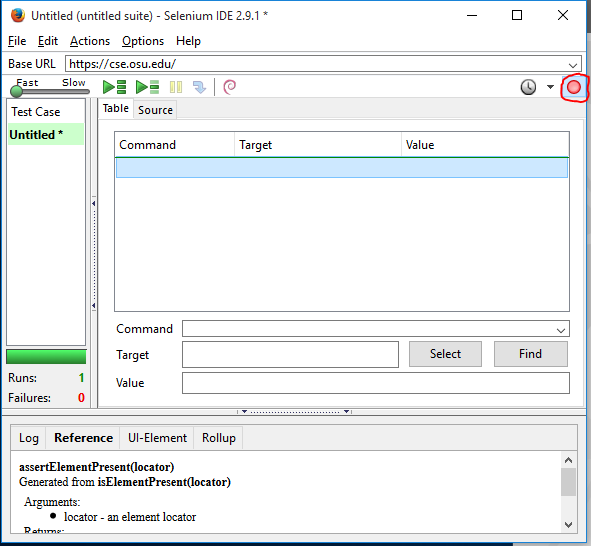
2. Activate the record function by clicking on the red button in the IDE.
HowTo
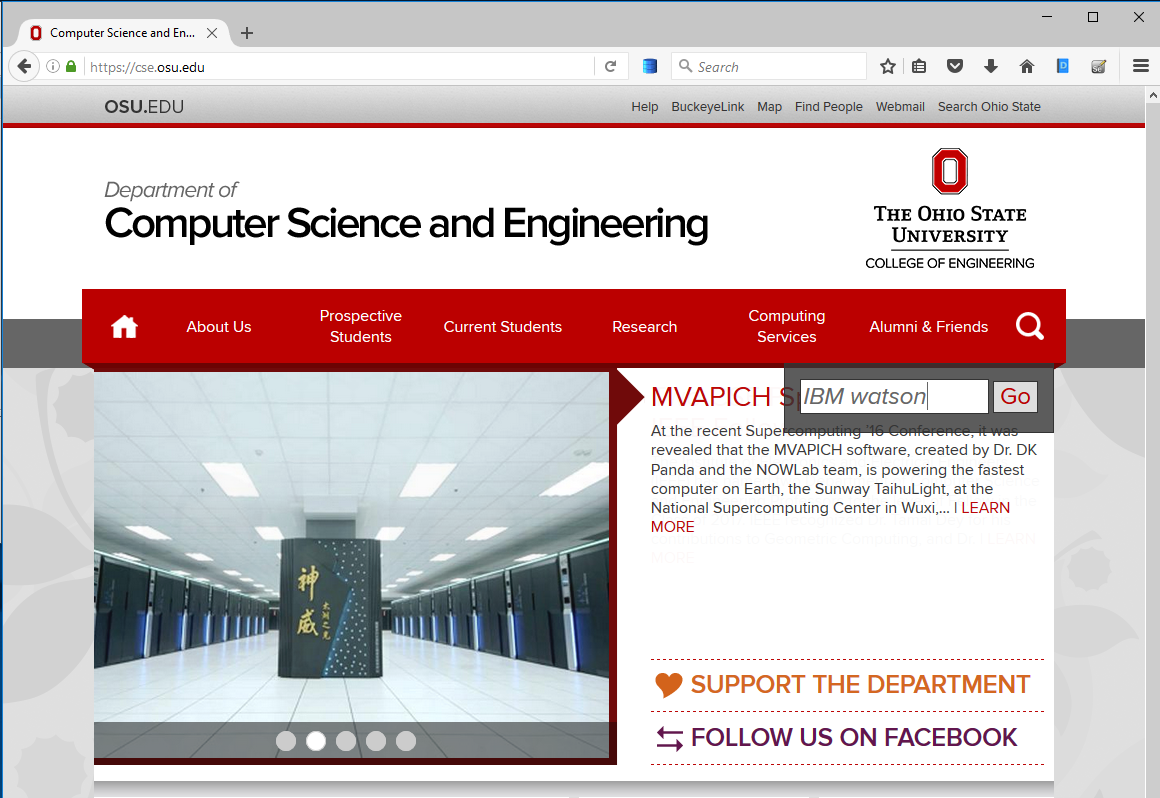
3. Now let's strat build a test case. Click the query buttom on the webpage and then type in the search field with "IBM watson".
HowTo
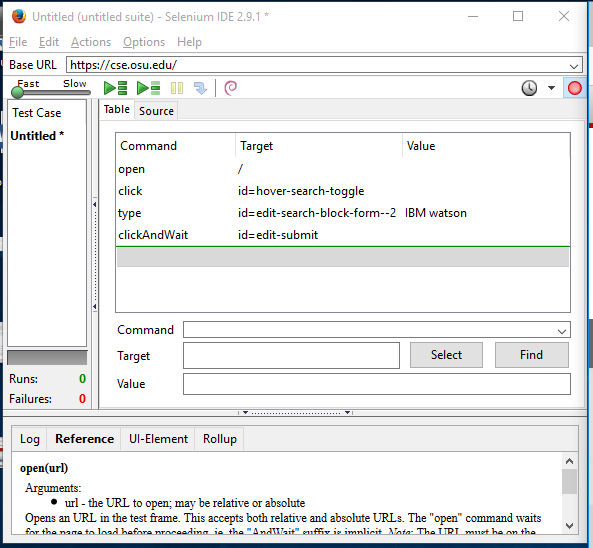
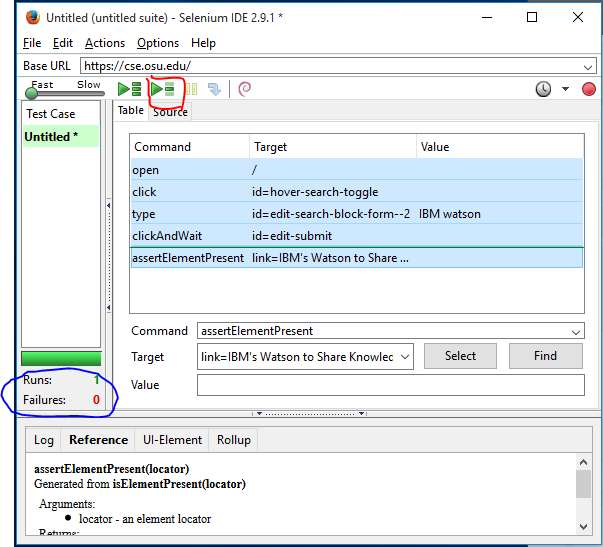
4. Click on the "Go" button on the webpage and you should see Selenium IDE window looks like this below:
HowTo
5. Deactivate recording in the IDE. Similar as the previous step.
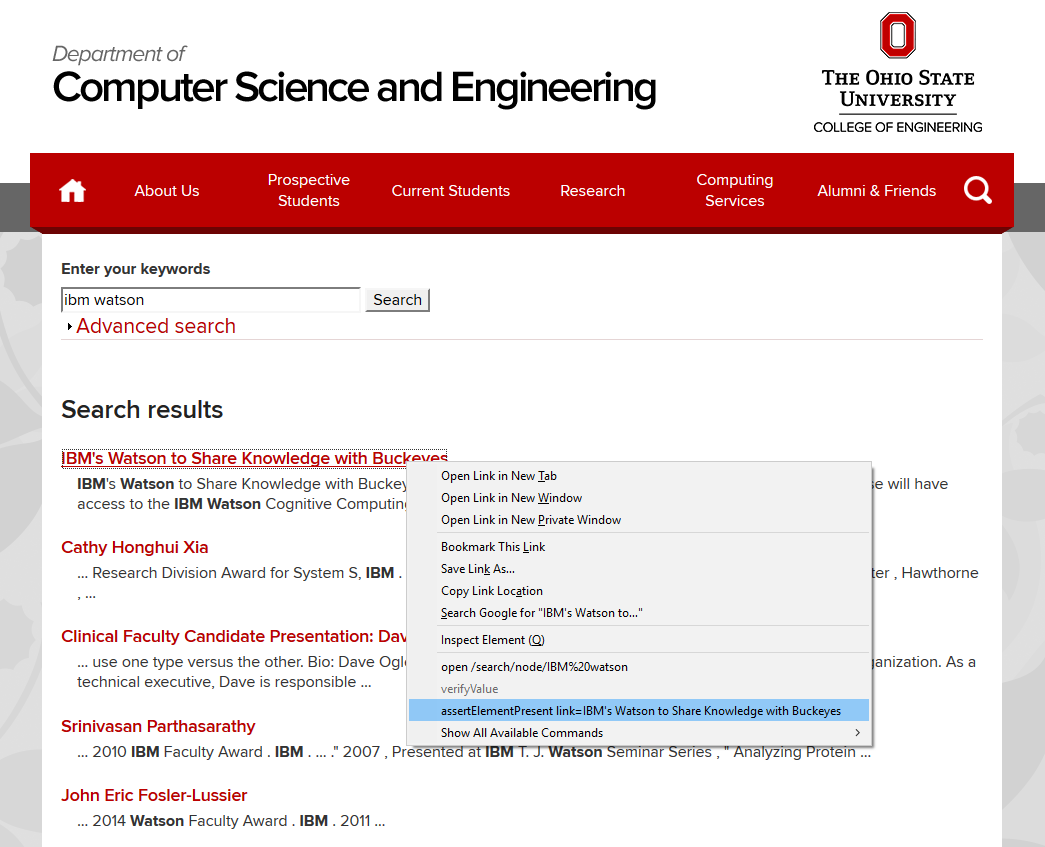
6. Rgiht click on the "IBM's Watson to Share Knowledge with Buckeyes" link and select assertElementPresent command.
HowTo
7. The command should appear in the IDE now. "Click on Play Current test case" to test this test case. You should see no Failures.
Locators
Text
Locators are what Selenium uses to find and match items on your page that needs to interact with. There are seven locators.
1. Identifier
2. Id
3. Name
4. Link
5. DOM
6. XPath
7. CSS
Works with id and name attributes of html tags.
Identifier
Sample Code:
<html>
<body>
<form id="login">
<input name="username" type="text"/>
<input name="password" type="password"/>
</form>
</body>
</html>
identifier = login
identifier = username
Pros: This strategy does not rely on the structure of the page and works even when the page changes.
Cons: Will match several elements if they share same name, so be careful when naming elements
ID
The Id strategy looks for an element in the page having an id attribute corresponding to the specified pattern. <label id ="my_id" /> will be matched by a locator like id=my_id or just my_id
Pros: Each id is already assumed unique so no chance of matching several elements like identifier
Cons: Works well only for fixed ids and not generated ones
Name
This is very similar to Id except it uses the name attribute. It also has the additional feature of specify a filter to refine your locator.
Sample Code:
<html>
<body>
<div id="pancakes">
<button type="button" name="pancake" value="Blueberry">Blueberry</button>
<button type="button" name="pancake" value="Banana">Banana</button>
<button type="button" name="pancake" value="Strawberry">Strawberry</button>
</div>
</body>
</html>
Value Filter: When having multiple name locator the same but each with a different value.
Index: same as value but works with an index instead. For example name = pancake index = 1 would be equivalent to selecting the Banana Button.
Pros: Great for fixed list of similar elements
Cons: Not so great for data-bound lists
Link
Is made solely for links and selects the anchor element containing the specified text: link = Text of link
Pros: Useful when testing navigation and will only select anchor elements
Cons: You have to know the text of the link before
DOM
The DOM strategy works by locating elements that matches javascript expression referring to an element in the DOM of the page
Pros: Javascript allows you to build dynamic locators
Cons: Relies on the structure of the page
Examples:
* dom = document.div['pancakes].button[0]
* document.div[0].button[2]
* dom = function foo() { return document.getElementById("pancakes"); }; foo();
XPath
The standard navigation tool through an XML document. Can be used anywhere where there is XML.
Pros: Allows very precise locators
Cons: Slower than CSS
Examples:
* xpath = //button[@value="Blueberry"]: matches the Blueberry button
* //div[@id="pancakes"]/button[0]: (equivalent to above)
CSS
The CSS locator uses CSS selectors to find elements in the page.
Pros: Much faster than XPath and allows for selection of elements by their surrounding context while keeping a good balance between structure and attributes
Cons: More complex with higher learning curves
Examples:
*css = div[id="pancakes"] > button{value="Blueberry"]
Test Cases and Commands
Commands
Commands are divided in 3 parts
- Actions - Change the state of the application (Ex: Selecting, Clicking, Typing)
- Accessors - Store variables and do inspection (Ex: Query term)
-
Assertions - Do inspections
- assert - test is aborted if assertion fails
- verify - test is not aborted, result goes to log
- waitFor - test until condition is met or timeout is reached
Test Cases
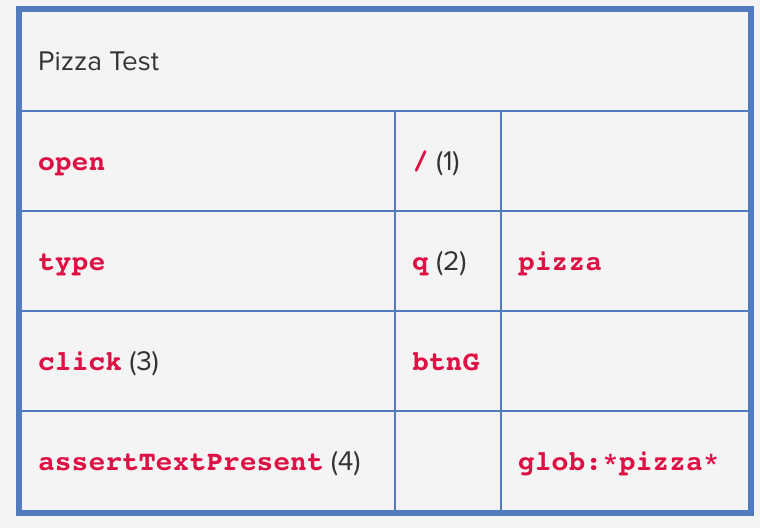
Testing Language called Selenese. (Domain Specific Language)
A test action contains 3 parts:
- Method - Action to perform
- Locator - The subject
- Value - Value to be passed
Test Cases

- Open application root
- Type "pizza" in the textfield named q
- Click on button called btnG
- Assert that there is "pizza" in the results
Python Demo
from selenium import webdriver
from selenium.webdriver.common.keys import Keys

driver = webdriver.Chrome()
driver.get("http://test.zeivom.michaelcristina.com/")
#assert "Welcome to Zeivom" in driver.title:

if "Welcome to Zeivom" in driver.title:
    print("Title is Correct")
else:
    print("Error with Title")

elem = driver.find_element_by_name("text")
elem.clear()
searchTerm = "Denzel Washington"
elem.send_keys(searchTerm)
elem.send_keys(Keys.RETURN)
#assert "Names" not in driver.page_source

if searchTerm in driver.page_source:
    print("We found movies with "+searchTerm+" 👌")
else:
    print("We did NOT movies with "+searchTerm+" 😂")
pip install selenium
brew install chromedriverThank You!
References
https://newcircle.com/bookshelf/selenium_tutorial/testing_strategies
http://selenium-python.readthedocs.io/getting-started.html
Tech Presentation
By Jebena ☕️
Tech Presentation
- 116


