React Native
for
Beginners
May 28, 29 2018
Internal Training
Who Am I?
- Joseph Khan
- Principal Engineer
- Developer of Coupie
- Author
- From Guwahati...
jkhan@yodlee.com
Who Are You?
How will we proceed?
- Slides
- Lectures
- Examples & Hands On
What will we cover?
- Intro to React Native & Inspiration
- Turning the clock back - Basics of JavaScript
- ES6 concepts
- Installing the necessary tools
- React Native basics
- CSS Flexbox and Styling
- Deep Dive into React Native - advanced concepts
- Build a real native mobile app
- Debugging
What is React Native
UI Framework to build pure native mobile apps using JavaScript and React (Native)
It's an extension of the React Framework
Provides a suite of components and API's to build native iOS and Android mobile apps.
Developers need not know Java or Swift to write beautiful native mobile apps.
Learn Once, Write Everywhere
Remember...
React (for web)
React Native (for mobile)
Hybrid Mobile App Development
Web Developers build mobile apps using technologies that they are aware of - HTML, CSS, JavaScript
Technologies like Cordova/Phonegap, Ionic help them convert a web application to a mobile application
Application
HTML
CSS
JavaScript
Cordova/Phonegap
Ionic
Difference from Phonegap/Cordova
Phonegap/Cordova was the go to technology for Javascript/Web developers to build mobile apps prior to React Native. It still is..
eg. Coupie, PFM mobile apps
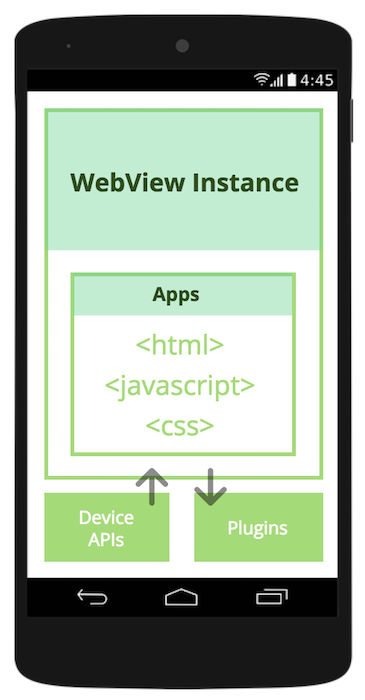
- Actually a web application packaged inside a native wrapper
- HTML, CSS & JavaScript running inside a web browser (webview)
- Performance is not great
- Limited access to device API's
- HTML, CSS & JavaScript running on the web browser has never been able to match Native performance
- Companies like Facebook, Walmart have moved from Hybrid mobile development to pure native mobile app development.
Challenges
How React Native Differs
Web/Hybrid
Android
iOS
React Native
Gives you all the necessary components that will be compiled to their respective Android or iOS counterpart under the hood
<div>
<View>
<input />
<TextInput>
We do not use web elements like <div>, <span>, <p> etc
EditText
UITextView
UIView
Android.View
Small Demo
To inspire you!


Setting Up React Native Development
Installing the necessary tools
1. NodeJS & NPM - https://nodejs.org/en/
Why? - React Native uses Node Package Manager (npm) to install/uninstall modules and all its dependency management. npm is available when NodeJS is installed.
2. Watchman - keeps a watch on file changes
3. React Native CLI (Command Line Interface)
npm install -g react-native-cli
4. Integrated Development Environment
- XCode - Mac
- Android Studio - Mac & Windows
5. Simulators - for development & debugging
- iOS Simulators (Mac only)
- Android Emulators (Mac & Windows)
Command Line Interface (CLI)
- react-native init ProjectName
- react-native run-android
- react-native run-ios
- npm start, react-native start
- If you have yarn
- yarn start
- yarn add some_module
Let's create our first
React Native
project
react-native init AwesomeProject
Running our First Project
- Run the App on iOS Simulator
- Run the App on Android Emulator
- Real device?? - we will do later
Congratulations!
We have successfully created our first RN application
Before we go crazy with React Native
Let's learn some JavaScript & ES6 basics
JavaScript
- Variables
- Scope of Variables
- Looping
- Operators
- Functions
- Objects
ES6 (ES2015) JavaScript
- Variables - let & constants
- Scope of variables
- Operators
- Looping
- Functions & Arrow Functions
- Default values for function parameters
- Getters & Setters
- Classes and inheritance
- Accessing superclass methods/properties
- Method overriding
- ES6 modules - import & export
- ES6 Template Strings
- Spread operator (...)
- Destructuring
React Native basics
Lets continue with our First Project
import React, { Component } from 'react';
import {
  Platform,
  StyleSheet,
  Text,
  View
} from 'react-native';

export default class App extends Component {
  render() {
    return (
      <View style={styles.container}>
        <Text style={styles.welcome}>
          Welcome to React Native!
        </Text>
      </View>
    );
  }
}

const styles = StyleSheet.create({
  container: {
    flex: 1,
    justifyContent: 'center',
    alignItems: 'center',
    backgroundColor: '#F5FCFF',
  },
  welcome: {
    fontSize: 20,
    textAlign: 'center',
    margin: 10,
  }
});
What goes inside a React Native Component
Importing modules (ES6 style)
Our component class
JSX - the view part that gets rendered
Styles declaration
JSX
const element = <h1>Hello, world!</h1>;- This funny tag syntax is neither a string nor HTML.
- It is called JSX
- It is a syntax extension to JavaScript
- JSX produces React elements
You define a React element that will be rendered
const name = "Joseph";
const element = <h1>Hello {name}</h1>;

ReactDOM.render(element, document.getElementById('root'));
CodePen Try: https://codepen.io/pen?&editors=0010
You can embed JavaScript expression in JSX.
You can do almost anything (eg. make a function call) from a JSX expression
React Syntax
2 types of data that control a component
- Props
- State
Understanding Props
-
Passing Data between components
-
Parent passes data to child using props
-
Fixed throughout the lifetime of the component
class Greeting extends Component {
  render() {
    let {name} = this.props;
    return (
      <Text>Hello {name}</Text>
    );
  }
}


export default class App extends Component {
  render() {
    return (
      <View style={styles.container}>
        <Greeting name="Joseph" />
        <Greeting name="Amit" />
      </View>
    );
  }
}
All components provided by React Native uses props.
eg. <Image />, <TextInput />
Understanding State
-
state lives inside the component, private to it
-
state represents the data that is going to change
-
whenever state changes, the component re-renders
class Greeting extends Component {
  constructor(super) {
      super(props);
      this.state = {
          name: "Joseph"
      }

      setTimeout(function() {
          //update the state after 1s
          this,setState({name: "Ayaan"});
      }.bind(this), 1000);
  }
  render() {
    return (
      <Text>Hello {this.state.name}</Text>
    );
  }
}
Our First React Component
Let's create a very basic component
And understand these concepts
Greeting component & then make it blinking
class Greeting extends Component {
  render() {
    let {name} = this.props;
    return (
      <Text>Hello {name}!</Text>
    );
  }
}

//Root App
export default class App extends Component {
  render() {
    return (
      <View style={styles.container}>
        <Greeting name="Joseph" />
        <Greeting name="Amit" />
      </View>
    );
  }
}
Component Life Cycle
Lifecycle phases that a component goes through
Initialization
Mounting
Update
UnMounting
Component Life Cycle
Lifecycle callbacks/methods
Initialization
Mounting
Update
UnMounting
- componentWillMount()
- render()
- componentDidMount()
- constructor(props)
- componentWillUnMount()
- shouldComponentUpdate()
- componentWillUpdate()
- render()
- componentDidUpdate()
- componentWillReceiveProps(nextProps)
Flexbox Styling basics
React Native does not use CSS
It uses an object based CSS kind of declaration to style component
import {StyleSheet} from 'react-native';

const styles = StyleSheet.create({
    container: {
        flex: 1,
        flexDirection: 'row',
        justifyContent: 'center',
        alignItems: 'center'
    }
});


render() {
    return (
        <View style={styles.container}></View>
    );
}
Lets see few example of styling...
Flexbox Layout
By default components are placed in a column layout or vertically
flexDirection: 'column'
flexDirection: 'row'
Main Axis
Cross Axis
Cross Axis
Main Axis
justifyContent
justifyContent
alignItems
alignItems
Deep Diving into React Native
Best place to learn..
- React Native official docs
- React official docs
Important Basic Components
- <View></View>
- <Text></Text>
- <Image />
- <TextInput />
- <ScrollView></ScrollView>
- <Button />
Using these basic components provided by RN, you can compose/create much bigger components and finally an Application
Let's see some examples...
Handling user input
<TextInput /> component to take user input.
User can type text into it..
constructor(props) {
    super(props);

    this.state = {
      taskName: '',
      taskArr: []
    };
}

render() {
    return (
        <TextInput
        style={styles.taskNameInput}
        placeholder="Type your task name"
        value={this.state.taskName}
        onChangeText={(val) => {this.setState({taskName: val})}}/>
    );
}
We store the value in state, because it is changing.
Handling User clicks
- In React Native world we do not call click
- We call them taps or press
- Use onPress(), onLongPress()
<TouchableOpacity onPress={}></TouchableOpacity>

<TouchableHighlight></TouchableHighlight>

<Button onPress={}></Button>
Scrolling content
React Native provides the <ScrollView> component for that
Sometimes your content can cross your viewport. We then need to scroll to see it.

import {ScrollView} from 'react-native';
import ListItem from './ListItem';

<ScrollView style={styles.scrollContainer}>
    {this.state.taskArr.map((item, index) => {
        return (
            <ListItem key={index} taskName={item} />
        );
    })}
</ScrollView>
Scroll works upon the scroll/touch gesture
Styling Components
- We do not use CSS directly
- We use JavaScript to style components
- All of the core component accept a prop called style
- Style property name and their values usually match how CSS works on the web
- We use camel casing to define style properties
const styles = StyleSheet.create({
    backgroundColor: '#ff0000',
    fontWeight: 600,
    fontSize: 20,
    flexDirection: 'row'
});
Example:
We use backgroundColor rather than background-color
Layout & Positioning
- We use Flexbox concepts
- We use flexDirection, alignItems, justifyContent & flex
<View style={{flex: 1, flexDirection: 'row'}}>
    <View style={{width: 50, height: 50, backgroundColor: 'powderblue'}} />
    <View style={{width: 50, height: 50, backgroundColor: 'skyblue'}} />
    <View style={{width: 50, height: 50, backgroundColor: 'steelblue'}} />
</View>
Example of flexDirection
Example of flex
<View style={{flex: 1}}>
    <View style={{flex: 1, backgroundColor: 'powderblue'}} />
    <View style={{flex: 2, backgroundColor: 'skyblue'}} />
    <View style={{flex: 3, backgroundColor: 'steelblue'}} />
</View>justifyContent
alignItems
flex-start
flex-end
center
space-around
space-between
space-evenly
flex-start
flex-end
center
stretch
(main axis)
(cross/secondary axis)
Lets create a ToDo App
We will use these concepts
- User Input
- Press
- Scrolling content
- Content Layout-ing
- State & Props

Exercise
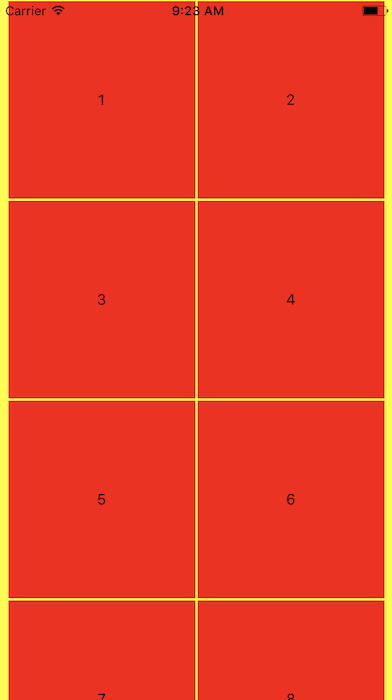
Lets create a Grid Layout
We will use these concepts
- Flex box
- Layout
- Wrapping
Exercise
Some advanced Components
- FlatList
- Picker
- Switch
- Modal
- ...
FlatList
For all list based needs. Has lots of built in support
- Fully cross-platform.
- Optional horizontal mode.
- Configurable viewability callbacks.
- Header support.
export default class FlatListExample extends Component {
	constructor(props) {
		super(props);
		this.data = [{key: 1, name: 'Joseph'}, {key: 2, name: 'Amit'}];
	}
	renderListItem = (info) => {
		//console.log(info);
		return (<Text>{info.item.name}</Text>);
	}
	render() {
		return (
			<View style={{flex: 1, backgroundColor: 'yellow'}}>
				<FlatList
  					data={this.data}
  					renderItem={this.renderListItem}
  					keyExtractor={(item) => item.key + ""}
				/>
			</View>
		);
	}
}- Footer support.
- Separator support.
- Pull to Refresh.
- Scroll loading.
- ScrollToIndex support.
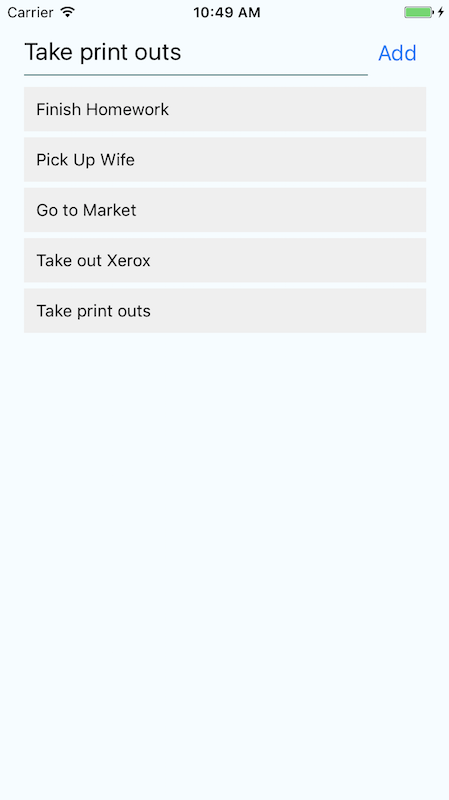
ToDo App
Lets replace our ScrollView with FlatList

FlatList
Some useful API's
- Dimension
- Platform
- Writing platform specific code
- component.android.js, component.ios.js
Lets create a Horizontal Scroll View
We will make use of
- Dimensions to get the screen width
Exercise
AsyncStorage
AsyncStorage is a simple, unencrypted, asynchronous, persistent, key-value storage system that is global to the app. It should be used instead of LocalStorage.
AsyncStorage methods returns a Promise which can then be handled.
Useful methods
- AsyncStorage.setItem().then().catch()
- AsyncStorage.getItem().then().catch()
import {AsyncStorage} from 'react-native';

//initialize the AsyncStorage Store, SETTING VALUES
var data = {firstName: 'Joseph', lastName: 'Khan'};
AsyncStorage.setItem("@MyStore:key1", JSON.stringify(data)).then(() => {
    console.log('Item has been set in AsyncStorage');
});

//GETTING the values
//read from AsyncStorage
AsyncStorage.getItem("@MyStore:key1").then((value) => {
    console.log(typeof value);
    console.log(JSON.parse(value));
}).catch((err) => {
    //handle any error here
});

//GET ALL KEYS
AsyncStorage.getAllKeys().then((keys) => {
    console.log('All Keys', keys); //keys comes as an array
});- AsyncStorage.removeItem().then()
- AsyncStorage.clear().then()
- AsyncStorage.getAllKeys().then()
Make API/HTTP Calls
We will make use of Random User Generator API for our data (https://randomuser.me/)
componentDidMount() {
    //make an API call
    let url = "https://randomuser.me/api/?results=100"; //random user api

    //GET call
    fetch(url).then((response) => {
        //convert raw response to JSON. This step is mandatory
        return response.json();
    }).then((responseJson) => {
        //work on the JSON data here
        this.setState({
            dataArr: responseJson.results,
            isLoading: false
        });
    }).catch((error) => {
        //handle any error here
        console.log(error);
    });
}
And then use the fetch() method to make Network calls
Remember, fetch() returns a Promise which can then be handled using then()/catch blocks
Animations
- Animations are very important to create a great user experience.
- React Native provides two complementary animation systems: Animated for granular and interactive control of specific values, and LayoutAnimation for animated global layout transactions.
Lets see a few examples of using Animated API, interpolation etc...
Navigation & Navigators
A React Native App will seldom be a single page/view application. There will be several screens in it.
We will use React Navigation - https://reactnavigation.org/ for our navigation needs
Stack Navigator
Drawer Navigator
Install 3rd party modules/components
- React Native provides a decent list of useful components.
- But sometimes it might not be sufficient.
- You install modules/libraries/components provided by the Open Source community.
npm install --save react-navigationLets install 2 modules into our project
1. React Navigation - for all our navigation needs
2. React Native Vector Icons - for our vector icon needs
npm install react-native-vector-icons --saveLinking native dependencies after installation
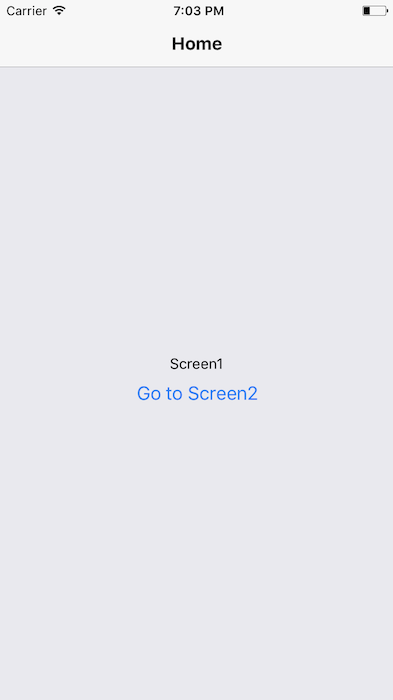
Example of Navigation
Lets build a simple Navigation example
We will use the react-navigation module. We will try Stack Navigator, Drawer Navigator
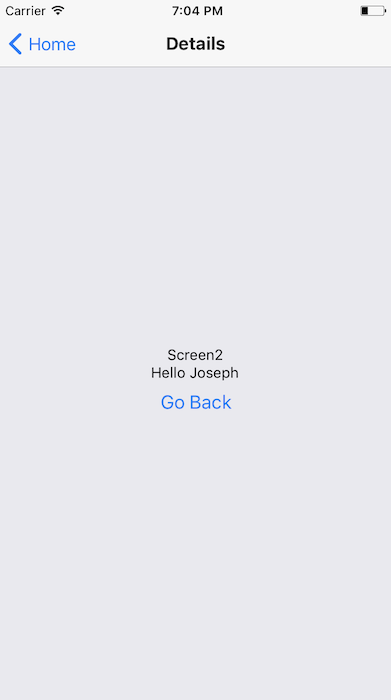
Tab Navigator - exercise for you
We are all set to build a full native mobile application
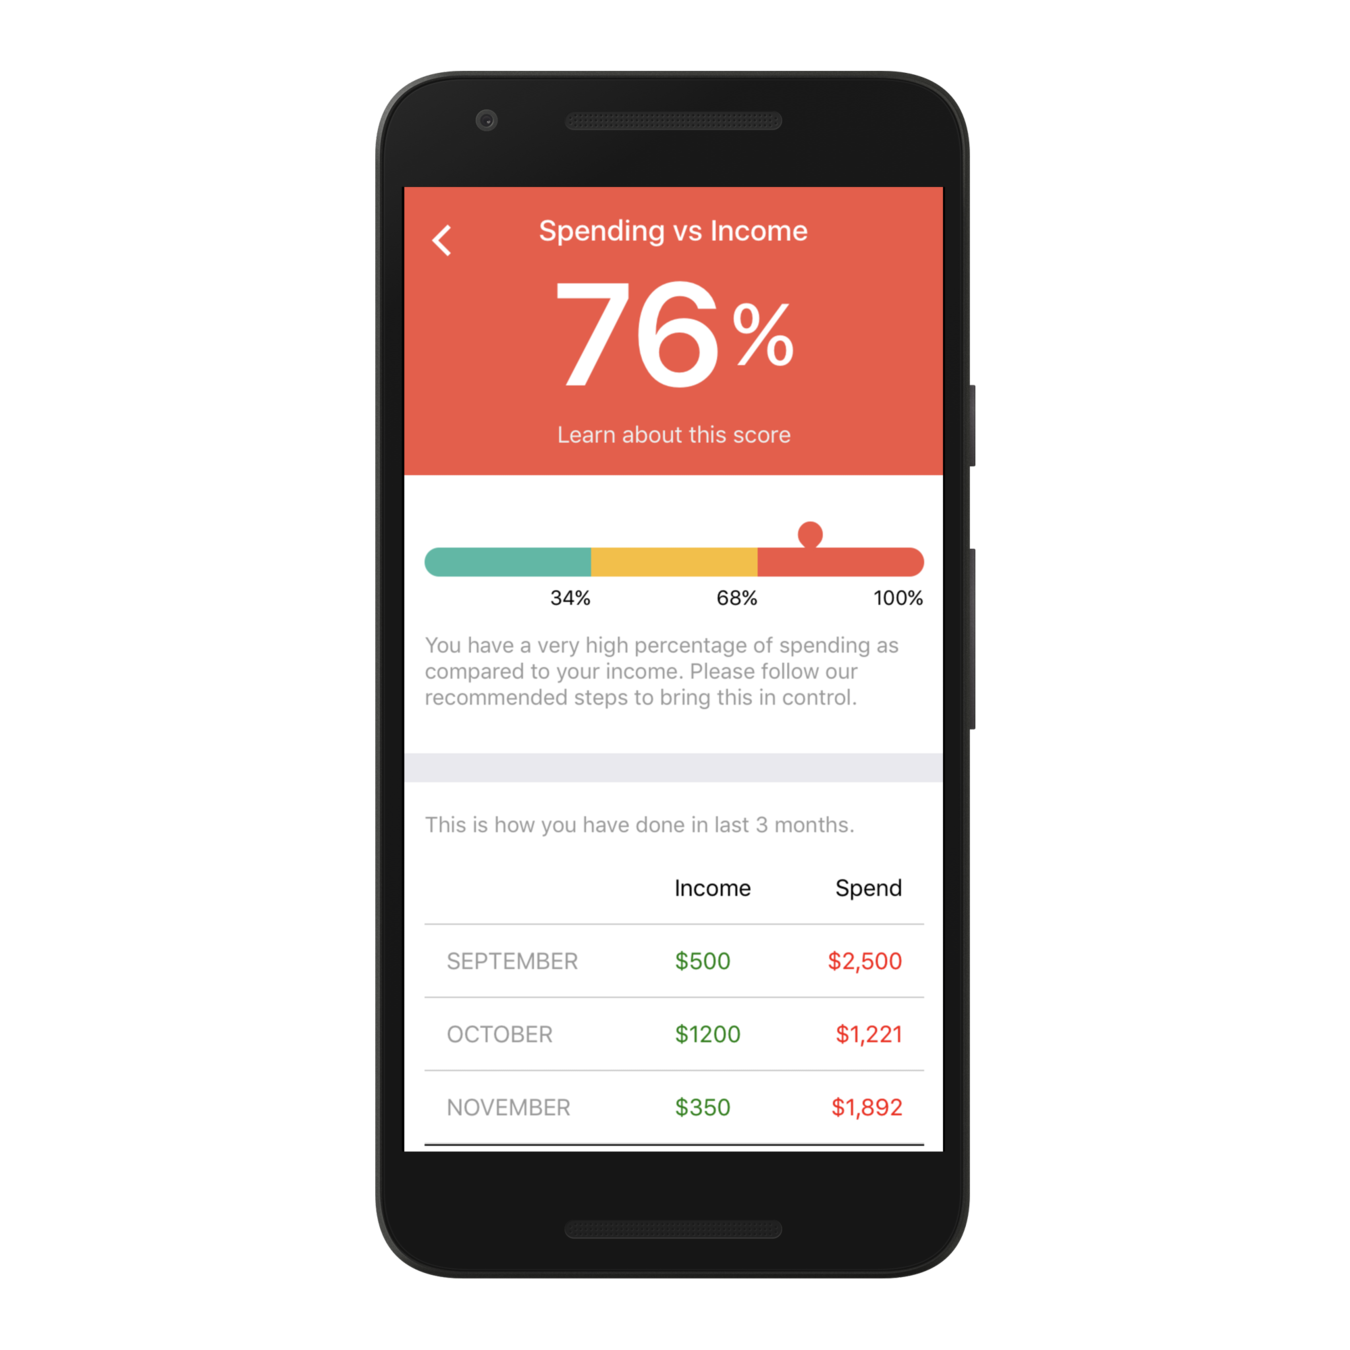
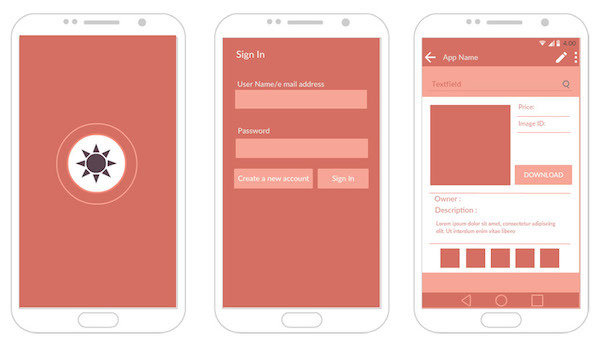
Demo App
Hands on
- Lets create a simple User Directory Application
- We will use the free RandomUser API for our Data
- Basic Login/Logout flow
- Navigation
- Passing Data between screens
- List
- Styling
- Custom Components
Our Demo App will cover all these...
Let's see the wires and UX flows in the next slide ->
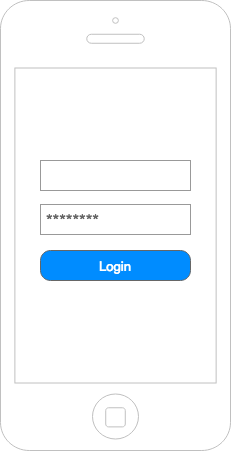


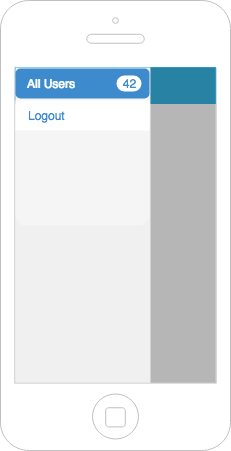

What all components can you think of?
Code Repo
Debugging
Familiar tools
- Chrome debugger
- Live reloading
- Hot reloading
- Breakpoints
- Logs
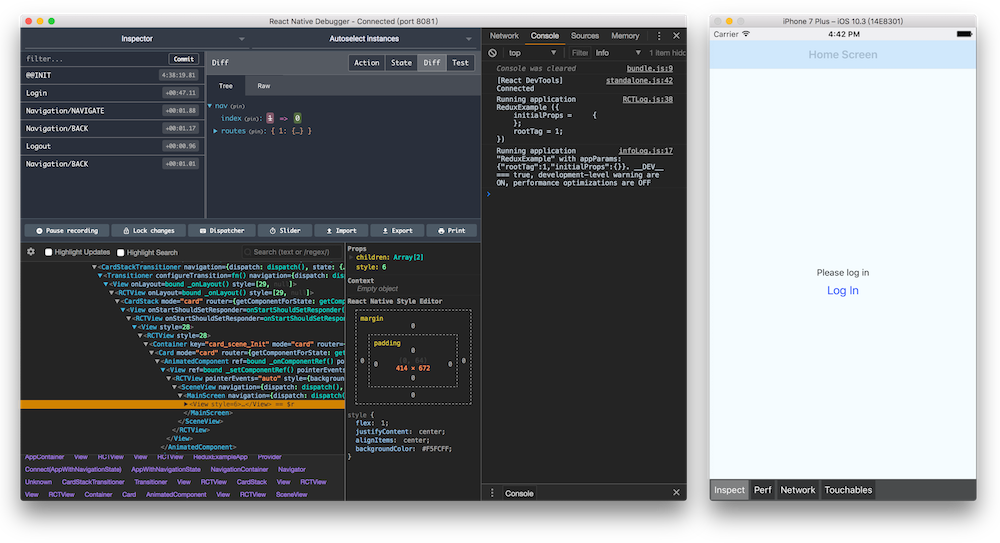
Better Debugging Tool
react-native-debugger: https://github.com/jhen0409/react-native-debugger
Standalone Desktop App for debugging.
Q & A
Sky is the LIMIT
Now there’s nobody stopping you from building breathtaking native mobile apps using React Native & JavaScript and putting all your web development skills to kill the App Stores.
Feedback
Your feedback will help me improve...
Thank You!
Good Books


It was nice talking to you
React Native
By Joseph K


