Decoupling our Angular.js App
Who am I?
- Josh Finnie
- Senior Software Maven @ TrackMaven
- NodeDC Co-Organizer
- Lover of both Python & Javascript
Agenda
- What - The history of TrackMaven's application
- Why - An explanation of why we did this crazy thing
- How - The steps we took to accomplish our task
- Questions -
I am sure you have some(Actually, just ask your questions when they come up, it's better that way!) - Concerns - I am sure you have some
Disclaimer
I might be wrong, if I am, point it out. This should be a discussion. The processes I will show today worked for TrackMaven; it might not work for everyone.
:-)
What is TrackMaven?
- TrackMaven is an integrated marketing analytics platform for digital marketers.
- We collect data and translate said data into information marketers want to know.
- Our backend in written in Python using the Django framework.
- Our frontend is written in CoffeeScript using the Angular.js framework.
The Beginning
TrackMaven started off as every web application tends to do. We built a Django app then slowly added JavaScript to the frontend to make it more "useful."
Django
V
Django + Backbone
V
Django + Angular (Djangular)
V
Django & Angular

Like this!
Stolen from: http://i.stack.imgur.com/3rCS1.png
Djangular
The Djangular portion of our story was great. We were able to build a strong, powerful application for our customers.
- Things that Djangular does great
- Separation of concerns, Django Rest Framework for data manipulation, Angular.js for displaying data.
- Angular.js use of two-way-data-binding for amazingly complete data representations and visualizations.
- Djangular allowed for rapid development of both the backend and frontend simultaneously.
Djangular
The Djangular portion of our story was also not so great. We were able to build a strong, powerful application for our customers, but with some drawbacks.
- Things that Djangular does not great
- Renders the Angular.js code through Django's template rendering process.
- Static files, even ones that were exclusively angular.js specific, were handled through Django and was very difficult to optimize.
- Everything was done through the Django application.
The Rise of Djangular

Watch here: https://www.youtube.com/watch?v=GVDjoTt3r8A
The fall of Djangular
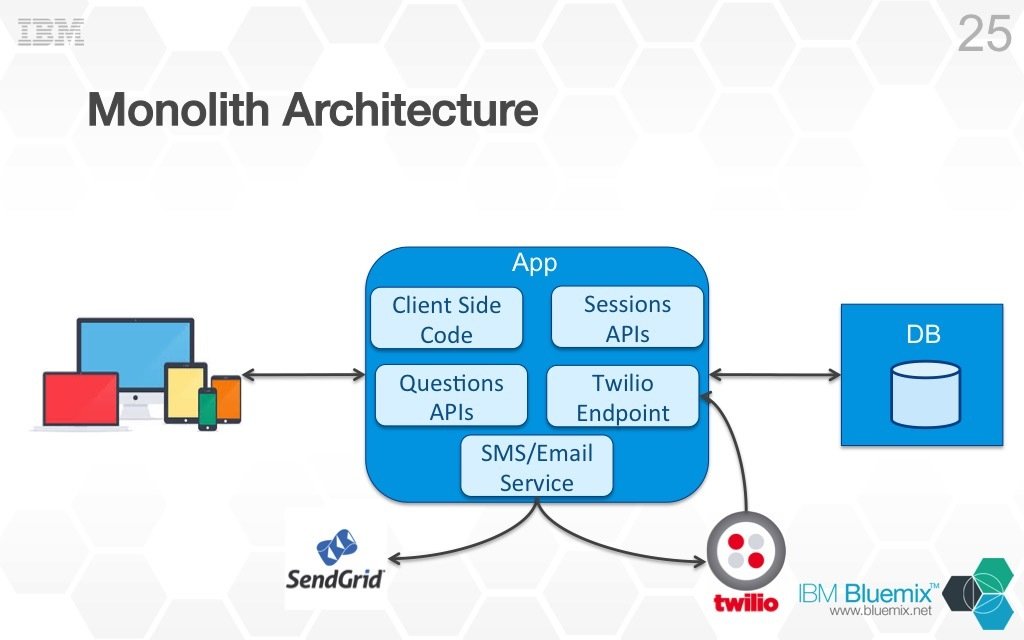
But all good things have to come to an end. We were really hitting the maximum efficiency we could get with a large monolithic application.
- Issues that arose due to our expansive monolith
- Rebases were a nightmare amongst programmers
- Blocking features were stuck in QA due to other features waiting on the blocked feature
- Deploys for frontend changes took the entire time of building the monolithic application (10-15 minutes by the end)

"Our" Monolithic App
Stolen from: http://ryanjbaxter.com/wp-content/uploads/2015/07/intro-to-microservices.jpg
Enter Microservices
The first steps we took to fix our infrastructure was to start breaking our monolithic application into microservices.
- Microservices fixed a lot of our issues
- We could build features in isolation
- We were not blocked by other microservice changes (mostly...)
But this change actually did not decouple the frontend angular application from the backend. That would be much more work.

Much better
Stolen from: http://www.wwwlicious.com/content/images/2016/05/monolith-microservices.jpg
Goodbye Djangular, Hello Django & Angular
The last step we took was the most recent change to our stack. We decoupled the Angular.js application completely from the Django backend.
- Django is now an API service, using Django Rest Framework to its fullest potential.
- Angular.js is now a true Single Page Application (SPA) which talks to our API service for all data.
Decoupling Djangular
It's interesting the issues that arose as we embarked on decoupling the Angular.js frontend from the Django backend.
- The next few slides will talk about the following issues:
-
Needed to get authentication set up
-
Needed to get our deployment system set up
-
Needed to get our django backend onto a different URL
-
Needed to hook up testing and staging environments.
-
Authentication, it's kind of Important
People sign into TrackMaven.

Authentication
As we decoupled our application, we needed a way for our user to stay authenticated. Having a decoupled frontend Angular.js application made this a bit more difficult versus our Djangular set up, since we didn't have access to the user object at all times anymore.
Introducing JWT
(Jot, no really)
JWT stands for JSON Web Token.
It "is an open standard that defines a compact and self-contained way for securely transmitting information between parties as a JSON object. This information can be verified and trusted because it is digitally signed. JWTs can be signed using a secret (with the HMAC algorithm) or a public/private key pair using RSA." [1]
This standard works nicely for our problem.
[1] https://jwt.io/introduction/
Why JWTs?
JWTs are most commonly used for authentication between web servers. It allows for us to verify a user, assign a JWT and then check for that JWT for each subsequent call by that user. Forever solving any issue we had with Authentication.
But really...
It is a standard that was used in Django Rest Framework. It's tried-and-trued. Plus it seemed like a good idea.
JWT Flow

Stolen from: http://robmclarty.com/system/pictures/sources/68/flow-jwt_large.jpg?1450224340
Angular.js JWT Inteceptor
There was a little tweaking we needed to do to Angular.js to always send the JWT with each request, but nothing an interceptor couldn't handle...
angular.module('app.interceptors')

.factory('HttpAuthInterceptor', ['myJWT', '$q', (myJWT, $q) ->
    class HttpAuthInterceptor
        request: (config) ->
            if myJWT.jwt
                config.headers['Authorization'] = "JWT #{myJWT.jwt}"
            return config or $q.when(config)

    return new HttpAuthInterceptor()
])

.config(($httpProvider) ->
    $httpProvider.interceptors.push('HttpAuthInterceptor')
)
Angular.js JWT Con't
There's a bit more magic here. Like we have a Angular.js Service that saves & reads the JWT for cookies or local storage. We have a JWT factory that allows us to inject it in other places besides the header, etc...
There are libraries that do this for you now:
Working with our SPA
People like to code @ TrackMaven.

Thank Gulp!
We use Gulp. Gulp does a lot for us, but coming from a Djangular setup, we wanted a lot out of our decoupled Angular.js application.
- Things we wanted to replicate
- Local test development
- Multi-deploy (to testing, staging, production)
- Things that got better
- Local testing with different environment's backend
- Seamless deployment with CDN support
- Reliability of AWS S3 for frontend application
Some improvements
# Run locally, pointing at a certain Environment
$ gulp --env=<environment> --debug=false
# Deploy current code to certain Environment
$ gulp deploy --env=<environment>
# Get the keys/values currently set.
$ gulp config --get --env=<environment>
# Remove a key/value.
$ gulp config --rm MICROSERVICE_1_URL --env=<environment>
# Set a new key/value.
$ gulp config --set MICROSERVICE_1_URL=https://url.com --env=<environment>
Here, we run the local angular.js application pointing to the environment we specify using the --env flag.
(Thanks yarg!)
--env, behind the scenes
let argv = yargs
    .boolean('debug')
    .default('debug', true)
    .choices('env', ['local', 'production', 'staging', 'testing'])
    .argv

// Copies setting.js from /code/app/ into our locally served copy.
gulp.task('settings', function() {
    if (argv.env == 'local') {
        gulp.src(globs.settings)
            .pipe(gulp.dest(config.output))
    }
    else if (argv.env) {
        // Ensure folder exsits.
        mkdirp(config.output)
        let file = fs.createWriteStream(config.output + 'settings.js', {flags: 'w'})
        return request.get("https://s3.amazonaws.com/" + buckets[argv.env] + "/settings.js")
            .on('data', function(data) {
                return file.write(data)
            })
            .on('response', function(data) {
                if (data.statusCode != 200) {
                    console.log("No settings.js exists. Creating empty settings.js")
                    return fs.closeSync(fs.openSync(config.output + '/settings.js', 'w'))
                }
            })
    }
})
settings.js, behind the scenes
THIRDPARTY_REDIRECT_URI = "http://localhost:3000/third-party-redirect/"
THIRDPARTY_CLIENT_ID = "XXXXXXXXXXXXXXXX"
STATIC_URL = "http:/localhost:8000/static/"
MICROSERVICE_1_URL = "http://localhost:5000/"
MICROSERVICE_2_URL = "http://localhost:8001"
MICROSERVICE_3_URL = "http://localhost:5041/"
MICROSERVICE_4_URL = "https://localhost:8005/"
API_URL = "http://localhost:8000/"
// Optional.
HEAD_ID = "..."
DEBUG = "TRUE"
This is amazingly powerful. Our angular.js application takes the settings.js file and adds these variables to the application's scope. We now manipulate the entire SPA's API calls through a single file.
More Gulp Magic (Deploys)
// Uploads the ./deploy folder to S3.
gulp.task('upload-to-s3', function() {
    if (argv.env && argv.env != 'local') {
        var awsOptions = {
            ...
            'params': {
                'Bucket': buckets[argv.env]
            }
        }
        var publisher = awspublish.create(awsOptions)
        var headers = {
            'Cache-Control': 'no-cache, no-transform, public',
            'x-amz-acl': 'public-read'
        }
        return gulp.src('./deploy/**')
            .pipe(publisher.publish(headers))
            .pipe(awspublish.reporter({
                states: ['create', 'update', 'delete']}))
    }
})
Using yargs, we can now deploy our angular.js SPA to AWS S3 with a simple gulp command. This is AWESOME! We went from 15 minute deploys to mere seconds.
Even More Gulp Magic
Gulp, used in this way, is super powerful. Also decoupling our angular.js in such a way where we can manipulate it locally using variables is great. With a settings.js file and a strong Gulp file we can:
- Add and Delete variables for any environment with a single command
- Do normal Gulp stuff
- Build CoffeeScript
- Compress images
- Lint
- etc.
Testing our SPA
People like to test TrackMaven.

Testing our App
With the strong Gulp game I showed previously, this has actually helped our testing of the application.
- We can now test against production data
- Our testing environment is utilized less, we can test more
- We remove a lot of the strain for needing really up-to-date data on our development machines.
Testing our App (Con't)
Also, we use Circle CI to test and deploy our angular.js SPA continuously!
- Unit & Integration tests are run on each push to master.
- If the tests pass, CircleCI runs the gulp deploy command for us!
No need to deploy to master!
Testing our App (Con't)
# Example circleci.yml

machine:
  services:
    - docker

test:
  override:
    - docker-compose run builder npm run test

deployment:
  release:
    branch: [master]
    commands:
      - docker-compose run -e AWS_KEY=$AWS_KEY -e AWS_SECRET=$AWS_SECRET \
        builder gulp deploy --env production
Thanks!
Questions?
Comments?
Concerns?
I am @joshfinnie everywhere, these slides will be at http://joshfinnie.com/talks/ soon-ish!
Decoupling our Angular.js App
By Josh Finnie
Decoupling our Angular.js App
- 3,467


