Command Line Applications in Node.js
Who am I?
- Josh Finnie
- Senior Software Maven @ TrackMaven
- Co-Organizer of @NodeDC & @NodeschoolDC
- Big fan of Javascript (and Python)
What's this talk about?
- Building command line applications in Node.js
- The why
- The how
The Why
- We know javascript very well.
- We do not know bashscript very well
- With Gulp and other task runners, Node.js is becoming ubiquitous on today's computers.
Bash >:(
case $input in
  hello)
    echo "You said hello"
  ;;
  bye)
    echo "You said bye"
    if foo; then
      bar
    fi
  ;;
  *)
    echo "You said something weird..."
  ;;
esac
Really??
More Reasons to love Javascript
- NPM and its over 200,000 packages
- makes coding apps super easy
- Data streaming
- It's fast!
The How
Node.js
Write your app with Node.js
#!/usr/bin/env node

console.log("Hello World!");
Make it executable
$ chmod u+x myCLARun it
$(Node v4.2) ./myCLA
Hello World!
Node.js (Now with Args)
Write your app with Node.js
#!/usr/bin/env node

var userArgs = process.argv.slice(2);
var name = userArgs[0];

console.log("Hello " + name + "!");
Run it
$(Node v4.2) ./myCLA2 Josh
Hello Josh!
Making this better...
Messing with process.argv is a no fun. Luckily, there's really no need...
$ ./bin/pushfile -u README.md

console.log(process.argv);

//[ '/usr/local/Cellar/node/4.2.1/bin/node',
//  '/Users/joshfinnie/src/personal/pushfile/bin/pushfile',
//  '-u',
//  'README.md' ]
Making this better...
Let's find a library to handle arg parsing for us, since this is not pretty:
// Don't do this!
var userArgs = process.argv.slice(2);
var name = userArgs[0];Making this better...
#!/usr/bin/env node

// Excerpt taken from Pushfile.

var opts = require('commander');
var version = require(__dirname + '/../package').version;

opts
  .version(version)
  .usage('[options] <file ...>')
  .option('-u, --unique', 'Gives a unique hash for uploaded file.')
  .option('-c, --configure', 'Create a configuration file.')
  .option('-v, --version', 'Prints Version');

opts
  .on('--help', function(){
    console.log('  Examples:');
    console.log('');
    console.log('    $ pushfile -u <FILENAME>');
    console.log('    $ pushfile <FILENAME>');
    console.log('    $ pushfile -v');
    console.log('    $ pushfile -c');
    console.log('');
  });

opts.parse(process.argv);
Making this better...
if (opts.configure) {
  pushfile.createConfig();
}
else (optsLength > 0) {
  pushfile.pushfile(opts.args[0], unique=opts.unique);
}
With commander.js, user arguments are now easily accessible:
No need to hunt through the array of process.argv for what the user inputted.
Making this better...
$ ./bin/pushfile -h

  Usage: pushfile [options] <file ...>

  Options:

    -h, --help       output usage information
    -V, --version    output the version number
    -u, --unique     Gives a unique hash for uploaded file.
    -c, --configure  Create a configuration file.
    -v, --version    Prints Version

  Examples:

    $ pushfile -u <FILENAME>
    $ pushfile <FILENAME>
    $ pushfile -v
    $ pushfile -c
Also, commander.js gives really slick --help options out of the box:
The How
Node.js- Gulp.js & Babel.js
- Testing
- Publishing
Gulp.js & Babel.js
The package.json file:
{
  ...,

  "devDependencies": {
    "babel-core": "^6.1.2",
    "babel-plugin-transform-es2015-modules-commonjs": "^6.1.3",
    "babel-preset-es2015": "^6.1.2",
    "babel-preset-stage-0": "^6.1.2",
    "gulp": "^3.9.0",
    "gulp-babel": "^6.1.0",
    "gulp-concat": "^2.6.0",
    "gulp-plumber": "^1.0.1",
    "gulp-uglify": "^1.4.2",
    ...
  }
}
Gulp.js & Babel.js
The gulp.es6 file:
import gulp from 'gulp';

import babel from 'gulp-babel';
import plumber from 'gulp-plumber';
import uglify from 'gulp-uglify';
import concat from 'gulp-concat';

gulp.task('babel', () => {
    gulp.src('src/*.es6')
        .pipe(plumber())
        .pipe(babel())
        .pipe(gulp.dest('lib'));
});

gulp.task('minify', () => {
    gulp.src('src/babel/*.js')
        .pipe(plumber())
        .pipe(concat('app.js'))
        .pipe(uglify())
        .pipe(gulp.dest('lib'));
})

gulp.task('watch', () => {
    gulp.watch('src/*.es6', ['babel', 'minify'])
})

gulp.task('default', ['babel', 'minify', 'watch']);
Gulp.js & Babel.js
The gulp.js file:
require('babel-core/register');
require('./gulpfile.es6');
:-( (but it's getting better...)
The How
Node.jsGulp.js &Babel.js- Testing
- Publishing
Testing
Testing is awesome, since we are testing a Node.js app not a bash app... Take your pick:
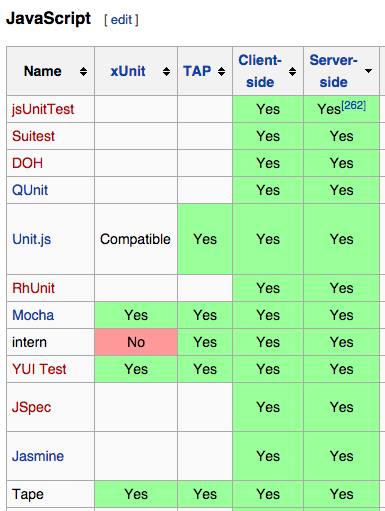
Source: List_of_unit_testing_frameworks#JavaScript (Wikipedia)
Example Unit Test
import assert from 'assert';

let hashfile = require('../lib/hashfile');


describe('hashlib', () => {

  it('should return proper hash of filename', () => {
    hashfile.hash('test/test_of_long_file_name.json', 'test_salt', (result) => {
      assert.equal('aNLAzajPvK.json', result);
    });
  });

  it('should return same file extension', () => {
    hashfile.hash('test/test_of_long_file_name.json', 'test_salt', (result) => {
      assert.equal('json', result.split('.').pop());
    });
  });

  it('should return a filename of only 10 charachers', () => {
    hashfile.hash('test/test_of_long_file_name.json', 'test_salt', (result) => {
      assert.equal(10, result.substr(0, result.lastIndexOf('.')).length);
    });
  });

});
The How
Node.jsGulp.js &Babel.jsTesting- Publishing
Publishing
- Preparing your command line app
- Signing up for NPM (on npmjs.com)
- Shrinkwrap your project
- Publishing to NPM
Preparing your CLA
-
Update your package.json file:
- Set preferGlobal to true
- Set the location of your executable using bin
/// package.json
{
    ...,
    "preferGlobal": true,
    "bin": {"app": "bin/app"}
}Signing up for NPM
- Create user on NPM
- Run
npm adduserto set up user
$ npm adduser
Username: joshfinnie
Password:
Email: (this IS public) josh@jfin.us
Shrinkwrap your CLA
-
Run
npm shrinkwrapin your project directory.
$ npm shrinkwrap
...
wrote npm-shrinkwrap.json
This command locks down the versions of a package's dependencies so that you can control exactly which versions of each dependency will be used when your package is installed. The package.json file is still required if you want to use npm install. [ 1]
Example npm-shrinkwrap.json
{
    ...,
    "prompt": {
      "version": "0.2.14",
      "from": "prompt@0.2.14",
      "resolved": "https://registry.npmjs.org/prompt/-/prompt-0.2.14.tgz",
      "dependencies": {
        "pkginfo": {
          "version": "0.3.1",
          "from": "pkginfo@>=0.0.0 <1.0.0",
          "resolved": "https://registry.npmjs.org/pkginfo/-/pkginfo-0.3.1.tgz"
        },
        ...
        "utile": {
          "version": "0.2.1",
          "from": "utile@>=0.2.0 <0.3.0",
          "resolved": "https://registry.npmjs.org/utile/-/utile-0.2.1.tgz",
          "dependencies": {
            "async": {
              "version": "0.2.10",
              "from": "async@>=0.2.9 <0.3.0",
              "resolved": "https://registry.npmjs.org/async/-/async-0.2.10.tgz"
            },
            "deep-equal": {
              "version": "1.0.1",
              "from": "deep-equal@*",
              "resolved": "https://registry.npmjs.org/deep-equal/-/deep-equal-1.0.1.tgz"
            },
            ...,
        }
      }
}Publish to NPM
-
Run
npm publish .in your project directory.
$ npm publish .- Yes, it's that easy...
Conclusion
This talk should get you from 0 to publishing your own command line application in Node.js
- Remember
- It's just javascript
- Argument parsing is a pain, use a library
- Test your application
- Publish often
Connect with Me!
- @joshfinnie on Twitter
- joshfinnie on Github
- http://www.joshfinnie.com
Connect with TrackMaven!
- @TrackMaven on Twitter
- TrackMaven on Github
- TrackMaven Engine Room
We're hiring!
Questions?
?
NationJS Command Line Apps in Node
By Josh Finnie


