{Digital Safe}
Operating in a Cloud Environment
# ABOUT THE INSTRUCTOR

-
Former Forward Communications
- Software Engineer
- Linux Enthusiast

# AGENDA
1
- Introduction
- Procurement & Attribution
- Basic Setup
- Version Control
- Scripting and Automation
2
- Building Locally
- Containers & Namespaces
- Custom Images
- Recipe Tools
3
- Dynamic Monitoring
- Accessing Remote Services
- Cloud Hardening
- Firewalls
4
- Automated Hardening and Scanning
- Q & A
- Capstone
Training Days
# Our TECH STACK
-
Fedora (35)
- KDE Plasma Shell
- ZSH
- Some Extra Applications and Tweaks along the way
# OUR TECH STACK


# TAKING NOTES ONLINE
Taking Notes
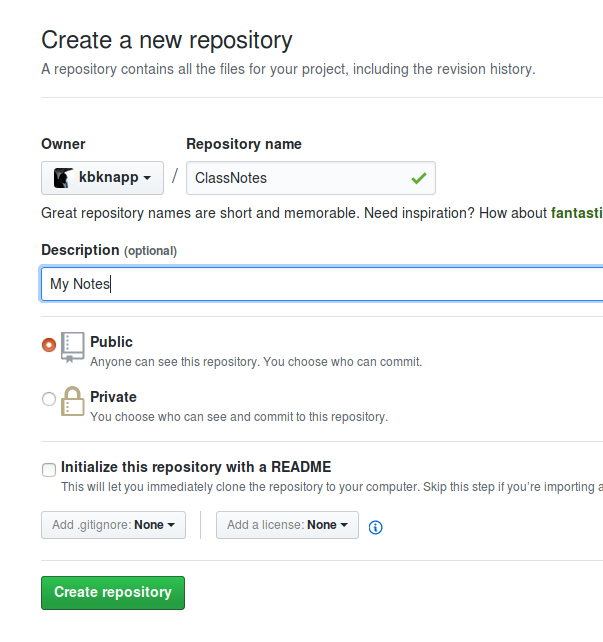
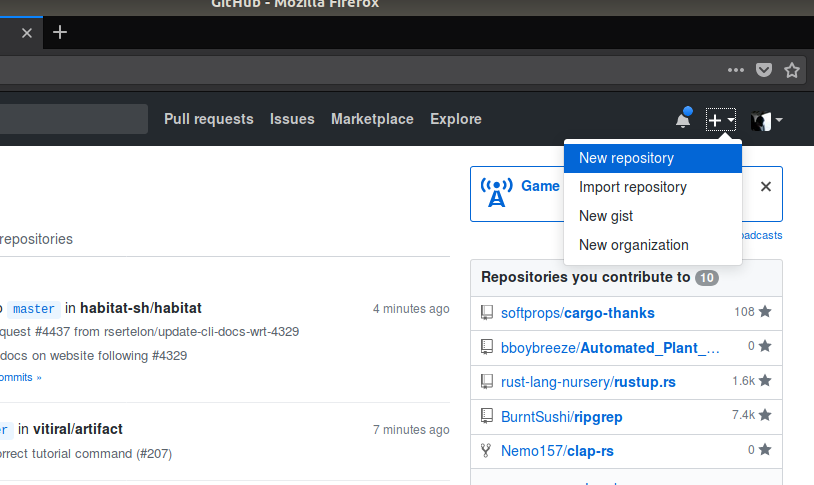
- www.github.com
- Open Source Code Repositories
- Create a Repository for "ClassNotes"
- Use Markdown in ".md" files
https://obsidian.md
# TAKING NOTES

$ sudo dnf install flatpak
$ flatpak remote-add --if-not-exists flathub https://flathub.org/repo/flathub.flatpakrepo
$ flatpak install flathub md.obsidian.Obsidian
Markdown in 30 Seconds
# TAKING NOTES
# Title

## Sub Title

### etc. etc. etc.

Comments about `commands`

List:

- **bold**
- *italics*
- ++underline++
- ~~strikethrough~~
- ==Highlight==

- [ ] Incomplete Checkbox
- [x] Complete Checkbox

Even [hyper-links](www.someurl.com)
```python
# Code Here
def say_hi(name="Kevin"):
print(f'Hello {name}')
say_hi("Tom")
```{Day 01}
From Zero to ________
{Procurement}
How and Where do we get a "Cloud Environment"
Define Requirements
- Resources
- POPs
- Attribution
- Timelines of use
1.
2.
Research Providers
- Big names vs small names
- Capabilities
- Payment Model
3.
Rotate Responsibly
- Data exfil costs
- Rotating within a provider
- Rotating resources
# PROCUREMENT PROCESS
Most providers are trying to prevent crypto mining, scams, and illegal activity
https://prv.to
{Attribution}
Who am I? Who are We?
- Assume Compromise
- Spiking Interest AKA Being too Sneaky
- Historical Backstopping
- Should You Use Third Parties?
- Trust but verify
Attribution Pillars

# ATTRIBUTION
- Network / Application (Packets, Ports, Protocols, Timestamps)
- Logistical
- Usage (Timezone, etc.)
- Internal State (Language, Configuration, etc.)

# TYPES OF ATTRIBUTION
- Consider the Threat Model
- What can they see?
- Where are they looking from?
- What don't I want them to see?
- What do I want them to see?
- Who can they collaborate with?
- Consider trade-offs in usability, security, and noise floor
# THREAT MODEL

{Linux}
Catching Up
# What is Linux?
- Technically an Open Source kernel
- Commonly known as a Open Source Operating System
- An Operating System is a kernel and tools together
- Also referred to as GNU/Linux to credit the tools + the kernel
- Created in 1991 by Linus Torvalds based on Unix
- Heavily used in servers, embedded, and development environments
- Reputation for being advanced or difficult
# Open Source?
- Software where the source code used to build the software is open to the public
- Usually released under special licenses
- Different licenses have different restrictions
- Licenses have been the topic of holy wars
- 'Free' as in Speech, sometimes 'Free' as in Beer


# Key Linux Concepts
- Everything is a file (including directories)
- Absolute paths start with a leading '/'
- Relative paths start with anything else
- 'Hidden' files start with a leading '.'
- Many configurations and settings are simply text files
- Many GUI programs simply 'wrap' command line programs
- Commands can be 'linked' (or 'chained') with one another

# LINUX COMPONENTS
CPU
Screen
HDD
RAM
...
Linux Kernel
GNU Core Utilities
System Config
PKG MGMT
User Applications
User Applications
Desktop Environment
# COMMON DISTROS
- Debian Based
- Includes Ubuntu, Mint, Elementary
- DEB Packages
- Redhat Based
- Includes CentOS (and Clones), Fedora
- RPM Packages
- Other Notable
- Arch Based (Manjaro, Garuda)
- OpenSUSE


# COMMON Desktop Envrionments


Gnome 3
KDE Plasma Shell
Specialized (i3, etc.)
# File System
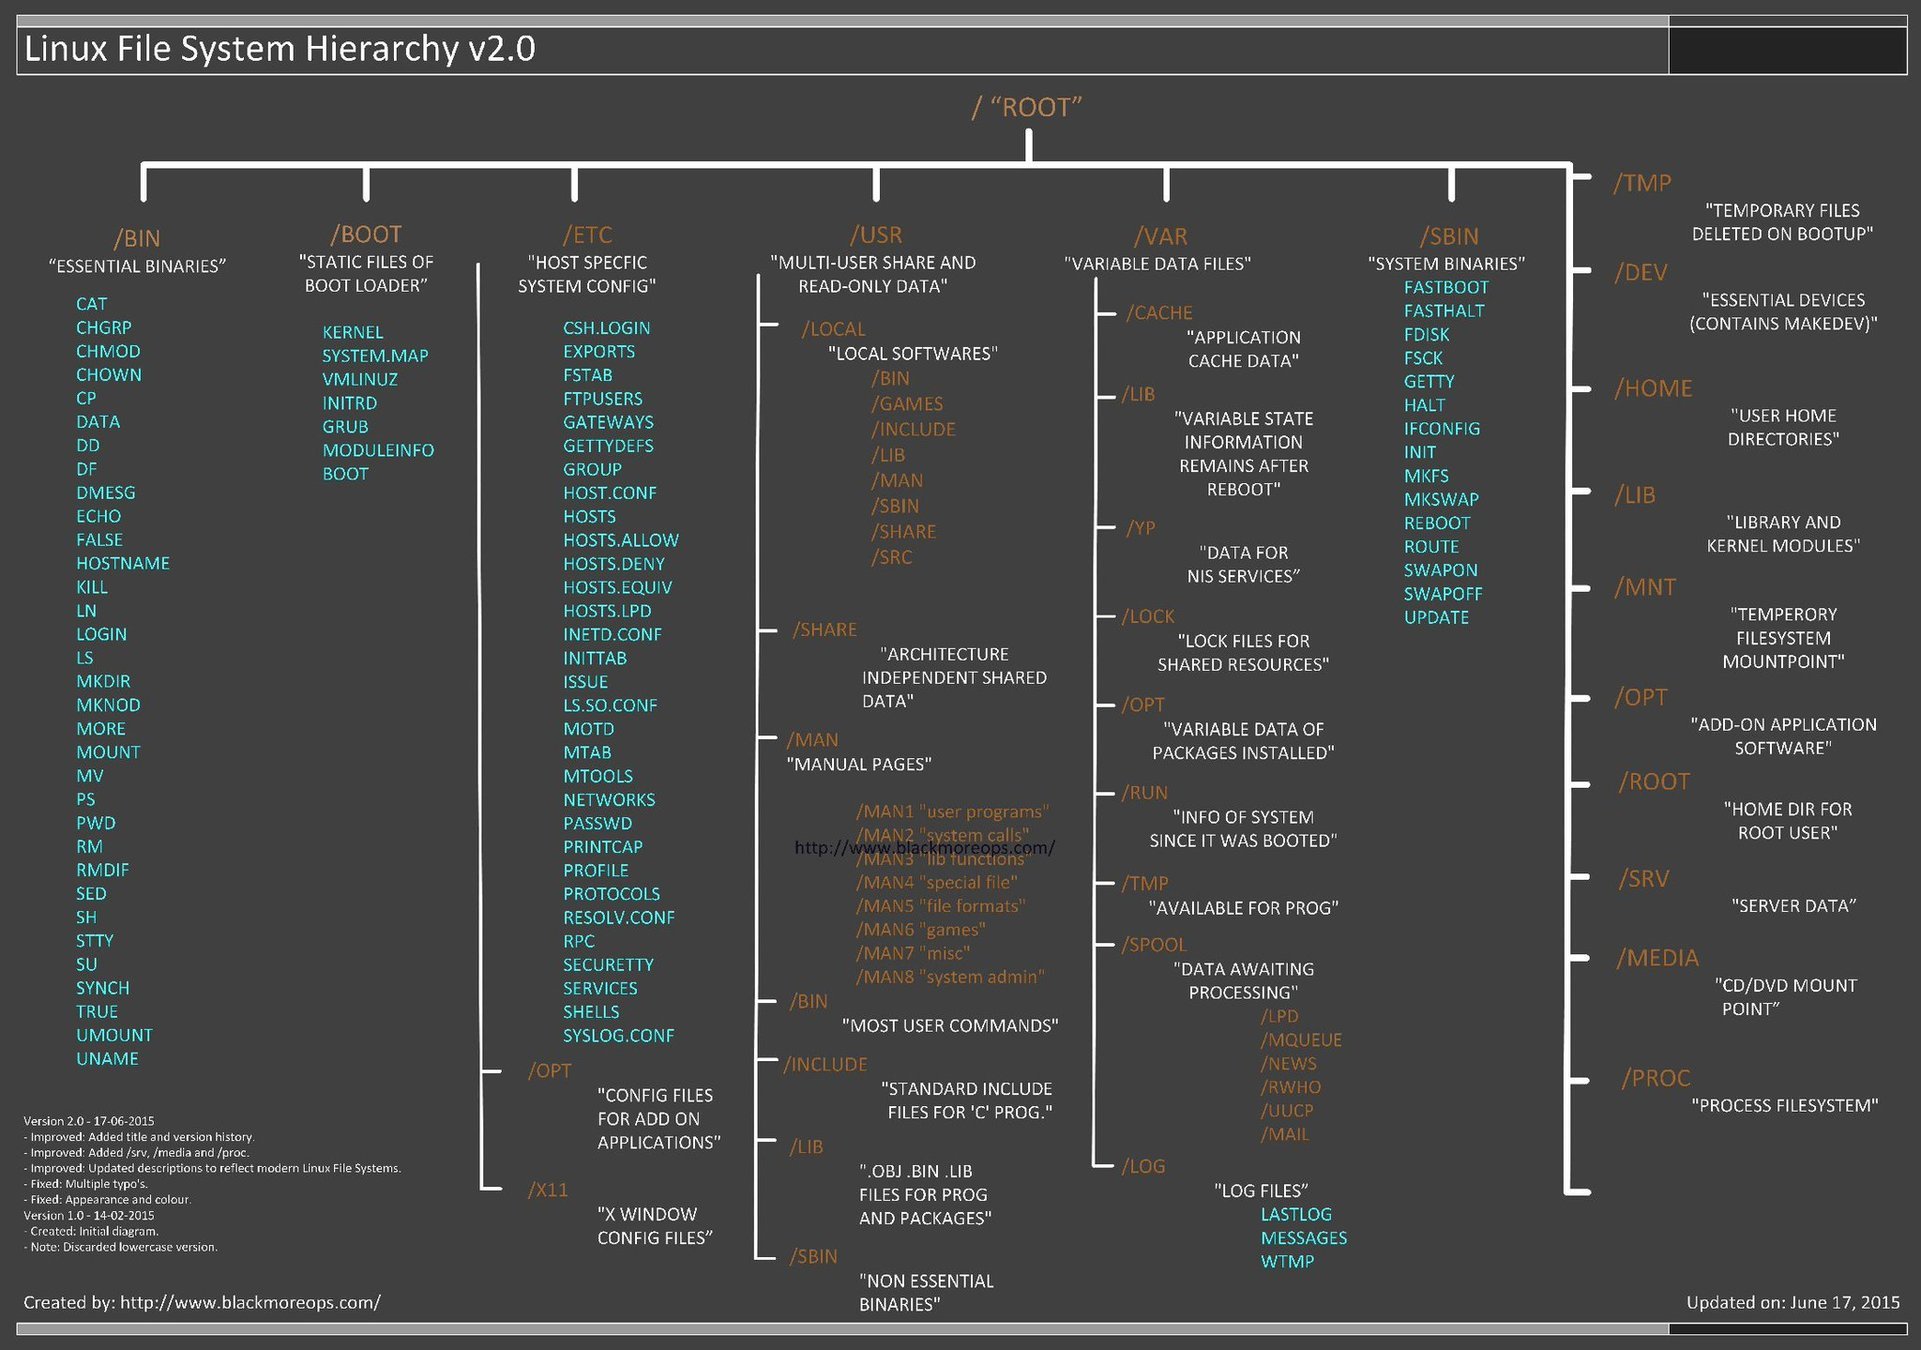
# Permissions
- Three sections of three "types" of permissions
- r = read
- w = write
- x = execute
- - = None
- Sections are: Owner, Group, and Other (or World)
- A fourth prefix section includes
- - = file
- d = directory
- l = link
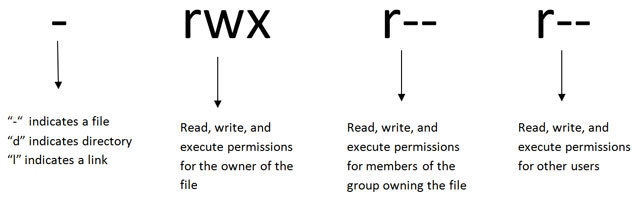
$  touch file

$  ls -l file
-rw-rw-r-- 1 student student 0 Jan 16 13:58 file

$  chmod o+x file

$  ls -l file
-rw-rw-r-x 1 student student 0 Jan 16 13:58 file
# Permissions
- Commands
- chown
- chmod
{Shell Setup}
Becoming a Nerd
Combining Commands (Pipes)
- Commands can be combined by using pipes
- Pipes take the output of one command, and make it the input for another command
- Pipes use the | character
- Purpose is to change or modify the output in some way
- This is extremely useful!
$ command1 | command2 | command3# Pipes
Redirecting
- Redirecting is similar to piping, except that either the input, output, or error output can be "sent somewhere else"
- Useful for:
- Sending the output of a command to a file
- Using the contents of a file as input to a command
- Three Operators
- > Output - Start from the beginning
- < Input
- >> Append
$  echo "Send me to a file" > file.txt

$  echo < file.txt
Send me to a file
# Redirecting
Special Redirecting
- All files are accessible via "special numbers" (known as file descriptors)
- stdin = "0"
- stdout = "1"
- stderr = "2"
- Useful to send errors to places such as to log errors, or ignore
$  cat some_file.txt 2> err_file.txt
  # Redirect stderr to 'err_file.txt'

$  cat some_file.txt 2>&1
  # Redirect stderr to stdout (stdout still goes to screen)

$  cat some_file.txt 2>&1 > out.txt
  # Redirect stderr to stdout, then stdout to 'out.txt' file

$  cat some_file.txt &> some_file.txt
  # Redirect stderr AND stdout to a file
# Redirecting
- Nobody remembers all the commands and options!
- Google!
- Help Docs exist for most commands
- $ command --help
- $ command -h
- Manpages are good if there is no internet
- $ man command
# Finding Help

- quickref.me
- curl cheat.sh/CMD
- tldr CMD
- Completions
- Suggestions
- Themes
- Human Readable Scripting
- However...
# FISH SHELL

- Completions
- Corrections
- Plugins
Let's do it!
$ sudo dnf install zsh util-linux-user git

$ sudo chsh -s $(which zsh) $USER
# in ~/.zshrc

ENABLE_CORRECTION="true"
COMPLETION_WAITING_DOTS="true"

export PATH=/usr/local/bin:$HOME/.local/bin:$PATH
export SSH_KEY_PATH="~/.ssh/rsa_id"
export TERM="xterm-256color"
fpath+=~/.zfunc
compinit -U
# ZSH SHELL
Oh My ZSH
$ git clone \
  https://github.com/robbyrussell/oh-my-zsh \
  ~/.oh-my-zsh
# in the TOP of ~/.zshrc

export ZSH=$HOME/.oh-my-zsh
ZSH_THEME="robbyrussell"
plugins=()
source $ZSH/oh-my-zsh.shBut mind how many plugins you use!
# ZSH PLUGINS
Auto Suggestions
$ git clone \
  https://github.com/zsh-users/zsh-autosuggestions \
  ~/.oh-my-zsh/custom/plugins/zsh-autosuggestions
# in ~/.zshrc

plugins=(
  zsh-autosuggestions
)
# ZSH PLUGINS
Syntax Highlighting
$ git clone \
  https://github.com/zsh-users/zsh-syntax-highlighting.git \
  ~/.oh-my-zsh/custom/plugins/zsh-syntax-highlighting
# in ~/.zshrc
plugins=(
zsh-autosuggestions
zsh-syntax-highlighting
)# ZSH PLUGINS
Abbrev Alias
$ git clone \
  https://github.com/momo-lab/zsh-abbrev-alias \
  ~/.config/zsh-abbrev-alias/
# in ~/.zshrc
export USE_ABBREV_ALIAS=1
source $HOME/.config/zsh-abbrev-alias/abbrev-alias.plugin.zsh
abbrev-alias gl='git log --graph --all --oneline --decorate'When to use Regular Aliases?
# ZSH PLUGINS
Built In Plugins
# in ~/.zshrc

plugins=(
  zsh-autosuggestions
  zsh-syntax-highlighting
  sudo
  dnf
  git
)
Full List of Plugins
# ZSH PLUGINS
Custom Prompts - Starship
$ curl -fsSL https://starship.rs/install.sh | bash
# In ~/.zshrc

# Remove ZSH_THEME...

eval "$(starship init zsh)"
# STARSHIP
╭─kevin@shenron in repo: toast on main [$] is 📦 v0.45.2 via v1.60.0-nightly took 28ms
╰─➤FZF - The Fuzzy Finder
$ git clone --depth 1 https://github.com/junegunn/fzf.git ~/.fzf

$ ~/.fzf/install
# In ~/.zshrc
[ -f ~/.fzf.zsh ] && source ~/.fzf.zshCommands
- CTRL + r
- CTRL + t
# FZF
Navi - Personal Cheat Sheet
$ curl -sL https://raw.githubusercontent.com/denisidoro/navi/master/scripts/install | sh# In ~/.zshrc
eval "$(navi widget zsh)"
Commands
- CTRL + g
# NAVI
Navi Cheats Example
% dnf

# List files included in an RPM
sudo dnf repoquery --installed -l <PKG>

# List files included in an installed RPM
sudo dnf repoquery --installed -l <EXISTING_PKG>

# Disable repository
sudo dnf config-manager --set-disabled <EXISTING_REPO>

# Add repository
sudo dnf config-manager --add-repo <REPOSITORY>

$ EXISTING_REPO: dnf repolist | awk '{print $1}'
$ EXISTING_PKG: rpm -qa | grep -oP '^[^.]*(?=-[0-9])'
# NAVI
{Pre-Scripting}
Advanced Command Line
# SHELL-FU
Variables
- We can store information in variables
- These variables are like "buckets", we may not know exactly what is in the bucket, but we can refer to the contents at use
- Syntax is a dollar sign ($) followed by a word or underscore
- Convention uses UPPER_SNAKE_CASE
- Your environment stores many variables
# SHELL-FU
Variable Continued
- To see current variables in your environment, use the command 'env'
- Some important variables are:
- USER - your current username
- SHELL - Which shell program you are using
- PWD - Your current directory
- EDITOR - Your text editor
- PATH - Where to look for binary executables
# SHELL-FU
Creating and Using Variables
- Create a variable using the variable name, followed by an equals sign, followed by the "value"
- Then get the "value" out of the variable by using a dollar sign ($) followed by the variable name
$  ANIMAL=cat

$  echo $ANIMAL
cat
{Substitutions and Expansion}
AKA Magic
# EXPANSIONS
- Saves typing
- Reduce errors
- Two types of expansions
- globs
- parameter expansions

$ mv /some/long/path/file.old /some/long/path/file.new

# vs

$ mv /some/long/path/file.{old,new}
# GLOBS
Matches zero or more characters
Matches exactly one character
Matches given characters only
Matches any except given chars
$ ls -l
total 264896
-rw-r--r--  1 kevin kevin 15400455 Jan 17 10:33 09b25a9a5c720.tar.gz
-rw-rw-r--  1 kevin kevin 43487904 Dec  7 13:00 code_1.18.1-1510857349_amd64.deb
-rw-rw-r--  1 kevin kevin 27765264 Dec  7 13:01 encryptr_2.0.0-1_amd64.deb
-rw-rw-r--  1 kevin kevin  1407463 Jan 10 14:14 FEL-r22.pdf
-rw-rw-r--  1 kevin kevin   397750 Jan 10 14:14 FEL.tar.gz
-rw-rw-r--  1 kevin kevin 42004318 Dec  7 13:01 haroopad-v0.13.1-x64.deb
-rw-rw-r--  1 kevin kevin 79941824 Dec  7 13:04 keybase_amd64.deb

$ ls -l *.deb
total 264896
-rw-rw-r--  1 kevin kevin 43487904 Dec  7 13:00 code_1.18.1-1510857349_amd64.deb
-rw-rw-r--  1 kevin kevin 27765264 Dec  7 13:01 encryptr_2.0.0-1_amd64.deb
-rw-rw-r--  1 kevin kevin 42004318 Dec  7 13:01 haroopad-v0.13.1-x64.deb
-rw-rw-r--  1 kevin kevin 79941824 Dec  7 13:04 keybase_amd64.deb
*
[abc]
In short...wild cards
Special Groups
[[:named:]]
[!abc]
alpha digit alnum
lower upper
punct space
?
# PARAMETER EXPANSIONS
- AKA "curly brace expansion"
- Expands to "lists"
- Can be combined with globs
$ echo {one,two,three}
one two three

$ ls -l {*.deb,0*}
-rw-r--r-- 1 kevin kevin 15400455 Jan 17 10:33 09b2af7a5c720.tar.gz
-rw-rw-r-- 1 kevin kevin 43487904 Dec  7 13:00 code_1.18.1-1510857349_amd64.deb
-rw-rw-r-- 1 kevin kevin 27765264 Dec  7 13:01 encryptr_2.0.0-1_amd64.deb
-rw-rw-r-- 1 kevin kevin 49035482 Dec 19 15:23 google-chrome-stable_current_amd64.deb
-rw-rw-r-- 1 kevin kevin 42004318 Dec  7 13:01 haroopad-v0.13.1-x64.deb
-rw-rw-r-- 1 kevin kevin 79941824 Dec  7 13:04 keybase_amd64.deb
- Supports basic sequences (similar to 'seq' command)
$ echo {A..Z}
A B C D E F G H I J K L M N O P Q R S T U V W X Y Z
# COMMAND SUBSTITUTION
- Allows using the output of a command as the actual input for another command
- In other words, the output is used inline as if it was directly typed on the command line
$ ls $(echo "-l")
total 264896
-rw-r--r--  1 student student 15400455 Jan 17 10:33 09b2afa5c720.tar.gz
-rw-rw-r--  1 student student 43487904 Dec  7 13:00 code_1.18.1-1510857349_amd64.deb
-rw-rw-r--  1 student student 27765264 Dec  7 13:01 encryptr_2.0.0-1_amd64.deb

$ ls -l
total 264896
-rw-r--r--  1 student student 15400455 Jan 17 10:33 09b2afa5c720.tar.gz
-rw-rw-r--  1 student student 43487904 Dec  7 13:00 code_1.18.1-1510857349_amd64.deb
-rw-rw-r--  1 student student 27765264 Dec  7 13:01 encryptr_2.0.0-1_amd64.deb
- Like parameter expansion, but uses a dollar sign ( ) and expands variables
$ ANIMAL=cat

$ echo ${ANIMAL}
cat

$ echo ${ANIMAL}s
cats

$ echo $ANIMALs
# PARAMETER SUBSTITUTION
$
- Supports internal substitution via forward slashes ( )
- Supports Default values via
$ ANIMAL=cat

$ echo ${ANIMAL/at/ow}
cow

$ echo ${ANIMALs:-dog}
dog
$ CAT=tabby
$ ANIMAL=CAT
$ echo ${ANIMAL}
CAT
$ echo ${#ANIMAL}
3
$ echo ${!ANIMAL}
tabby# PARAMETER SUBSTITUTION
/
:-
#
!
Variable Length
Variable Indirection
Other operators available
- Using the 'diff' command
$ diff <(ls -l) <(ls -al)
1c1,3
< total 264896
---
> total 264904
> drwxr-xr-x  3 student student     4096 Jan 17 11:11 .
> drwxr-xr-x 35 student student     4096 Jan 17 12:34 ..

$ diff $(ls -l) $(ls -al)
diff: invalid option -- '-'
diff: Try 'diff --help' for more information.- Very close to command substitution, but subtly different!
- Process substitution uses <(command) whereas command substitution uses $(command)
- Allows using the output of a command, but stored in a "temporary file" (/dev/fd/<#>) then that file is passed to the next command
# PROCESS SUBSTITUTION
{Version Control}
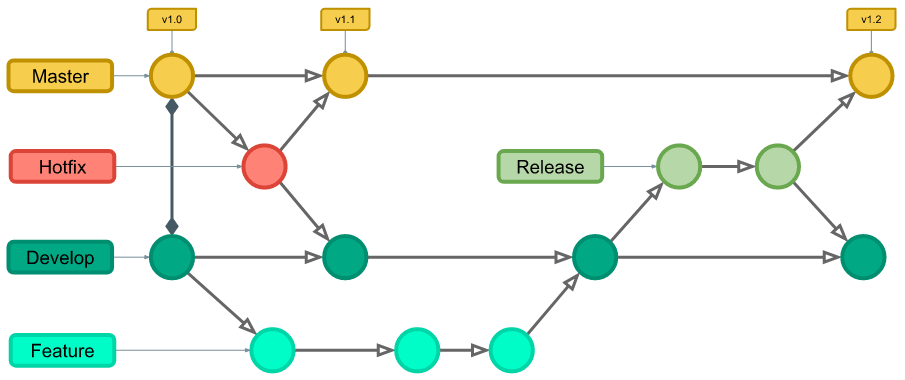
Taming the chaos
- Version control software that tracks changes to files
- Allows you (or multiple people) to contribute to a single project
- Allows multiple 'branches' to be worked on at the same time and merged together
- git is SUPER complex, we will only scratch the surface
# GIT

Basics
- Enable git tracking on a folder (i.e. project)
$ git init- By default you are working on the 'main' branch
- By default git tracks all files in the folder (if you add new files later use the command git add <files>)
- Work on files as normal
- Once you are ready to "save" your code issue the command
$ git commit -a - This "saves" the files and asks you to add a message about what you changed
- Use detailed messages!
- To add the message inline use 'git commit -am "message"'
# GIT
Branching
- Lets say you have a working script, but want to add a new feature or work on a bug, but you don't want to break existing code
- You can add a new branch
- This in effect copies your project, and allows you work on both the working code and the 'copy' code at the same time
- To branch, use
$ git switch my-branch-name# GIT
Branches (cont.)
- You switch back and forth between branches at will
$ git switch awesomefeature - Once you have a working feature, or bug fix you can 'merge' the two branches back into one
$ git switch main

$ git merge awesomefeature - When you have no need for a branch anymore you can delete it
$ git branch -D awesomefeature# GIT
# GIT
github.com (and alternatives)
- Online git repositories
- Allows you to save projects and work with others easily
- Free service requires public repositories (i.e. projects)
- Can be used for more than just scripting/coding
There are self hosted alternatives!
# GIT


# GIT
{Scripting}
Just do this for me...
# SCRIPTING
- Great for lazy people!
- Also repetitive tests
- At it's most basic form, it's a file containing a list of commands to run

Making a Script
- Sh-Bang
- Commands
#!/bin/bash

echo "Hello world!"- Save the file to ~/.local/bin/script_01.sh
# SCRIPTING
Running a Script
- We can run a script with notation
- Alternatively if the script is located in a directory listed in our variable, we can just use the script name
$ ./.local/bin/script_01.sh
zsh: permission denied: ./.local/bin/script_01.sh
# SCRIPTING
$PATH
./
Making Scripts Executable
- If we look at our script, we'll see it's not executable
$ ls -l .local/bin
total 4
-rw-rw-r-- 1 student student 33 Jan 29 10:46 script_01.sh
$ chmod u+x .local/bin/script_01.sh
$ ls -l .local/bin
-rwxrw-r-- 1 student student 33 Jan 29 10:46 script_01.sh
$ ./.local/bin/script_01.sh
Hello world!# SCRIPTING
Modifying $PATH
- ./ syntax is fine for one-off scripts, but if this is something we'll want to run many times, it's better to have it inside a director in $PATH
$ export PATH=$PATH:$HOME/.local/bin

$ script_01.sh
Hello world!- We can take this a step further by modifying in our shell startup configuration file
# SCRIPTING
$PATH
Loops
- Sometimes we want to do a task repeatedly
- We can use a loop to do something a set number of times, or over a set of data
- We'll start by using a for loop on the command line
- Then move it into a script
- The basic syntax is
- for <VAR> in <SET>; do <CMD>; done
$ for NUM in $(seq 1 10); do echo "Hello World! x$NUM"; done
Hello World! x1
Hello World! x2
Hello World! x3
Hello World! x4
Hello World! x5
Hello World! x6
Hello World! x7
Hello World! x8
Hello World! x9
Hello World! x10
# SCRIPTING
for
Loops in Scripts
- Although we can do complex things in loops on the command line, it quickly becomes hard to read
- If we move the loop to a script, readability improves
- The basic syntax becomes
for <VAR> in <SET>;
do
    <CMDS>
done
for NUM in $(seq 1 10);
do
echo "Hello $NUM times:"
for _ in $(seq 1 $NUM);
do
echo -e "\tHello"
done
doneWe can even nest loops
# SCRIPTING
Making Decisions
- So far we can only do a set number of tasks in a script
- It's flexible...but it could be better
- Now we'll learn how to do a specific task only in some circumstances, and a different task otherwise
- These types of statements are called conditionals
- The basic syntax is
if [ <CONDITION> ];
then
    <command if true>
else
    <command if NOT true>
fi- The 'else' could even be omitted if we only want to run a command in some circumstances, but nothing in others
# SCRIPTING
Caveat to Conditionals
- '[' vs '[['
- [ <condition> ]
- older
- more portable
- supported everywhere
- less flexible
- [[ <condition> ]]
- Newer
- not as well supported
- allows for much easier testing
- My personal opinion, default to `[[ <condition> ]]` unless you have a reason not to
# SCRIPTING
Failing
- Another form of conditionals is boolean logic
- Instead of if...else...fi blocks, we can use boolean operators
- - means and (i.e. success)
- - means or (i.e. failure)
- The basic syntax is
- <command1> && <command2>
- Run command1
- Run command2 only if command1 succeeds
- <command1> || <command2>
- Run command1
- Run command2 only if command1 fails
- <command1> && <command2>
- Can be nested with parenthesis
- Works great on the command line
- Very useful to exit scripts early
- <command that can fail> || (echo "reason" && false)
# SCRIPTING
&&
||
{Python}
Getting friendly with the snake
What is Python?
- A scripting language (specifically an interpreter)
- Uses text files (typically ending with ) to perform specific tasks
- Each text file is read and executed from top to bottom
- NOT compiled
- ...Buuuuut JIT compiling does happen (.pyc)
- Must have interpreter installed to run python scripts
# PYTHON
.py
Why use Python?
- Tasks that are: Repeatable, Mundane, Complex, Precise, Time Consuming, etc.
- Bridge the end-user technology gap
- Rapid prototyping of larger projects
- Brevity
- Short development time
- HUGE repository of libraries and modules (i.e. VERY popular)
# PYTHON
Hello World
# in hello.py
print('Hello World!')
Run via
$ python hello.py
Hello world!
# PYTHON
Variables
- Must start with a letter
- Typically snake_case_names
- Use descriptive names when possible
- Cannot be a keyword
- Assigned and re-assigned using '='
name = 'something'
age = 29
more_text = a_var
# PYTHON
Types
- Dynamic Types
- Common Types
- strings
- numbers (int, float, etc.)
- characters
- bools
- lists, dicts, sets, and tuples
- objects
- None
num1 = 2
num2 = 2
both = num1 + num2
print('Adding: ', both)
both = num1 - num2
print('Subtracting: ', both)
both = num1 / num2
print('Dividing: ', both)
both = num1 * num2
print('Multiplying: ', both)
both = num1 % num2
print('Modding: ', both)
text1 = '2'
text2 = '2'
both = text1 + text2
print('String and String: ', both)
fl1 = 2.2
int1 = 2
both = fl1 + int1
print('Float and Int: ', both)
fl2 = 2.2
both = fl1 + fl2
print('Float and Float: ', both)
# PYTHON
Strings
- In Python 3.x all strings are a sequence of valid UTF-8 Unicode characters
- ASCII vs UTF-8
- 1 byte vs maybe several
- ASCII byte strings in Python 3 (str type, or b'literal')
- Hidden characters in strings
- Escape character is \ (i.e. 'string with\'quotes\'')
- Common hidden characters
- \n
- \t
- \c\r
- Strings are simply lists of characters and can be sliced (more on that later...)
# PYTHON
Lists
- An unordered sequence of values
- Values do not need to be same type
- Formed using the [ and ] characters, separating values by , character
- Can be indexed via an integer
- Starts at 0!!
- A negative integer means, "From the end"
my_list = ['Kevin', 'Knapp', 29]
print(my_list[0])
print(my_list[1])
print(my_list[2])
# PYTHON
List Slicing
- Lists can be sliced to refer to a specific section of the list using the [:] characters and 0, 1, or 2 numbers
- Using 0 numbers refers the to whole list
my_list[:]- The number before the : is the start index
- The number after the : is the end index
- Omitting either says, "Everything till the end, or from the beginning" respectivly
from_start_to_index_5[:5]
from_index_2_to_end[2:]
from_index_1_to_4[1:4]- A negative number for either start or end, simply reverses the index (i.e. from start or from end)
- Start must ALWAYS be below End
# PYTHON
dict
- A.k.a. hash-map or a key-value list
- Keys do not need to be same type as value
- Literal uses {, :, and }
- Keys MUST not conflict
- Values accesses via [ and ] with the key
person = {'first': 'Kevin',
          'last': 'Knapp',
          'age': 29 }
my_age = person['age']
# PYTHON
Set
- An unordered list of UNIQUE items
- Literals use { and }
- Cannot be access via [ and ], but can be iterated
- A good use is to remove duplicates from other collections
my_set = set()
my_set.add('kevin')
# PYTHON
Conditionals
- Sometimes you want to take different actions based on certain conditions
- Python provides if/else statements
- Conditions use Boolean logic to determine which path to take
if some_expression_or_variable:
    # Actions take if TRUE
else:
# Actions to take if FALSE- Python also provides multi-condition statements by adding elif
if some_expression_or_variable:
    # Actions take if TRUE
elif some_new_test:
    # Actions to take if TRUE
else:
    # Actions to take if all tests are FALSE
# PYTHON
Loops
- Sometimes you need to do a specific operation multiple times
- Python provides loops for these occasions
- There are two types of loops in Python
- for
- while
# PYTHON
for Loop
- Used when you need to do something a specific number of times, or for an entire collection of values
- The syntax is
for value in some_collection:
# do something- For example, to print every item in a list
my_list = ['item 1', 'item 2', 'item 3', 'item 4']
for item in my_list:
    print(item)
# PYTHON
for Loop Cont.
- If you want to do something a specific number of times you can use the range() function (Functions will be covered later)
# say 'Hello' 10 times
for _ in range(10):
print('Hello')- Notice we used the '_' character, that's because we didn't need the 'item' variable (in this case it would be a number). Alternatively if we wanted to use it to count we could do
# Count to 10
for num in range(1,11):
    print(num)
    print(',')
Note the start and end values passed to range
# PYTHON
Functions
- Functions start with the def keyword, then the name, then parenthesis containing any optional arguments
- Arguments are positional and mandatory (with one exception, more on this later...)
- If functions wish to send the results back, they use the return keyword followed by the results variable or literal
# A function that takes 2 arguments and doesn't
# return a result
def my_function(some_arg, other_arg):
    # do some work here...

# A function that takes 0 arguments and
# returns a result
def my_other_function():
    # do some more work...
    return True
# PYTHON
Keyword Arguments
- Keyword Arguments (a.k.a. kwargs/kargs) allow you to have optional arguments to a function or method (along with mixing the order)
def cool_function(name='kevin', age=29):
    # do stuff here
    return (name, age)

# use the function
n, a = cool_function(age=50)
print('name={}, age={}'.format(n,a))- kwargs can be mixed with positional args too
# PYTHON
Testing with a REPL
- Read Evaluate Print Loop
- Python's REPL is called IDLE
- Accessed via 'python' command
- To stop, type 'quit()'
- Most python modules are available, plus some extras (namely dir() )
- Sessions non-persistent
- Great for testing (and short term memory loss, aka 'getting old')
# PYTHON
{Ansible}
Controlling a Fleet
Ansible
- Made by Red Hat
- Automation via "scripting light"
- Playbooks made up of Plays
---
- name: apply non-kernel updates
  hosts: "{{ HOSTS | default('web') }}"
  become: true
  gather_facts: false

  tasks:
  - name: upgrade all packages except kernel
    yum:
      name: '*'
      state: latest
      exclude: kernel*
    tags: all

  - name: upgrade all packages security related except kernel
    yum:
      name: '*'
      state: latest
      security: true
      exclude: kernel*
tags: security- Written in YAML
- Built-in Modules
- Inventories!
- Under the hood its a lot of Python
- Can make your own modules in Python
# ANSIBLE
Inventories
---
all:
  children:
    controller:
      hosts:
        localhost:
          ansible_connection: local
    user_nodes:
      hosts:
        user01:
          ansible_host: 192.168.1.20
        user02:
          ansible_host: 192.168.1.21
        user03:
          ansible_host: 192.168.1.22
    database_server:
      hosts:
        db01:
        db02:
        db03:
    projext_x:
      children:
        user_nodes:
database_server:- Written in YAML
- Can group nodes
- Groups can have children
- Can use IPs or Hostnames
# ANSIBLE
Running Playbooks
$ ansible-playbook -i inventory_file playbook.yml# ANSIBLE
{Day 02}
Containers, Containers, Containers
{Containers}
Buzzword Bingo
# What is a Container
- Software bundled with all dependencies
- Sort of like a .ZIP with with special permissions
- Has it's own "view" of the world (aka Namespace)
- Process Tree
- Network Stack
- Filesystem / mount points
- Resource Limits (CPU, RAM, etc)
- UID / GID
- "Image" vs "Container"
- "Container" vs "VM"

# What is a Container
Hardware
Linux Kernel
GNU Core Utilities
System Config
PKG MGMT
App
Container
VM
GNU Core Utilities
System Config
PKG MGMT
App
Linux Kernel
GNU Core Utilities
System Config
PKG MGMT
App
Virtual
Hardware
# What is a Container
Hardware
Linux Kernel
GNU Core Utilities
System Config
PKG MGMT
App
Container
VM
App
Linux Kernel
GNU Core Utilities
System Config
PKG MGMT
App
Virtual
Hardware
# Container Software
- Kernel Built In
- LXC
- Namespaces
- CGroups
- User Facing
- Docker
- Podman
- Orchestration Layer
- Kubernetes
- Nomad
- Rancher


# Container Software
Install Docker
$ curl -LSs https://get.docker.com | sh
$ sudo usermod -aG docker $USER
$ sudo systemctl enable --now docker
Install Podman
$ sudo dnf install podman

# Container Software
Testing It Out
$ docker run hello-world

Hello from Docker!
This message shows that your installation appears to be working correctly.

To generate this message, Docker took the following steps:
 1. The Docker client contacted the Docker daemon.
 2. The Docker daemon pulled the "hello-world" image from the Docker Hub.
    (amd64)
 3. The Docker daemon created a new container from that image which runs the
    executable that produces the output you are currently reading.
 4. The Docker daemon streamed that output to the Docker client, which sent it
    to your terminal.

To try something more ambitious, you can run an Ubuntu container with:
 $ docker run -it ubuntu bash

Share images, automate workflows, and more with a free Docker ID:
 https://hub.docker.com/

For more examples and ideas, visit:
 https://docs.docker.com/get-started/

$ podman run hello-world

 [...]
# Container Software
Fedora Toolbox
$ sudo dnf install toolbox

$ toolbox enter
Creates an overlay system with a shared home directory
Great for testing and development!
# docker-compose
- Allows cooperative containers
- Helps sharing resources such as mounts or networks
- Declarative YAML format file
- Will eventually be integrated into the actual docker command line tool
version: "2"

services:
  bookstack:
    image: lscr.io/linuxserver/bookstack
    container_name: bookstack
    environment:
      - APP_URL=http://localhost/
      - DB_HOST=bookstack_db
      - DB_USER=bookstackuser
      - DB_PASS=bookstackpass
      - DB_DATABASE=bookstackapp
      - PUID=996
      - PGID=994
    ports:
      - 6875:80
    depends_on:
      - bookstack_db
    networks:
      - bookstack-tier
    restart: unless-stopped
    volumes:
      - ./data:/config


  bookstack_db:
    image: lscr.io/linuxserver/mariadb
    container_name: bookstack_db
    networks:
      - bookstack-tier
    environment:
      - MYSQL_ROOT_PASSWORD=bookstackdbrootpass
      - TZ=America/New_York
      - MYSQL_DATABASE=bookstackapp
      - MYSQL_USER=bookstackuser
      - MYSQL_PASSWORD=bookstackpass
      - PUID=996
      - PGID=994
    restart: unless-stopped
    volumes:
      - ./data:/config

networks:
  bookstack-tier:
    driver: bridge
$ sudo dnf install docker-compose$ sudo dnf install podman-compose{Container Alternatives}
VMs, and alternative tools
# VAGRANT
$ sudo dnf install vagrant
$ vagrant init hashicorp/bionic64
$ vagrant up
  Bringing machine 'default' up with 'virtualbox' provider...
  ==> default: Importing base box 'hashicorp/bionic64'...
  ==> default: Forwarding ports...
  default: 22 (guest)
  => 2222 (host) (adapter 1)
  ==> default: Waiting for machine to boot...

$ vagrant ssh
vagrant@bionic64:~$ _- Allows for creating VMs from Code
- Under the hood uses Virtual Box or other hypervisors
- Each VM is configured with Ruby scripts
- Can then provision VMs using inline shell, or dedicated shell scripts
- EXCELLENT for test environments!
# VAGRANTFILE
Vagrant.configure("2") do |config|
  config.vm.box = "ubuntu/bionic64"
  config.vm.synced_folder ".", "/vagrant", disabled: true

  # StandAlone Server Only
  config.vm.define "server2" do |server2|
    server2.vm.network "private_network", ip: "192.168.42.20",
      virtualbox__intnet: "thnet"

    server2.vm.provider "virtualbox" do |vb|
      vb.name = "server2"
      vb.memory = "1024"
    end

    server2.vm.provision :shell, path: "./bootstrap_server.sh"
  end

  # Sensor to Server/Sensor
  config.vm.define "sensor1" do |sensor1|
    sensor1.vm.network "private_network", ip: "192.168.42.11",
      virtualbox__intnet: "thnet"

    sensor1.vm.provider "virtualbox" do |vb|
      vb.name = "sensor1"
      vb.memory = "1024"
    end

    sensor1.vm.provision :shell, path: "./bootstrap_sensor.sh"
  end

  # APT Repo
  config.vm.define "repo" do |repo|
    repo.vm.network "private_network", ip: "192.168.42.2",
      virtualbox__intnet: "thnet"

    repo.vm.provider "virtualbox" do |vb|
      vb.name = "repo"
      vb.memory = "1024"
    end

    repo.vm.provision :file, source: '../pkgs/deps.tgz', destination: "/home/vagrant/"
    repo.vm.provision :shell, path: "../bootstrap_repo.sh"
  end
end
# LXD
- Made by Canonical
- Orchestrate containers
- Can also do VMs with --vm
- Easy snapshot and restore
$ sudo snap install lxd
$ sudo lxd init
$ lxc launch ubuntu:20.04 [--vm]
# MULTIPASS
$ sudo snap install multipass
$ multipass launch- Made by Canonical
- Easy VMs from the command line

{Custom Images}
Have it your way
# DOCKERFILE
# Dockerfile
FROM alpine:latest
RUN apk add python3
ENTRYPOINT ["python3", "-m", "http.server"]
$ docker build -t pyserv .
$ docker image ls
REPOSITORY TAG IMAGE ID CREATED SIZE
pyserv latest fec6935a627e 3 minutes ago 54MB- Declarative document for building container images
- Should be checked in to version control
Each directive creates a "layer" which is built upon (and can lead to huge sizes!)
# DOCKERFILE LINTS
$ docker run --rm -i hadolint/hadolint < Dockerfile

Unable to find image 'hadolint/hadolint:latest' locally
latest: Pulling from hadolint/hadolint
d0727728368a: Pull complete
Digest: sha256:1b47f3192d2c69c622863b84d5cccbfa0c1fac9022bfc297aa931e6d44e51608
Status: Downloaded newer image for hadolint/hadolint:latest
-:1 DL3007 warning: Using latest is prone to errors if the image will ever update. Pin the version explicitly to a release tag
-:2 DL3018 warning: Pin versions in apk add. Instead of `apk add <package>` use `apk add <package>=<version>`
-:2 DL3019 info: Use the `--no-cache` switch to avoid the need to use `--update` and remove `/var/cache/apk/*` when done installing packages
Lint your Dockerfiles!
https://github.com/hadolint/hadolint
# Container Registries
- Repositories (public and private) for container images
- Allows easily sharing and pulling images
- Public Registries
- Docker Hub
- Quay.io
- AWS
- Others...
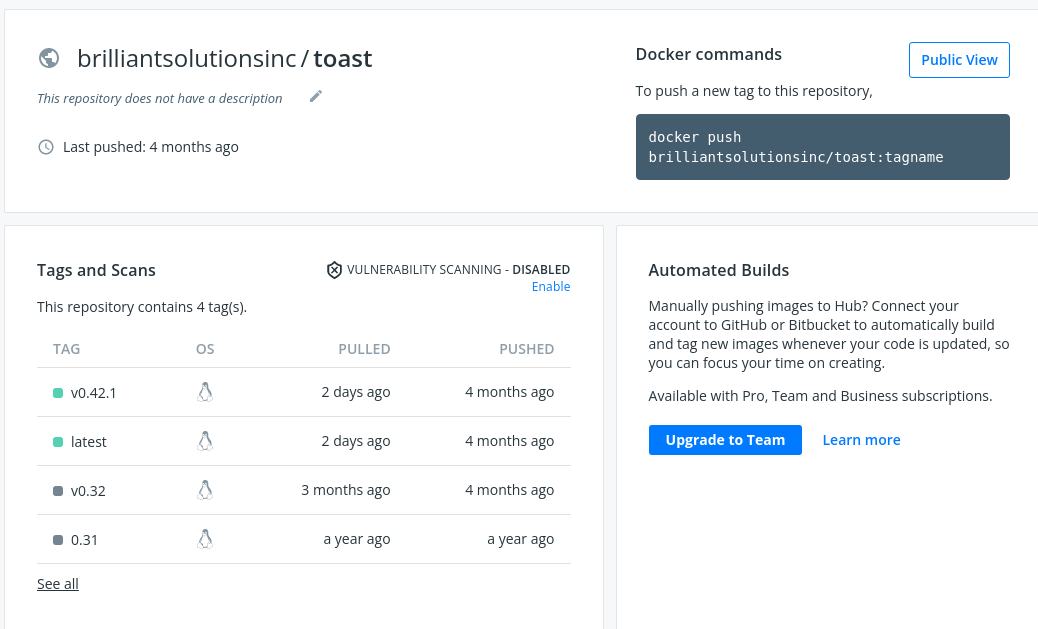
- GitLab contains per-repository Registries
# Container Registries
- Can also export containers, or save images to TAR files
- These can then be loaded on another system
$ docker save pyserv -o pyserv.tar

$ ls -l
   inode Permissions Links Size Blocks User  Group Date Modified Name
62391693 .rw-r--r--@     1   83      8 kevin kevin 15 Jan 14:48  Dockerfile
62391694 .rw-------@     1 54Mi 110264 kevin kevin 15 Jan 14:57  pyserv.tar

$ tar tf pyserv.tar
9ba2039e49404b3ae8654f99e9d22564cfbeaf6588ec1c06ac048a5357853341/
9ba2039e49404b3ae8654f99e9d22564cfbeaf6588ec1c06ac048a5357853341/VERSION
9ba2039e49404b3ae8654f99e9d22564cfbeaf6588ec1c06ac048a5357853341/json
9ba2039e49404b3ae8654f99e9d22564cfbeaf6588ec1c06ac048a5357853341/layer.tar
fc9537bd0694747ea59e49ff8617bf343626b0fb3a4657c0cb8f02c859c4f909/
fc9537bd0694747ea59e49ff8617bf343626b0fb3a4657c0cb8f02c859c4f909/VERSION
fc9537bd0694747ea59e49ff8617bf343626b0fb3a4657c0cb8f02c859c4f909/json
fc9537bd0694747ea59e49ff8617bf343626b0fb3a4657c0cb8f02c859c4f909/layer.tar
fec6935a627eb73a17b0269f95aa5cda4b1c5d70c032c87e333d7827ce1d4154.json
manifest.json
repositories
# Working with Images
Tips for working with Container Images and Layers
$ curl -OL \
  https://github.com/wagoodman/dive/releases/download/v0.9.2/dive_0.9.2_linux_amd64.rpm
$ sudo dnf install ./dive*.rpm
https://github.com/wagoodman/dive

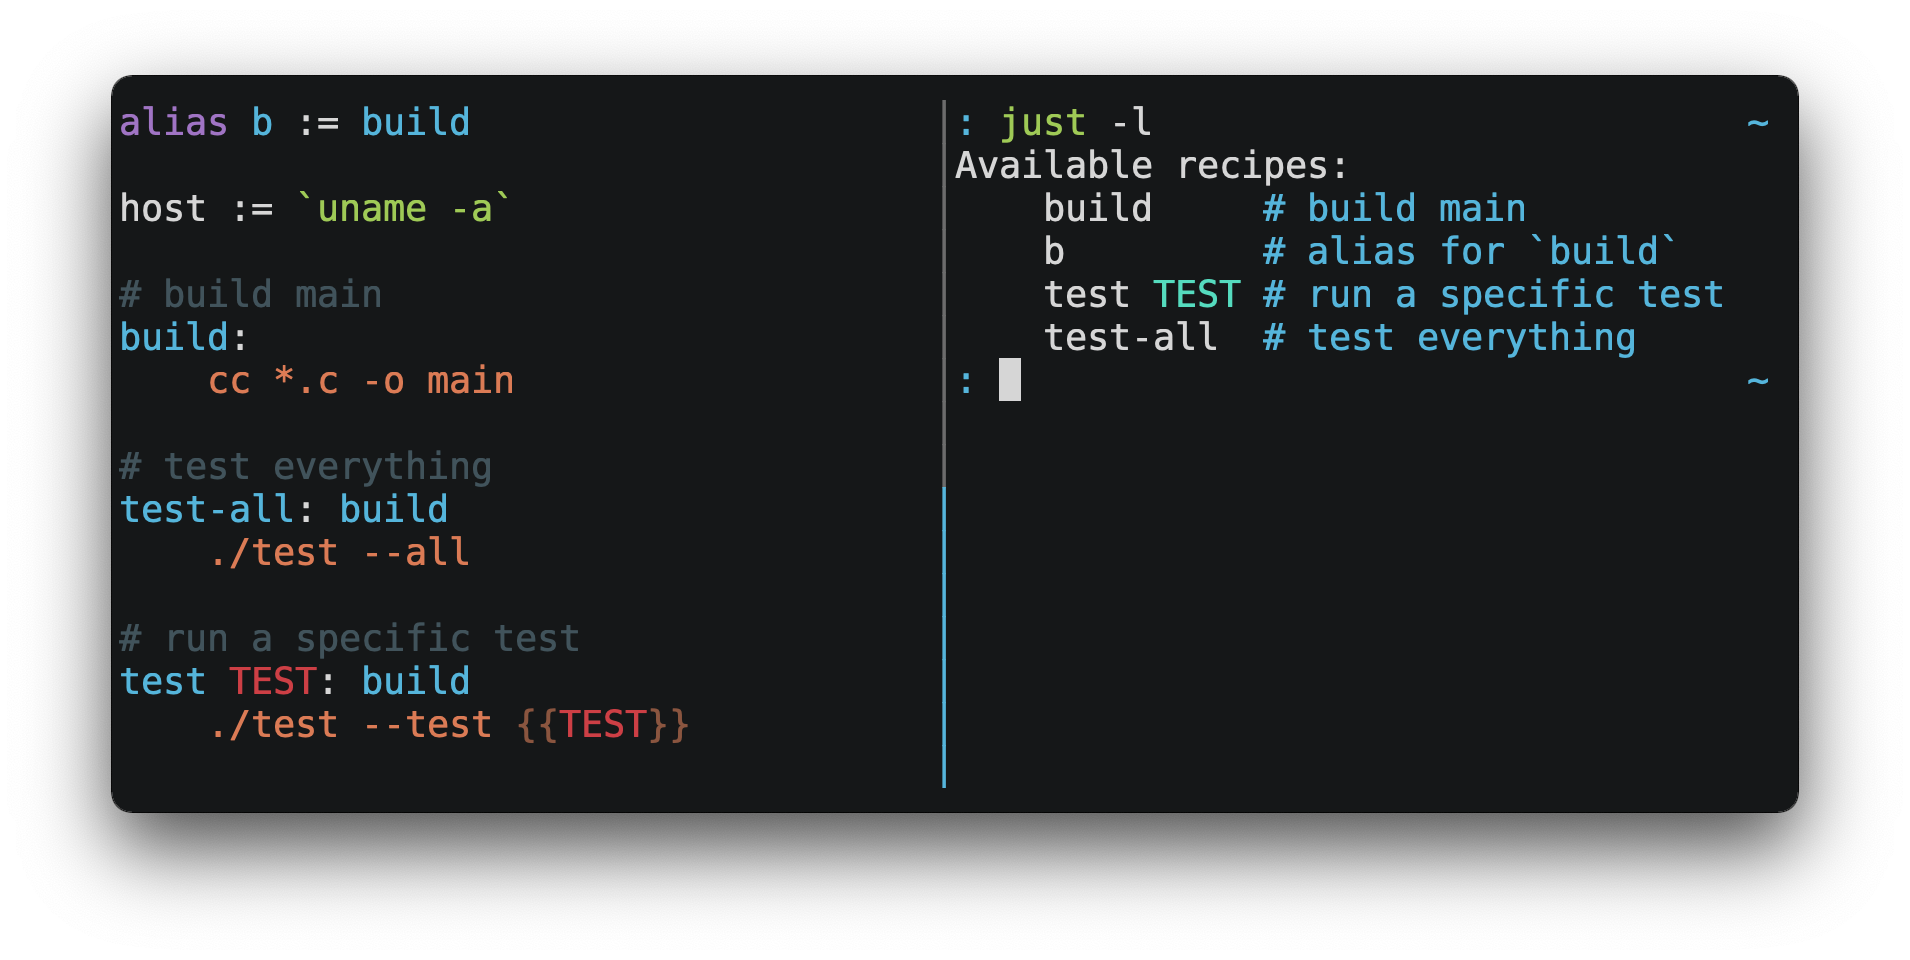
{Recipes}
Scripting...lite
github.com/casey/just
# JUST
$ curl \
  --proto '=https' --tlsv1.2 -sSf https://just.systems/install.sh | \
  bash -s -- --to ~/.local/bin/
github.com/stepchowfun/toast
# TOAST
image: ubuntu
tasks:
  install_figlet:
    command: |
      apt-get update
      apt-get install --yes figlet

  greet:
    dependencies:
      - install_figlet
    command: figlet 'Hello, World!'
$ curl https://raw.githubusercontent.com/stepchowfun/toast/main/install.sh -LSfs | sh
{Day 03}
Monitoring, Remote Admin, and Hardening
{Monitoring}
Watching everything
# MONITORING
- Known Requirements
- Ephemeral Data
- Useful in Troubleshooting
- May not be useful long term
Live
Historical
- Long term storage
- Can "go back in time" to visualize events
- May be raw/unprocessed data
Actioned
- Actions taken on events
- AKA Alerting
- May spawn more logging
- Consider attribution!
Built In-(ish) Monitoring
# MONITORING
- The tops (top, memtop, ptop, sntop, vtop, htop)
- + Modern Alternatives
- ps, free, du (and family), df, lsblk, watch
- systemd
- network monitoring utilities
- Basic tools can be used to view the state of the system (ip, ifconfig, netstat, lsof, iptables, tcpdump, ping, nslookup, arp, traceroute/mtr)
- nethogs
Consider the difference between local node monitoring, and "entire system" monitoring
# CONTAINER MONITORING
$ docker stats
CONTAINER ID   NAME                      CPU %     MEM USAGE / LIMIT    MEM %     NET I/O           BLOCK I/O         PIDS
036b8ad6c7c2   tak_takserver_1           1.82%     5.313GiB / 31.4GiB   16.92%    444MB / 2.08GB    0B / 1.13MB       368
a3c79a328776   tak_pg_1                  0.11%     259.1MiB / 31.4GiB   0.81%     927MB / 183MB     16.4kB / 2.96GB   10
3a36813ff86c   tak_openfire_1            0.12%     678.7MiB / 31.4GiB   2.11%     9.01MB / 12.2MB   0B / 852kB        64
b360b0eee623   metrics_node-exporter_1   0.00%     21.22MiB / 31.4GiB   0.07%     0B / 0B           17.9MB / 0B       19
73be46dd33fa   metrics_cadvisor_1        6.09%     202MiB / 31.4GiB     0.63%     155MB / 8.29GB    31.4MB / 0B       42
docker stats
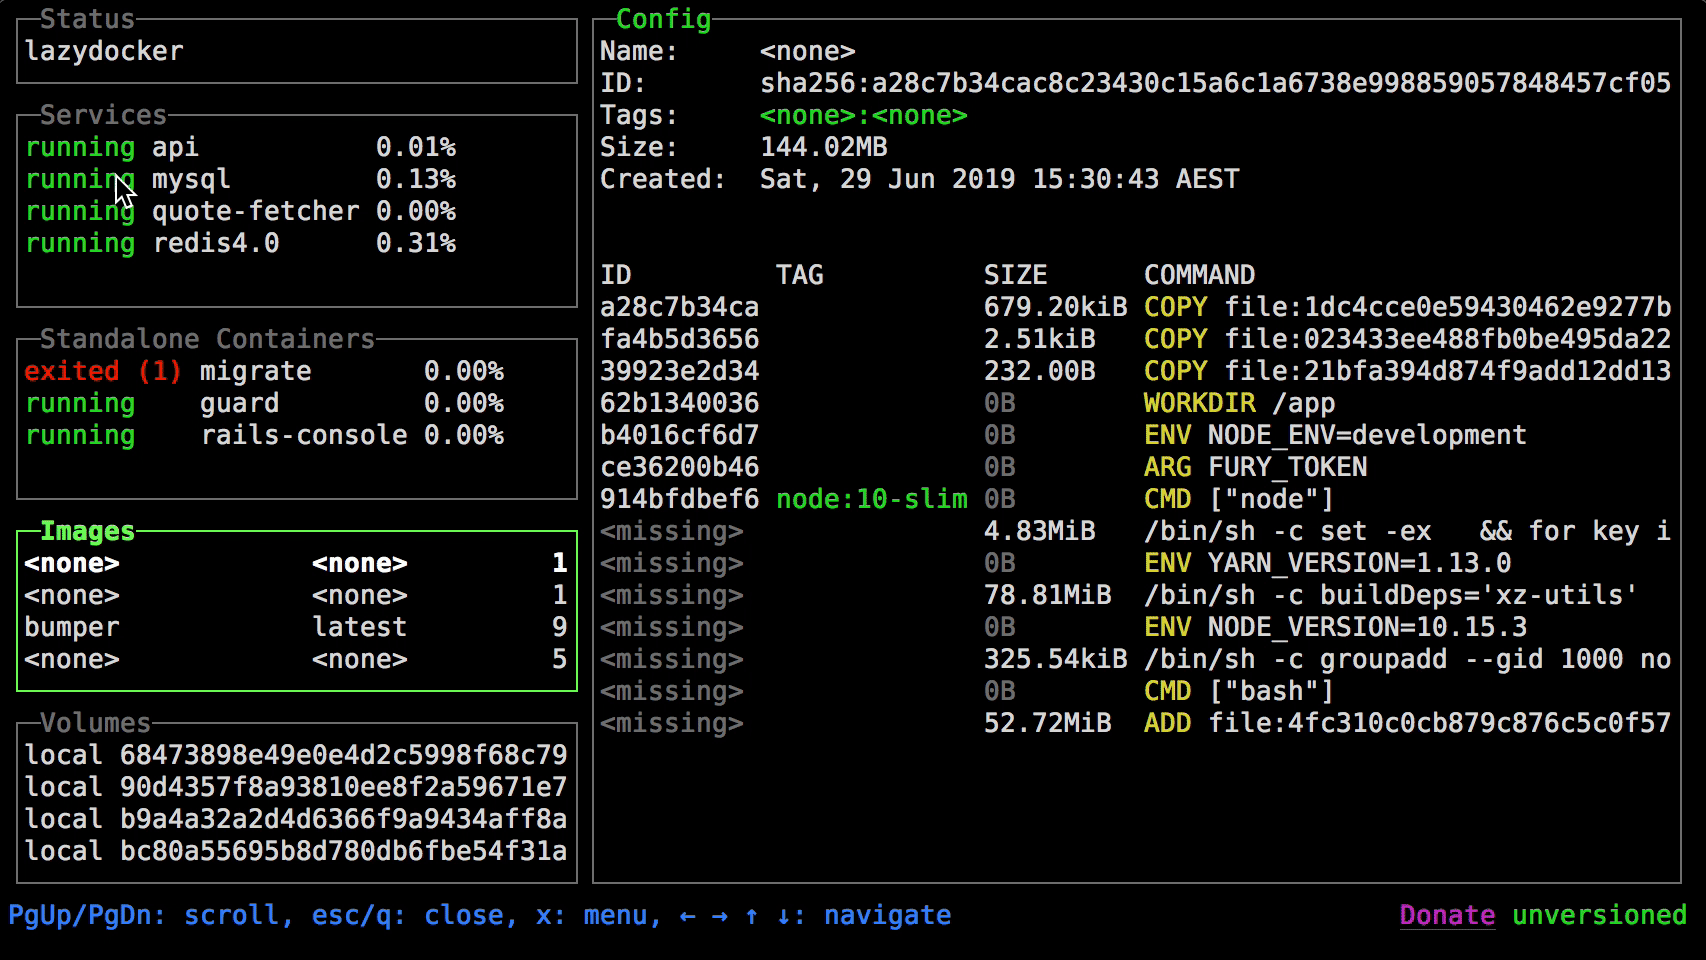
https://github.com/jesseduffield/lazydocker
# PROMETHEUS
- Time Series Database
- Primarily a "Pull/Scrape" Methodology
- Does support a "Push Gateway"
- Metrics are provided by the logged application via "Exporters"
- Uses a Query Language called PromQL
- Great for ad-hoc queries and basic visualization


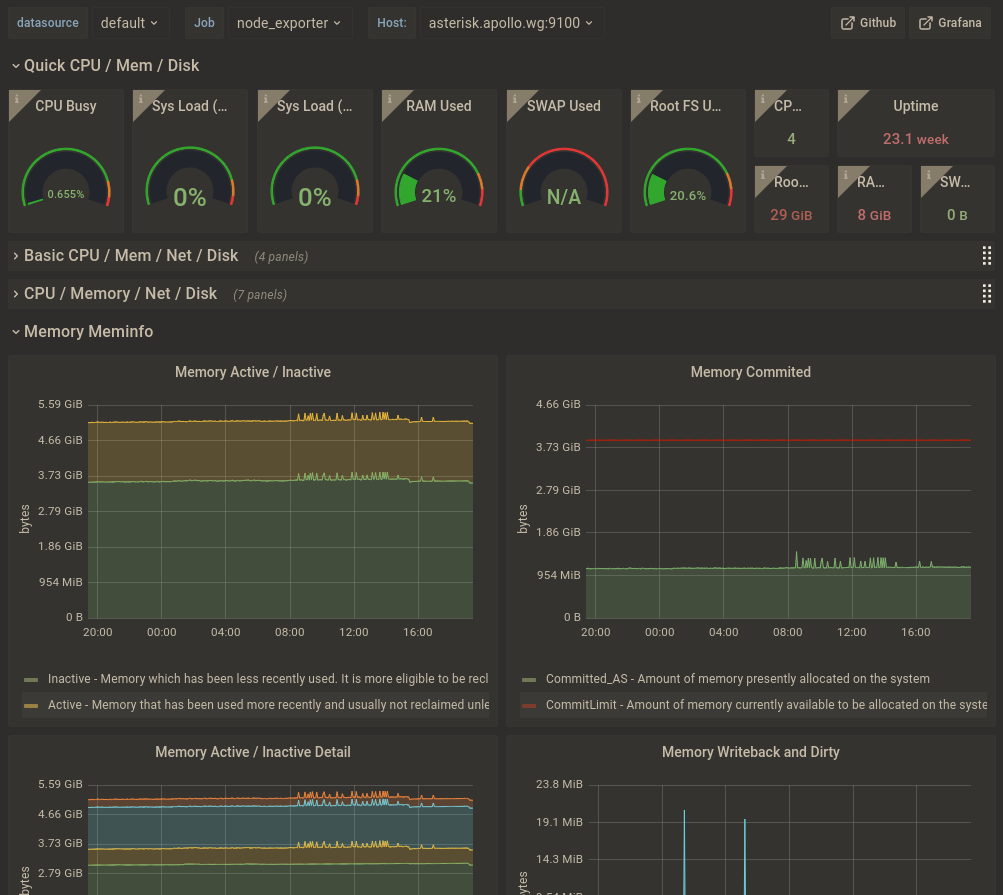
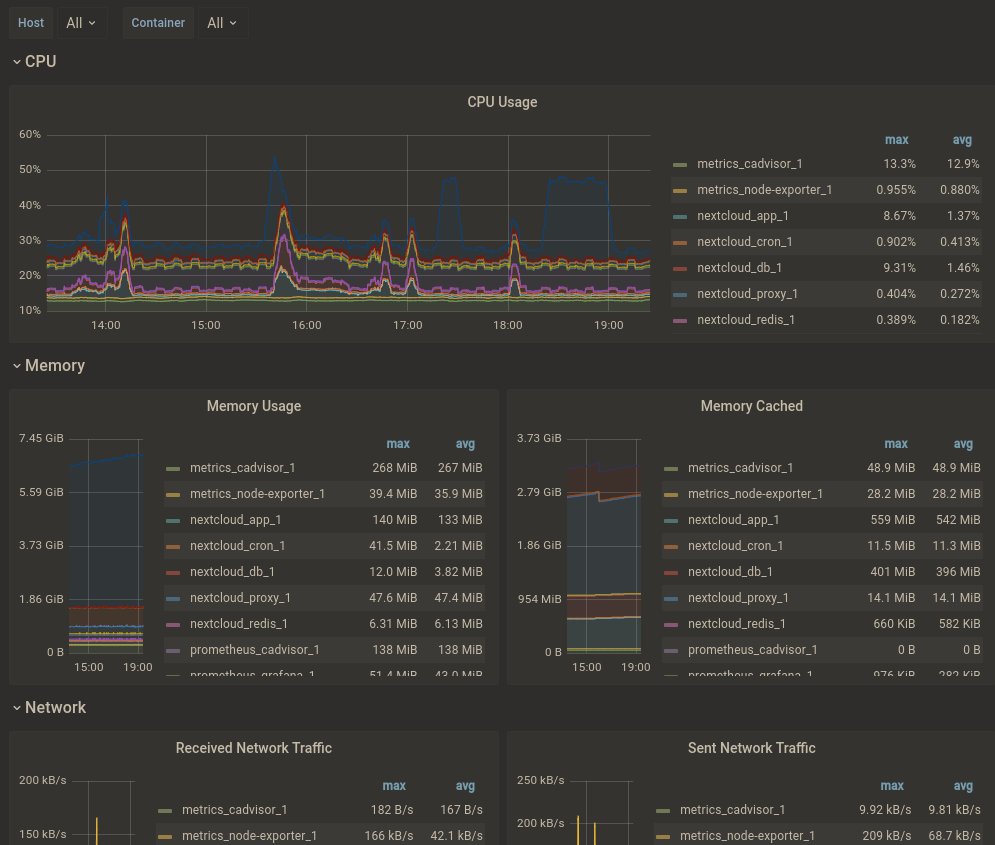
# Graphana

- The visualization tool of choice
- Works amazing with Prometheus (and many other databases too)
- Has a decent learning curve
- Can download/use pre-made dashboards
- Many Prometheus Exporters come with Graphana dashboards
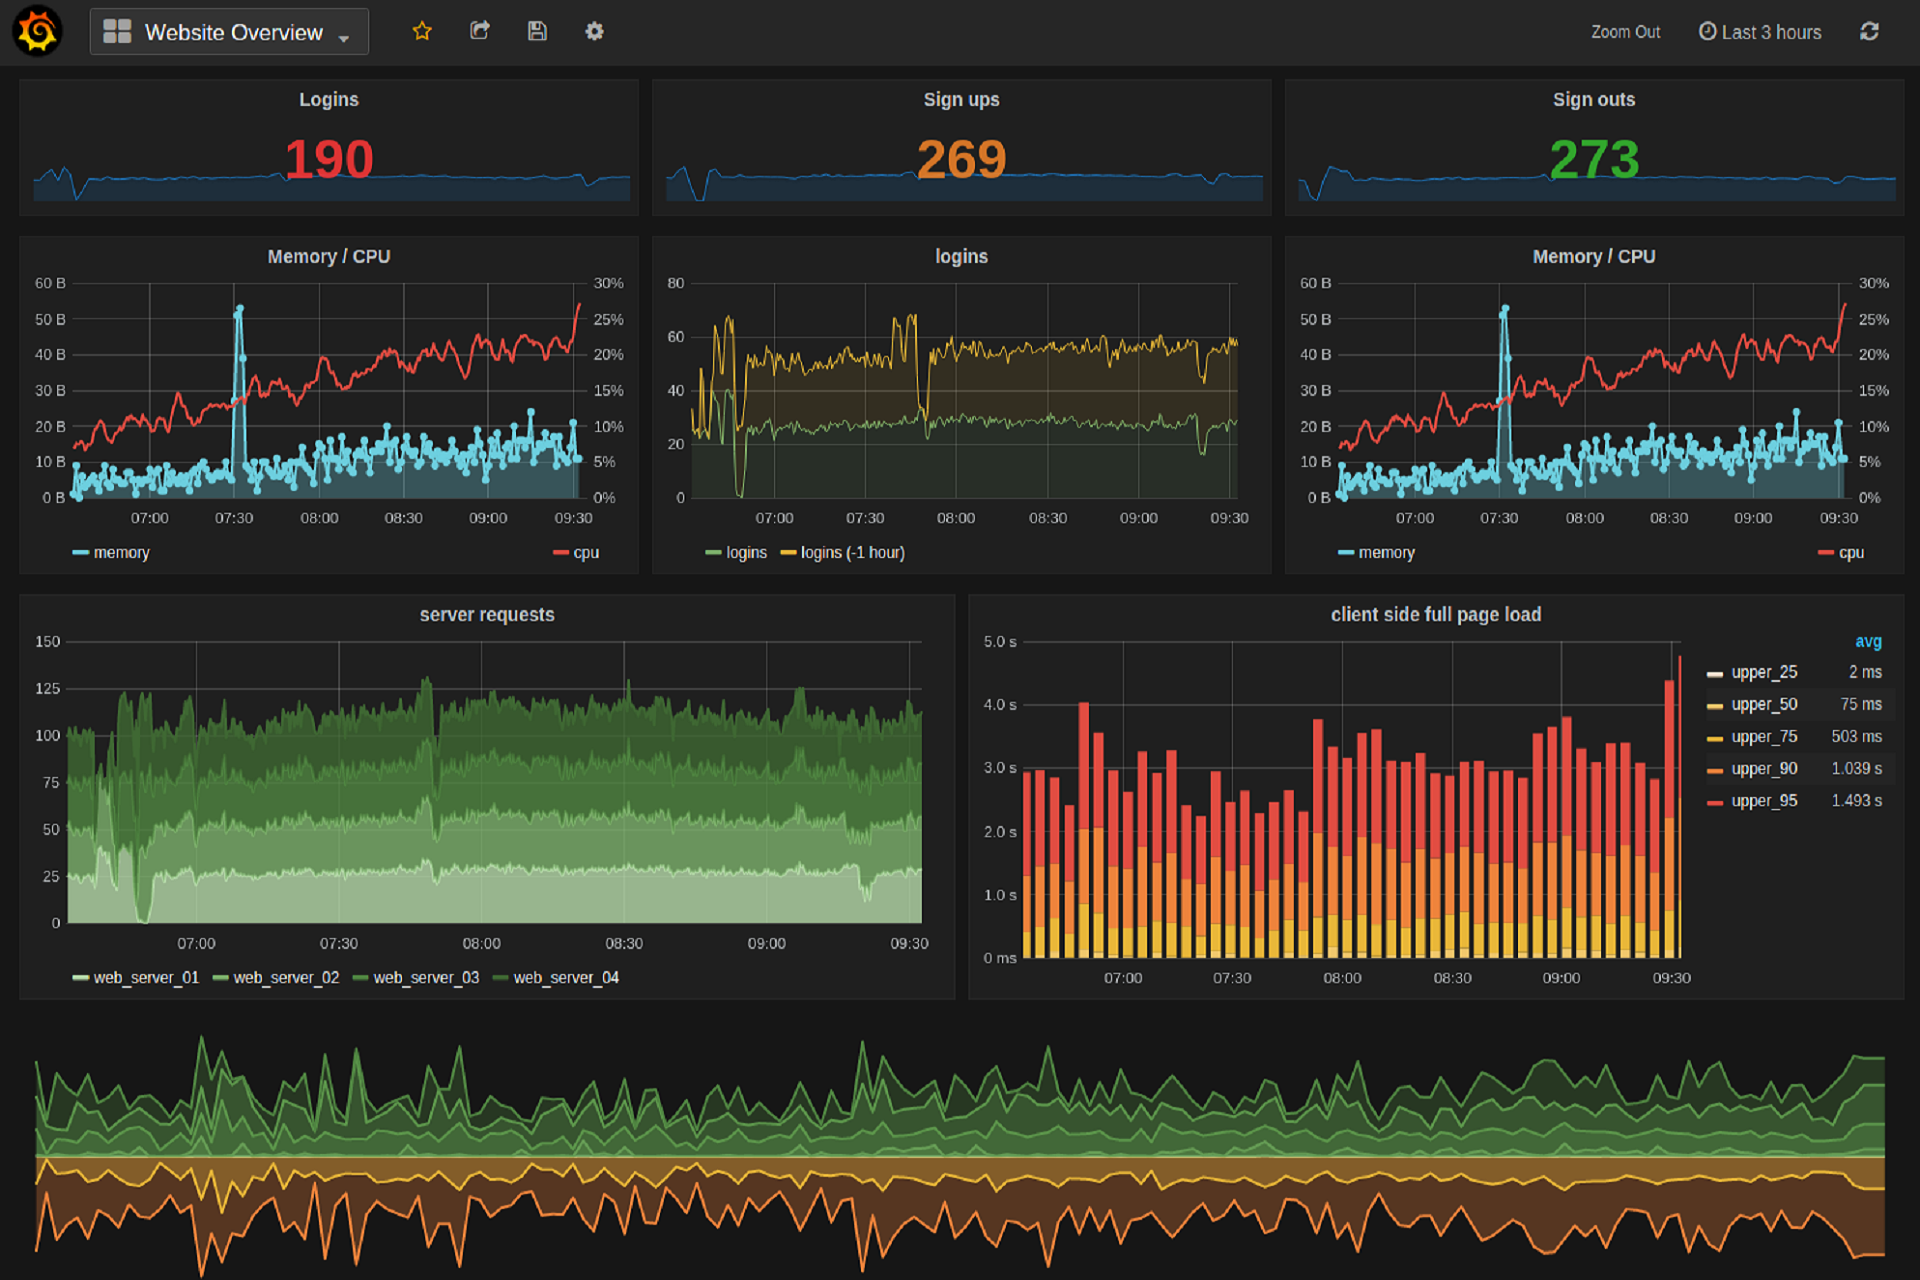
- Key Dashboards / Exporters
- node_exporter
- cAdvisor
# Graphana - NODE_EXPORTER
# Graphana - CADVISOR
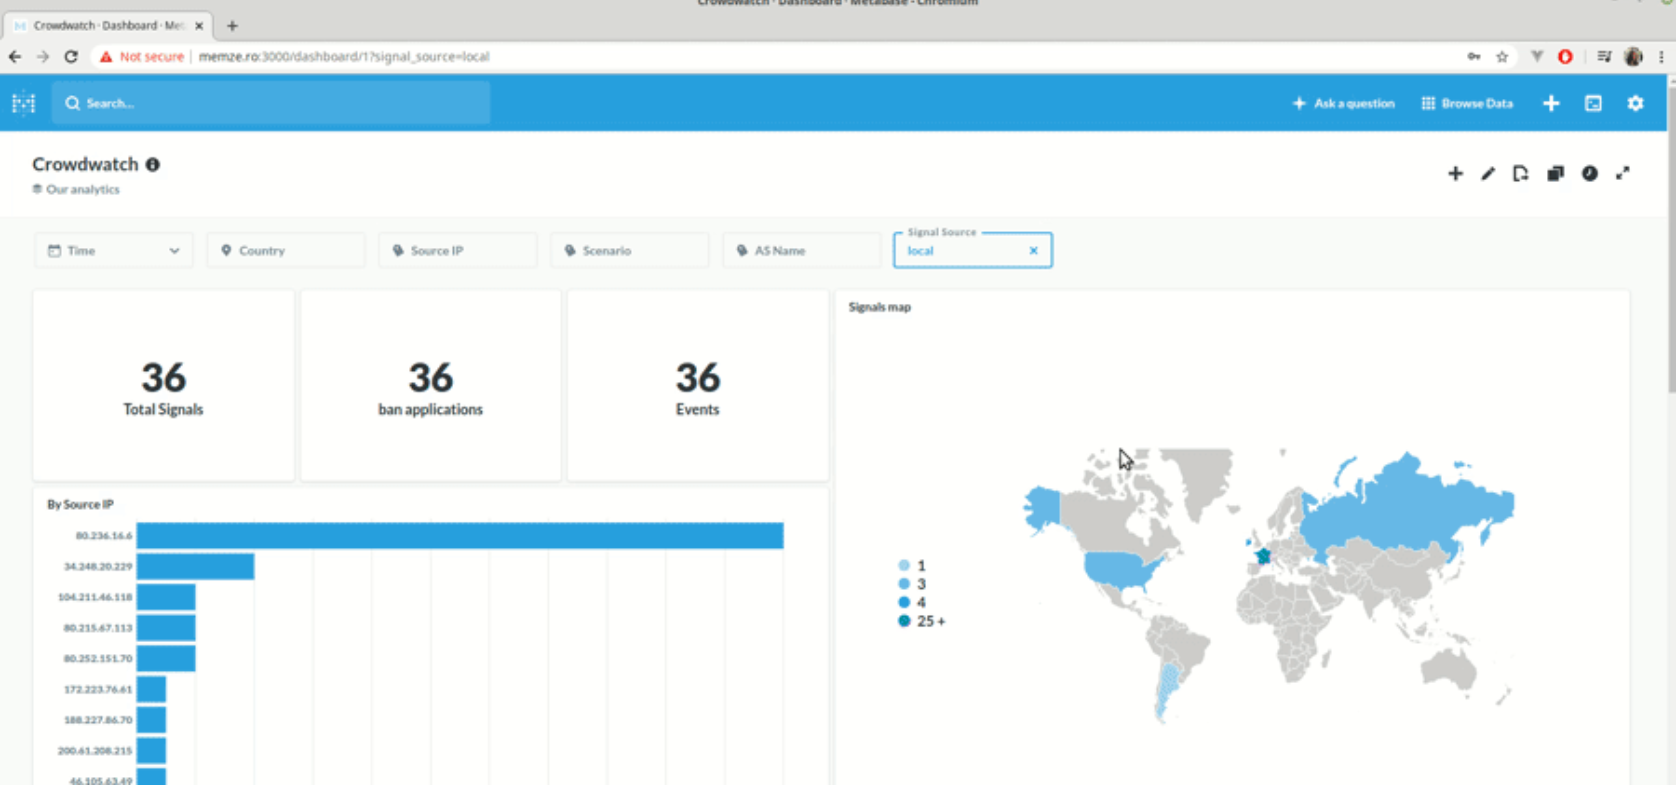
{Private Services}
Remote Services...but private
# CONNECTIVITY
- Internal vs. External Connectivity
- Common
- SSH (Derivatives; Mosh, Auto-SSH, sshuttle etc.)
- wstunnel, stunnel, OBFSProxy
- Layer 3 VPNs
- IPSec
- OpenVPN
- Tinc
- Wireguard (Derivatives; Nebula, Tailscale, Innernet, etc.)
- Layer 2 VPNs
- ZeroTier


# WIREGUARD
- In Kernel (userspace implementations and kmods exist too)
- Noise Protocol
- Simple (vs. easy)
- ChaCha20Poly1305
- Performance
- Efficiency (i.e. battery life)
- NOT Configurable
- Low Level Primitive
- Possibly Quantum Resistant with Optional PSK

# WIREGUARD
$ sudo dnf install wireguard-tools
$ sudo mkdir /etc/wireguard
$ cd /etc/wireguard
$ sudo wg genkey | tee hub.private | wg pubkey > hub.public
$ sudo wg genkey | tee client.private | wg pubkey > client.public
# /etc/wireguard/wg0.conf
[Interface]
PrivateKey = 2DiO+Ox5cURGbFLWniVmx/N1laqYGIZpv/IPDuiYkVg=
Address = 10.10.10.1/24
ListenPort = 51820
DNS = 1.1.1.1
# Client
[Peer]
PublicKey = hrbwZZxxjVuP7QvlWm9YDyg+40ftgQo5mKRrWmekpFw=
AllowedIPs = 10.10.10.2/32
PersistentKeepalive = 25$ sudo systemctl enable --now wg-quick@wg0# SSH CONFIG FILES
Host myserver
  HostName 51.127.128.14
  User kevink
  IdentityFile ~/.ssh/roshi
  UserKnownHostsFile /dev/null
  StrictHostKeyChecking no
  PasswordAuthentication no
  IdentitiesOnly yes
  LogLevel FATAL
  Compression yes
Port 22- Use them!
- Makes SSH (and SCP) a breeze to use
- Stored in ~/.ssh/config
- Supports Globs and ! syntax
- Can be overridden with
-F FILE
-o "option=value"
# SSH TUNNELS

- Can be used to forward *local* traffic to a remote server (extremely useful for remote dashboards)
- Can be used to forward local through *through* a remote server (i.e. a poor man's VPN)
$ ssh user@host -L 8080:127.0.0.1:3000 -N- can be specified multiple times
$ pip3 install --upgrade --user sshuttle
$ sshuttle -r user@host 0.0.0.0/0- can be used to exclude subnets
-x
-L
{Easy Mode Remote Admin}
Enough of this terminal...
# COCKPIT
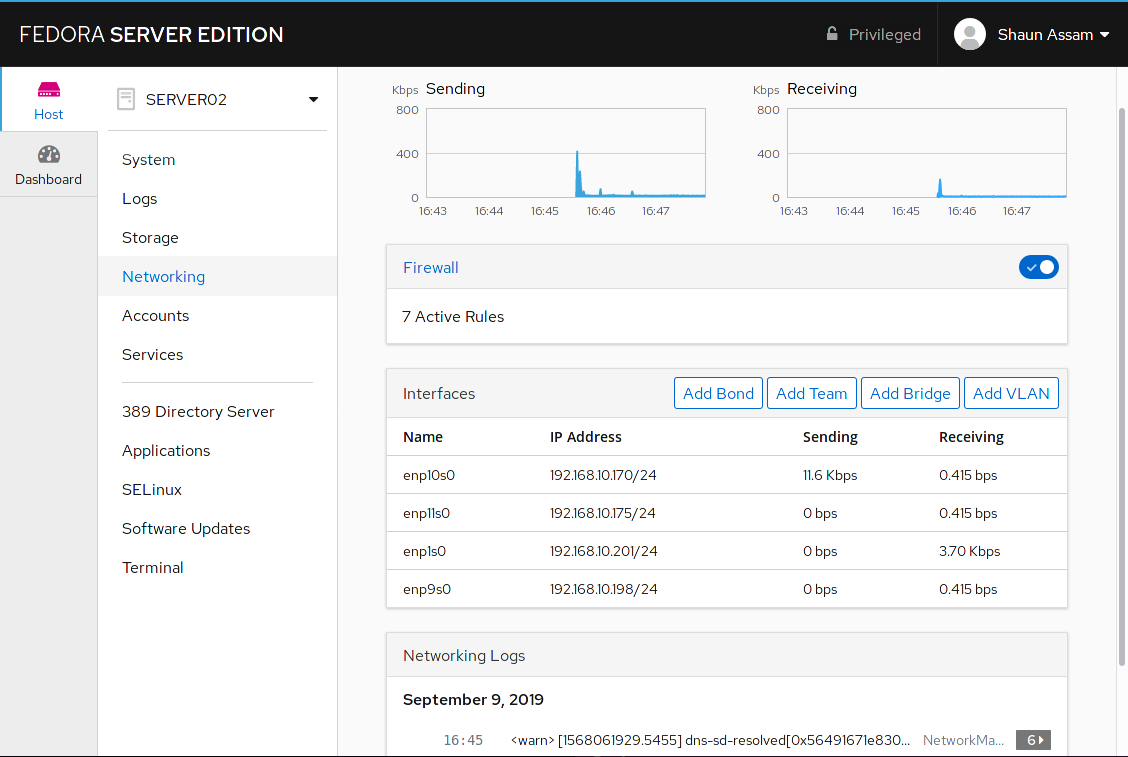
- A Web GUI for your servers
- Made by Redhat
- Works on Ubuntu based distros as well
- Additional plugins control things like Containers, VMs, etc.
- Can be used for local machine too!
$ sudo dnf install cockpit
$ sudo systemctl enable --now cockpit cockpit.socket
$ sudo firewall-cmd --permanent --zone=public --add-service=cockpit
$ sudo firewall-cmd --reload
{Hardening}
Make 'em work for it
# HARDENING
- Shotgun Blast vs Targeted
- Whats the goal: Meeting a policy?
- Consider a Zero Trust Model
- Types of hardening, and from whom:
- Network
- System
- Application
- Schedule Red Team Assessments (even if only internal)
The Most Low Hanging Fruit Will Be the Exploit!
The defense must be correct 100% of the time, but the offense only needs to be correct once!
Many issues boil down to permissions
# SSH HARDENING
If you do nothing else - Do this
PermitRootLogin prohibit-password # or 'no' even better
PasswordAuthentication yes # Normally this should be 'no'
PrintLastLog yes
PermitEmptyPasswords no
MaxAuthTries 3
ClientAliveInterval 200
ClientAliveCountMax 3
MaxSessions 3
HostbasedAuthentication no

KexAlgorithms curve25519-sha256@libssh.org,ecdh-sha2-nistp521,ecdh-sha2-nistp384,ecdh-sha2-nistp256,diffie-hellman-group-exchange-sha256
Ciphers chacha20-poly1305@openssh.com,aes256-gcm@openssh.com,aes256-ctr

Macs hmac-sha2-512-etm@openssh.com,hmac-sha2-256-etm@openssh.com,hmac-sha2-512,hmac-sha2-256
$ sudo chown root:root /etc/ssh/sshd_config
$ sudo chmod 0600 /etc/ssh/sshd_config
$ sudo systemctl restart sshd# RUST-MOTD
github.com/rust-motd/rust-motd
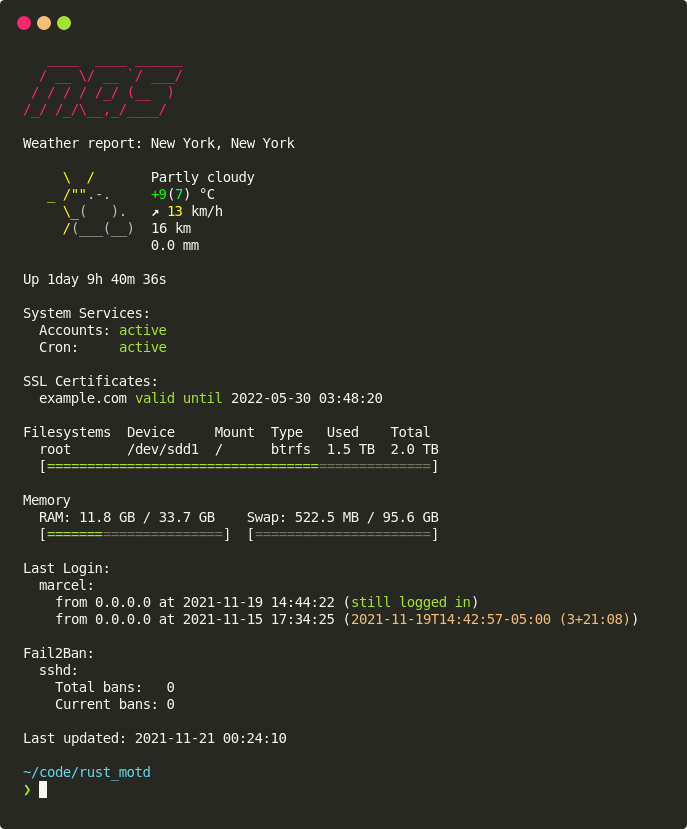
-
Configure via: $HOME/.config/rust-motd/config.toml
[service_status]
docker = "docker"
gitlab-runner = "gitlab-runner"

[uptime]
prefix = "Up"

[filesystems]
root = "/"

[fail_2_ban]
jails = ["sshd", "anotherjail"]

[last_login]
kevin = 2
root = 3

[last_run]
# SYSTEMD SERVICE HARDENING
We can harden on a per-service basis
This should be the first thing you reach for!
$ sudo systemd-analyze security
UNIT             EXPOSURE PREDICATE
atd.service           9.6 UNSAFE
crond.service         9.6 UNSAFE
httpd.service         9.2 UNSAFE
mariadb.service       8.8 EXPOSED
sshd.service          9.6 UNSAFE

$ sudo systemd-analyze security httpd.service
  NAME                   DESCRIPTION                                          EXPOSURE
✗ PrivateDevices         Service potentially has access to hardware devices        0.2
✓ PrivateTmp             Service has no access to other software's temporary files
✗ ProtectControlGroups   Service may modify to the control group file system       0.2
✗ ProtectHome            Service has full access to home directories               0.2
✗ ProtectKernelTunables  Service may alter kernel tunables                         0.2
✗ ProtectSystem          Service has full access to the OS file hierarchy          0.2
✗ RestrictSUIDSGID       Service may create SUID/SGID files                        0.2
✗ RootDirectory          Service runs within the host's root directory             0.1
…
→ Overall exposure level for httpd.service: 9.2 UNSAFE# FAIL2BAN
Ban IPs based on failed login attempts
There are times fail2ban isn't as useful as you'd think
$ sudo dnf install fail2ban

$ sudo cp /etc/fail2ban/fail2ban.{conf,local}
$ sudo cp /etc/fail2ban/jail.{conf,local}

$ sudo systemctl enable --now fail2ban

$ sudo tail -f /var/log/fail2ban.log
To see "jailed" IPs
$ sudo fail2ban-client status sshd
Status for the jail: sshd
|- Filter
|  |- Currently failed:	0
|  |- Total failed:	0
|  `- File list:	/var/log/auth.log
`- Actions
   |- Currently banned:	0
   |- Total banned:	0
   `- Banned IP list:

# unban an IP
$ sudo fail2ban-client set sshd unbanip 1.2.3.4
# CROWDSEC
github.com/crowdsecurity/crowdsec
"CrowdSec is a free, modern & collaborative behavior detection engine, coupled with a global IP reputation network"

- Similar to a distributed fail2ban
- Requires a detection engine + a "bouncer"
# HARDENING
CentOS Hardening will be covered in Day 04 via OpenSCAP
# UBUNTU-HARDENING
github.com/konstruktoid/hardening
$ git clone https://github.com/konstruktoid/hardening
$ cd hardening
$ sed -i "s/CHANGEME=''/CHANGEME=foo" ubuntu.cfg
$ sudo bash ubuntu.sh
Primarily only good for Ubuntu based systems, however some of the internal scripts are applicable across many distros
{SELinux}
Oh no...
# SELINUX

- One of two popular Linux Security Module (LSM) (a third is being built)
- AppArmor (Ubuntu) and Sandbox are the other two
- Originally developed by NSA
- Now maintained by Red Hat and the default LSM on RHEL based distros
- A reputation for being extremely complex
- Most people unfortunately just disable it
Three Primary Modes:
- Enforcing
- Permissive
- Disabled
# SELINUX
Configuration File: /etc/selinux/config
# Get the current mode
$ sudo getenforce
$ sudo sestatus

# Temporarily Change Modes
$ sudo setenforce [enforcing|permissive|1|0]
Common Commands:
- getenforce | setenforce
- semanage [boolean|port|fcontext] [-l]
- ausearch
- chcon | restorecon | matchpathcon
- semodule
# SELINUX CONTEXT LABELS
- Uses a MAC pattern vs traditional Unix DAC pattern
- Fundamentally all files contain "labels" which consist of contexts in the form of
- USER : ROLE : TYPE : LEVEL
- suffixed _u, _r, _t (and prefix s)
- Adding -Z to a command will display SELinux information, such as with ls or ps
$ ps -eZ
LABEL                               PID TTY          TIME CMD
system_u:system_r:init_t:s0           1 ?        00:00:14 systemd
system_u:system_r:kernel_t:s0         2 ?        00:00:00 kthreadd
system_u:system_r:httpd_t:s0      25134 ?        00:00:00 httpd
restorecon PATH will set the file context to whatever the system configuration specifies (view or change with semanage fcontext [--list])
# SELINUX FCONTEXT
restorecon PATH will set the file context to whatever the system configuration specifies (view or change with semanage fcontext [--list])
$ sudo semanage fcontext -l
SELinux fcontext                    type               Context

/home                               directory          system_u:object_r:home_root_t:s0
/home                               symbolic link      system_u:object_r:home_root_t:s0
/home/(.*/)?\.snapshots(/.*)?       all files

$ sudo semanage fcontext -a -t unconfined_u:object_r:user_home_t:s0 /home
$ sudo restorecon -v -r /home
Caution
files retain the context they had previously
files *may not* retain the context they had previously
files inherit the context of the parent directory
MOVED
COPIED
CREATED
# SELINUX BOOLEANS
Booleans are on/off switches
- List with semanage boolean --list
$ sudo semanage boolean -l
SELinux boolean                State  Default Description
  ...
xend_run_blktap                (on   ,   on)  Allow xend to run blktap
xend_run_qemu                  (on   ,   on)  Allow xend to run qemu
xguest_connect_network         (on   ,   on)  Allow xguest to connect network
xguest_exec_content            (on   ,   on)  Allow xguest to exec content
xguest_mount_media             (on   ,   on)  Allow xguest to mount media
  ...

$ setsbool [-P] xguest_connect_network off
Means permanent
-P
# SELINUX PORTS
The Firewall **AND** SELinux Control Network Access
- List with semanage port --list
$ sudo semanage port -l
SELinux Port Type              Proto    Port Number

afs3_callback_port_t           tcp      7001
afs_fs_port_t                  udp      7000, 7005
afs_ka_port_t                  udp      7004
amanda_port_t                  tcp      10080-10083
amqp_port_t                    tcp      15672, 5671-5672
amqp_port_t                    udp      5671-5672
asterisk_port_t                udp      2427, 2727, 4569

$ sudo semanage port -a -p udp -t asterisk_port_t 8989
Means ADD
-a
Means DELETE
-d
Means MODIFY
-m
# SELINUX TROUBLESHOOTING
- ausearch is most helpful in displaying errors
$ sudo ausearch -m avc -ts recent
----
time->Tue Dec 21 10:15:53 2021
type=AVC msg=audit(1640099753.877:245): avc:  denied  { write } for  pid=2368 comm="flatpak" name="system_bus_socket" dev="tmpfs" ino=2513 scontext=system_u:system_r:fedoratp_t:s0-s0:c0.c1023 tcontext=system_u:object_r:system_dbusd_var_run_t:s0 tclass=sock_file permissive=0
----
time->Tue Dec 21 10:15:53 2021
type=AVC msg=audit(1640099753.893:246): avc:  denied  { write } for  pid=2370 comm="flatpak" name="system_bus_socket" dev="tmpfs" ino=2513 scontext=system_u:system_r:fedoratp_t:s0-s0:c0.c1023 tcontext=system_u:object_r:system_dbusd_var_run_t:s0 tclass=sock_file permissive=0
----- Narrow down to a specific component (comm= above) with -c
- Other valid time values: this-year, this-month, week-ago, yesterday, today, boot, now
- audit2allow can be used to create a custom policy (and loaded via semodule)
# SELINUX
Instead of setting the entire system to permissive, consider changing just the problem domain
$ ps -eZ
LABEL                               PID TTY          TIME CMD
system_u:system_r:init_t:s0           1 ?        00:00:14 systemd
system_u:system_r:kernel_t:s0         2 ?        00:00:00 kthreadd
system_u:system_r:httpd_t:s0      25134 ?        00:00:00 httpd

$ sudo semanage permissive -a httpd_t
Means ADD
-a
Means DELETE
-d
Means MODIFY
-m
{Firewalls}
Not in my house
# IPTABLES
- Rule based firewalls
- Rules are designated for different "chains" which are part of different "tables"
- Each packet is filtered through these chains of rules, one after the other
- At each rule, the kernel decides whether to perform an action (such as drop) on the packet if it matches the rule, or let it continue processing
- The action may be something simple like, "log and continue processing" or "allow"
- The packet is sent through these chains of rules and through the different tables until either an action is performed on the packet that drops it, or ultimately the default rule is applied (i.e. it makes it all the way through all rules of all chains of all tables)
- Packets can match multiple rules, but are processed in order
- Let's visualize this...
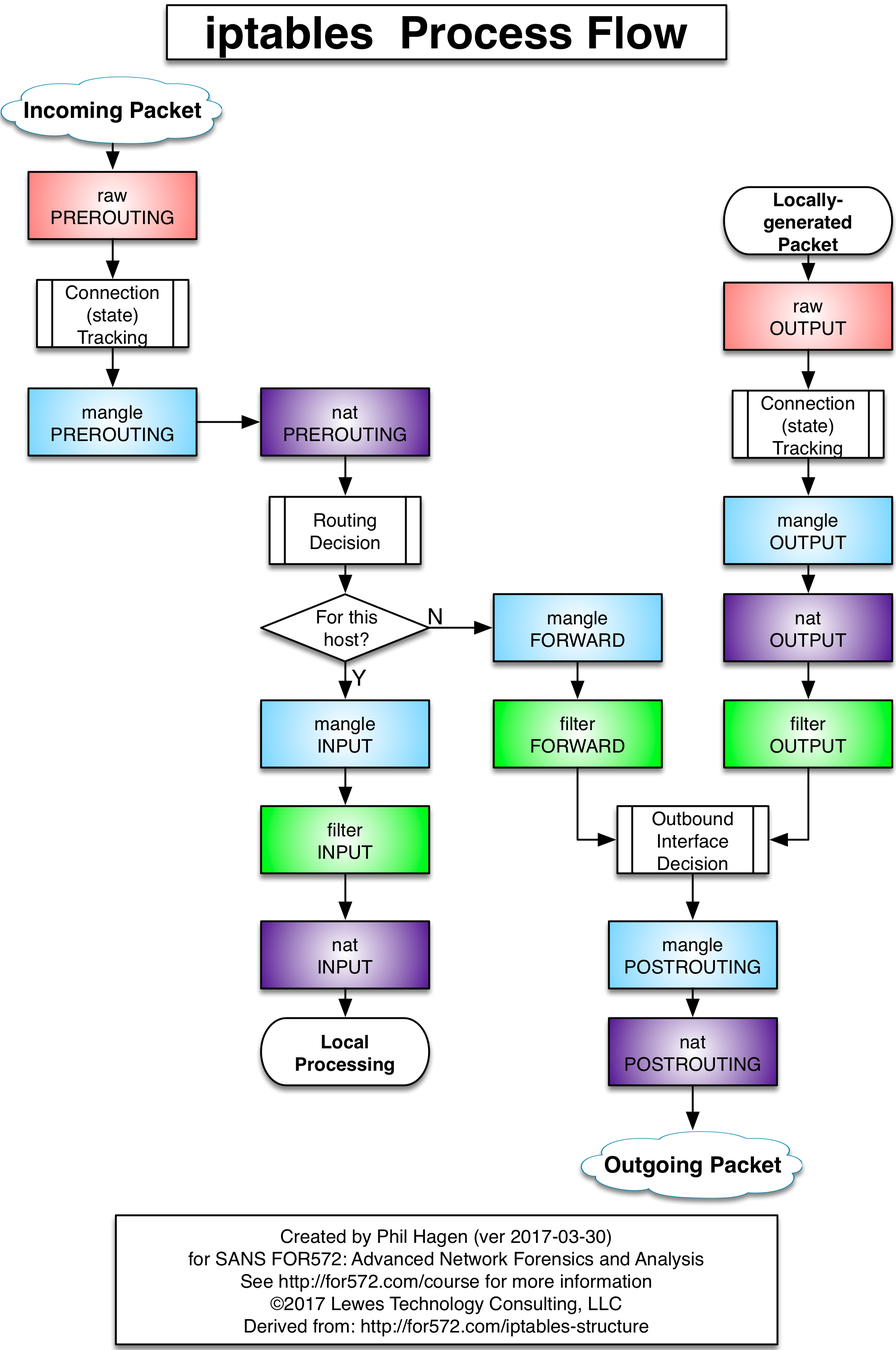
# IPTABLES
Chains
- In it's simplest form (the default table known as the FILTER table), there are three chains in order of processing
- INPUT: Packets coming in
- FORWARD: Packets being forwarded
- OUTPUT: Packets going out
- When we talk about tables, different tables may have different chains
# IPTABLES
Tables
- Although you'll primarily use the default table, there is one other table you should know
- nat
- The nat table includes the following four chains in order of processing:
- PREROUTING
- INPUT
- OUTPUT
- POSTROUTING
# IPTABLES
Rule Syntax
- The first thing you should know: iptables -L
- Lists the chains for the default table
- The table can be changed with -t <TABLE>
- One can "Flush" or reset the rules of a table with -F
- iptables -F
- iptables -t nat -F
- Before we spoke about the default policy, which is if the rule makes it to the end of a chain, what should happen.
- By default the policy is ALLOW for all chains
- You can change the policy of a particular chain with -P
- iptables -P INPUT DROP
# IPTABLES
Policy
- When changing the default policy, ESPECIALLY of a remote box, be sure not to cut your current connection
- By default iptables rules are non-persistent and will be reset on reboot
- We can save and restore rulesets with
- iptables-save > /tmp/iptables-v4
- iptables-restore < /tmp/iptables-v4
- There are packages which will do this for us automatically at boot
- iptables-persistent
- To save (which will auto restore at next boot):
- dpkg-reconfigure iptables-persistent
- To save (which will auto restore at next boot):
- iptables-persistent
# IPTABLES
Modifying Chains
- Rules can be modified (appended, inserted, or deleted) on chains with these various commands
| Command | Function |
|---|---|
| iptables -A <CHAIN> | "Append" a rule at the bottom of <CHAIN> |
| tcpdump -I <CHAIN> <NUM> | Insert a rule on <CHAIN> and rule number <NUM> |
| iptables -D <CHAIN> <NUM> | Delete rule number <NUM> from <CHAIN> |
- TIP: it can be helpful to use the `--line-numbers` option which will display the line numbers of the rules for easier inserting/deleting
# IPTABLES
Rules
- Now that we know how to view tables and chains, and list or modify the current rules, we actually learn about the rules themselves
- Most rules are similar to using tcpdump, you can specify "filters" to match packets
- There are various flags and switches which modify or add these filters to the rule
- Some flags/switches enable other flags and switches
- These are known as "match extensions"
# IPTABLES
Rules
| Option / Flag | Function |
|---|---|
| -j <ACTION> | What to do with the packet. Normally: * ACCEPT * LOG * DROP * MASQUERADE |
| -p [!] <PROTO> | Match a particular protocol like 'tcp' or 'udp' |
| -i <IFACE> | Match only on input interface <IFACE>. If '!' is included it reverses the rule |
| -d [!] <IP>[/cidr] | Destination IP/network. If '!' is included it reverses the rule |
| -s [!] <IP> | Source IP/network. If '!' is included it reverses the rule |
| -o <IFACE> | Only match output interface <IFACE> |
| -m <NAME> | Performs a "match" matches can be thought of as "modules" and enable other "matching options/flags" More on this later... |
| --dport <NUM> | Destination port |
| --sport <NUM> | Source port |
Common Rule options/switches
# IPTABLES
Matches
| Option / Flag | Function |
|---|---|
| -m conntrack | Adds a --ctstate <STATE> flag where you can match connection states * ESTABLISHED * RELATED * NEW * INVALID Can be comma separated like ESTABLISHED,RELATED Also adds --ctproto |
| -m comment | Allows adding comments with --comment "some comment" |
| -m multiport | Allows matching on more than one port with --dports <port1,port2> |
| -m iprange | Allows --src-range and --dst-range for a range of IPs |
| -m log | Adds --log-level <#> to only log at specified logging levels |
| -m udp OR -m tcp | Adds --sport and --dport that will match only TCP or UDP ports |
- Common match names (modules)
List of all extensions: http://ipset.netfilter.org/iptables-extensions.man.html
# IPTABLES
Tips
- When working with iptables open two terminals, or a split screen
- In one screen run the iptables commands
- In the other run:
- watch -n 1 iptables -L --line-numbers
# IPTABLES
# IPTABLES
*filter
:INPUT DROP
:FORWARD DROP
:OUTPUT ACCEPT
-N port-scanning
-N syn_flood
-A INPUT -i lo -j ACCEPT
-A INPUT -m conntrack --ctstate RELATED,ESTABLISHED -j ACCEPT
-A INPUT -p tcp --syn -j syn_flood
-A INPUT -p icmp -m limit --limit 1/sec --limit-burst 1 -j ACCEPT
-A INPUT -p icmp -m limit --limit 1/sec --limit-burst 1 -j LOG --log-prefix PING-DROP
-A INPUT -p icmp -j DROP
-A INPUT -f -j DROP
-A INPUT -p tcp -m tcp --tcp-flags FIN,SYN,RST,PSH,ACK,URG NONE -j DROP
-A INPUT -p tcp -m connlimit --connlimit-above 80 --connlimit-mask 32 --connlimit-saddr -j REJECT --reject-with tcp-reset
-A OUTPUT -o lo -j ACCEPT
-A OUTPUT -p icmp -j ACCEPT
-A port-scanning -p tcp -m tcp --tcp-flags FIN,SYN,RST,ACK RST -m limit --limit 1/sec --limit-burst 2 -j RETURN
-A port-scanning -j DROP
-A syn_flood -m limit --limit 1/sec --limit-burst 3 -j RETURN
-A syn_flood -j DROP
-A INPUT -p tcp -m tcp --dport 22 -j ACCEPT
COMMIT
*mangle
:PREROUTING ACCEPT
:INPUT ACCEPT
:FORWARD ACCEPT
:OUTPUT ACCEPT
:POSTROUTING ACCEPT
-A PREROUTING -m conntrack --ctstate INVALID -j DROP
-A PREROUTING -p tcp -m tcp ! --tcp-flags FIN,SYN,RST,ACK SYN -m conntrack --ctstate NEW -j DROP
-A PREROUTING -p tcp -m tcp --tcp-flags FIN,SYN,RST,PSH,ACK,URG NONE -j DROP
-A PREROUTING -p tcp -m tcp --tcp-flags FIN,SYN FIN,SYN -j DROP
-A PREROUTING -p tcp -m tcp --tcp-flags SYN,RST SYN,RST -j DROP
-A PREROUTING -p tcp -m tcp --tcp-flags FIN,RST FIN,RST -j DROP
-A PREROUTING -p tcp -m tcp --tcp-flags FIN,ACK FIN -j DROP
-A PREROUTING -p tcp -m tcp --tcp-flags ACK,URG URG -j DROP
-A PREROUTING -p tcp -m tcp --tcp-flags FIN,ACK FIN -j DROP
-A PREROUTING -p tcp -m tcp --tcp-flags PSH,ACK PSH -j DROP
-A PREROUTING -p tcp -m tcp --tcp-flags FIN,SYN,RST,PSH,ACK,URG FIN,SYN,RST,PSH,ACK,URG -j DROP
-A PREROUTING -p tcp -m tcp --tcp-flags FIN,SYN,RST,PSH,ACK,URG NONE -j DROP
-A PREROUTING -p tcp -m tcp --tcp-flags FIN,SYN,RST,PSH,ACK,URG FIN,PSH,URG -j DROP
-A PREROUTING -p tcp -m tcp --tcp-flags FIN,SYN,RST,PSH,ACK,URG FIN,SYN,PSH,URG -j DROP
-A PREROUTING -p tcp -m tcp --tcp-flags FIN,SYN,RST,PSH,ACK,URG FIN,SYN,RST,ACK,URG -j DROP
COMMIT
# IPTABLES
[Unit]
Description=Packet Filtering Framework
After=network-online.target
Requires=network.target

[Service]
Type=oneshot
RemainAfterExit=yes
ExecStart=/sbin/iptables-restore /etc/ipv4.rules
ExecReload=/sbin/iptables-restore /etc/ipv4.rules
ExecStop=/sbin/iptables -P INPUT ACCEPT
ExecStop=/sbin/iptables -P FORWARD ACCEPT
ExecStop=/sbin/iptables -F

[Install]
WantedBy=multi-user.target
$ sudo systemctl daemon-reload
$ sudo systemctl enable --now iptables.serviceEnable IP Forwarding
- In order to use the FORWARD chains or any nat'ing you'll have to enable IP forwarding in the kernel
- To check if forwarding is already enabled
- $ cat /proc/sys/net/ipv4/ip_forward
- if you see a 0 fowarding is NOT enabled
- if you see a 1 forwarding is enabled
- To enable forwarding use
- # echo 1 > /proc/sys/net/ipv4/ip_forward
# IPTABLES
The Uncomplicated FireWall
- Default in Ubuntu based distros
- Uses iptables under the hood
- Sometimes deceptively "simple"
# UFW
$ sudo ufw status
ufw: active

$ sudo ufw allow ssh/tcp
$ sudo ufw deny 8888/udp
$ sudo ufw limit 80/tcp
$ sudo ufw deny from 192.168.1.100/24 on eth0 proto any- Default in RHEL based distros
- Uses nftables under the hood by default (can be switched to iptables)
- MUCH easier (but larger!) CLI
- Still a complex system due to trying to paper over a complex system
- Focuses on "zones"
- Can be controlled via XML files on the system...(blech)
- Ephemeral!
- Don't forget --reload or --permanent
- Supports raw iptables syntax too
# FIREWALLD
$ sudo firewall-cmd --state
$ sudo firewall-cmd --get-*
$ sudo firewall-cmd --zone=internal --add-port=25/tcp
# IPTABLES
- How does this compare to nftables?
- Where does firewalld and firewall-cmd fit in?
- What about ufw?
Outstanding Questions
{Day 04}
Scanning, Recap and Capstone
{Scanning}
Tell me what's wrong
# LYNIS
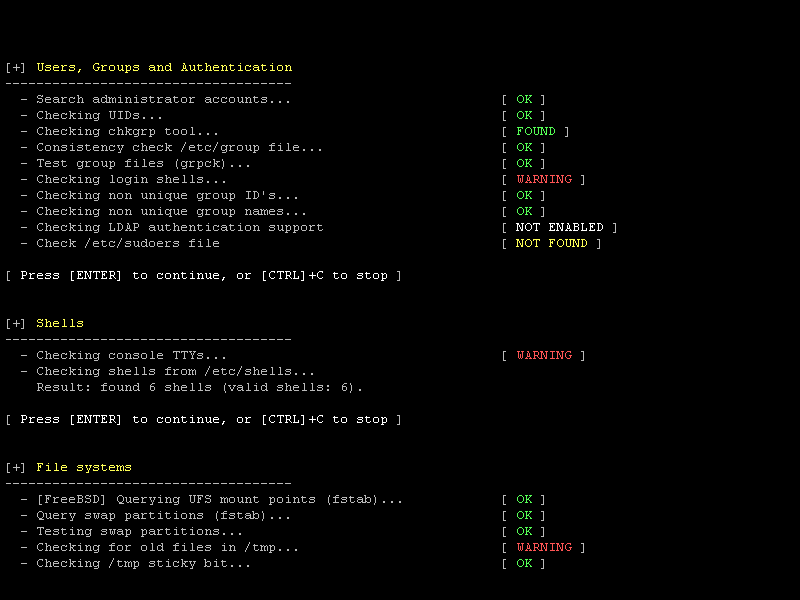
Automated heath and security scanning for Linux
# LinPEAS
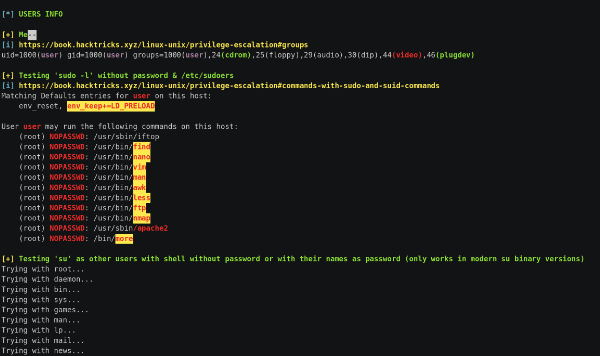
Searches for Privilege Escalation Paths
# OpenSCAP
- Very comprehensive scan against "policies"
- Generates a nice interactive HTML report
- Can generate "remediation" fixes in either shell scripts or Ansible playbooks based on findings
- Used to meet "enterprise" standards
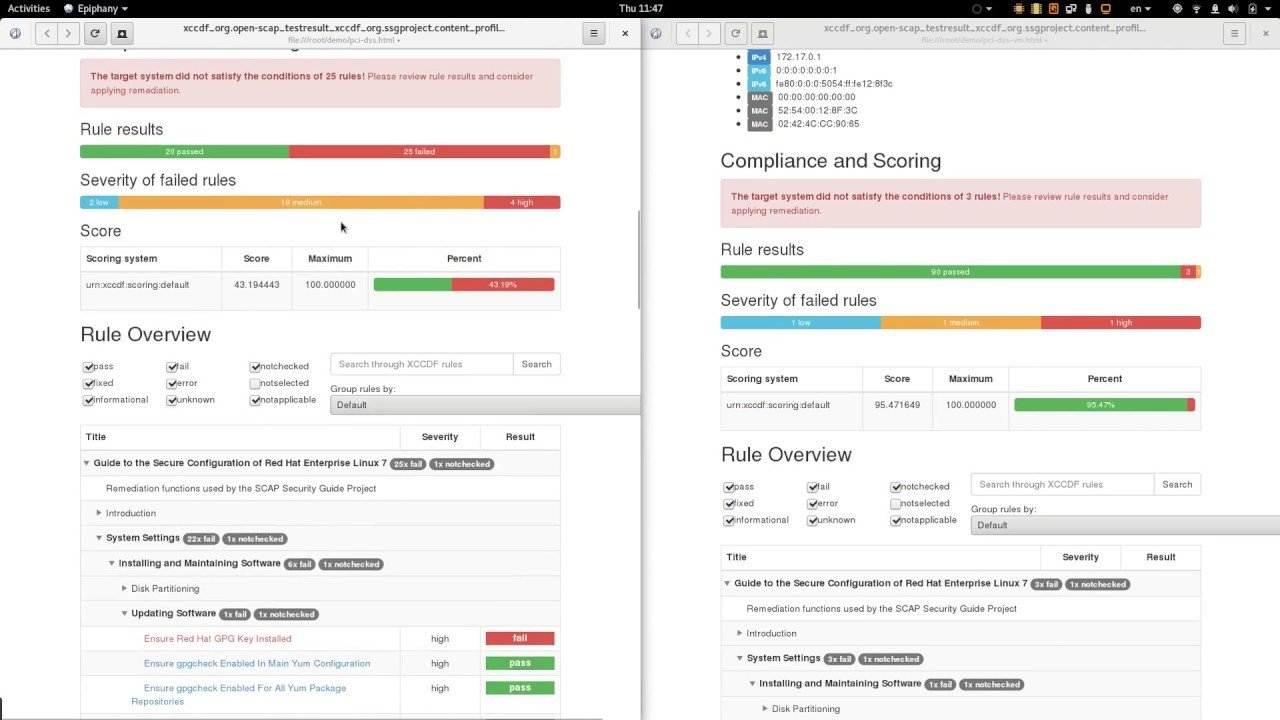
- Some distros lack the needed "policies" (Ubuntu)
- Some distros require workarounds (CentOS)
Running an OpenSCAP Scan
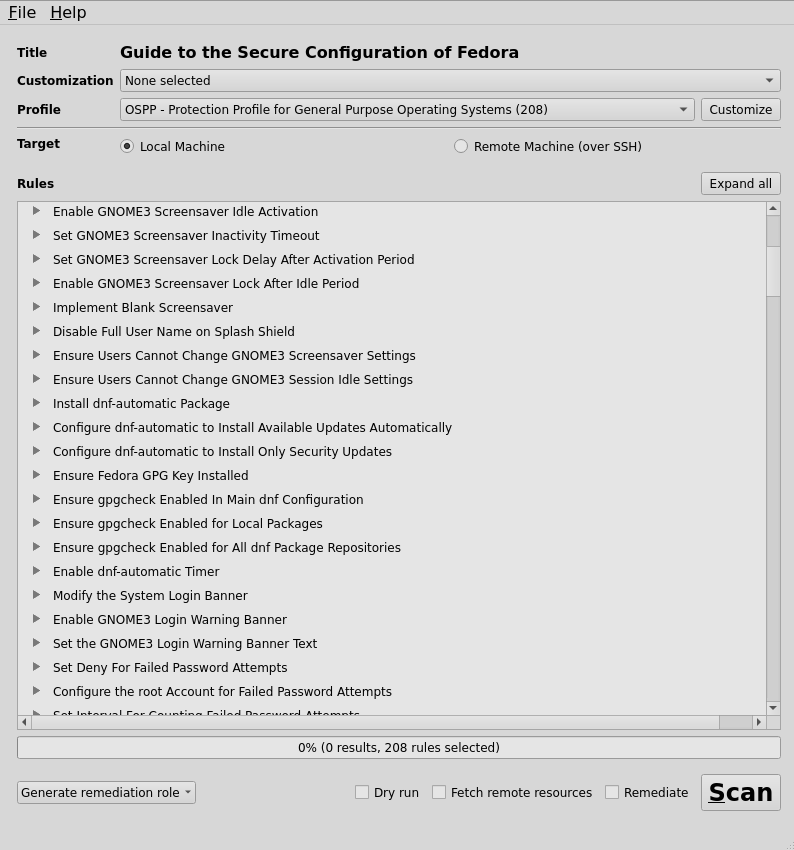
# OpenSCAP
$ sudo dnf install -y openscap-scanner scap-security-guide

$ sudo oscap xccdf eval \
	--profile xccdf_org.ssgproject.content_profile_stig \
	--report $(hostname)-scap-report.$(date +%Y%m%d).html \
	--results $(hostname)-scap-xccdf.$(date +%Y%m%d).xml \
	--cpe /usr/share/xml/scap/ssg/content/ssg-rhel8-cpe-dictionary.xml \
	--fetch-remote-resources \
	/usr/share/xml/scap/ssg/content/ssg-rhel8-ds.xml

# first scan gives `notapplicable` for everything
# The workaround...

$ sudo cp /usr/share/openscap/cpe/openscap-cpe-dict.xml{,.dist}
$ sudo cp /usr/share/openscap/cpe/openscap-cpe-oval.xml{,.dist}
$ sudo curl -L \
  https://raw.githubusercontent.com/OpenSCAP/openscap/maint-1.3/cpe/openscap-cpe-dict.xml \
  -o /usr/share/openscap/cpe/openscap-cpe-dict.xml
$ sudo curl -L \
  https://raw.githubusercontent.com/OpenSCAP/openscap/maint-1.3/cpe/openscap-cpe-oval.xml \
  -o /usr/share/openscap/cpe/openscap-cpe-oval.xml
$ sudo sed -i \
-e 's|idref="cpe:/o:redhat:enterprise_linux|idref="cpe:/o:centos:centos|g' \
-e 's|ref_id="cpe:/o:redhat:enterprise_linux|ref_id="cpe:/o:centos:centos|g' \
/usr/share/xml/scap/ssg/content/ssg-rhel*.xml
OpenSCAP Workbench
# OpenSCAP
{Q&A}
Questions?
{Capstone}
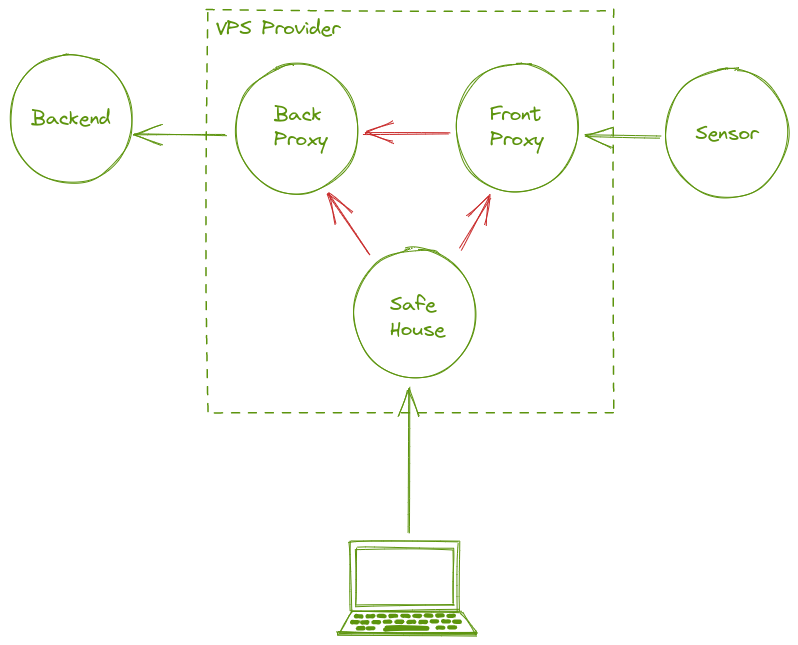
Now do it.
| Student | Control | Back Proxy | Front Proxy |
|---|---|---|---|
| Student01 | 137.184.98.24 10.136.0.3 |
143.198.167.106 10.136.0.2 |
104.248.115.67 10.136.0.22 |
| Student02 | 159.223.122.166 10.136.0.9 |
137.184.158.238 10.136.0.19 |
198.211.99.131 10.136.0.31 |
| Student03 | 159.223.114.187 10.136.0.7 |
159.223.96.252 10.136.0.21 |
104.248.115.77 10.136.0.23 |
| Student04 | 137.184.219.176 10.136.0.5 |
147.182.186.155 10.136.0.13 |
104.248.115.87 10.136.0.25 |
| Student05 | 137.184.195.184 10.136.0.4 |
137.184.99.29 10.136.0.17 |
104.248.115.102 10.136.0.28 |
| Student06 | 159.223.118.134 10.136.0.12 |
147.182.218.170 10.136.0.14 |
104.248.115.84 10.136.0.24 |
| Student07 | 159.223.122.250 10.136.0.10 |
137.184.63.109 10.136.0.15 |
104.248.115.99 10.136.0.27 |
| Student08 | 159.223.122.135 10.136.0.8 |
137.184.213.156 10.136.0.20 |
104.248.115.90 10.136.0.26 |
| Student09 | 159.223.114.42 10.136.0.6 |
137.184.135.121 10.136.0.18 |
104.248.115.120 10.136.0.29 |
| Student10 | 159.223.118.112 10.136.0.11 |
137.184.105.180 10.136.0.16 |
104.248.115.132 10.136.0.30 |
# IP SPACE
# DIAGRAM
Digital Safe
By Kevin Knapp