Chatbot實作工作坊
真理大學110學年度第2學期 微課程
Outline
- Chatbot簡介
- 認識Dialogflow
- Chatbot建置指引
Chatbot聊天機器人分類
General Purpose


task-oriented
中文版 Eliza (心理醫師)
(Artificial Linguistic Internet Computer Entity)
負責特定工作
Chatbot聊天機器人技術
Rule-based
樣式比對(pattern matching)
Corpus-based
採用大量詞庫進行訓練
詞庫來源: crowdsourcing, wikipedia
Chatbot聊天機器人架構

語音辨識
自然語言理解
狀態追蹤
自然語言產生
文字轉語音
對話策略
Dialogflow
Dialogflow
自然語言理解 (Natural Language Understanding) 平台

使用者的語句
代理人程式
預測意圖
擷取字句當中的資訊
預測 + 資訊擷取
Dialogflow
使用者的語句
代理人程式
可以預測的意圖
「意圖」包含:

訓練用片語
引發的動作
附帶的參數
回覆的語句
預測的機制?如何運用擷取的資訊?
Dialogflow
自然語言理解 (Natural Language Understanding) 平台
自然語言處理 NLP
命名實體辨識
Name Entity Recognition
詞類標記
Port-Of-Speech tagging
文字分類
Text Categorization
機器翻譯
Machine Translation
自然語言理解 NLU
自然語言推理
Natural language Inference
語意解析
Semantic Parsing
文字摘要
Text Summarization
情感分析
Sentiment Analysis
問答系統
Question-Answering System
對話代理
Dialogue Agent
Dialogflow
Dialogflow Essentials (ES)
- 試用版、基本版
- 試用版免費:小於 每分鐘180次text requests
超過則 ➪ 每個request $0.002美元
(請參考配額與限制)
Dialogflow Customer Experience (CX)
- 進階版
- 視覺化介面(如對話流程設定)

Prebuilt Agents
步驟1: 新建代理人 Create Agent (optional) (1/2)

如果左側選單無Prebuilt Agents,則先Create Agent

步驟1: 新建代理人 Create Agent (optional) (2/2)
輸入代理人名稱
設定預設語言別
綁定Google專案
步驟2: 套用Prebuilt代理人 (Prebuilt Agents) (1/4)

步驟2: 套用Prebuilt代理人 (Prebuilt Agents) (2/4)

任選一個agent
步驟2: 套用Prebuilt代理人 (Prebuilt Agents) (3/4)

Agent名稱
建立新的Google專案
步驟2: 套用Prebuilt代理人 (Prebuilt Agents) (4/4)

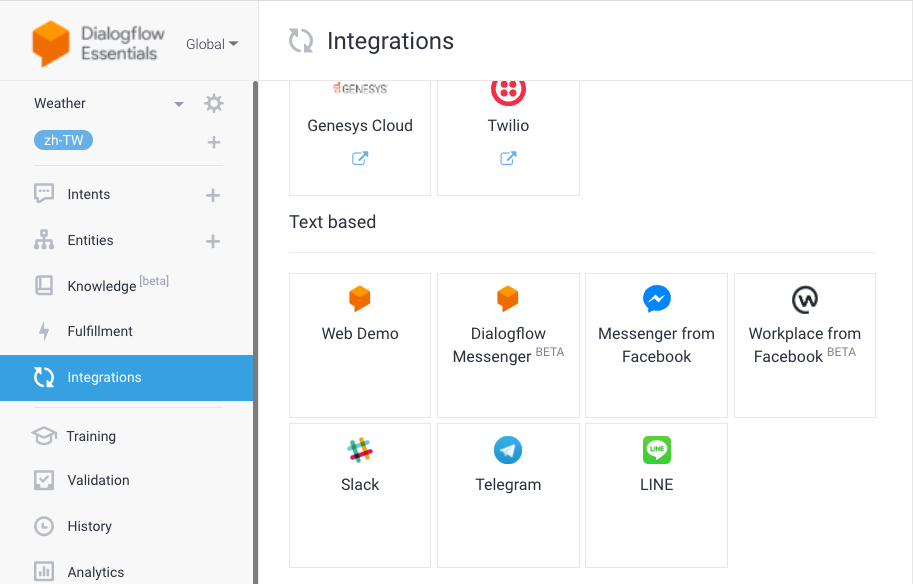
步驟3: 與其他平台整合以Line為例
1. 前往LINE Developers Console建立Channel
(使用Messaging API)
2. 從Dialogflow ES控制台取得Line webhook URL
3. 完成Line webhook設定(Line 平台端)
4. 完成Dialogflow integrations端的設定
步驟3-1: 建立Line Channel使用Line Messaging API
3-1 前往LINE Developers Console建立Channel

你的系統(如Dialogflow)
Channel是LINE平台與你的系統之間的「溝通路徑」
(HTTP協定、採用「訂閱」機制)

步驟3-1: 建立Line Channel使用Line Messaging API
3-1-1. 登入LINE Developers Console

步驟3-1: 建立Line Channel使用Line Messaging API
3-1-2. 以開發者身份註冊(僅需設定一次)

輸入姓名、Email
步驟3-1: 建立Line Channel使用Line Messaging API
3-1-3. 建立新的Provider
輸入Provider名稱

步驟3-1: 建立Line Channel使用Line Messaging API
3-1-4. 建立Messaging API channel (1/3)

步驟3-1: 建立Line Channel使用Line Messaging API
3-1-4. 建立Messaging API channel (2/3)

步驟3-1: 建立Line Channel使用Line Messaging API
3-1-4. 建立Messaging API channel (3/3)

步驟3-1: 建立Line Channel使用Line Messaging API
3-1-5. 確認Channel已成功建立

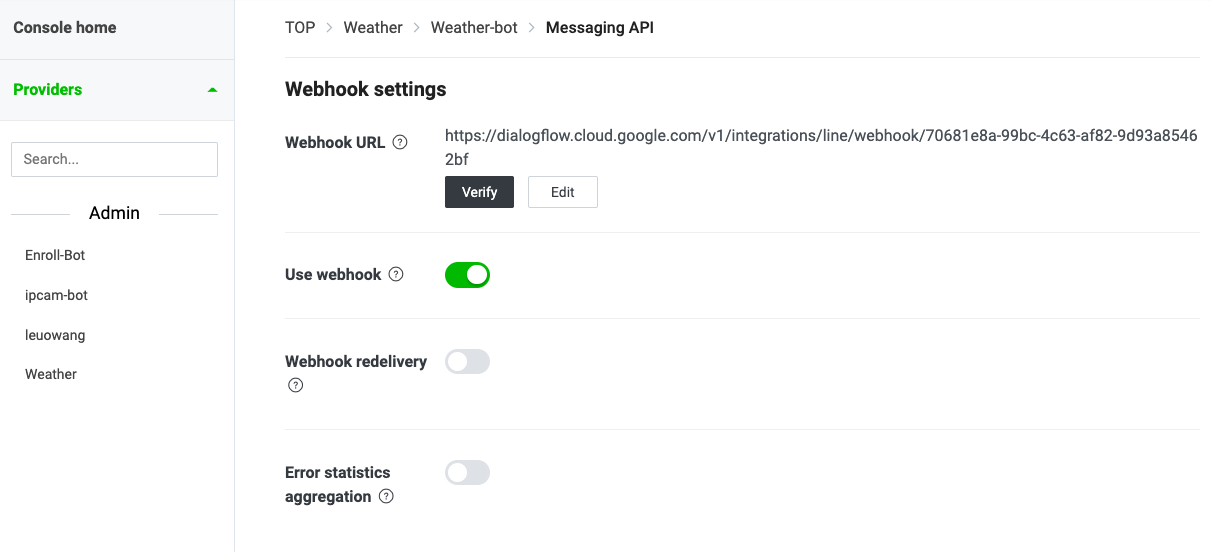
步驟3-2: 取得LINE webhook URL從Dialogflow控制台
Prebuilt agent不要更改Webhook版本設定
❶
❷ prebuilt agent使用v1, 勿改


步驟3-2: 取得LINE webhook URL從Dialogflow控制台
步驟3-2: 取得LINE webhook URL從Dialogflow控制台

複製Webhook URL, 準備到LINE Developers Console進行設定
步驟3-3: 在LINE Developers Console設定Webhook URL
Webhook URL: 你的系統網址
你的系統(如Dialogflow)
所以,Webhook是什麼?
步驟3-3: 在LINE Developers Console設定Webhook URL

❶ 選擇3-1建立的Provider
❶ 選擇3-1建立的Provider
❷ 點選此分頁
3-3-1 前往LINE Developers Console 啟用Webhook
步驟3-3: 在LINE Developers Console設定Webhook URL
3-3-1 前往LINE Developers Console 啟用Webhook
❶ 貼上Webhook URL
❷ 打開啟用開關
步驟3-3: 在LINE Developers Console設定Webhook URL
3-3-2 關閉「自動回覆訊息」(重要!)
❶ 點選Edit, 關閉自動回覆訊息

步驟3-4: 將Channel ID, Channel secret, Channel access token貼至Dialogflow
回Dialogflow agent
步驟3-4: 將Channel ID, Channel secret, Channel access token貼至Dialogflow
❶ 準備從Line Provider處複製Channel ID, Channel secret, Channel access token貼至此處
❷ 啟動agent,作為Line平台的bot server
步驟3-4: 將Channel ID, Channel secret, Channel access token貼至Dialogflow

❶ Channel ID在Basic information段落的最前面
步驟3-4: 將Channel ID, Channel secret, Channel access token貼至Dialogflow
❷ Channel secret在Basic information段落的最後面

步驟3-4: 將Channel ID, Channel secret, Channel access token貼至Dialogflow
❸ Channel access token在Basic information段落的最後面

步驟3-5: 掃描QR-Code, 加入好友
打開手機,掃描QR-Code,加入好友


步驟3-6: 建立回應訊息
打開手機,掃描QR-Code,加入好友
步驟3-7: 測試聊天機器人
打開手機,掃描QR-Code,加入好友
Create Agents
你的chatbot能提供什麼服務?
荷蘭皇家航空提供「訂位」與「打包清單」服務


訂位
打包清單提醒

達美樂提供「點餐」與「訂單追蹤」服務
點餐
訂單追蹤


線上售票公司提供「查詢」與「訂票」服務
查詢
訂票


你的chatbot想提供什麼服務?
- 庫存:「請問{某個商品}還有貨嗎?」
- 營業時間:「請問門市營業{時間}為何?」
- 推薦:「有沒有可以{解決某種問題}的東西?」
- 推薦:「哪個{牌子}的電視比較好?」
- 關聯推薦
...
電商服務:除了訂購之外,可能還可提供...
- 推薦:「哪裡有好吃/玩的{target}?」
- 推薦:「我想找{某地}{天數}的自由行行程
- 預約:「我要預約這個行程」
- 路線規劃:「{target}怎麼去?」
...
觀光旅遊業:可能可提供...
你的chatbot想提供什麼服務?
{target}: 小吃、景點、餐廳...
單車店/ 理髮店
1.「我想預約{服務}」
2.「請問你們明天有營業嗎?」
{服務}: 洗頭、剪頭髮、買車、保養
你的chatbot想提供什麼服務?
Chatbot 以單車店為例

步驟1: 新建代理人 Create Agent (optional) (1/2)
Create Agent
步驟1: 新建代理人 Create Agent (optional) (2/2)
輸入代理人名稱
設定預設語言別
綁定Google專案
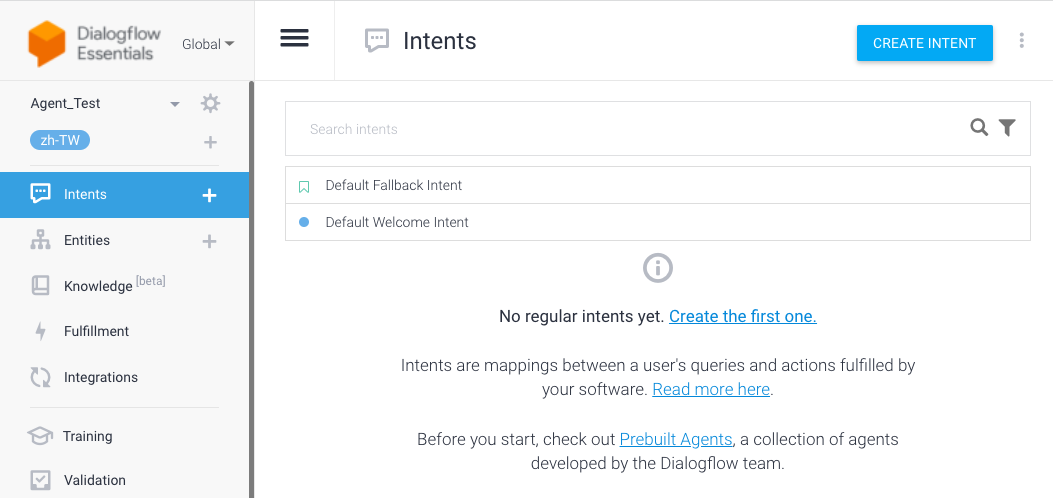
步驟2: 建立意圖 (Create Intent)
測試主控台
建立新的意圖
預設Intents

已產生兩個Intents: Fallback, Welcome
輸入測試語句
何時觸發Welcome? 偵測到「開始對話」的語句
何時觸發Fallback? 偵測到agent不了解的語句
Intent指的是某句子中的意圖(intention)
我要預約
明天天氣預報
你們店怎麼去?
使用者字句
可能的意圖
預約
查詢天氣
查詢地址
Intent指的是某句子中的意圖(intention)
我要預約
明天天氣預報
你們店怎麼去?
使用者字句
可能的意圖
預約
查詢天氣
查詢地址
訓練用片語
執行動作與參數
回應
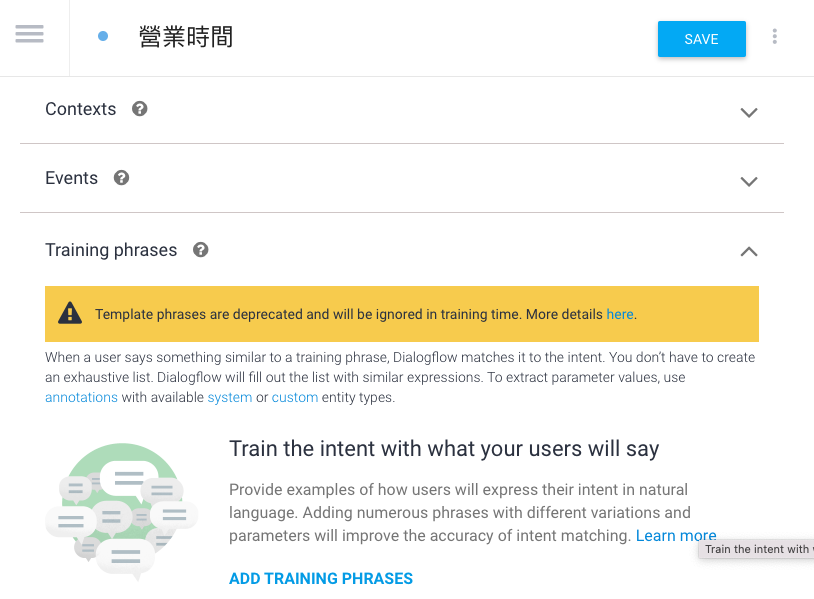
步驟2-1: 制定Welcome意圖 (Create Intent)
2-1-1 客製化Welcome意圖:需符合系統目標、Bot的人設

❸存檔
❶ 刪除預設回應訊息
❷ 新增回應訊息如上
歡迎光臨!你想知道本店營業時間,還是想要預約來店?
步驟2-1: 制定Welcome意圖 (Create Intent)
❸訓練用片語都可用來測試看看
❶ 輸入測試的句子
❷ 查看是否出現回應訊息

2-1-1 客製化Welcome意圖:需符合系統目標、Bot的人設
步驟2-1: 制定Welcome意圖 (Create Intent)
❶ 多加幾種不同的歡迎詞
2-1-2 建立回應訊息的變形

❷ 存檔後測試
你好!我可以告訴你本店營業時間,也可以幫你預約,你需要什麼服務呢?
嗨!有什麼需要幫忙的嗎?我可以告訴你本店營業時間,也能幫你預約來店。
步驟2-2: 建立自訂意圖 (Custom Intent)
❶ 建立新的意圖
2-2-1 兩個工作: 告知營業時間、預約 ➔ 自訂意圖
步驟2-2: 建立自訂意圖 (Custom Intent)
❶ 輸入意圖名稱
2-2-1 兩個工作: 告知營業時間、預約 ➔ 自訂意圖
❷ 存檔
❸ 新增訓練用片語
步驟2-2: 建立自訂意圖 (Custom Intent)
❶ 輸入多個訓練用片語
2-2-2 新增訓練用片語
❷ 存檔

步驟2-2: 建立自訂意圖 (Custom Intent)
❶ 輸入多個回應訊息
2-2-3 建立回應訊息
❷ 存檔

步驟2-3: 制定Fallback意圖 (Fallback Intent)
2-3 不了解使用者字句時,觸發Fallback意圖
❸存檔
❶ 刪除預設回應訊息
❷ 新增回應訊息如上
抱歉,請問你是要詢問營業時間?還是要預約來店呢?

不好意思,請問你是想知道營業時間?還是要預約呢?
步驟2-4: 建立「預約」自訂意圖 (Intent with parameters)
「預約」意圖必須能夠處理更複雜的句子

❶ 辨識出3 PM, today為重要資訊
❷ 回應訊息附上剛提及的日期、時間資訊
Dialogflow要能辨識重要資訊、並將之儲存
參數(parameters), 每個辨識出來的參數都有自己的實體型別(entity type)
步驟2-4: 建立「預約」自訂意圖 (Intent with parameters)
2-4-1 新增「預約」意圖
❶ 輸入我要預約今天下午三點

❷ 系統自動偵測出兩個參數
或
手動標示兩個參數並選擇正確的entity type
❸存檔
步驟2-4: 建立「預約」自訂意圖 (Intent with parameters)
2-4-1 新增「預約」意圖(續)
❶ 回應訊息輸入上列文字
❷存檔

收到!為你預約 $date 時間是 $time 來店賞車,期待你的光臨。
步驟2-4: 建立「預約」自訂意圖 (Intent with parameters)
2-4-2 加入更多的訓練用片語
❶ 加入更多訓練用片語
❷存檔

我想看看最新款的單車
包含一些不含日期時間的句子
我的車壞了
步驟2-4: 建立「預約」自訂意圖 (Intent with parameters)
2-4-3 設定「參數」為必要資訊 (slot filling)
❶ 勾選為「必要」REQUIRED參數
我想看看最新款的單車
❷ 打開Define prompts,輸入後續提示字句
我的車壞了

使用者輸入的句子經常不包含日期、時間,要如何預約
❸存檔
步驟2-4: 建立「預約」自訂意圖 (Intent with parameters)
2-4-4 填入「參數」缺少時的提示訊息 (slot filling)
❶ 加入後續提示字句

以缺少日期為例,輸入後續Bot應該回應的問句

❷存檔
步驟2-4: 建立「預約」自訂意圖 (Intent with parameters)
2-4-4 填入「參數」缺少時的提示訊息 (slot filling)

❶ 加入後續提示字句
缺少「時間」時,後續Bot應該回應的問句
❷存檔
步驟2-5: 呼叫「預約」程式 (fulfillment using webhook)
預約若要記錄下來,需要外部程式(透過webhook)協助完成

Fulfillment運作示意圖
Fulfillment: 用來解決使用者要求的「外部服務」
(用量超過一定數量需付費)
步驟2-5: 呼叫「預約」程式 (fulfillment using webhook)
目標:Dialogflow收到「日期」、「時間」,記錄到Google日曆

❶ 開啟wehook call選項
❷存檔
前往「預約」intent
webhook外部服務:使用內建編輯器inline editor, 支援node.js程式
步驟2-5: 呼叫「預約」程式 (fulfillment using webhook)
❶ 開啟inline editor選項
fulfillments

❷ 在此處寫程式
❸ 部署
步驟2-5: 呼叫「預約」程式 (fulfillment using webhook)
{
  "name": "DialogflowFirebaseWebhook",
  "description": "Firebase Webhook dependencies for a Dialogflow agent.",
  "version": "0.0.1",
  "private": true,
  "license": "Apache Version 2.0",
  "author": "Google Inc.",
  "engines": {
    "node": "6"
  },
  "scripts": {
    "lint": "semistandard --fix \"**/*.js\"",
    "start": "firebase deploy --only functions",
    "deploy": "firebase deploy --only functions"
  },
  "dependencies": {
    "firebase-functions": "^2.0.2",
    "firebase-admin": "^5.13.1",
    "googleapis": "^27.0.0",
    "actions-on-google": "2.2.0",
    "dialogflow-fulfillment": "0.5.0"
  }
}
貼至package.json的內容
刪除原package.json的內容
步驟2-5: 呼叫「預約」程式 (fulfillment using webhook)
/**
 * Copyright 2017 Google Inc. All Rights Reserved.
 *
 * Licensed under the Apache License, Version 2.0 (the "License");
 * you may not use this file except in compliance with the License.
 * You may obtain a copy of the License at
 *
 *      http://www.apache.org/licenses/LICENSE-2.0
 *
 * Unless required by applicable law or agreed to in writing, software
 * distributed under the License is distributed on an "AS IS" BASIS,
 * WITHOUT WARRANTIES OR CONDITIONS OF ANY KIND, either express or implied.
 * See the License for the specific language governing permissions and
 * limitations under the License.
 */

'use strict';

const functions = require('firebase-functions');
const {google} = require('googleapis');
const {WebhookClient} = require('dialogflow-fulfillment');

// 需輸入Google Calander API裡的 calendar ID and service account JSON
const calendarId = '此處換成CALENDAR ID'; // Example: 6ujc6j6rgfk02cp02vg6h38cs0@group.calendar.google.com
const serviceAccount = {}; // 貼上JSON物件,The JSON object looks like: { "type": "service_account", ... }

// 設定 Google Calendar service account credentials
const serviceAccountAuth = new google.auth.JWT({
  email: serviceAccount.client_email,
  key: serviceAccount.private_key,
  scopes: 'https://www.googleapis.com/auth/calendar'
});

const calendar = google.calendar('v3');
process.env.DEBUG = 'dialogflow:*'; // It enables lib debugging statements

const timeZone = 'America/Los_Angeles';  // Change it to your time zone
const timeZoneOffset = '-07:00';         // Change it to your time zone offset

exports.dialogflowFirebaseFulfillment = functions.https.onRequest((request, response) => {
  const agent = new WebhookClient({ request, response });

  function makeAppointment (agent) {
    // Use the Dialogflow's date and time parameters to create Javascript Date instances, 'dateTimeStart' and 'dateTimeEnd',
    // which are used to specify the appointment's time.
    const appointmentDuration = 1;// Define the length of the appointment to be one hour.
    const dateTimeStart = convertParametersDate(agent.parameters.date, agent.parameters.time);
    const dateTimeEnd = addHours(dateTimeStart, appointmentDuration);
    const appointmentTimeString = getLocaleTimeString(dateTimeStart);
    const appointmentDateString = getLocaleDateString(dateTimeStart);
    // Check the availability of the time slot and set up an appointment if the time slot is available on the calendar
    return createCalendarEvent(dateTimeStart, dateTimeEnd).then(() => {
      agent.add(`Got it. I have your appointment scheduled on ${appointmentDateString} at ${appointmentTimeString}. See you soon. Good-bye.`);
    }).catch(() => {
      agent.add(`Sorry, we're booked on ${appointmentDateString} at ${appointmentTimeString}. Is there anything else I can do for you?`);
    });
  }
  let intentMap = new Map();
  intentMap.set('Make Appointment', makeAppointment);  // It maps the intent 'Make Appointment' to the function 'makeAppointment()'
  agent.handleRequest(intentMap);
});

function createCalendarEvent (dateTimeStart, dateTimeEnd) {
  return new Promise((resolve, reject) => {
    calendar.events.list({  // List all events in the specified time period
      auth: serviceAccountAuth,
      calendarId: calendarId,
      timeMin: dateTimeStart.toISOString(),
      timeMax: dateTimeEnd.toISOString()
    }, (err, calendarResponse) => {
      // Check if there exists any event on the calendar given the specified the time period
      if (err || calendarResponse.data.items.length > 0) {
        reject(err || new Error('Requested time conflicts with another appointment'));
      } else {
        // Create an event for the requested time period
        calendar.events.insert({ auth: serviceAccountAuth,
          calendarId: calendarId,
          resource: {summary: 'Bike Appointment',
            start: {dateTime: dateTimeStart},
            end: {dateTime: dateTimeEnd}}
        }, (err, event) => {
          err ? reject(err) : resolve(event);
        }
        );
      }
    });
  });
}

// A helper function that receives Dialogflow's 'date' and 'time' parameters and creates a Date instance.
function convertParametersDate(date, time){
  return new Date(Date.parse(date.split('T')[0] + 'T' + time.split('T')[1].split('-')[0] + timeZoneOffset));
}

// A helper function that adds the integer value of 'hoursToAdd' to the Date instance 'dateObj' and returns a new Data instance.
function addHours(dateObj, hoursToAdd){
  return new Date(new Date(dateObj).setHours(dateObj.getHours() + hoursToAdd));
}

// A helper function that converts the Date instance 'dateObj' into a string that represents this time in English.
function getLocaleTimeString(dateObj){
  return dateObj.toLocaleTimeString('en-US', { hour: 'numeric', hour12: true, timeZone: timeZone });
}

// A helper function that converts the Date instance 'dateObj' into a string that represents this date in English.
function getLocaleDateString(dateObj){
  return dateObj.toLocaleDateString('en-US', { weekday: 'long', month: 'long', day: 'numeric', timeZone: timeZone });
}
貼至index.js的內容

刪除原index.js的內容
需要Google Calendar API的金鑰☟

取得金鑰的方式


❸
❶
❷
找到Google Calendar API的卡片,啟動
取得金鑰的方式
❶
❷


❸
取得金鑰的方式
❶ 填入名稱與ID,值可相同
❷

取得金鑰的方式
❶ 點入服務帳戶
❷

❸
按下建立,會提示下載檔案,存檔
練習時間
設計Chatbot就是在設計軟體系統
軟體工程的方法論都可派上用場
軟體工具

心智圖

試算表
需求發想:User Story
客戶需求
- 要有淡水的交通資訊
捷運、客運、自行車、開車、搭船 - 淡水景點介紹
根據GPS位置顯示景點、呼叫google導航... - 美食介紹與評論
呼叫google導航、評論店家...
- 淡水天氣資訊
串接氣象資料 - 好康折價券
根據GPS位置顯示景點...

功能發想:功能性需求
資料盤點
需求發想
Persona
需求發想
資料搜尋四種樣態
循序漸進...
Chatbot實作工作坊
By Leuo-Hong Wang


