

Max Fuchs
I am interested in open-source software and peer-production for non-digital goods.
WebApp for Everyone
Hoodie is a free and Open Source Software for building applications for the web and iOS. It is a complete backend for your apps, ready for you to get creative. It works immediately out-of-the-box: develop your frontend code, plug it into Hoodie’s frontend-friendly API and your app is ready.
When you develop it, your app runs locally first, you can then deploy and host it wherever you want to. And if you want to extend Hoodie’s core features, you can check our list of currently available plugins or build plugins yourself.
Hoodie is a noBackend technology — it's there for making the lives of frontend developers easier by abstracting away the backend and keeping you from worrying about backends. It gives you Dreamcode: a simple, easy-to-learn-and-implement frontend API built into it. Hoodie is also Offline First, which means that your app users’ data is stored locally by default so your Hoodie-based apps are accessible and usable anytime, independent from your users’ internet connection.
Hoodie comes with a command line tool called Hoodie-CLI, which helps you with a lot of Hoodie-related tasks, like setting up and running an app. If you're unsure about anything concerning CLI, you can ask it for help:
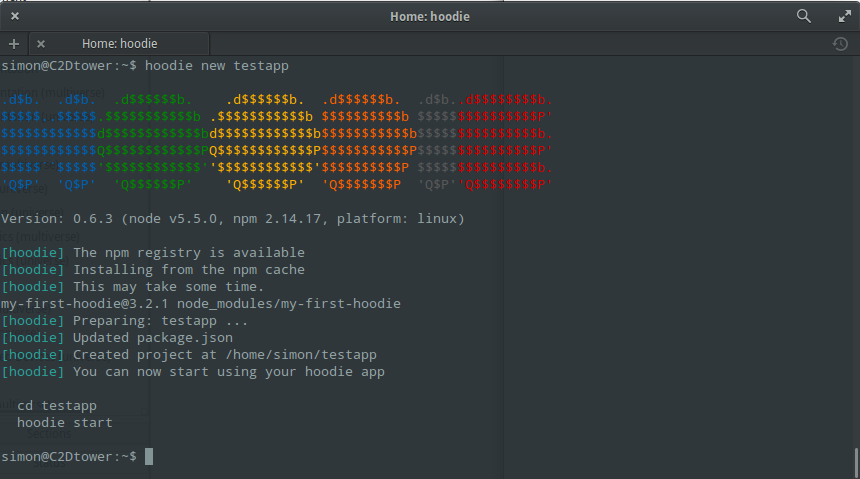
hoodie -hThe very first step is using Hoodie-CLI to instantiate a new application. In your terminal, go to the directory you want your application to be in and enter:
hoodie new testappResult:
This is Hoodie downloading all of the libraries it needs to scaffold out your app, setting up the server code, and installing the default plugins. There will now be a folder called testapp, in which you'll find a simple demo application. Let's open the directory and start up the Hoodie server!
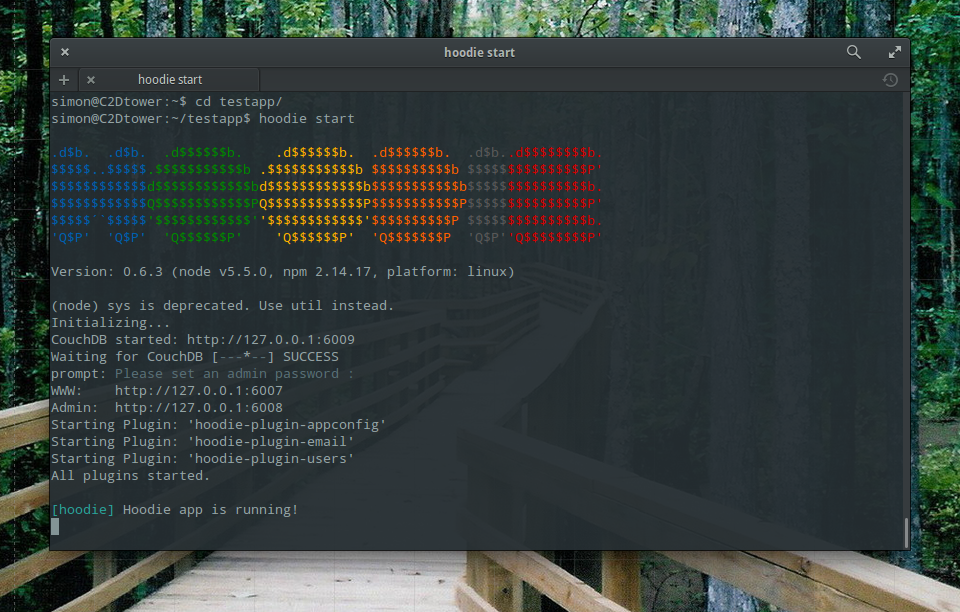
On the very first run, you'll be prompted to enter a password for the Admin Dashboard, just pick something simple for now, like "alpacas". Because alpacas are neat. Then, a bunch of URLs and additional info appear.
cd testapp
hoodie startGreat, your app started up and is now telling you a bunch of things about itself, for example at which URL you can access the app and which plugins it is running. The first thing you'll notice though is that Hoodie opens a browser with the demo app already running in it.
Note: if you don't want Hoodie to open a new browser tab, start the Hoodie server with
The -n stands for "no new browser tab please, I've already got one."
hoodie start -nYou get 3 Urls:
You get 3 Urls:
CouchDB started: http://127.0.0.1:6098
It's what the Hoodie library talks to when it fetches and stores data. You can append /_utils to this URL to reach the CouchDB database admin tool (similar to phpMyAdmin for MySQL), which is called Futon (and will soon be called Fauxton). You can sign in to Futon (or Fauxton) with the admin password you set earlier. For now, you don't really have to bother with it, but in the future, it'll be nice for inspecting the database.
You get 3 Urls:
WWW: http://127.0.0.1:6096
This is the URL that Hoodie just opened in a browser for you, it's where your app is running.
Admin: http://127.0.0.1:6097
We'll cover the dashboard in a later guide, but it's where you can see how many users you have, reset their passwords, check out plugin admin panels etc. Again, the admin password you previously set will get you in.
List the files and folders in your current directory by typing
and you should see something like this:
Let's get the easiest part out of the way first – the readme file. As the name suggests, you should read it, as it contains lots of useful information.
lsdata node_modules package.json README.md www
Every Hoodie app is a Node.js application and every Node.js application needs a package.json file. It defines the name of the app (testapp in this case) and its dependencies. It is used to install and declare the used versions of hoodie-server and all core plugins.
This is where npm, the package management system for Node, keeps all its files. Hoodie uses it to manage its plugins and dependencies, and you might use it too to manage front- and backend modules in your app. The content of this folder is determined by the previously mentioned package.json file in the app folder. To learn more about npm, check out this introduction.
The contents of this folder are essential for the Hoodie app to work, so there are two things to remember:
All your changes to the files in this folder will be overwritten whenever you have to install or update dependencies, and it makes no sense to put this huge folder into source control, because everyone can restore it with a simple command:
npm installYup, that's your database. It's not hidden away in usr/local/ somewhere, it's right there in your app folder. This setup makes it really easy to move the app and its data to another system without much hassle. Also, if you want to clear all of your test data during development, you can just delete or rename this folder, Hoodie will recreate it and you can start with a clean slate. In fact, this folder wasn't generated by hoodie new, but by running the app once. You'll want to leave this out of source control, too.
This is where your app lives. It includes the usual index.html and all of the app's assets. If you're into task runners such as Grunt or Gulp, this is where you'd put your compiled code (it's practically your dist folder). Hoodie doesn't care about what else you add to the app folder, so feel free to throw in your source folder, tests, more documentation, whatever you like.
Now of course, you won't want to start coding with the Hoodie demo application every single time, which is why hoodie new supports templates. Templates can either come in the form of npm packages
or github repositories:
hoodie new appname -t npm packagehoodie new appname -t githubusername/reponameThe demo app will already have this line in its index.html, but essentially, all you need to do to make your app Hoodie-ready is include a single js library:
You'll notice that this file isn't in node_modules or some vendor or lib folder, instead, it is served directly by the Hoodie server itself. This is cool because it automatically contains all of the installed plugins' frontend code, too. Less hassle for you!
And that's actually it! You're ready to go.
<script src="/_api/_files/hoodie.js"></script>Hoodie is designed to let you build frontends the way you like to build frontends. The only way you talk to Hoodie in the frontend of your app is through the Hoodie API, which lives in a global window object and is, unsurprisingly, called window.hoodie, or simply hoodie.
Go ahead, open the app in your browser, open the console in your browser's dev tools and type hoodie.. It'll show you all of the globally available methods, like hoodie.account and hoodie.store, which are the most important ones. We'll cover these two in the next part of this guide.
For now, congratulations! You've created a demo Hoodie app, learned about the basic structure of a Hoodie project, you know all about the endpoints and app URLs and how to include and use the Hoodie library in your project.
You should make Tutorial 1.
If you wanna skipp it, run this code to start new app.
That should open the default Hoodie app in your browser.
hoodie new hoodietut
cd hoodietut
hoodie startIt's a simple todo-app designed to show you some of the basics of Hoodie. It's built with jQuery and Bootstrap for speed and simplicity. You can sign up, in and out, you can add todo items, and you can check them off.
In the upper right, there is a drop down for Sign Up. Click on it and create an account with your desired username and password. After that you should be logged in automatically, and now your todos will be saved to the database. If you sign in from a different browser, your todos will appear there, too.
If you use the app without signing up and/or in, you're an anonymous user. Your todos will get saved locally, in your browser, and they'll still be there when you reload the page, but they won't get saved to the server, and you won't be able to see them from anywhere else. Also, they'll vanish forever when you clear your browser store.
You can use a Hoodie app as an anonymous user first, and once you decide to sign up, your data will automatically be moved to your proper account and synced.
Go ahead, add a couple of todos!
Once you're signed in to a Hoodie app, Hoodie will constantly try to keep your user data in sync between the server and any client that user may be signed in to. To see this happening, open the app's URL in a different Browser, or in incognito mode (so you won't be signed in automatically). Sign in to the second instance of the app with the same credentials, and when you add a todo in either tab, it should appear in the other within a few seconds. Keep that second tab open for now.
We strongly believe that apps shouldn't break just because they're offline. So naturally, this todo app also works offline. Give it a try:
In the terminal, turn off the Hoodie server with ctrl+c (Mac) or alt+c (Windows).
In one of the tabs, add a few todos. You'll notice two things:
And now, let's turn the server back on again (the -n option prevents a new browser tab being opened):
Now observe the two tabs: they should sync up with the server, and both should show all the todos you entered while offline. Preeetty nice, we think.
Hoodie apps are super robust even in bad networks, and you get two big user experience bonuses:
No frustrating error messages when going offline during use
Your users can always access their own data, even when offline
The code to make this work must be super complex, right? You'll be surprised…
hoodie start -nLet's take a look at how the todo app uses Hoodie. Open
in your editor of choice.
At the very top, we initialise Hoodie and assign it to a var, so we can call its methods:
www/assets/js/main.jsvar hoodie = new Hoodie();
Now scroll to the end of the file, where we handle adding a new todo to the Hoodie store. This will save the todo in the currently logged in user's own little private database. It'll get synced to the server, and it'll get synced back whenever the user logs in to the app again.
$('#todoinput').on('keypress', function(event) {
  if (event.keyCode === 13 && event.target.value.length) {
    hoodie.store.add('todo', {title: event.target.value});
    event.target.value = '';
  }
});The inside of the if statement is where all the action is: we're calling Hoodie's store.add() method and passing two values:
And that, fundamentally, is it.
One line. That stores your todo in the local browser store, and Hoodie will take care of syncing it to wherever it needs to be. Pretty simple, right? add() also returns some promises so you can check if it worked, but let's skip that for now.
hoodie.store.add(type, object);Type is a fundamental convention to deal with the lack of schemas in CouchDB, which is the database system that Hoodie uses.
In CouchDB, the same database can contain a wide variety of different records, none of which have to be defined in advance. For example, you might have records on people and records on location. The type attribute is used to distinguish these… well, types of records from each other. Here are some (abridged and fictional) objects that Hoodie might write to CouchDB:
{
    type: 'person',
    name: 'Hans Hansson',
    spirit_animal: 'Otter'
}

{
    type: 'location',
    name: 'Berlin',
    is_often_quite_windy: true
}You'll notice that these are, again, just JavaScript objects. Throughout your entire Hoodie app, all data is always just JavaScript objects. But back to type:
Type is essential to give your schemaless data some structure, so when you want to fetch all locations, for example, you can easily do so.
So far, we've only seen how the app stores the new todo after it's been entered, but not how it's actually being displayed. Take a look at the code right above the listener we just looked at, near the end of main.js:
// when a todo changes, update the UI.
hoodie.store.on('todo:add', todos.add);
hoodie.store.on('todo:update', todos.update);
hoodie.store.on('todo:remove', todos.remove);What's happening here? We're listening to some events emitted by the Hoodie store. Look at the first one: todo:add. That gets fired whenever a new object with the type todo is added. Simple, hm? The others should be self-explanatory now. When this listener fires, it calls a method that updates the model (an array of objects called collection) and then the view. There is no direct connection between the todo input and the todo list.
So we've neatly decoupled adding a todo from displaying a new todo, and this gets us all the fancy syncing action we saw previously, for free. There's no extra code to make syncing work. When a new todo arrives in the in-browser storage, the todo:add event gets fired, and the view updates. With this code, you don't have to care about where the todo came from (the current client, or the one in that other tab, or another on a phone), the app will handle it regardless.
We strooooongly suggest you use this decoupled structure when building your own apps. It really unlocks the power of Hoodie!
In the next several steps our demo todo app will be modified to give todos a priority of urgent, normal or later.
The todo app lets you type in new todos and saves them when you hit the return key. This works fine for a single input, but as we will be adding another form input for the todo priority, a submit button will be more appropriate.
First add a button to the www/index.html file. Look for the text input with the id todoinput. In the line after it add a button with the id add-todo:
<button id="add-todo">Add New Todo</button>Second, change the main.js file so a new todo is added when the button is clicked instead of when return is pressed. Replace the last code block in the file with this:
The first line binds to a click on our newly created button. When the button is clicked the second line adds a new todo using the hoodie.store.add method. The third line within our new function clears the input.
Save the two files and refresh your browser. Enter a new task. You should see it rendered after clicking the Add New Todo button.
Now we're ready to change the interface and the data model.
// handle creating a new task
$('#add-todo').on('click', function() {
  hoodie.store.add('todo', {title: $("#todoinput").val()});
  $("#todoinput").val('');
});Adding a priority requires a new input element. Insert this right above the new button we just added in www/index.html:
Now modify the click method in main.js to store the priority:
<select id="priorityinput" class="form-control">
  <option>Urgent</option>
  <option selected="selected">Normal</option>
  <option>Later</option>
</select>
<button id="add-todo">Add</button>
// handle creating a new task
$('#add-todo').on('click', function() {
hoodie.store.add('todo', {
title: $("#todoinput").val(),
priority: $("#priorityinput").val()
});
$("#todoinput").val('');
});In the same file, modify the paint() function to display the priority:
Change
to:
Save everything and try it!
+ collection[i].title ++ collection[i].priority + ': ' + collection[i].title +At this point you should start seeing that each new task is prefaced by a priority. Because there's no database schema, it's super simple to add new values to objects in Hoodie without having to think about the database or the data structure.
However, if you haven't ticked off all the tasks you created before we added the priority selector, those will now render "undefined:" in place of a priority. Not cool. This is the flipside of simply changing the data structure on the fly. In a traditional database, you'd do a data model migration in the database and add a priority of normal to all todos that don't already have one. But since we're running a system that distributes copies of each users' database to any number of devices, we can't do that. We don't even know how many databases there are, or where.
One solution to this problem is to build a robust view that simply deals with missing fields:
If you're still in the prototyping/testing phase and you want to start with a fresh database, you could also just stop the server, delete the data folder in the project root, restart the server, and sign up in the app again.
var todo = collection[i];
todo.priority = todo.priority || 'Normal';

var $li = $('<li>' +
                 '<input type="checkbox">' +
                    '<label></label>' +
                 '</input>' +
                 '<input type="text"></input>' +
            '</li>'
            );


var label = todo.priority + ': ' + todo.title;

$li.data('id', todo.id);
$li.find('label').text(label);
$li.find('input[type="text"]').val(label);

$el.append($li);We've only briefly touched hoodie.store.add and hoodie.store.on, but that should already give you a pretty good idea of how Hoodie works, and how your app could be structured. You've also seen that Hoodie's got your back with regard to cross-device syncing and offline support. You now know how users work, and if you spend a bit more time with main.js, you'll come across hoodie.store.findAll and learn how to load data from Hoodie, too.
We'd love to hear your feedback on this guide, and whether it helped you. Feel free to get in touch with us on IRC or Slack.
Thanks for your interest and time!
And here's your congratulatory chicken:
Second, change the main.js file so a new todo is added when the button is clicked instead of when return is pressed. Replace the last code block in the file with this:
The first line binds to a click on our newly created button. When the button is clicked the second line adds a new todo using the hoodie.store.add method. The third line within our new function clears the input.
Save the two files and refresh your browser. Enter a new task. You should see it rendered after clicking the Add New Todo button.
Now we're ready to change the interface and the data model.
// handle creating a new task
$('#add-todo').on('click', function() {
  hoodie.store.add('todo', {title: $("#todoinput").val()});
  $("#todoinput").val('');
});By Max Fuchs
Hoodie is a back-end for front-end developers who focus on building decentralized, off-line-first apps.


