
React Native
Day 3
-
Fetching Data
-
Fetch API & Axios usage
-
Handling loading, errors
-
Firebase overview
-
-
Async Storage
-
Storing data locally
-
AsyncStorage basics
-
-
Handling User Input & Forms
-
Controlled components
-
Form validation (Formik, Yup basics)
-
-
Practical Example
-
Build a to-do list or product listing app fetching from API
-
Save favorite items locally
-
-
Error Handling & User Feedback
-
Toasts, alerts, loaders
-
React Native Async Storage
Overview of Async Storage
Persistent storage for React Native apps

Usage Scenarios
Ideal for storing user preferences and session data.
Installation
- Run: npm install @react-native-async-storage/async-storage
Importing Async Storage
Use: import AsyncStorage from '@react-native-async-storage/async-storage';

Saving Data
AsyncStorage.setItem('key', 'value');
Retrieving Data
AsyncStorage.getItem('key').then(value => console.log(value));

Removing Data
AsyncStorage.removeItem('key');
Error Handling
Use try-catch for async/await operations.

Best Practices
- Avoid storing large data
- Use JSON.stringify for objects
Understanding Promises in JavaScript
Key Concepts
Asynchronous Programming
Promises simplify handling asynchronous operations in JavaScript. They are executed in so called "microtask queue".
And their execution is not a part of event loop.

Promise Syntax
Use `new Promise((resolve, reject) => {})` for creating promises.
Promise States
- Pending
- Fulfilled
- Rejected
Promise Methods
Common methods:
–`then()`,
– `catch()`,
– `finally()`.
Example Code
// Function that returns a Promise
function fetchData() {
    return new Promise((resolve, reject) => {
        console.log("Fetching data...");

        setTimeout(() => {
            const success = true; // Change this to false to trigger reject

            if (success) {
                resolve("Data fetched successfully!");
            } else {
                reject("Error: Failed to fetch data.");
            }
        }, 2000); // Simulate a 2-second delay
    });
}

// Using the Promise
fetchData()
    .then(result => {
        console.log(result); // Runs if resolved
    })
    .catch(error => {
        console.error(error); // Runs if rejected
    })
    .finally(() => {
        console.log("Fetch attempt finished.");
    });
Example Code
// Function that returns a Promise
function fetchData() {
    return new Promise((resolve, reject) => {
        console.log("Fetching data...");

        setTimeout(() => {
            const success = true; // Change to false to simulate an error
            if (success) {
                resolve("Data fetched successfully!");
            } else {
                reject("Error: Failed to fetch data.");
            }
        }, 2000);
    });
}
// Async function using await
async function getData() {
    try {
        const result = await fetchData(); // Wait until the Promise resolves/rejects
        console.log(result);
    } catch (error) {
        console.error(error);
    } finally {
        console.log("Fetch attempt finished.");
    }
}
// Call the async function
getData();
Error Handling
Use `catch()` to handle errors in promise chains.
Introduction to Axios
What is Axios?
Installing Axios
- npm install axios
- yarn add axios
Making HTTP Requests
Axios simplifies making HTTP requests in React Native applications.
Making a GET Request
Example: axios.get('https://api.example.com/data')
Error Handling with Axios
Use try-catch blocks to handle errors effectively.

Making a POST Request
Example: axios.post('https://api.example.com/data', { key: 'value' })
Using Interceptors
Interceptors allow modifying requests or responses globally.
Best Practices
- Use async/await for cleaner code
- Handle errors gracefully

Conclusion
Axios is essential for efficient data fetching in React Native.
// Import axios (if running in Node.js)
// const axios = require('axios');

// Async function to fetch data
async function getUserData() {
    try {
        console.log("Fetching user data...");

        const response = await axios.get('https://jsonplaceholder.typicode.com/users/1');

        console.log("User data received:");
        console.log(response.data); // The actual data from the API
    } catch (error) {
        console.error("Error fetching user data:", error.message);
    } finally {
        console.log("Request finished.");
    }
}

// Call the function
getUserData();
// Create an Axios instance
const api = axios.create({
baseURL: 'https://jsonplaceholder.typicode.com',
timeout: 5000 // 5 seconds timeout
});
// Add a request interceptor
api.interceptors.request.use(
config => {
console.log("🔹 Request sent:", config.method.toUpperCase(), config.url);
// Example: Add an Authorization token to headers
config.headers.Authorization = 'Bearer fake-jwt-token';
return config;
},
error => {
console.error("❌ Request error:", error);
return Promise.reject(error);
}
);
// Add a response interceptor
api.interceptors.response.use(
response => {
console.log("✅ Response received:", response.status);
return response;
},
error => {
console.error("❌ Response error:", error.message);
return Promise.reject(error);
}
);Global State Management
What is state management?
It refers to managing the state of one or several user interface control systems like that of radio controls, action buttons, input fields, etc. It is a programming technique for User Interface in which the state of a single UI control completely or partially depends on the state of all the other UI controls.
source: https://www.simplilearn.com/tutorials/asp-dot-net-tutorial/state-management-in-asp-net
Global state is the data we manage across multiple components. Global state is necessary when we want to get and update data anywhere in our app, or in multiple components at least. A common example of global state is authenticated user state.
source: https://www.freecodecamp.org/news/how-to-manage-state-in-your-react-apps/
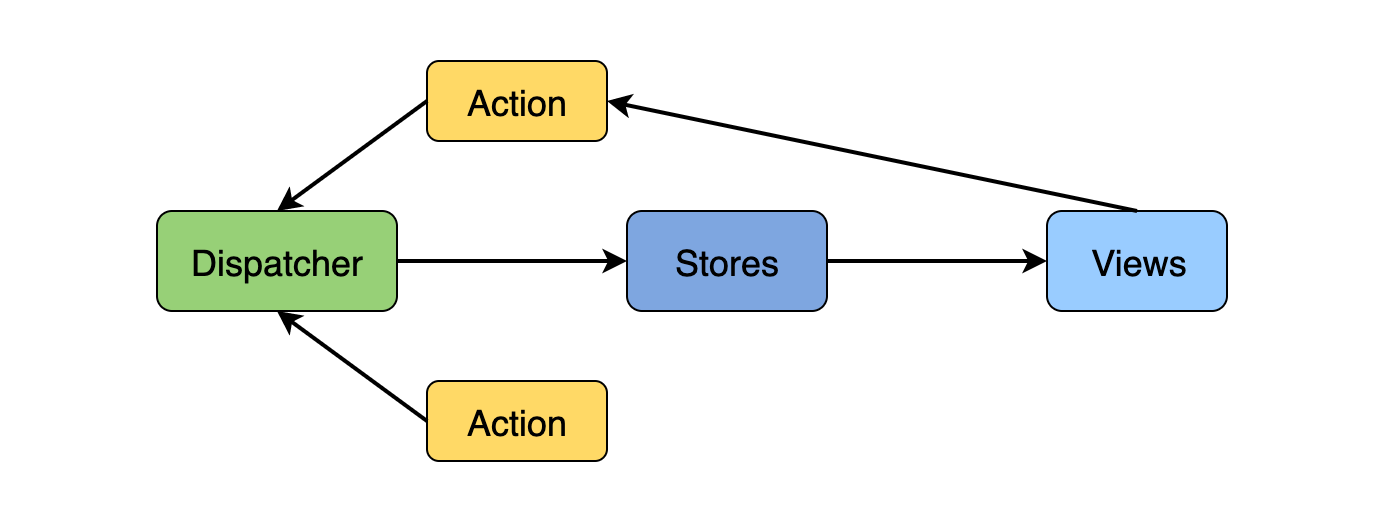
Flux Architecture
React Context API
Redux
Flux Architecture
One of the more common design patterns is called the MVC design pattern, which stands for model, view, controller. This pattern organizes your code into three boxes:
- The raw data that will be the model of your application
- The logic that takes that raw data and turns into functions that will control the state of the application
- The user interface where your client will interact with and view the application
As applications scale, the MVC data flow can become more of a problem because MVC applications have data that can move in multiple directions, creating two-way data flows. Code is difficult to maintain. If we want to iterate on problems quickly, this way of writing the code is not going to work.
Facebook solved this problem with the creation of the Flux Architecture.
Flux Architecture – a design pattern that only allows data to flow in one direction while working in conjunction with React to only update a web page when the state of a component changes.
Parts of the Flux Architecture
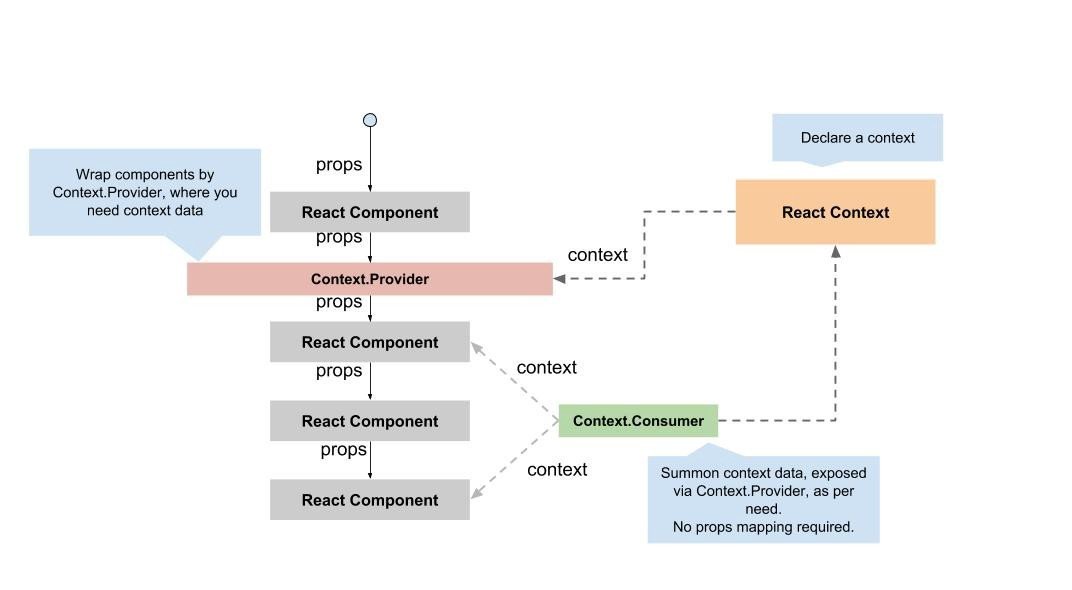
React Context API
What is Context API?
The React Context API is a way for a React app to effectively produce global variables that can be passed around. This is the alternative to "prop drilling" or moving props from grandparent to child to parent, and so on. Context is also touted as an easier, lighter approach to state management using Redux.
Context API is a (kind of) new feature added in version 16.3 of React that allows one to share state across the entire app (or part of it) lightly and with ease.
source: https://www.loginradius.com/blog/engineering/react-context-api/
Read: https://reactjs.org/docs/context.html#api
What is React 16 context API and why should you care?
Context is designed to share data that can be considered “global” for a tree of React Components.
It sits next to React to props and state.
In other words, Context provides a way to pass data through the component tree without having to pass props down manually at every level.
https://ipraveen.medium.com/react-basic-how-react-16-context-api-work-7257591589fc
How to Use React Context
1. Create a Context
First, create a context using React.createContext().
import React from 'react';

const MyContext = React.createContext();
How to Use React Context
2. Provide Context Value
Use the Provider component to pass down the context value. Wrap the component tree where you want the context to be available.
import React from 'react';
import App from './App';

const MyContext = React.createContext();

const Main = () => (
  <MyContext.Provider value={{ user: 'John Doe' }}>
    <App />
  </MyContext.Provider>
);
How to Use React Context
3. Consume Context Value
Access the context value in a component using the Consumer component or the useContext hook.
import React from 'react';
import MyContext from './MyContext';

const MyComponent = () => (
  <MyContext.Consumer>
    {value => <Text>User: {value.user}</Text>}
  </MyContext.Consumer>
);

export default MyComponent;
How to Use React Context
3. Consume Context Value
Access the context value in a component using the Consumer component or the useContext hook.
import React, { useContext } from 'react';
import MyContext from './MyContext';

const MyComponent = () => {
  const contextValue = useContext(MyContext);
  return <Text>User: {contextValue.user}</Text>;
};

export default MyComponent;
Redux Architecture
Redux is a library that acts as a state container and helps to manage your application data flow. It is similar to Flux architecture and has a lot in common with it.
The Redux Architecture takes what we already know about the Flux Architecture and expands it so it is more efficient for grander, more complex applications.
The two biggest improvements that Redux offers is one store that is accessible and subscriptable to all React components, and a reducer inside that store that will determine the changes to your application’s state.
Much of the architecture to Redux is very similar to that of Flux Architecture.

Parts of the Redux Architecture
One Store to Hold State
When we think about the Flux Architecture and how it works, we know it has a unidirectional data flow. We tend to think of our React applications in terms of parent-child relationships. What if we had a child component that said, for instance, needed to talk to a cousin?
If using Flux Architecture, the state would be lifted up to both components’ nearest common ancestor. This gets to be a bit complex when that nearest common ancestor is five generations back. This can lead to a problem called props drilling and makes your code a bit less readable. This is where Redux comes in.
https://www.educative.io/blog/react-design-patterns-best-practices#flux
React Native – Day 4
By noinputsignal


