Angular
What is it?
- framework for writing single page applications
- helps to split problems to smaller ones
- provides tools for building forms, routing, animations, making http requests, testing...
Component tree
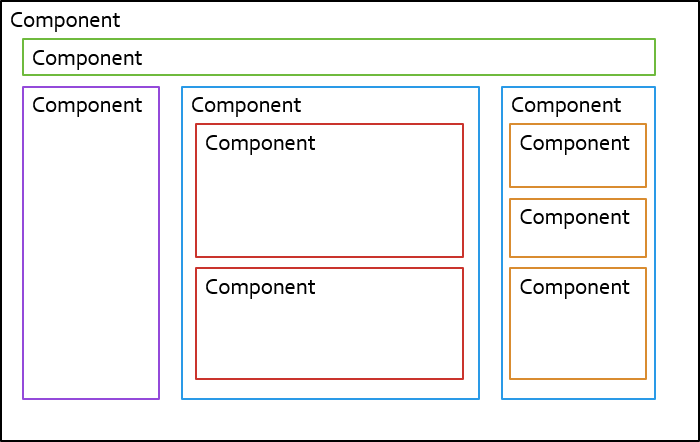
- split big problems to smaller ones
Component tree
Component
Component
Component
Component
Component
Component
Component tree
- Stateful components (smart)
- used to fetch data, do data manipulation
- call services with business logic
- Stateless components (dumb)
- only display data
- may have internal logic but only related to component itself
- pass data down, emit events up
Component tree
Component
User info
ArticleList
Article
Today Weather
Article
I am smart 💡
Service
data down
events up
angular-cli
- command line app for scaffolding and developing angular app
- sudo npm install -g @angular/cli
Hello world
ng new hello-world
run:
ng serve
create:
without routing for now
src folder
- app = sources of our app
- assets = images, fonts, static files etc.
- index.html
- styles.css - main CSS file
src/app folder
- contains code of your application
- app.component.* is the root component
- app.module.ts defines the main module
Before we go deeper
remove everything from app.component.html
Component properties
export class AppComponent {
    myVariable = 'My name is Martin';

    ...
}
app.component.ts
<p>
  This is my variable: {{ myVariable }}
</p>
app.component.html
(click)=func()
- react on click event
- calls function defined in component
<button type="button" (click)="switchMood()">Switch mood</button>class AppComponent {
switchMood() {
this.happy = !this.happy;
}
}.html
.ts
*ngIf
- allows you to hide/show something depending on condition
<div *ngIf="happy">
  I am happy
</div>
<div *ngIf="!happy">
  I am sad
</div>
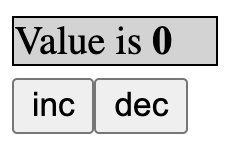
Lets try it
- create counter button
- it starts with 0
- everytime you click it increments by 1
- create button with dropdown menu
- when you click button div appears
- links to google.com and ibm.com in div
- when you click button again div disappears
- use position absolute
App structure
UsersModule
OrdersModule
SharedModule
UsersListComponent
UsersDetailComponent
AddressFormComponent
TodayMenuComponent
ShoppingCartComponent
NavbarComponent
BeautifulButtonComponent
UserBadgeComponent
Module example
@NgModule({
  declarations: [
    UsersListComponent,
    UserDetailComponent,
    AddressFormComponent,
    UserBadgeComponent
  ],
  imports: [
    FormsModule,
    UsersRoutingModule
  ],
  exports: [
    UserBadgeComponent
  ]
})
export class UsersModule { }- it's a glue for your app
Module simplified
- when you create component, pipe or directive
- add it in declarations array
- when you need a module from a library or Angular itself
- add it in imports array
Generate your component
ng generate component article
What happened?
- created folder article
- .css, .html, .ts, .spec.ts
- added ArticleComponent to app.module.ts
article.component.ts
import { Component, OnInit } from '@angular/core';

@Component({
  selector: 'app-article',
  templateUrl: './article.component.html',
  styleUrls: ['./article.component.css']
})
export class ArticleComponent implements OnInit {

  constructor() { }

  ngOnInit() {
  }

}
Use your component
- use your component as html tag
- <app-article></app-article>
- in your app-article component create:
- heading in <h1> using red color
- text in <p> using grey color
How do components communicate?
Component tree
Parent
Component
Component
Child
I am smart 💡
DATA
EVENTS
Service
@Input()
- allows you to pass data to child component (down)
- uses [ ] in template
import {Input} from '@angular/core';
export class ChildComponent {
    @Input()
    someNumber = 0;
}
<app-child-component [someNumber]="propertyInParent">
</app-child-component>parent-component.html
child-component.ts
Input exercise
- modify ArticleComponent to accept title and text as inputs
- pass title and text from root component
*ngFor
- used for repetition
- repeats element for each item in the array
<ul>
    <li *ngFor="let name of names">
        {{ name }}
    </li>
</ul>
array in the class
Let's try that
- we will modify our app to support multiple articles
- create an array of articles in the root component
- id - unique number (1,2,3...)
- title
- text
- timestamp
- print all articles in the array using *ngFor
- create button which will generate a new article
- gives id which is not yet used
- gives title + text (can be same all the time)
- sets current timestamp
@Output()
- allows you to send data to parent component (up)
- uses ( ) in template
import {Output, EventEmitter} from '@angular/core';
export class ChildComponent {
    @Output()
    onClicked = new EventEmitter<void>();

    click() {
        this.onClicked.emit();
    }
}
<app-child-component (onClicked)="methodInParent()">
</app-child-component>
child-component.ts
parent-component.html
@Output() with value
- pass to emit
- $event contains emitted value
import {Output, EventEmitter} from '@angular/core';
export class ChildComponent {
    @Output()
    onClicked = new EventEmitter<string>();

    click() {
        this.onClicked.emit('a message');
    }
}
<app-child-component (onClicked)="methodInParent($event)">
</app-child-component>
child-component.ts
parent-component.html
Output exercise
- add "delete" button to the ArticleComponent
- when clicked it will send event to parent component to remove given article
root
article
articles []
removeArticle()
@Output()
Pipes
- used to format output data in templates
- may accept parameters after ":"
- built-in pipes
- date
- currency, percent
- json
- lowercase, uppercase
- decimal, slice
- async
{{timestamp | date: 'medium'}}

<pre>{{complexObject | json}}</pre>
Try it out
- format the article timestamp to use format hh:mm:ss
- try printing articles array using json pipe
Your own pipes
- ng generate pipe words-counter
- 1st argument - input
- 2nd argument - parameters
@Pipe({
  name: 'wordsCounter'
})
export class WordsCounterPipe implements PipeTransform {

  transform(value: unknown, ...args?: unknown[]): unknown {
    return null;
  }

}
Create pipe for words count
- input: text
- output: words count
- for each article display words count
Testing
Testing
- npm test
- used to verify your code doesn't break when changed
- in .spec.ts files
- TDD - test driven development
- first write a test
- write implementation after
Jasmine
- testing framework
- describe - groups tests together
- it - tests
-
expect ...
- toBe - comparing simple values (numbers, strings)
- toEqual - comparing objects
- toContain - for text
- toHaveBeenCalled - for methods
- ...
- reference
Testing pipes
- given input we expect certain output
- test happy path and edge cases
it('counts words in empty text', () => {
  const pipe = new WordsCounterPipe();
  const emptyText = '';
  const result = pipe.transform(emptyText);
  expect(result).toBe(0);
});
Write tests for words counter
- what cases should you test?
- write few tests
Directives
Directives
- attached to existing element (div, component ...)
- used eg. to modify DOM, for form validations...
- attribute directives
- [ngClass], [ngStyle], ...
- structural directives
- *ngFor, *ngIf...
ngClass
- used to dynamically change HTML class
- uses object with boolean values
export class Component {
    stylesObject = {
        green: true,
        monday: this.isMonday()
    }
}
<div [ngClass]="stylesObject"></div>
<!-- turns into: -->
<div class="green monday"></div>.ts
.html
Let's try it
- create div with a text inside
- create two buttons
- "switch colour"
- red - applies red colour to the text
- "switch font size"
- large - sets font-size to 30px to the text
- "switch colour"
Angular Material
Angular Material
- set of UI components provided by Google
- https://material.angular.io
- ng add @angular/material
Use Material components
- use Material button
- import MatButtonModule
- use mat-raised-button directive
<button mat-raised-button color="primary">
  Switch color
</button>
Forms
Template-driven
- everything in template
- easier to understand
- action-based
- use observables
- defined by code
- structure defined in template
- easier to test
Reactive forms (model driven)
Reactive forms
- import ReactiveFormsModule in the module ❗️
- from @angular/forms
- create a form in HTML:
<form [formGroup]="myForm">
    ...
</form>
Form Group
Form Control
Form Control
Form Group
Form Control
Form Control
Inputs
<input type="text" formControlName="firstName">
<input type="text" formControlName="surname">
<fieldset formGroupName="address">
    <input type="text" formControlName="street">
    <input type="text" formControlName="city">
</fieldset>
Definition in component
- keys of form group must match formControlName and formControlGroup attributes
import { FormGroup, FormControl } from '@angular/forms';

class Compoennt {
    myForm: FormGroup;

    constructor() {
        this.myForm = new FormGroup({
            firstName: new FormControl(''),
            surname: new FormControl(''),
            address: new FormGroup({
                street: new FormControl(''),
                city: new FormControl(''),
            })
        });
    }
}
{
firstName: '',
surname: '',
address: {
street: '',
city: ''
}
}Submit form
- you need a submit button
<form [formGroup]="myForm" (ngSubmit)="saveForm()">
    ...
    <button type="submit">save</button>
</form>
component.ts
saveForm() {
   console.log(this.myForm.value);
}
Validations
- defined in the component
- built-in validators
- Validators.required
- Validators.email
- Validators.minLength(6)
- ...
import { Validators } from '@angular/forms';

...

this.myForm = new FormGroup({
    firstName: new FormControl('', Validators.required),
    email: new FormControl('', [Validators.required, Validators.email]),
});
Show error message
- form state
- controls state
<form [formGroup]="myForm">
    <div>Name: <input type="text" formControlName="firstName"></div>

    <div>Email: <input type="text" formControlName="email"></div>

    <div>Is email field valid? {{myForm.get('email').valid}}</div>
    <div *ngIf="myForm.get('email').hasError('required')">
        This field is required
    </div>
    <div *ngIf="myForm.get('email').hasError('email')">
        Enter valid email
    </div>

    <div>Is whole form valid? {{myForm.valid}}</div>
</form>
Form builder
- shorthand for creating FormGroup
constructor(fb: FormBuilder) {
  this.myForm = fb.group({
    firstName: [''],
    surName: [''],
    address: fb.group({
      street: [''],
      city: ['Prague', [Validators.required]]
    })
  });
}
Let's try it!
- create a form for adding new article
- title, text
- author
- email (must enter correct email, required)
- name (required)
- create save button which is enabled only when the form is valid
- BONUS: use button and input from Material Design
<button [disabled]="true" (click)="save()">I am disabled</button>Services
Services
- used for business logic (calculations, data manipulation, calling API)
- singletons
- easy to test
import { Injectable } from '@angular/core';

@Injectable({providedIn: 'root'})
export class CalculatorService {

  propertyInService = 'hello';

  constructor() { }

  add(a: number, b: number): number {
    return a + b;
  }
}
Use them in component
- injected by DI in constructor
@Component({
    selector: 'app-root',
    templateUrl: './app.component.html',
    styleUrls: ['./app.component.css']
})
export class AppComponent {

    constructor(public calculatorService: CalculatorService) {}

    someMethod() {
        return this.calculatorService.add(3, 5);
    }
}
Show value from service
<div>
   {{calculatorService.property}}
</div>
.html
Improve your app
- create service ArticlesService
- ng generate service articles
- make the articles array part of the service
- create a method to create a new article
- move removeArticle to the service
- create a component to display count of articles (read from the service)
Testing services
- uses dependency injection container
- TestBed.configureTestingModule({})
- creates module for testing
- used to provide dependencies (HttpClient in this example)
- TestBed.inject(ArticlesService) to get a reference
describe('ArticlesService', () => {
  beforeEach(() => TestBed.configureTestingModule({
    providers: [HttpClient]
  }));

  it('should be created', () => {
    const service: ArticlesService = TestBed.inject(ArticlesService);
    expect(service).toBeTruthy();
  });
});
Mocking other services
- let's say we don't want to use real service
- instead we would like to use custom implementation of SessionService
beforeEach(() => TestBed.configureTestingModule({
    providers: [{
        provide: HttpClient,
        useValue: {
            get(url) {
                return Promise.reject();
            }
        }
    }]
}));
Try it
- write tests for addArticle() method
- write tests for removeArticle() method
More about components
Component lifecycle
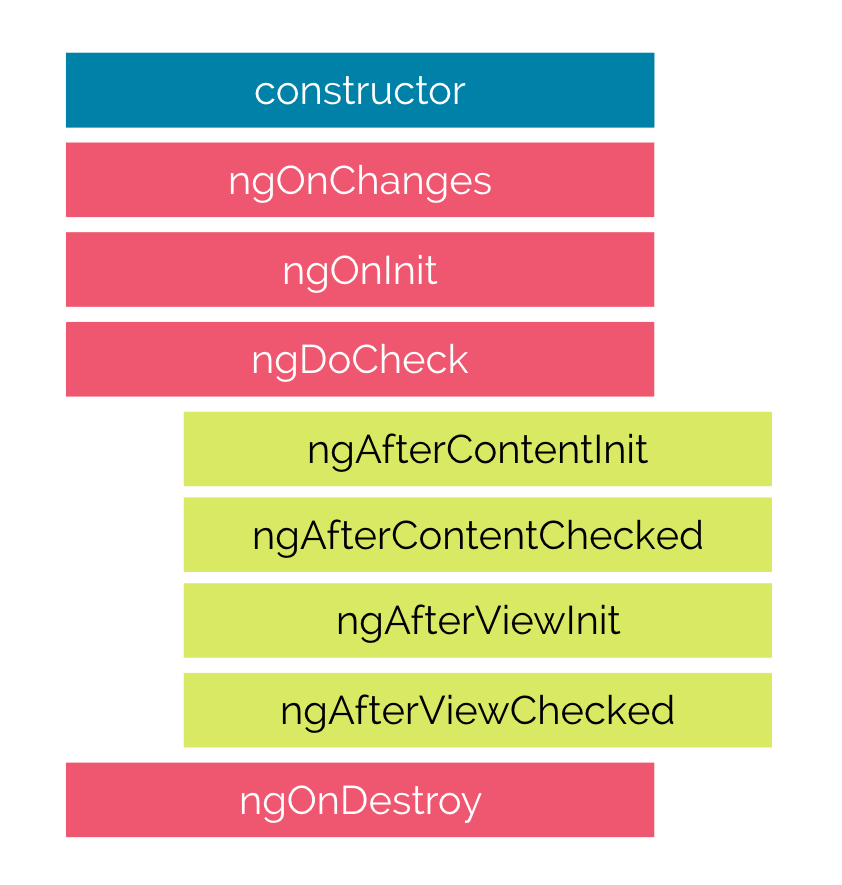
Lifecycle hooks
-
ngOnChanges
- called when @Input is changed
-
ngOnInit
- when component is being created
-
ngAfterViewInit
- after DOM is initialized
-
ngOnDestroy
- when component is being removed
ngOnChanges
ngOnChanges(changes: SimpleChanges) {
  if (
    (changes.a.currentValue &&
     changes.a.currentValue !== changes.a.previousValue)
    ||
    (changes.b.currentValue &&
     changes.b.currentValue !== changes.b.previousValue)
  ) {
    this.recalculate();
  }
}
Accessing native element
- after ngAfterViewInit hook
.html
.ts
export class Component implements AfterViewInit {
  @ViewChild('counterButton')
  counterButton: ElementRef<HTMLButtonElement>;

  ngAfterViewInit() {
      this.counterButton.nativeElement.disabled = true;
  }
}
<button #counterButton (click)="increment()">
{{ counter }}
</button>Local variable
- used to control child component
- only after view init
.html (local variable)
.ts (ViewChild)
export class Component implements AfterViewInit {
  @ViewChild('counterComponent')
  // or @ViewChild(CounterComponent)
  counterButton: CounterComponent;

  ngAfterViewInit() {
    setTimeout(() => {
      this.counterButton.counter++
    }, 0);
  }
}
<app-counter #counterComponent></app-counter>
{{counterComponent.counter}}Content projection
Content projection
- pass HTML from parent to the child
<app-button (click)="doSomething()">
    <span class="highlight">Click me!</span>
</app-button>
<button type="button">
<ng-content></ng-content>
</button>parent.html
child.html
Exercise
- create counter component with public API
- increment()
- decrement()
- getter for counter
- style counter component to have border and lightgray background
- pass HTML for displaying counter value using ng-content (for example in <strong> tag)
- create buttons controlling the counter outside of counter component
Testing components
Testing component
- component is HTML + class
- fixture
- used to access nativeElement and debugElement
- used to trigger change detection
- component
- instance of the component class
Change detection
- triggers DOM update
- fixture.detectChanges()
- do it when HTML is supposed to be updated
Check DOM (method 1)
- use fixture.nativeElement.querySelector
HTML:
<h1>{{something}}</h1>

TS:
export class Component {
  something = 'hello';
}
it('should display hello', () => {
const title = fixture.nativeElement.querySelector('h1');
fixture.detectChanges();
expect(title.textContent).toContain('hello');
});
Check DOM (method 2)
- use fixture.debugElement.query
- By.css, By.directive
HTML:
<h1>{{something}}</h1>

TS:
export class Component {
  something = 'hello';
}
import { By } from '@angular/platform-browser';
it('should display hello', () => {
const title = fixture.debugElement.query(By.css('h1'));
fixture.detectChanges();
expect(title.nativeElement.textContent).toContain('hello');
});
Try it
- write test for ArticleComponent
- given an article it should display title and text
Trigger click
// using nativeElement
const button = fixture.nativeElement.querySelector('.increment');
button.click();

// using debugElement
const button = fixture.debugElement.query(By.css('.increment'));
button.triggerEventHandler('click', null);
Query by directive
const articleComponents = fixture.debugElement.queryAll(
    By.directive(ArticleComponent)
);
expect(articleComponents.length).toBe(2);- queries component by type
- possible only using debugElement
Try it
- write test for root component (AppComponent)
- counter button increments the counter
- button for creating article adds an article
Mocking the service
- provide fake service implementation
TestBed.configureTestingModule({
    declarations: [...],
    providers: [
        {
            provide: ArticleService,
            useValue: {
                articles: [],
                addArticle() {},
                removeArticle() {}
            }
        ],
    ]
}).compileComponents();
Spies
- used to verify that a method was called
- let spy = jasmine.createSpy()
- spyOn(articleService, 'addArticle')
const articleService = TestBed.inject(ArticleService);
spyOn(articleService, 'addArticle');

/// do work related to test

expect(articleService.addArticle).toHaveBeenCalled();
Spies
- faking behavior / return value
// original behavior
spyOn(articleService, 'addArticle').and.callThrough();

// custom return value
spyOn(articleService, 'addArticle').and.returnValue(5);

// replaced by another function
spyOn(articleService, 'addArticle').and.callFake(() => {
    return 5;
});
Try it
- click on addArticle button
- verify that service has been called
Observables

Learning curve
Observables
- like promises but may "resolve" multiple times
- rxjs library
- they use operators for data control and transformation
How do you create a promise?
const promise = new Promise((resolve, reject) => {
    ... long running code
    resolve(data);
});
How do you create an observable?
const obs$ = new Observable(observer => {
    ... long running code
    observer.next(data);
    observer.next(data);
    observer.complete();
});
Observables are lazy
Compared to promises
let obs$ = new Observable(() =>
    console.log('work');
);
obs$.subscribe()
obs$.toPromise()
let promise = new Promise(() =>
console.log('work');
);How do you error a promise?
const promise = new Promise((resolve, reject) => {
    ... long running code
    reject('It went wrong');
});
How do you error an observable?
const obs$ = new Observable(observer => {
    ... long running code
    observer.error('It went wrong');
});
.subscribe()
obs$.subscribe(nextCallback);
obs$.subscribe({
  next: () => { ... },
  error: () => { ... },
  complete: () => { ... }
});
Exercise
- create a function called interval which creates an observable emitting a number every X ms
- 1,2,3,4...
interval(1000).subscribe(x => console.log(x));Solution
function interval(time) {
    return new Observable(observer => {
        let counter = 1;
        setInterval(() =>
            observer.next(counter++);
        }, time);
    });
}
How to stop observing
const subscription = interval$.subscribe(onTick);
subscription.unsubscribe();
Q: What happens?
const subscription = interval(1000)
    .subscribe(val => console.log(val));
subscription.unsubscribe();
function interval(time) {
return new Observable(observer => {
let counter = 1;
setInterval(() => {
console.log('XXX');
observer.next(counter++);
}, time);
});
}Answer
const subscription = interval(1000)
    .subscribe(val => console.log(val));
subscription.unsubscribe();
function interval(time) {
return new Observable(observer => {
let counter = 1;
const interval = setInterval(() => {
console.log('XXX');
observer.next(counter++);
}, time);
return () => clearInterval(interval);
});
}Q: What happens?
const interval$ = interval(1000);
let subscription = interval$.subscribe(onTick);
subscription = interval$.subscribe(onTick);
subscription.unsubscribe();
Other ways to create observable
- of(10, 12, 13)
- from([10, 12, 13])
- from(promise)
- fromEvent(document, 'click');
- interval(1000), timer(delay, interval)
- empty(), of()
- ...
Q: What happens?
const obs$ = from([1,2,3,4]);
console.log('one');
obs$.subscribe({
    next: x => console.log(x),
    complete: () => console.log('done')
});
console.log('two');
Operators
.pipe(...)
const derived$ = interval(1000).pipe(
    map(x => x * 2)
);
derived$.subscribe(x => console.log(x));
.map
- applies function to every emitted item
import { from } from 'rxjs';
import { map } from 'rxjs/operators';

from([1,2,3,4,5])
    .pipe(
        map(val => val * 10)
    )
    .subscribe(val => console.log(val));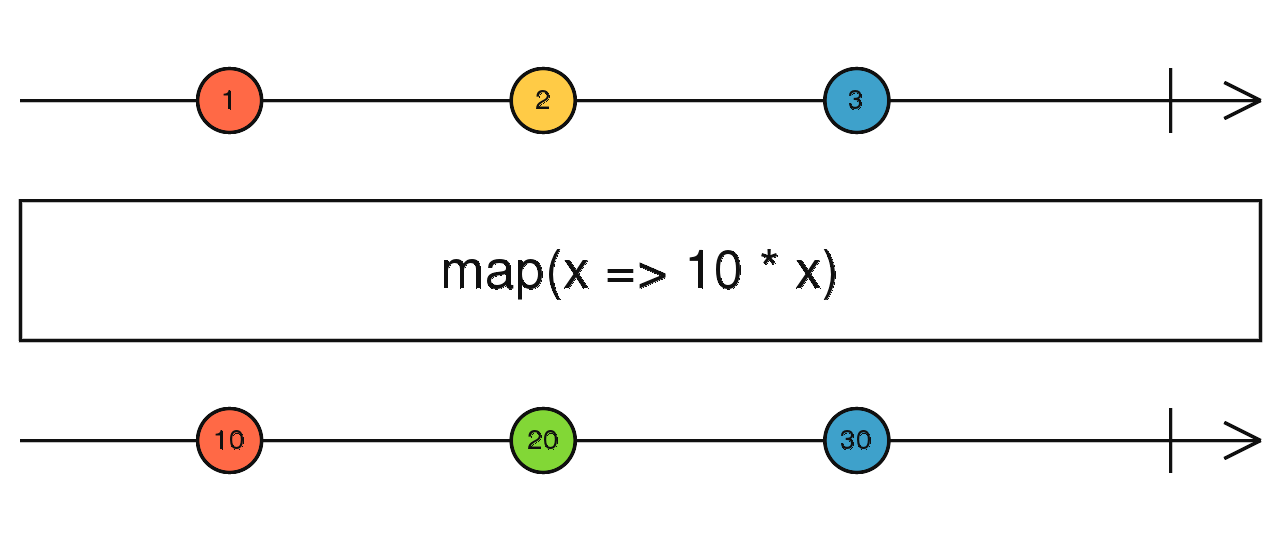
Q: What happens?
const interval$ = interval(1000);
const derived$ = interval$.pipe(
    map(x => x * 2)
);
interval$.subscribe(x => console.log(x));
Basic operators
take(5)
skip(3)
map(x => x*2)
filter(x => x % 2)
tap(console.log)
debounceTime(1000)
reduce((acc, curr) => ...)
[1,2,3,4,5].reduce((acc, curr) =>
    acc + curr
);
Arrays
from([1,2,3,4,5]).pipe(reduce((acc, curr) =>
    acc + curr
));
Observables
scan((acc, curr) => ...)
from([1,2,3,4,5]).pipe(scan((acc, curr) =>
    acc + curr
, 0));
distinctUntilChanged()
shareReplay(1)
Exercise
- use basic operators to print
- output: 13, 17, 19, 23
- start with interval(200)
- hint: filter, skip, take
function isPrime(n) {
  for (let i = 2; i < n; i++) {
    if (n % i === 0) {
      return false;
    }
  }
  return n !== 1 && n !== 0;
}
Combining multiple observables
merge
- combines into one observables
const intervalOne$ = interval(1000);
const intervalTwo$ = interval(500);

merge(intervalOne$, intervalTwo$).subscribe(...)
combineLatest
- waits for all to emit
- emit each time after
const intervalOne$ = timer(1000, 1000);
const intervalTwo$ = timer(5000, 500);

combineLatest(intervalOne$, intervalTwo$).subscribe(...)


// 4, 0 <- depends on the first one to emit
// 5, 0
// 5, 1
// 5, 2
// 6, 3
// 6, 4
forkJoin
- waits for all to complete
- like Promise.all
const intervalOne$ = timer(1000, 1000).pipe(take(3));
const intervalTwo$ = timer(5000, 500).pipe(take(5));

forkJoin(intervalOne$, intervalTwo$).subscribe(...)

// 2, 4
switchMap
- switches to another observable
interval(5000).pipe(
    switchMap(() => interval(500))
)
Subject
What is a subject?
- observable
- you can make it emit anytime using next()
const subject = new Subject();

subject.subscribe(x => console.log(x));

subject.next(1);
subject.next(2);
Special types of subjects
- BehaviorSubject
- has getValue() for synchronous reading of the last value
- ReplaySubject
- emits the last value for every new subscription
Exercise
- create a subject
- create a button
- make the subject emit on every click
- console.log on each click by listening to Subject
References
- https://www.learnrxjs.io
- best docs: https://rxjs-dev.firebaseapp.com
- visualization https://rxviz.com/
async pipe
- subscribe in the template
<div>{{ interval$ | async }}</div>Loading message
<div *ngIf="subj | async as value; else loading">
  {{ value }}
</div>

<ng-template #loading>
  waiting for a value...
</ng-template>
Back to Angular...
Change detection strategy
- by default Angular checks every printed property
- OnPush
- Angular detect changes only when inputs changes (use immutable objects)
- or when detectChanges is called
@Component({
  ...
  changeDetection: ChangeDetectionStrategy.OnPush
})
class Component {
  constructor(private cd: ChangeDetectorRef) { }

  detectChanges(): void {
    this.cd.detectChanges();
  }
}
Managing state
- using Subject
@Injectable({providedIn: 'root'})
class ArticlesService {
    private articles: Articles[] = [];
    private changes$ = new ReplaySubject<Articles[]>(1);

    constructor() {
        this.changes$.next(this.articles);
    }

    addAdrticle() {
        this.articles.push({...});
        this.changes$.next(this.articles);
    }

    getChanges(): Observable<Article[]> {
        return this.changes$.asObservable();
    }
}
State management
- add changes$ to your service
- in ArticleCounterComponent
- print out number of items in the articles array using async pipe
Create a new project
✋
- with routing enabled
- remove everything from app.component.html except <router-outlet></router-outlet>
ng new jokes
? Would you like to add Angular routing? (y/N) y
HTTP requests
Http requests
- we use Angular service HttpClient
- this service is in HttpClientModule ❗️
- so we have to import it in our main module
- it returns Observable
// in the main module... app.module.ts
import { HttpClientModule } from '@angular/common/http';

@NgModule({
    ...
    imports: [
        HttpClientModule
    ],
    ...
})

// in the code...
import { HttpClient } from '@angular/common/http';
class Component {
    constructor(http: HttpClient) {
        http.get<ResponseInterface>('/api/items').subscribe(data => {
            console.log(data);
        });
    }
}
url
Http call from service
import { HttpClient } from '@angular/common/http';

@Injectable({providedIn: 'root'})
export class DataSourceService {
    constructor(public http: HttpClient) {}

    fetch(): Observable<ResponseInterface> {
        return this.http.get<ResponseInterface>('/api/items');
    }
}
@Component{...}
export class SomeComponent {
data: ResponseInterface;
constructor(dataService: DataSourceService) {
dataService.fetch().subscribe(response => this.data = response);
}
}Component:
Service:
- we typically return observable and subscribe in the component
Let's make http request
- open API request in browser
- define interface based on the response
- https://api.chucknorris.io
- create a service JokeService
- display joke in the component
- create a button to load another joke
GET https://api.chucknorris.io/jokes/randomRouting
Routing
- navigation
- requires RoutingModule
- ng new project --routing
- routes are rendered in <router-outlet>
- supports module lazy loading
Define routes
- in router module
- path points to component
- parameters in url
// app-routing.module.ts
const routes: Routes = [
  { path: 'articles', component: ArticleListComponent },
  { path: 'article/:articleId', component: ArticleComponent },
  { path: '',
    redirectTo: '/articles',
    pathMatch: 'full'
  },
  { path: '**', component: PageNotFoundComponent }
];
Access url params
- inject service ActivatedRoute
- observe .paramMap
- observe .queryParamMap
class Component {
    constructor(route: ActivatedRoute) {
        route.pathParam.subscribe(params => console.log(params));
    }
}
Links
<a [routerLink]="['/users', id]">in code:
constructor(public router: Router) {
    this.router.navigate(['/users', id ]);
}
Try routing
-
create two new components
- CategoryComponent - load categories and create links to /joke/:category
- JokeComponent - read category from url and load joke
- Create routes
- / -> CategoryComponent
- /joke/:category -> JokeComponent
- load joke based on category
Router guards
- just a service
- used to control loading of route
-
CanActivate - used for authentication
- returns boolean or Promise<boolean> or Observable<boolean>
- when it's false navigation doesn't happen
- CanDeactivate - used to prevent navigation
- Resolve - preload data
Resolver
- preloads data
- ng g s joke-resolver
export class JokeResolverService implements Resolve<Joke> {
  resolve(route: ActivatedRouteSnapshot): Observable<Joke> {
    const category = route.paramMap.get('category');
    return this.service.fetchJokeFromCategory(category);
  }
}
Resolver
- in component subscribe to ActivatedRoute ➡️ data
this.activatedRoute.data.subscribe(
    data => console.log(data.joke)
);
{
  path: 'joke/:category',
  component: JokeComponent,
  resolve: {
    joke: JokeResolverService
  }
}
app-routing.module.ts
Use resolver
- use resolver to load joke
- display joke in the component using resolver
Lazy loading
Lazy loaded modules
- contains own routing
- module is loaded after navigation
$ ng generate module jokes --route jokes --module app.moduleLazy load jokes module
- move everything related to jokes module
- create index route with text:
- "Do you want to hear a joke?"
- add link leading to categories
- load jokes module lazily
Index
Categories
Lazy jokes module
Updating to new Angular
-
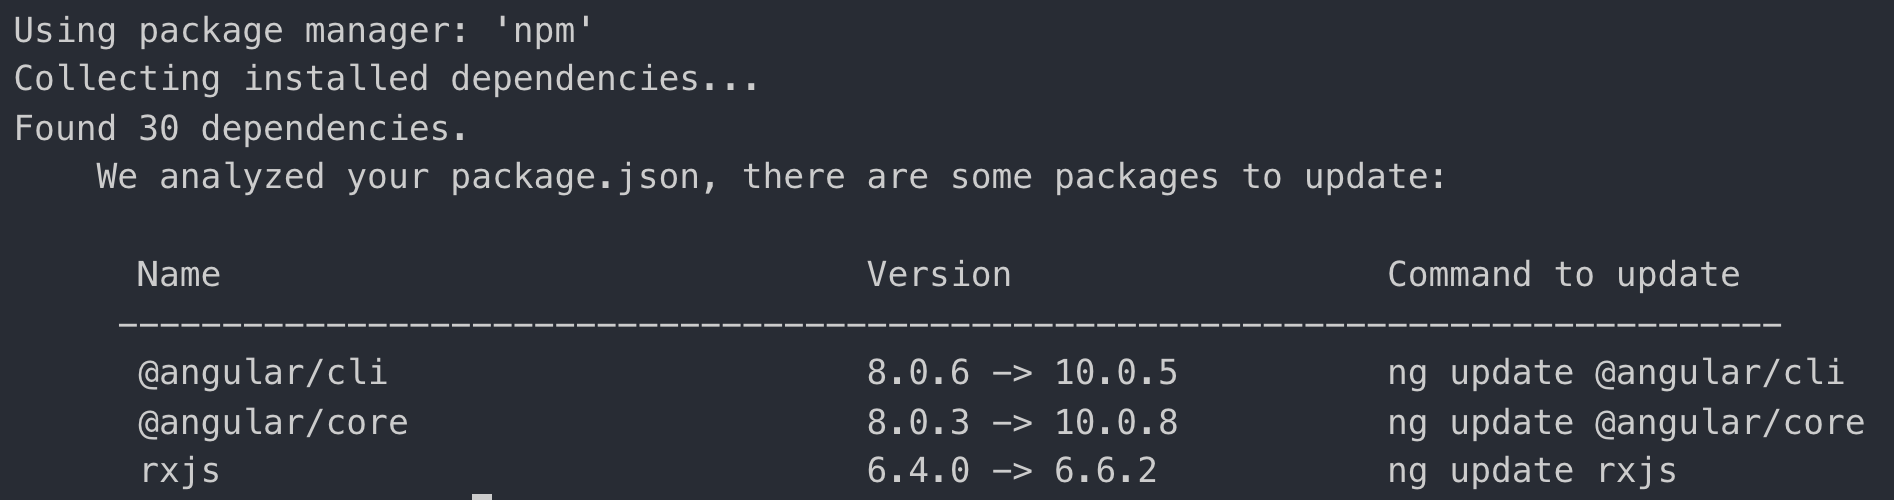
ng update
- shows you what to execute to upgrade
- ng update --all
- https://update.angular.io
Sharing code as a library
Create a library
- generate library project
- ng new my-workspace --create-application=false
- ng generate library my-lib
- work in /projects/my-lib
- public API is defined in public-api.ts
Develop library
- to test it we use it locally in any project
- link it to node_modules
- npm link <path-to-lib>/dist/my-lib
- modify tsconfig.app.json
- link it to node_modules
"compilerOptions": {
  "paths": {
    "@angular/*": ["./node_modules/@angular/*"]
  }
},
Develop library
- we must build the library on every change
- in lib: npm run build -- --watch
- in testing project import the library module:
import { MyLibModule } from 'my-lib';

@NgModule({
  imports: [
    ...
    MyLibModule
  ]
})
export class AppModule {}
Publish
- build it
- ng build --prod
- go to dist/my-lib
- run npm publish
Few tips
- Spectator for testing
- avoid Protractor for e2e tests (use TestCafe or Cypress)
- unsubscribe in component: until-destroy
- form validations: ngx-valdemort
- various libs list: awesome angular
- nx for monorepo and multiple apps with shared code
🎉
Nanoenergies Angular
By Martin Nuc