React Basic in Typescript
🙋♂️
Frontend engineer
- 9 years FE experience
- AngularJS, Angular, Ember, React
- currently Staff engineer at Productboard
❤️ 📸
❤️ 🛞
Schedule
- 9-12 morning
- recap of the previous day
- breaks: 10:00, 11:00
- 12-13 lunch
- 13-17 afternoon
- breaks: 14:00, 15:00, 16:00
Course
- exercises build on top of each other!
- discussions welcomed
Slides
GitHub
Your experience?
Setup IDE
Install
- Google Chrome
- nodejs
- Visual Studio Code
- eslint
- VS Code ➡ extensions ➡ search for eslint
- Quokka plugin
- VS Code ➡ extensions ➡ search for quokka
Javascript & Typescript
Let's talk about React! 💪
React
- library for managing view
- component based
- helps split the app into small pieces
- used to create SPA
Client
Server
Database
HTTP
browser
request
html page
Client
Server
Database
HTTP
React in browser, mobile app...
API
request
data
Single page application
Web server
html, js
Vite
Vite
- tool for scaffolding react app
- replaced create-react-app
npm create vite@latestProject name: … (react-course)
Select a framework: › React
Select a variant: › Typescript
Important parts
package.json
- describes the package
- dependecies list
- npm scripts
tsconfig.json
- settings for typescript compiler
- "target" = build for version of JS
index.html
- HTML
- notice div id="root"
/public folder
- contains assets which are not referenced in the source
main.tsx
- renders React into HTML element
ReactDOM.createRoot(document.getElementById('root')!).render(
  <React.StrictMode>
    <App />
  </React.StrictMode>,
)
App.tsx
- the main component
➡️ Start the React app
npm run dev
JSX
Elements
const label = React.createElement('a', {
  href: 'https://google.com'
}, 'Go to Google.com');
<a href="https://google.com">Go to Google.com</a>children
props
type
What is JSX?
- syntactic sugar around createElement
- almost like HTML
- transpiled to Javascript
- example in App.tsx:
import React from 'react';

function App() {
  return (
    <div className="App">
      Hello
    </div>
  );
}
function App() {
return React.createElement('div', { className: 'App' }, 'Hello');
}Q: Why className?
import React from 'react';

function App() {
  return (
    <div className="App">
      Hello
    </div>
  );
}
function App() {
return React.createElement('div', { className: 'App'}, 'Hello');
}Q: What happens now?
import React from 'react';

function App() {
  return (
    <div>
      Yes
    </div>
    <div>
      No
    </div>
  );
}
function App() {
return ????????
}Solution: React Fragment
- like empty element
- when you want to return multiple elements - wrap them in fragment
import React from 'react';

function App() {
  return (
    <>
      <div>
        Yes
      </div>
      <div>
        No
      </div>
    </>
  );
}
➡️ Before we continue
- remove everything in the body of App.tsx component
- notice the browser reloads
function App() {
  return <h1>Hello</h1>;
}
Print a variable
function App() {
  let something = 'hello';

  return <div>{something}</div>;
}
Print an array
function Array() {
  let array = [1,2,3];

  return <div>
    {array.map((item, index) => <span key={index}>{item}</span>)}
  </div>;
}
‼️ key prop
Components
Component
- reusable unit
- just a function
-
input
- ="props"
-
output
- React element
type Props = {
  name: string;
};

function NameComponent(props: Props) {
  return <h1>Hi, my name is {props.name}!</h1>;
}

ReactDOM.render(
  <NameComponent name="Martin" />,
  document.getElementById('root')
);
Component tree
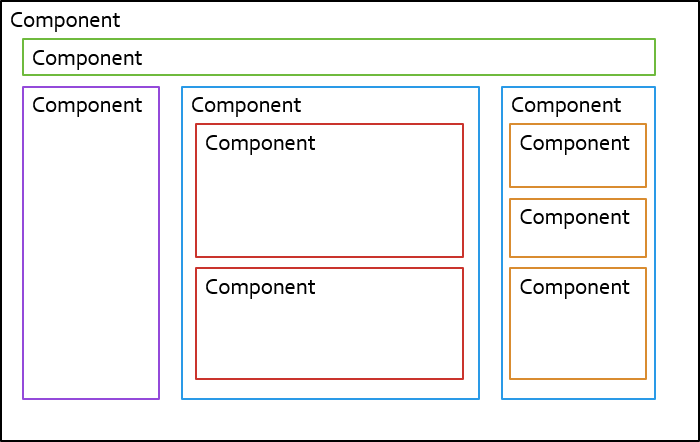
- split big problems to smaller ones
Component tree
Component
Component
Component
Component
Component
Component
Component tree
- Stateful components (smart)
- used to fetch data
- data manipulation
- Stateless components (dumb)
- only display data
- pass data down, emit events up
Component tree
Component
User info
ArticleList
Article
Today Weather
Article
I am smart 💡
Stateless component
- everything to display is received via props
- just a function
- input: props (=properties)
- output: React element
- easy to test
function NameComponent(props) {
  return <h1>{props.name}</h1>;
}
How to use a component?
- pass data down via props
function App() {
  return <NameComponent name="Martin" />
}
Event handling
- React unifies API of events (link)
<button type="button" onClick={() => console.log('Hello')}>
  Hello world
</button>
➡️ Dynamic table [old]
- 1️⃣ create a component that renders an array as a HTML table in a single row
- 2️⃣ create a component that renders an array as a HTML table with a specific number of columns
- receives the array and number of columns in props
| 1 | 2 | 3 |
|---|---|---|
| 4 | 5 | 6 |
| 7 |
const input = [1,2,3,4,5,6,7]

<Table columns={3} array={input} />| 1 | 2 | 3 | 4 | 5 | 6 | 7 |
|---|
1️⃣
const input = [1,2,3,4,5,6,7]

<Table array={input} />
2️⃣
➡️ Vending machine [final]
Tatranka
Fidorka
Mars
Price: 20,-
Coins: 50,-
🪙
Insert coin
3x
5x
0x
out of stock
➡️ Vending machine
Tatranka
Fidorka
Mars
➡️ N-buttons
- show available items
- click on the button console.logs name
- label all buttons: "1x"
Tatranka
Fidorka
Mars
function VendingMachine() {
  const items = [
	'Tatranka',
    'Fidorka',
	'Mars'
  ];

  return ...
}

function VendingItem() {
  return <button />{name}
}
1x
1x
1x
State
useState
- hook for storing data
- instead of declaring variable
import React, { useState } from 'react';

function Counter() {
  const [name, setName] = useState('nobody');

  function handleGiveName(name: string) {
    setName(name);
  }

  return <div>
    My name is {name}.
    <button onClick={() => handleGiveName('Martin')}>
      Give me name
    </button>
  </div>
}
initial value
➡️ Create counter [old]
- create button with counter as text
- start from 0
- everytime you click the button the counter is increased
➡️ Vending machine
Tatranka
Fidorka
Mars
3x
5x
0x
➡️ Create goods counter
- each vending machine item should show a count of available items
- start with 5x items each
- when clicked, it should decrease the number
- the number cannot be negative
Component lifecycle
- mounted
- updated
- triggered by change of state
- triggered by change of props
- ➡️ render
- unmounted
Class components
- rarely used nowadays
- uses a class instead of a function
- this.props
- this.setState() to change state
- life cycle hooks
- componentDidMount
- componentWillUnmount
Counter example
import React from 'react';

type State = {
  counter: number;
}

export class MyComponent extends React.Component<{}, State> {
  state = {
    counter: 0
  };

  increment() {
    this.setState({ counter: this.state.counter + 1 });
  }

  render() {
    const { counter } = this.state;
    return <div>
      Counter: {counter}
      <button type="button" onClick={() => this.increment()}>Increment</button>
    </div>
  }
}
➡️ Rewrite class component as a functional component
type Props = {
  pregeneratedCount: number
}

type State = {
  generatedNumbers: number[];
}

export class NumberGeneratorClass extends React.Component<Props, State> {
  constructor(props: Props) {
    super(props);
    const generatedNumbers = [...Array(props.pregeneratedCount)].map(() => Math.random());
    this.state = {
      generatedNumbers
    };
  }

  generateNew() {
    this.setState({ generatedNumbers: [...this.state.generatedNumbers, Math.random()] });
  }

  render() {
    const { generatedNumbers } = this.state;
    return <div>
      {generatedNumbers.map((num, index) => <div key={index}>{num}</div>)}
      <button type="button" onClick={() => this.generateNew()}>Generate new</button>
    </div>
  }
}
Important things to notice
- setter needs a new reference
- we cannot use .push
- the initial set is generated on every render
Conditions
- use if statement
- use ternary operator
function MyComponent() {
  const random = Math.random();

  if (random < 0.5) {
    return <span>lower</span>
  } else {
    return <span>higher</span>
  }
}
function MyComponent() {
const random = Math.random();
return <span>
{random < 0.5 ? 'lower' : 'higher'}
</span>
}function MyComponent() {
const condition = true;
return <>
{condition && <span>It's true</span>}
</>
}➡️ Vending machine
Tatranka
Fidorka
Mars
3x
5x
0x
out of stock
➡️ Show out of stock
- item with 0 count should show it's out of stock
<div style={{color: 'red'}}>Out of stock</div>Debugging
Main tools
- console.log
- React dev tools
- Chrome debugger
debugger;Chrome dev tools
- Network
- Source
- Performance
- Application
- React dev tools
- Components
- Profiler
Logging
- Sentry.io
- TrackJS
Styling app
Import CSS
- global CSS
- can use preprocessors (SCSS, SASS)
import './App.css';

function Component() {
  return <div className="red">Hello</div>
}
.red {
color: red;
}App.css
App.tsx
CSS modules
- scoped CSS
- can use preprocessors (SCSS, SASS)
- css file must be named .module
import styles from './Component.module.css';

function Component() {
  return <div className={styles.red}>Hello</div>
}
.red {
color: red;
}App.module.css
App.tsx
Conditional styling without CSS modules
- classnames library
- npm i classnames @types/classnames
- key = class to be applied
- value = condition
import cn from 'classnames';

function ValidationState() {
  const [invalid, setInvalid] = useState(false);

  return <div className={cn({ red: invalid })}>
    Status
  </div>
}
Conditional styling with CSS modules
- dynamic keys
import cn from 'classnames';
import styles from './ValidationState.module.css';

function ValidationState() {
  const [invalid, setInvalid] = useState(false);

  return <div className={cn({ [styles.red]: invalid })}>
    Status
  </div>
}
➡️ Vending machine
Tatranka
Fidorka
Mars
3x
5x
0x
out of stock
➡️ Out of stock
- when out of stock (count = 0)
- apply a red background on the button
- disable the button
- use CSS modules
useEffect
useEffect
- hook for side effects
- = things not related to render
- second argument say when it runs
- empty - on every render
- [ ] - only at the begining (=on mount)
- [ variable ] - when a variable changes
- should return cleanup function
useEffect example
- tracks mouse position
export const MyMouse = () => {
  const [mousePosition, setMousePosition] = useState({x: 0, y: 0});

  useEffect(() => {
    const onMouseMove = (event: MouseEvent) => {
      setMousePosition({
        x: event.clientX,
        y: event.clientY
      });
    };
    window.addEventListener('mousemove', onMouseMove);

    return () => {
      window.removeEventListener('mousemove', onMouseMove);
    };
  }, []);

  const {x, y} = mousePosition;
  return (
    <div>My mouse x position is {x} and y position is {y}</div>
  );
};
➡️ Create automatic counter [old]
- create a component which increases the counter every second
- in the parent component create a button which shows/hides automatic counter component
➡️ Track where user clicks
- when the user performs a mouse click, save the coordinate
- show clicks history under the vending machine
Data down, events up
Events up
Component
User info
ArticleList
Article
Today Weather
Article
I am smart, I know what to do 💡
❤️ "User liked an article"
Creating own event
- component emits event up
type Props = {
  article: Article;
  onLike: () => void;
};

function Article(props: Props) {
  return <>
    <h1>{article.title}</h1>
  	<p>{article.shortText}</p>
    <button onClick={props.onLike}>❤️ Like</button>;
  </>
}
<Article article={article} onLike={() => handleLike(article)} />parent component:
child component:
➡️ Vending machine
Tatranka
Fidorka
Mars
3x
5x
0x
out of stock
Price: 20,-
➡️ Move state to the vending machine component
- information about count should be a concern of the Vending machine
- when a user clicks the button, it tells the vending machine to adjust the count
- show total price
Children props
Children props
- you might pass HTML as body of element:
<MyBytton onClick={...}>
  <Icon> Click me!
</MyBytton>- Table component receives react element via children prop:
function MyButton(props) {
  return (
    <button className="blue-button" onClick={props.onClick}>
      {props.children}
    </button>
  )
}
➡️ Create a generic dropdown
- What is dropdown?
- button which opens a menu when clicked
- props:
- label = label of the button
- children = the dropdown content
<DropdownComponent label="Open dropdown">
  Hello, this is dropdown!
</DropdownComponent>
➡️ Vending machine
Tatranka
Fidorka
Mars
🪙
Insert coin
3x
5x
0x
out of stock
+10 coins
+20 coins
+50 coins
Coins: 50,-
Price: 20,-
➡️ Add coins
- Show current coins
- Use the generic background to show buttons to insert coins
<DropdownComponent label="Insert coins">
  <button>+ 10 coins</button>
  <button>+ 20 coins</button>
  <button>+ 30 coins</button>
</DropdownComponent>
Controlled input
- use component state as the only source of truth
function Component() {
  const [inputName, setInputName] = useState(name);

  return <>
    {inputName}

    <input
      value={inputName}
      onChange={(e) => setInputName(e.target.value)} />
  </>
}
➡️ Vending machine
Tatranka
Fidorka
Mars
🪙
Insert coin
3x
5x
0x
out of stock
+10 coins
+20 coins
+50 coins
Any amount
Coins: 50,-
Price: 20,-
➡️ Create input
- input of type number
- how much the counter will increment
- on enter it adds the amount
+10 coins
+20 coins
+50 coins
Any amount
➡️ Vending machine
Tatranka
Fidorka
Mars
Price: 20,-
Coins: 50,-
🪙
Insert coin
3x
5x
0x
out of stock
Strict mode
Strict mode
- checks for common mistakes
- only in dev mode
- runs effects twice
- renders components twice
API request
Axios library
- used to make HTTP requests
- supports promises
- docs: https://axios-http.com/docs/example
- install: npm install axios
Axios POST usage
import axios from 'axios';

const payload = { name: 'Martin' };
const response = await axios.post('/api/users', payload);
console.log(response);
import axios from 'axios';

const payload = { name: 'Martin' };
axios.post('/api/users', payload)
  .then(response => console.log(response));
- good idea to trigger in useEffect - why?
Typed response
type Response = {
  id: number;
  name: string;
  age: number;
}

axios.get<Response>('/api/users/1')
➡️ Let's make http request
- open API request in browser to see structure of response
- 1️⃣ display joke in the component
- 2️⃣ create a button to load another joke
GET https://api.chucknorris.io/jokes/randomCustom hooks
Custom hooks
- separate logic from view
- no render
- named use*
- hooks to component lifecycle
- clear API
useMouseMove
const useMouseMove = () => {
  const [mousePosition, setMousePosition] = useState({ x: 0, y: 0 });

  useEffect(() => {
    const onMouseMove = (event: MouseEvent) => {
      setMousePosition({
        x: event.clientX,
        y: event.clientY,
      });
    };
    window.addEventListener('mousemove', onMouseMove);
    return () => {
      window.removeEventListener('mousemove', onMouseMove);
    };
  }, []);

  return { x: mousePosition.x, y: mousePosition.y };
};- mouse position example
- no input
- outputs x, y of mouse
Fetch joke hook
- 1️⃣ encapsulate fetching joke logic into a custom hook
- think about API first
- 2️⃣ Improvement: remember already fetched jokes, load next adds into the list
React Context
Context
- "global" state for subtree of components
- avoids passing props deep
- Provider + Consumer
type ContextValue = boolean;

const MyContext = React.createContext<ContextValue>(false);

function App() {
  return <MyContext.Provider value={true}>
    <Component />
  </MyContext.Provider>;
}

function Component() {
  const value = useContext(MyContext);

  return <div>{value}</div>;
}
Context
- pass object with value + setter
type ContextValue = {
  value: number;
  setValue: (value: ContextValue['value']) => void
};

const MyContext = React.createContext<ContextValue>({} as unknown as ContextValue);

function App() {
  const [value, setValue) = useState(0);

  return <MyContext.Provider value={{ value, setValue}}>
    <Component />
  </MyContext.Provider>;
}

function Component() {
  const {value, setValue} = useContext(MyContext);

  return <>
    <div>{value}</div>
    <button onClick={() => setValue(value + 1)}>Click</button>
  </>;
}
➡️ Vending machine
Tatranka
Fidorka
Mars
Price: 20,-
Coins: 50,-
🪙
Insert coin
3x
5x
0x
out of stock
➡️ Light switch 💡
- style vending machine based on a light switch
- light is on - bright
- light is off - dark
- create a light switch button
useRef
useRef
- manipulate with DOM elements
- object with mutable current property
function Component() {
  const inputRef = useRef<HTMLInputElement>(null);

  function handleClick() {
    inputRef.current.focus();
  }

  return <div>
    <input ref={inputRef} />
    <button onClick={handleClick}>Focus the input</button>
  </div>
}
➡️ Autofocus input
- make the input for coins focused on mount
🎉
React Typescript basic course
By Martin Nuc