Angular4+ with @ngrx
Chapter 1
Angular5+
Main Pluses:
1. Components
2. Modules
3. EventEmiter
4. Change Detection
5. Services and DI
What is it?
When it happens?
What are the requirements for solving the problem
1. explicit dependencies
2. If the state has been changed, we should know who was the source.
3. The change in state must come from one place
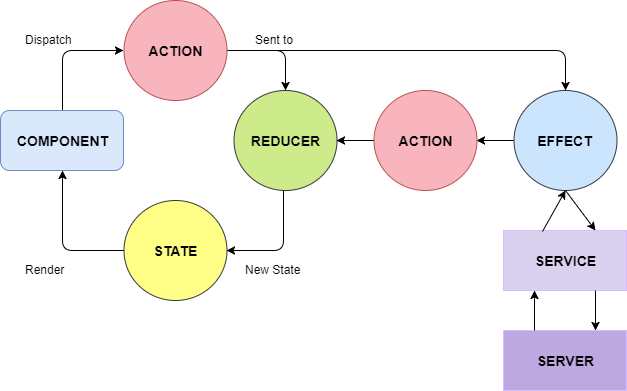
What is @ngrx?
Redux state managers have been very well received and have inspired the creation of @ngrx, a set of modules that implement the same way of managing state as well as some of the middleware and tools in the Redux ecosystem. @ngrx was created to be used specifically with Angular and RxJS, as it leans heavily on the observable paradigm.
Adding @ngrx to your Project
$ npm install @ngrx/core @ngrx/store --saveRedux
-
Single source of truth (state/store)
-
State is read-only
-
Changes are made with pure functions (reducers)
-
Reducers work only when an action occurs
What does this all mean
1. unidirectional data flow
2. a clear understanding of application state changes
3. separation of a state change from a presentation layer
Example
We create simple counter with @ngrx
We should create:
1. state;
2. action;
3. reducer.
State
export interface State {
  counter: number;
};

// we can init initial value
export const intitialState: State = {
  counter: 10
};
Call ProvideStore In NgModule
Reducers created, it’s time to configure Angular application
@ngrx/store v2
@ngrx/store v4
@NgModule({
  ...

  imports: [
    ...

    StoreModule.forRoot({ counter }),

    ...
  ],

  ...
})
export class AppModule {}
@NgModule({
...
imports: [
...
StoreModule.provideStore({ counter }),
...
],
...
})
export class AppModule {}Reducer
Reducers in a Redux application should not mutate the state, but return a copy of it, and be side-effect free. This encourages you to think of your application as UI that gets "computed" from a series of actions in time.
The reducer is the thing that catches and handles the actions that are dispatched from your smart components (or from your action reducers), and it is also the thing that actually resets the state to a new, modified state.
Reducer
export function counter(state: CounterState = initialState, action: Action): CounterState {
  switch (action.type) {
    case INCREMENT: {
      return {
        counter: state.counter + 1
      };
    }

    case DECREMENT: {
      return {
        counter: state.counter - 1
      };
    }

    case RESET: {
      return {
        counter: 0
      };
    }

    default: {
      return {
        counter: state.counter
      };
    }
  }
}
Creating your Application's Root Reducer
// root-reducer.ts

import {counterReducer} from './counter/counter.reducer';

export const rootReducer = {
  counter: counterReducer
};
@ngrx allows us to break our application into smaller reducers with a single area of concern. We can combine these reducers by creating an object that mirrors the application's AppState, where each property will point to one of those smaller reducers.
Action
Redux uses a concept called Actions, which describe state changes to your application. Redux actions are simple JSON objects that implement the Action interface provided by @ngrx:
Action
export function incrementAction(): Action {
  return {
    type: GET_COURSES,
    payload: {
    }
  };
}
@ngrx/store v2
@ngrx/store v4
import { Action } from '@ngrx/store';

export const INCREMENT: string = 'INCREMENT';
export const DECREMENT: string = 'DECREMENT';
export const RESET: string = 'RESET';

export class IncrementAction implements Action {
  public readonly type: string = INCREMENT;

  // constructor(public payload: CounterState) {}
}

export class DecrementAction implements Action {
  public readonly type: string = DECREMENT;

  // constructor(public payload: CounterState) {}
}

export class ResetAction implements Action {
  public readonly type: string = RESET;

  // constructor(public payload: CounterState) {}
}
Dispatch Actions
@Injectable()
export class CounterService {
  public store$;

  constructor(private store: Store<CounterState>) {
    this.store$ = this.store.select('counter');
  }

  public getCurrentValue(): Observable<CounterState> {
    return this.store$;
  }

  public increment(): void {
    this.store$.dispatch(new IncrementAction());
  }

  public decrement(): void {
    this.store$.dispatch(new DecrementAction());
  }

  public reset(): void {
    this.store$.dispatch(new ResetAction());
  }
}
Now we've seen how to implement the full "Redux Loop" in ngrx.
Example
Simple Counter
Chapter 2
@Effects
Often times, we need to perform some logic after an action has been dispatched and the store has been updated. Because reducers should be side-effect free, we need a way to handle these side-effects.
@Effects
Once again - when we access the server to accept data, write or take to / from the localStorage token, etc. - all these are side effects
How does it works?
Installing Ngrx/Effects
$ npm install @ngrx/effects --save@Effect
@Effect() update$ = this.action$
    .ofType('SUPER_SIMPLE_EFFECT')
    .switchMap( () =>
      Observable.of({type: "SUPER_SIMPLE_EFFECT_HAS_FINISHED"})
    );
1. “ngrx effect” will be triggered when we dispatch actions with the store (the same was we always send actions to the reducer);
2. Then we see “this.action$.ofType(‘SUPER_SIMPLE_EFFECT’)”.
.ofType means your taking in an observable and then returning the observable only if it is of that type
3. Then we do switchMap because we want to “switch over” from the original observable to a brand new observable.
4. This effect will then return an observable to some action, and the new action will then be handled in the reducer.
@Effect
@Injectable()
export class CounterEffects {
  @Effect() public reset$ = this.actions$
    .ofType(RESET)
    .map(() => ({ type: RESET_SUCCESS }));

  constructor(
    private actions$: Actions
  ) { }
}
@Effect
@Effect() getCorses$ = this.actions$
    .ofType(GET_COURSES)
    .switchMap((action) =>
      this.coursesResourceService.getCourses(action.payload.start,
                                             action.payload.count,
                                             action.payload.query)
        .map((data) => {
          return this.coursesService.processingData(data);
        })
        .map((data) => {
          return ({type: GET_COURSES_SUCCESS, payload: data});
        })
        .catch((error) => Observable.of({
            type: GET_COURSES_ERROR,
            payload: {
                error: { status: error.status }
            }
        })));
// action from @ngrx v2
export function getCoursesAction(start: number, count: number, query?: string): Action {
return {
type: GET_COURSES,
payload: {
start,
count,
query
}
};
}Configuring your effects service
@ngrx/store v2
@ngrx/store v4
@NgModule({
  ...

  imports: [
    ...

    EffectsModule.forRoot([CounterEffects]),

    ...
  ],

  ...
})
export class AppModule {}
@NgModule({
...
imports: [
...
EffectsModule.run(CounterEffects),
...
],
...
})
export class AppModule {}Example
Counter with Effect
Chapter 3
Debugging
npm install @ngrx/store-devtools --saveyarn add @ngrx/store-devtoolsor
Nightly builds
Install
npm install github:ngrx/store-devtools-buildsyarn add github:ngrx/store-devtools-buildsor
Instrumentation
Instrumentation with the Chrome / Firefox Extension
1. Download the Redux Devtools Extension
Instrumentation
2. In your AppModule add instrumentation to the module imports using StoreDevtoolsModule.instrument:
@ngrx/store v2@ngrx/store v4
@NgModule({

  imports: [
    ...

    !environment.production ? StoreDevtoolsModule.instrument({ maxAge: 50 }) : []

    ...
  ],
})
@NgModule({
imports: [
StoreDevtoolsModule.instrumentStore({ maxAge: 50 }),
// OR
StoreDevtoolsModule.instrumentOnlyWithExtension({
maxAge: 50
})
],
})Instrumentation

Example
Debugging Store
Examples
1. Simple Counter
2. Counter with Effect
3. Debugging
Bonus
Main types:
- Class decorators, e.g. @Component and @NgModule
- Property decorators for properties inside classes, e.g. @Input and @Output
- Method decorators for methods inside classes, e.g. @HostListener
- Parameter decorators for parameters inside class constructors, e.g. @Inject
This let’s us decorate specific methods within our class with functionality.
import { Component, HostListener } from '@angular/core';

@Component({
    selector: 'example-component',
    template: '<div>Woo a component!</div>'
})
export class ExampleComponent {
    @HostListener('click', ['$event'])
    onHostClick(event: Event) {
        // clicked, `event` available
    }
}function Console(target) {
console.log(target);
}
@Console
class ExampleClass {
constructor() {
console.log('Yo!');
}
}@Console('Hey!')
class ExampleClass {
constructor() {
console.log('Yo!');
}
}function Console(message) {
console.log('Message', message);
return function (target) {
console.log('Our decorated class', target);
}
}
@Console('Hey!')
class ExampleClass {
  constructor() {
    console.log('Yo!');
  }
}Every type of decorator shares the same core functionality. From a purely decorative point of view, @Component and @Directive both work in the same way, as do @Input and @Output. Angular does this by using a factory for each type of decorator.
So we know now how and why Angular uses decorators, but how are they actually applied to a class?
// es6
class ExampleClass {
  constructor() {
    console.log('Yo!');
  }
}
// typescript
var ExampleClass = (function() {
function ExampleClass() {
console.log('Yo!');
}
return ExampleClass;
})();@ConsoleGroup('ExampleClass')
class ExampleClass {
constructor() {
console.log('Yo!');
}
}var ExampleClass = (function() {
function ExampleClass() {
console.log('Yo!');
}
return ExampleClass;
})();
ExampleClass = __decorate([ConsoleGroup('ExampleClass')], ExampleClass);Links
- https://angular-2-training-book.rangle.io/handout/state-management/ngrx/
- http://www.wisdomofjim.com/blog/setting-up-ngrx-in-an-angular-2-project
- https://medium.com/@flashMasterJim/the-basics-of-ngrx-effects-effect-and-async-middleware-for-ngrx-store-in-angular-2-f25587493329
- https://github.com/ngrx/platform
- https://toddmotto.com/angular-decorators
- https://medium.com/@ttemplier/angular2-decorators-and-class-inheritance-905921dbd1b7
- https://github.com/ngrx/platform/blob/master/MIGRATION.md
- https://github.com/ngrx/platform/issues/111
- https://medium.com/@independbear/%D1%80%D0%B5%D0%B0%D0%BA%D1%82%D0%B8%D0%B2%D0%BD%D1%8B%D0%B5-%D0%BF%D1%80%D0%B8%D0%BB%D0%BE%D0%B6%D0%B5%D0%BD%D0%B8%D1%8F-%D0%BD%D0%B0-angular-ngrx-%D1%87%D0%B0%D1%81%D1%82%D1%8C-2-1412bc9adf17
- https://medium.com/@independbear/%D1%80%D0%B5%D0%B0%D0%BA%D1%82%D0%B8%D0%B2%D0%BD%D1%8B%D0%B5-%D0%BF%D1%80%D0%B8%D0%BB%D0%BE%D0%B6%D0%B5%D0%BD%D0%B8%D1%8F-%D0%BD%D0%B0-angular-ngrx-%D1%87%D0%B0%D1%81%D1%82%D1%8C-3-effects-6f4b34dfa289
Angular4+ with ngrx
By Oleg Rovenskyi


