
Omar Patel
Software developer/instructor
Here are some highlights about CMS:
Here is the final result of our update.php from last week:
https://goo.gl/ON4iQn
Note: You might run into some issues with the page giving warnings related about a header issue. This can be resolved by putting the "require require/login_check.php" line right above the HTML below all the rest of the code.
This week, we're going to finish our usage of CRUD and CMS by implementing the deletion of elements in our system.
We are also going to upload our projects to a live server, including the information from our local database.
Alright, so let's get started with deleting our information.
Let's say a user wants to delete their information. This is a typical use case for when a user wants to delete their profile. In this case, the profile is the user row for that particular user.
The steps we are going to take in order to perform this action is as follows:
1. Create a form for the username and password of the user.
2. Have a simple check to make sure the user wants to delete their user from the database.
3. If the username and password match that in the database, then delete the user.
Our Delete form is going to be very simple. We only need fields for username and password. The submit button should have a name and a value of "delete" and the method of the form should remain as "post". I suggest doing a copy/paste from the login.php form.
Try and do this on your own and then take a look at the solution on the next page.
<div id="container">
	<?php include "includes/header.php" ?>
	<?php include "includes/nav.php" ?>
<h1>Delete User</h1>
<form id="form_delete" method="post" action="">
	<ul>
		<li>
			<label for="username">Username</label>
			<input id="username" type="text" name="username" value="" />
		</li>
		<li>
			<label for="password">Password</label>
			<input id="password" type="password" name="password" value="" />
		</li>
		<li>
			<input id="submit_delete" type="submit" name="delete" value="Delete">
		</li>
	</ul>
</form>
	<?php include 'includes/footer.php' ?>
</div>
Delete Form
Delete Form
Next, be sure to delete any php code (aside from the require statements) from the top of the page. We're just going to copy and paste the code from our login.php file and then make some adjustments.
Changes:
if (isset($_POST['delete']) && trim($_POST['delete']) != '') {
	if (isset($_POST['username']) && isset($_POST['password'])
		&& trim($_POST['username']) != '' && trim($_POST['password']) != '') {

		$username = escape_quotes($_POST['username']);
$password = escape_quotes(hash("sha512", $_POST['password']));Delete Form
Next, we're going to just copy more code from login.php. Seeing a trend here? This one is going to be similar to the code from login.php, except that we're going to redirect the urls in the "die" functions to "delete.php". We're just checking to see if the login information from the form matches that of the database.
$password = escape_quotes(hash("sha512", $_POST['password']));

$user = get_all_info("SELECT * FROM users WHERE username='$username'");

// Get the first instance of the user and store it into an array
$userArray = $user->fetch_assoc();

if(count($userArray) <= 0) {
	die("<h2>That username doesn't exist! Please type in the correct username.
		<a href='delete.php'>Back</a></h2>");
}
if ($userArray['password'] != $password) {
	die("<h2>Incorrect password! <a href='delete.php'>Back</a></h2>");
}Delete Form
We will now go ahead and delete the information from our database.
		if ($userArray['Password'] != $password) {
			die("<h2>Incorrect password! <a href='delete.php'>Back</a></h2>");
		}

		insert_or_update_info("DELETE FROM users WHERE username='$username'");

		setcookie("c_user" , '' , time()-50000, '/');

	        $logged = false;

		echo "<h2>User has been deleted. <a href='index.php'>Home</a> </h2><br>";

	    exit;
	}
	else {
		echo "<h2>Please enter a username and password.</h2>";
	}
}Delete Form
		if ($userArray['Password'] != $password) {
			die("<h2>Incorrect password! <a href='delete.php'>Back</a></h2>");
		}

		insert_or_update_info("DELETE FROM users WHERE username='$username'");

		setcookie("c_user" , '' , time()-50000, '/');

	        $logged = false;

		echo "<h2>User has been deleted. <a href='index.php'>Home</a> </h2><br>";

	    exit;
	}
	else {
		echo "<h2>Please enter a username and password.</h2>";
	}
}JavaScript Check
$( document ).ready(function() {
    $("#form_delete").submit(function( event ) {
		var answer = confirm("Are you sure you want to delete the user?");

		if (answer == true) {
		    return;
		}

		event.preventDefault();
	});
});Delete Form
That's it! Your delete form should now be working. Test it out!
You now have a complete CRUD system that you can copy and use across any of your future sites :)
Putting your app on a live server
Now that we have a completed CRUD application, along with a contact form and a variety of other functionality, we should make it live for everyone to see.
If you're in this class, I'm sure you have experience with uploading your sites to a live page. This may have been done using FTP or Git with Github pages (if you've taken my classes).
I've found a free solution that works pretty well, so I'm gonna go with that for everyone. We're going to use a combination of Heroku for hosting, cleardb for our production database, and Sequel Pro for our database management system (just like phpmyadmin, but way nicer).
Putting your app on a live server
Here is the basis for the next series of steps: https://www.youtube.com/watch?v=iRgSQTmA-N4
Just like before, though, the video is going to be different in some regards from what I do, but the concepts are the same.
Hosting
Heroku is a cloud application platform and a service that we'll be using to host our web application.
Hosting
Hosting
Hosting
Hosting
Hosting
Hosting
Hosting
Hosting
Hosting
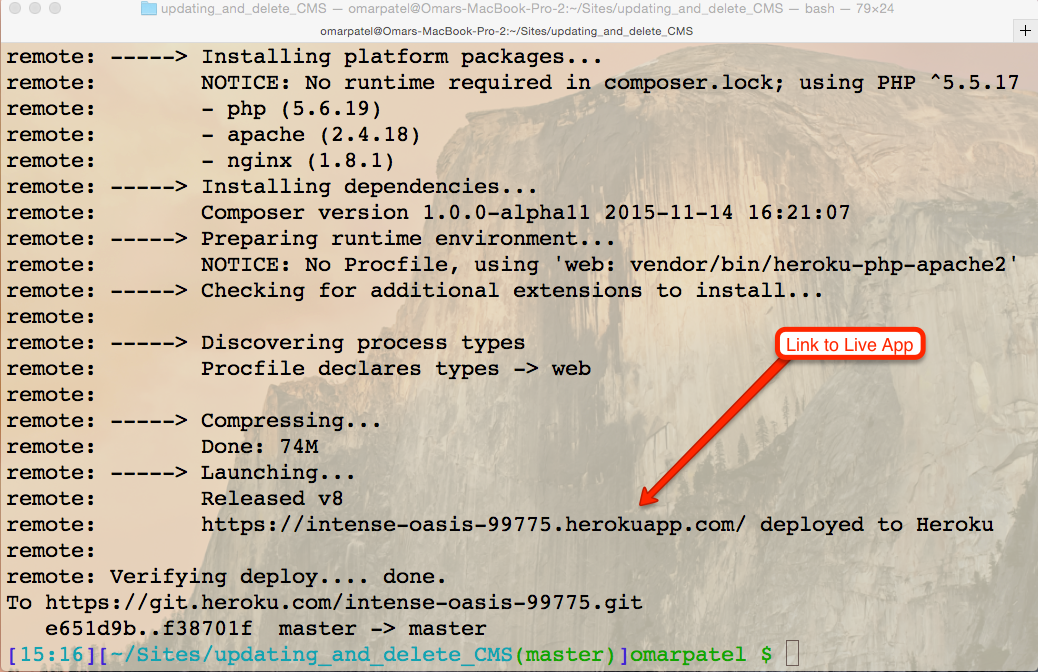
Now, that just means we have the following information:
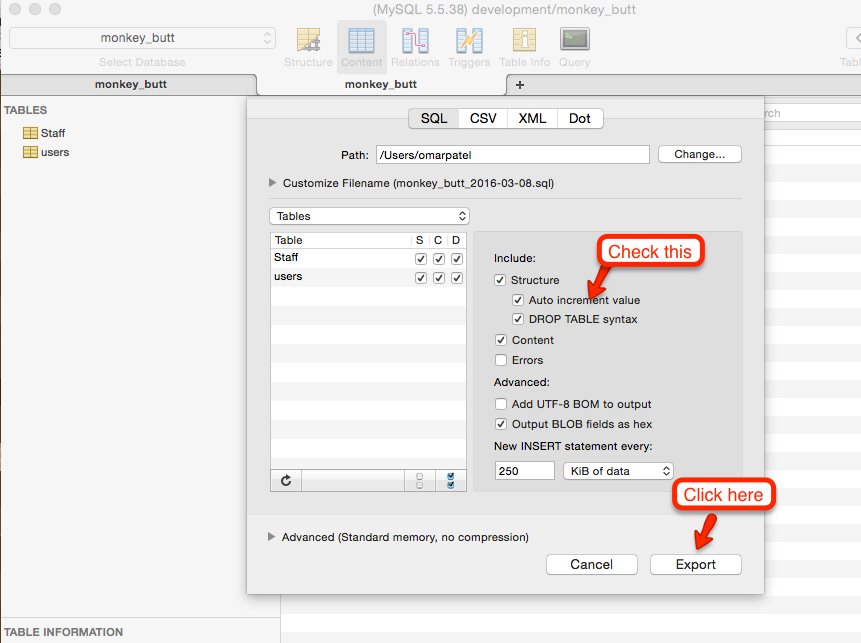
Of course, your credentials are going to look different than mine. We're going to use these credentials to log into our database from Sequel Pro or MySQLWorkbench. Before we do that, though, we're going to do something called a SQL dump. That sounds gross, but all it means is that we're going to get all of the info needed to get the information from our database and store it into a file.
Importing and Exporting
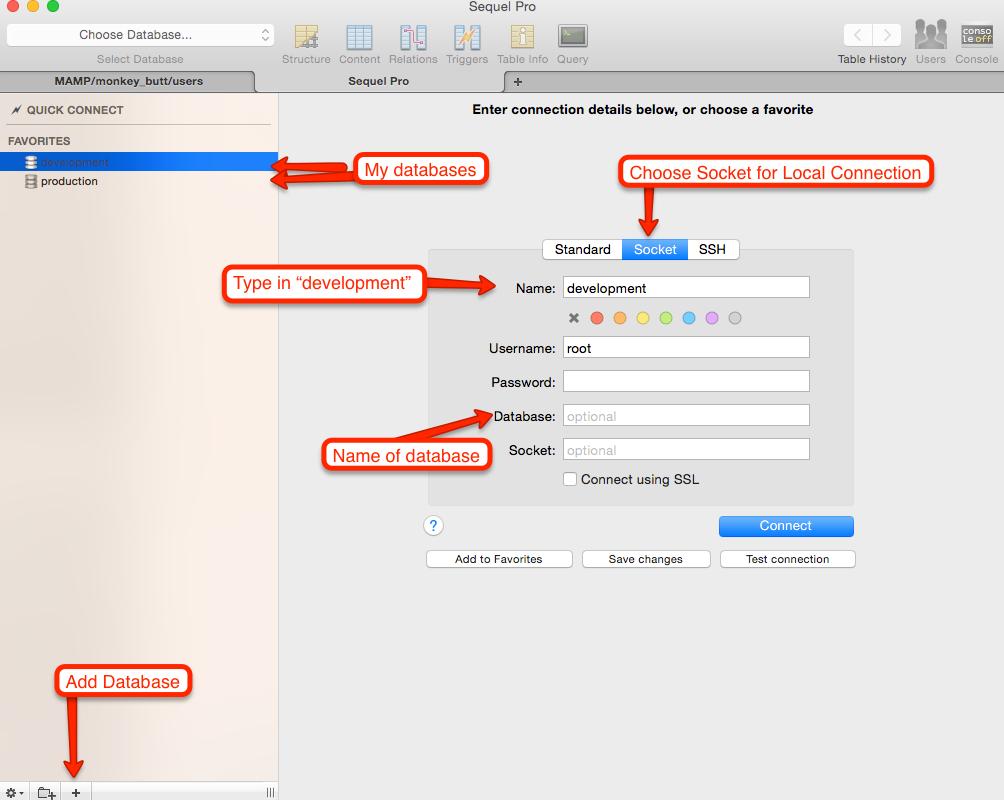
Let's log into our local database using Sequel Pro or MySQLWorkbench. As a side note, you can save your credentials so you don't have to keep type it in over and over when you want to log in.
Importing and Exporting
Importing and Exporting
Importing and Exporting
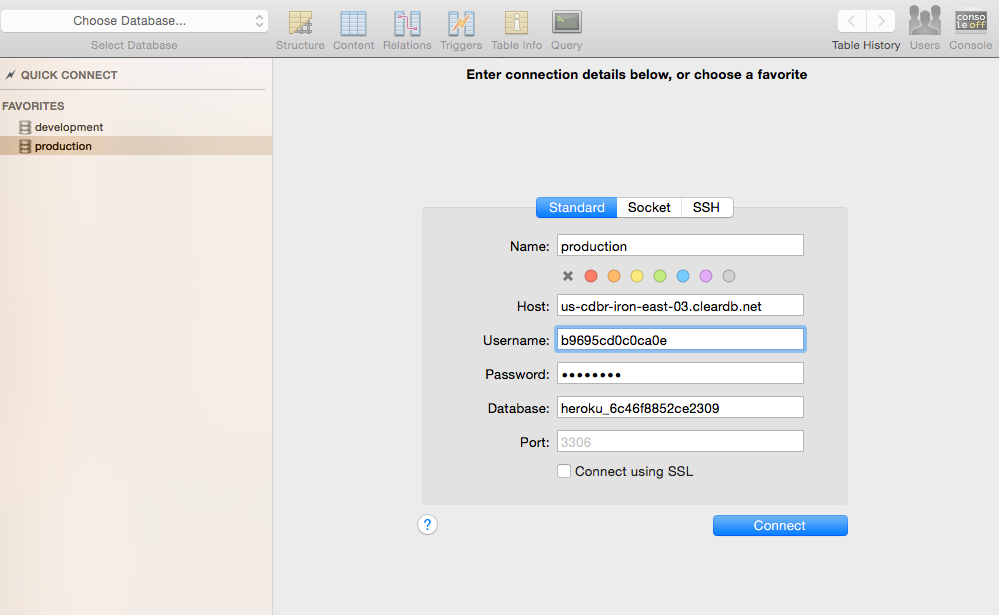
Log into the production database by using the credentials you got earlier form the terminal. It should look something like this:
Connecting
Once you log in, you should see all the information from your local database!
Ok, so our final step is going to be connecting our application to the production database. This part is going to be fairly short.
Go to your constants.php page and then go to the next slide for how the constants.php page should now look like.
Connecting
<?php

//DB Constants for local
// define("DB_SERVER", "localhost");
// define("DB_USER", "potatoMike");
// define("DB_PASS", "meowmix");
// define("DB_NAME", "monkey_butt");

//DB Constants for production
$cleardb_url = parse_url(getenv("CLEARDB_DATABASE_URL"));
$cleardb_server = $cleardb_url["host"];
$cleardb_username = $cleardb_url["user"];
$cleardb_password = $cleardb_url["pass"];
$cleardb_db = substr($cleardb_url["path"], 1);

define("DB_SERVER", $cleardb_server);
define("DB_USER", $cleardb_username );
define("DB_PASS", $cleardb_password);
define("DB_NAME", $cleardb_db);

?>Connecting
Notice that I commented out my connection constants for my local machine. That's because we now want to connect to our production database instead of our local database.
The second chunk of code is actually asking Heroku for the credentials. This is a secure way of using the information, since it prevents our file system from storing sensitive information. I've then sent the information from these variables into the define functions.
Once you've done this, please be sure to perform the following in the command line (minus the double quotes):
"git add ."
"git commit -m 'updated the constants file'"
"git push heroku master"
Connecting
That's it. If you refresh your heroku app, you should see your project up and running :)
Here is the final code for the files we went over today:
constants.php: https://goo.gl/wOpi6k
delete.php: https://goo.gl/y7cVX2
composer.json: Just has empty brackets inside.
Optional script.js file for form validation (making sure a user wants to delete their user): https://goo.gl/kil3QP
{}Be sure to add what we did today to your final project. I'll be checking to make sure it exists. Also, be sure that your app is hosted live and that the database is also on a live server. Basically, this assignment is a freebie if you've followed along with class today.
Design and develop a 4-page PHP and MySQL driven website.
By Omar Patel