Omar Patel
Software developer/instructor
Aka DES261
Finish the HTML part of the the tutorial by next week. This includes: INTRODUCTION TO HTML, HTML STRUCTURE: USING LISTS, HTML STRUCTURE: TABLES, DIVS, AND SPANS
Now that you know what the site is going to look like, we're going to try and bring it to life using HTML, CSS, and JavaScript.
Alright, so last week we completed part of the HTML tutorial in class. This week, we're going to go over CSS. Remember these facts about CSS?
Continue Working on the HTML & CSS track. Hopefully, you have completed the HTML portion of the tutorial (which is what's due today).
I can go over any concepts you didn't understand. Also, please take a look at the updated notes for last week's slides (they are now at a different link)
Again, please pair up in groups so that you can accomplish this together and help one another. I'll be here to answer questions, but I might not be available as fast as the person next to you.
p {
  color: red;
}/* The following is CSS for the Index.html file only */
p {
color: red;
/* font-family: Arial; Don't want to use this code for now */
font-size: 12px;
}
h1 {
color: white;
}
p {
    color: red;
}p {
font-family: Tahoma, Verdana, sans-serif;
}div {
width: 50px;
height: 50px;
}div {
border: 1px solid green;
}a {
text-decoration: none;
}div {
border-radius: 2px;
}div {
margin: 1px 2px 8px 0;
}div div a {
color: white;
}<div>
<div>
<a></a>
</div>
</div>* : The universal selector or * is used in CSS to select every HTML element. This is rarely used and if used, should be done carefully.
* {
    border: 1px dashed black;
}<!-- The divs with id's "first_div" and "second_div" are siblings -->
<div id="first_div">
<!-- The div with the id "first_nested_div" is a child
of the div with id "first_div". This also makes "first_div"
a parent of "first_nested_div" -->
<div id="first_nested_div">
</div>
</div>
<div id="second_div">
<div id="second_nested_div">
</div>
</div>
If p was contained in a div, then you could override that CSS if you increased your CSS specificity like this:
p {
    color: white;
}
div p {
color: purple;
}<div class="container">
<h1 id="title_header">Welcome!</h1>
</div>
<style>
.container {
color: white;
}
#title_header {
background-color: purple;
}
</style>a:hover {
color: pink;
}<div>
<p></p>
<p></p>
</div>
<style>
/* Will only style the first p element */
p:first-child {
color: red;
}
</style>
p:nth-child(4) {
    color: yellow;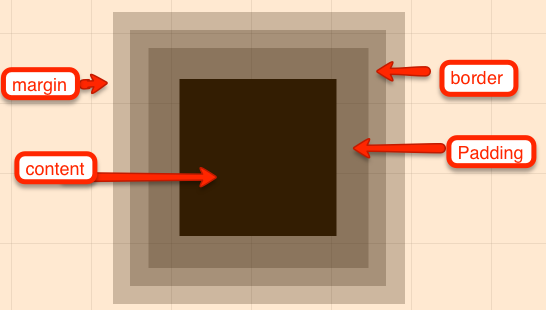
}div {
padding-top: 4px;
padding-left: 2px;
margin-top: 1px;
border: 1px dotted purple;
}<div id="block_container"></div>
<div id="inline_block_container"></div>
<div id="inline_container"></div>
<div id="invisible_container"></div>
<style>
#block_container {
display: block; //default display for divs
}
#inline_block_container {
display: inline-block;
/* displays element in the same line
as other elements, but as a block shape */
}
#inline_container {
display: inline; //displays element in same line
}
#invisible_container {
display: none; //hides element
}
</style>div {
float: right;
}
#footer {
clear: both;
}<div id="static_container"></div>
<div id="absolute_container"></div>
<div id="relative_container"></div>
<div id="fixed_container"></div>
<style>
#static_container {
position: static; //default position for any element
}
#absolute_container {
position: absolute; /* position relative to container
if container is non-static */
}
#relative_container {
position: relative; //position is relative to where it is
}
#fixed_container {
position: fixed; // position is stuck, even on scroll
}
</style><div id="first_div"></div>
<div id="second_div"></div>
<style>
#first_div {
z-index: 2; /* If both elements were stacked,
this element would be above
the other div. */
}
#second_div {
z-index: 1;
}
</style>Finish the final part of the the tutorial by next week. This includes: INTRODUCTION TO CSS, CSS CLASSES AND IDS, CSS ELEMENT POSITIONING
Quiz for next week will be based off of the CSS Tutorials
By Omar Patel