RustでLLVM IRを
出力する言語を作った話
Fizz Buzz編
スライドの内容は独自調査によるものです
間違っていたらすみません!
CAUTION!
誰?
- フロントエンドをメインにやってるエンジニア
- 最近はVueとか書いてる。状況に応じてバックエンドもやる
- 言語作成は初めて(2018/6から開始)

このスライドは?
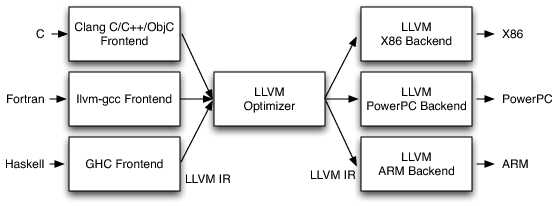
LLVM IRとは
- LLVMで使われている中間言語
- 各ステージのコンパイラのやりとりなどに用いられる
- Rustでも使われている
実物
- Fizz Buzzのgif貼っときます
- 気が向いたらレポジトリを見てやってください
作成範囲
作成範囲

LLVM IRを出力する処理を追加
- 基本的にllvm-sysが提供する関数を呼び出していく
- pointerを扱うのでunsafeを使う必要がある
- 直接は扱いにくいので淡々とラップしていく
// intの定数を作成する
pub fn const_int(llvm_type: *mut LLVMType, value: u64) -> *mut LLVMValue {
    unsafe {
        LLVMConstInt(
            llvm_type,            // int1, int8, int32などを指定する
            value,                    // 実際の値
            0                            // 0: unsigned, 1: signed
        )
    }
}
- ただマネするだけだとFizz Buzzが実装しにくい(※)
- while文をASTに追加
- 下みたいなLLVM IRをASTから出力するように実装する
define i32 @main() {
entry:
  %i = alloca i32
  store i32 1, i32* %i
  %0 = load i32, i32* %i
  %1 = icmp ule i32 %0, 100         ; %1 = (i <= 100)
  br i1 %1, label %2, label %7        ; %1がtrue => %2, false => %7

; <label>:2:                                      ; ラベル%2
  %3 = load i32, i32* %i
  %4 = add i32 %3, 1
  store i32 %4, i32* %i
  %5 = load i32, i32* %i
  %6 = icmp ule i32 %5, 100         ; %6 = (i <= 100)
  br i1 %6, label %2, label %7        ; %6がtrue => %2, false => %7

; <label>:7:                                      ; ラベル%7
  ret i32 1
}
Fizz Buzzを作るためwhile文などを追加
※ 再帰関数とか使えばできはする
let i = 1;

while (i <= 100) {
  i = i + 1;
}

return 1;
自作言語
LLVM IR
llvm-sysの使い方
1. LLVMBuilderを作成する
2. LLVMModuleを作成する
3. エントリポイントであるmainの関数を作成する
4. エントリポイントであるentryブロックを作成する
5. ブロック内の処理を記述する
6. 不要になったbuilderやmoduleを廃棄する
llvm-sysの使い方
Module
Function
Label
Block
実際の処理が入る
Label
Block
簡単なLLVM IRの構造
; 1を返すLLVM IR

; モジュール名
; ModuleID = 'main_module'
source_filename = "main_module"

; エントリポイントとなる関数
define i32 @main() {

; エントリポイントとなるブロック
entry:
  ret i32 1                ; ret(return)やbr(branch)でブロックを終了してやる必要がある
}
実際に以下のような1を返すだけの関数を実装してみる
llvm-sysの使い方
extern crate llvm_sys;
use std::ffi::CString;
use std::ptr;
use llvm_sys::core::*;

fn main() {
  unsafe {
    // 1. LLVMBuilderを作成する
    let builder = LLVMCreateBuilder();

    //  2. LLVMModuleを作成する
    let module_name = CString::new("main_module").unwrap().as_ptr();
    let module = LLVMModuleCreateWithName(module_name);

    // 3. エントリポイントであるmainの関数を作成する
    let int32_type = LLVMInt32Type();
    let function_name = CString::new("main").unwrap().as_ptr();
    let function_type = LLVMFunctionType(int32_type, ptr::null_mut(), 0, 0);
    let function = LLVMAddFunction(module, function_name, function_type);

    // 4. エントリポイントであるentryブロックを作成する
    let entry_block_name = CString::new("entry").unwrap().as_ptr();
    let entry_block = LLVMAppendBasicBlock(function, entry_block_name);
    LLVMPositionBuilderAtEnd(builder, entry_block);

    // 5. ブロック内の処理を記述する
    let return_value = LLVMConstInt(int32_type, 1, 0);
    LLVMBuildRet(builder, llvm_value);

    // 6. 不要になったbuilderやmoduleを廃棄する
    LLVMDisposeBuilder(builder);
    LLVMDisposeModule(module);
  }
}
extern crate llvm_sys;
use std::ffi::CString;
use std::ptr;
use llvm_sys::core::*;
fn main() {
unsafe {
// 1. LLVMBuilderを作成する
let builder = LLVMCreateBuilder();
// 2. LLVMModuleを作成する
let module_name = CString::new("main_module").unwrap().as_ptr();
let module = LLVMModuleCreateWithName(module_name);
// 3. エントリポイントであるmainの関数を作成する
let int32_type = LLVMInt32Type();
let function_name = CString::new("main").unwrap().as_ptr();
let function_type = LLVMFunctionType(int32_type, ptr::null_mut(), 0, 0);
let function = LLVMAddFunction(module, function_name, function_type);
// 4. エントリポイントであるentryブロックを作成する
let entry_block_name = CString::new("entry").unwrap().as_ptr();
let entry_block = LLVMAppendBasicBlock(function, entry_block_name);
LLVMPositionBuilderAtEnd(builder, entry_block);
// 5. ブロック内の処理を記述する
let return_value = LLVMConstInt(int32_type, 1, 0);
LLVMBuildRet(builder, llvm_value);
// 6. 不要になったbuilderやmoduleを廃棄する
LLVMDisposeBuilder(builder);
LLVMDisposeModule(module);
}
}長い
そして書きにくい…
llvm-sysを使う理由
1. 自力だと暗黙のブロックやラベルの処理が辛い
2. 開発用のサポートメソッドが便利
1. 自力だと暗黙のブロックやラベルの処理が辛い
下のようにif文を含んだ関数があったとする
let i = 1;

if (true) {
  i = 2;
} elseif(false) {
 i = 3;
}

return i;
上記の言語は自作言語。elseifをelse if と読めば
この式ではJavaScriptと同じ処理結果になる
以下のようなLLVM IRになる
define i32 @main() {
entry:
  %i = alloca i32
  store i32 1, i32* %i
  br i1 true, label %1, label %0

; <label>:0:                                      ; preds = %entry
  br i1 false, label %3, label %2

; <label>:1:                                      ; preds = %entry
  store i32 2, i32* %i
  br label %4

; <label>:2:                                      ; preds = %0
  br label %4

; <label>:3:                                      ; preds = %0
  br label %4

; <label>:4:                                      ; preds = %2, %3, %1
  %5 = load i32, i32* %i
  ret i32 %5
}
1. 自力だと暗黙のブロックやラベルの処理が辛い
ブロックやラベルは明示されない。暗黙のうちに決定
define i32 @main() {
entry:
  %i = alloca i32
  store i32 1, i32* %i
  br i1 true, label %1, label %0

; <label>:0:                                      ; preds = %entry
  br i1 false, label %3, label %2

; <label>:1:                                      ; preds = %entry
  store i32 2, i32* %i
  br label %4

; <label>:2:                                      ; preds = %0
  br label %4

; <label>:3:                                      ; preds = %0
  br label %4

; <label>:4:                                      ; preds = %2, %3, %1
  %5 = load i32, i32* %i
  ret i32 %5
}
1. 自力だと暗黙のブロックやラベルの処理が辛い
ブロックは暗黙の内に決まるが
brやretを使ってブロックを閉じてやる必要がある
define i32 @main() {
entry:
  %i = alloca i32
  store i32 1, i32* %i
  br i1 true, label %1, label %0

; <label>:0:                                      ; preds = %entry
  br i1 false, label %3, label %2

; <label>:1:                                      ; preds = %entry
  store i32 2, i32* %i
  br label %4

; <label>:2:                                      ; preds = %0
  br label %4

; <label>:3:                                      ; preds = %0
  br label %4

; <label>:4:                                      ; preds = %2, %3, %1
  %5 = load i32, i32* %i
  ret i32 %5
}
ブロックA
ブロックB
1. 自力だと暗黙のブロックやラベルの処理が辛い
暗黙のうちに決まるラベルを正確に指定してやる必要がある
define i32 @main() {
entry:
  %i = alloca i32
  store i32 1, i32* %i
  br i1 true, label %1, label %0

; <label>:0:                                      ; preds = %entry
  br i1 false, label %3, label %2

; <label>:1:                                      ; preds = %entry
  store i32 2, i32* %i
  br label %4

; <label>:2:                                      ; preds = %0
  br label %4

; <label>:3:                                      ; preds = %0
  br label %4

; <label>:4:                                      ; preds = %2, %3, %1
  %5 = load i32, i32* %i
  ret i32 %5
}
<label>:0とかは
単なるコメント
1. 自力だと暗黙のブロックやラベルの処理が辛い
llvm-sysならブロックやラベルの処理は自動でやってくれる
define i32 @main() {
entry:
  %i = alloca i32
  store i32 1, i32* %i
  br i1 true, label %1, label %0

; <label>:0:                                      ; preds = %entry
  br i1 false, label %3, label %2

; <label>:1:                                      ; preds = %entry
  store i32 2, i32* %i
  br label %4

; <label>:2:                                      ; preds = %0
  br label %4

; <label>:3:                                      ; preds = %0
  br label %4

; <label>:4:                                      ; preds = %2, %3, %1
  %5 = load i32, i32* %i
  ret i32 %5
}
1. 自力だと暗黙のブロックやラベルの処理が辛い
以下のような開発を行うためのメソッドがあり
ゼロから開発するよりは楽
LLVMVerifyModule
LLVMModuleを引数に取り、対象のモジュールのブロックが閉じていないとか、関数に渡している型が間違っているとかを教えてくれる。エラーコードなどのstructを返すわけでなく文字列を返してくるし、そもそもセグフォとかは認識してくれない
LLVMRunFunction
引数で指定した関数を実行し戻り値を受け取ることができる。一部の関数が使用できないなどの制限はあるが、Rust上でテストを行う際にとても便利
2. 開発用のサポートメソッドが便利
とりあえずFizz Buzzはできたが…
反省点
反省点や実装したいのに未実装な機能が多い
手製のParserとかも辛い
根本的に知識が不足している
特に実装したかったところ
反省点
- クロージャ
- 引数や戻り値として関数を使えるようにする
- 型検査
型検査
反省点
関数の宣言に型が必要なのに型検査自体はできていない
// 独自言語
let testFunction = fn(a: int): int {
    return a * 2;
};
testFunction(1);
; 出力結果のLLVM IR
define i32 @main() {
entry:
%0 = call i32 @0(i32 1)
ret i32 0
}
define i32 @0(i32) {
entry:
%1 = mul i32 %0, 2
ret i32 %1
}型検査
反省点
// Rust
// 関数をモジュールに追加する
#[allow(dead_code)]
pub fn add_function(target_module: *mut LLVMModule, function_type: *mut LLVMType, name: &str) -> *mut LLVMValue {
    unsafe {
        LLVMAddFunction(
            target_module,                            // 追加したいモジュール
            c_string!(name).as_ptr(),          // 関数名
            function_type                              // 関数の型
        )
    }
}

// 関数の型を作成する
#[allow(dead_code)]
pub fn function_type(ret_type: *mut LLVMType, args: &mut [*mut LLVMType]) -> *mut LLVMType {
    unsafe {
        LLVMFunctionType(
            ret_type,                        // 戻り値の型
            args.as_mut_ptr(),       // 引数の型の配列のポインタ
            args.len() as u32,          // 引数の型の配列のlength
            0                                      // 0: 引数の数が固定、 1: 引数の数の指定なし
        )
    }
}
関数の宣言時に関数の型を宣言してやる必要がある
現状では実行時まで型がわからない…
型検査
反省点
関数の宣言時に関数の型を宣言してやる必要がある
現状では実行時まで型がわからない…
- ASTに型情報を所持させる必要がある
- 型検査について調査し実装する必要がある
まとめ
- 素人でもとりあえず動くものはできる。楽しい
- LLVM IRを出力する以上、独自の型検査が必要そう
- ちょっと勉強して作り直してきます
参考リンクなど
ご静聴ありがとうございました
RustでLLVM IRを出力する言語を作った話 - Fizz Buzz編 -
By rchaser53
RustでLLVM IRを出力する言語を作った話 - Fizz Buzz編 -
RustでLLVM IRを出力する言語をとりあえず作ったみた。 Fizz Buzzができるようになったので一旦発表する。


