


Sergey Shalyapin
Front-End Developer
formally Angular 4
features
Angular 2 is faster and easier than Angular 1
It will speed up the initial load through server side rendering
Angular 2 is mainly focused on mobile apps
It supports both latest version of browsers, and also old browsers including IE9+ and Android 4.1+
Everything will be the component based approach
It uses Dependency Injection to maintain applications without writing too long code
It uses server side rendering for fast views on mobile
Angular 2 is not upgrade of Angular 1. Angular 2 is completely rewritten
Angular 2 is mobile oriented
Angular 1 core concept was $scope. You will not find $scope in Angular 2
Angular 1 controllers are gone. We can say that controllers are replaced with "Components" in Angular 2
now it is ngFor
In Angular 2 local variables are defined using hash(#) prefix
Two-way data binding: ng-model is replaced with [(ngModel)]
Hierarchical DI system is major performance booster
Angular 2 implements unidirectional tree based change detection which again increases performance
Angular 2 file size is 20kb less than Angular 1
Filtering functionality is called pipes
Angular 2 uses camelCase syntax for built-in directives. ng-class is now ngClass
In Angular 1 we can define a service via 5 different ways
- Factory
- Service
- Provider
- Constant
- Values
In Angular 2, class is the only way to define a service
import { Component } from '@angular/core';

@Component({
    selector: 'my-app',
    template: `<label>Name:</label>
               <input [(ngModel)]="name" placeholder="name">
               <h1>Welcome {{name}}!</h1>`
})
export class AppComponent {
    name= '';
}@Component({
changeDetection?: ChangeDetectionStrategy
viewProviders?: Provider[]
moduleId?: string
templateUrl?: string
template?: string
styleUrls?: string[]
styles?: string[]
animations?: any[]
encapsulation?: ViewEncapsulation
interpolation?: [string, string]
entryComponents?: Array<Type<any>|any[]>
})templateUrl?: string
Specifies a template URL for an Angular component.
template?: string
Specifies an inline template for an Angular component.
@Component({
    selector: 'my-app',
    template: `<label>Name:</label>
               <input [(ngModel)]="name" placeholder="name">
               <h1>Welcome {{name}}!</h1>`,
    styleUrls: ["app/app.component.css"]
})
//app.component.ts
@Component({
selector: 'my-app',
templateUrl: "app/app.component.html",
styleUrls: ["app/app.component.css"]
})//app.component.html
<label>Name:</label>
<input [(ngModel)]="name" placeholder="name">
<h1>Welcome {{name}}!</h1>The styles property takes an array of strings that contain CSS code
@Component({
    selector: 'my-app',
    template: `<label>Name:</label>
               <input [(ngModel)]="name" placeholder="name">
               <h1>Welcome {{name}}!</h1>`,
    styles: ['h1 { color: red; }']
})
You can load styles from external CSS files by adding a styleUrls attribute into a component's @Component decorator
//app.component.ts
@Component({
    selector: 'my-app',
    template: `<label>Name:</label>
               <input [(ngModel)]="name" placeholder="name">
               <h1>Welcome {{name}}!</h1>`,
    styleUrls: ["app/app.component.css"]
})
//app.component.css
h1 {
    color: red;
}
The :host selector is the only way to target the host element. You can't reach the host element from inside the component with other selectors because it's not part of the component's own template. The host element is in a parent component's template.
//app.component.css
:host {
    display: block;
    border: 1px solid black;
}

h1 {
    color: red;
}Use the /deep/ shadow-piercing descendant combinator to force a style down through the child component tree into all the child component views. The /deep/ combinator works to any depth of nested components, and it applies to both the view children and content children of the component.
//app.component.css
/deep/ .some-cls {
    background: yellow;
}| Data direction | Syntax | Type |
|---|---|---|
| One-way from data source to view target |
Interpolation Property Attribute Class Style |
|
| One-way from view target to data source |
Event | |
| Two-way |
|
Two-way |
{{expression}}
[target]="expression"
bind-target="expression"
(target)="statement"
on-target="statement"[(target)]="expression"
bindon-target="expression"The target of a data binding is something in the DOM. Depending on the binding type, the target can be an (element | component | directive) property, an (element | component | directive) event, or (rarely) an attribute name.
<img [src]="heroImageUrl">
<hero-detail [hero]="currentHero"></hero-detail>
<div [ngClass]="{'special': isSpecial}"></div>
Element property
Component property
Directive property
Element event
Component event
Directive event
<button (click)="onSave()">Save</button>
<hero-detail (deleteRequest)="deleteHero()"></hero-detail>
<div (myClick)="clicked=$event" clickable>click me</div>
Event and property
<input [(ngModel)]="name">class/stye property
<button
    [attr.aria-label]="help">
        help
</button>
Attribute
<div
    [class.special]="isSpecial">
        Special
</div>
<button
[style.color]="isSpecial ? 'red' : 'green'">Pass data from parent to child with input binding
//parent tempalte
<child
        [inputData]="setData"
        [specialInputName]="setSpecialData"
></child>
//child component
import { Component, Input } from '@angular/core';
@Component({
selector: 'child',
template: `
<p>Input data: {{inputData}}</p>
<p>Input data with special name: {{special}}</p>
`,
})
export class ChildComponent{
@Input()
public inputData:string;
@Input("specialInputName")
public special: string;
}//parent component
import { Component } from '@angular/core';
@Component({
selector: 'my-app',
templateUrl: "app/app.component.html",
styleUrls: ["app/app.component.css"]
})
export class AppComponent {
public setData: string = "bla-bla";
public setSpecialData: string = "special bla-bla";
}Intercept input property changes with a setter
import { Component, Input } from '@angular/core';

@Component({
    selector: 'child',
    template: `
        <p>Input data: {{inputData}}</p>
    `,
})
export class ChildComponent{
    private inputDataPR: string;

    @Input()
    public set inputData(value: string) {
        //some code
        this.inputDataPR = value
    };

    public get inputData(): string {
        return this.inputDataPR;
    }
}Parent listens for child event
//child component
import {
    Component,
    Output,
    EventEmitter
} from '@angular/core';

@Component({
    selector: 'child',
    template: `
        <button (click)="sendEvent()">
            Emmit event
        </button>
    `,
})
export class ChildComponent{
    @Output()
    public outputEvent: EventEmitter =
        new EventEmitter<string>();

    public sendEvent(): void {
        this.outputEvent.emit("emited event");
    }
}
//parent template
<child
        (outputEvent)="showEvent($event)"
></child>
//parent component
import { Component } from '@angular/core';
@Component({
selector: 'my-app',
templateUrl: "app/app.component.html",
styleUrls: ["app/app.component.css"]
})
export class AppComponent {
public showEvent(str: string):void {
console.log(str);
}
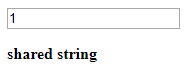
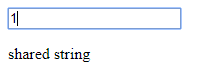
}Parent interacts with child via local variable
//child component
import {
    Component,
} from '@angular/core';

@Component({
    selector: 'child',
    template: `
        <p>{{sharedStr}}</p>
    `,
})
export class ChildComponent {
    public sharedStr: string = "shared string";
}
//parent component
import { Component } from '@angular/core';
@Component({
selector: 'my-app',
templateUrl: "app/app.component.html",
styleUrls: ["app/app.component.css"]
})
export class AppComponent {
}//parent template
<child #sharedVar ></child>
<button
(click)="sharedVar.sharedStr = 'new shared string'"
> Change shared variable
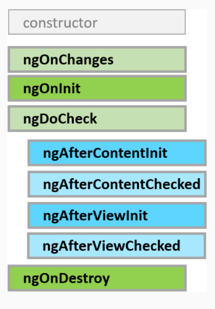
</button>ngOnChanges: вызывается до метода ngOnInit() при начальной установке свойств, которые связаны механизмом привязки, а также при любой их переустановке или изменении их значений. Данный метод в качестве параметра принимает объект класса SimpleChanges, который содержит предыдущие и текущие значения свойства.
ngOnInit: вызывается один раз после установки свойств компонента, которые участвуют в привязке. Выполняет инициализацию компонента
ngDoCheck: вызывается при каждой проверке изменений свойств компонента сразу после методов ngOnChanges и ngOnInit
ngAfterContentInit: вызывается один раз после метода ngDoCheck() после вставки содержимого в представление компонента кода html
ngAfterContentChecked: вызывается фреймворком Angular при проверке изменений содержимого, которое добавляется в представление компонента. Вызывается после метода ngAfterContentInit() и и после каждого последующего вызова метода ngDoCheck().
ngAfterViewInit: вызывается фреймворком Angular после инициализации представления компонента, а также представлений дочерних компонентов. Вызывается только один раз сразу после первого вызова метода ngAfterContentChecked()
ngAfterViewChecked: вызывается фреймворком Angular после проверки на изменения в представлении компонента, а также проверки представлений дочерних компонентов. Вызывается после первого вызова метода ngAfterViewInit() и после каждого последующего вызова ngAfterContentChecked()
ngOnDestroy: вызывается перед тем, как фреймворк Angular удалит компонент.
import {
    Component,
    ViewChild,
    ChangeDetectionStrategy,
    AfterViewInit
} from '@angular/core';
import { ChildComponent } from "app/child.component";

@Component({
    selector: 'my-app',
    templateUrl: "app/app.component.html",
    styleUrls: ["app/app.component.css"],
    changeDetection: ChangeDetectionStrategy.OnPush
})
export class AppComponent implements AfterViewInit{
    @ViewChild(ChildComponent)
    private childCmp: ChildComponent;

    ngAfterViewInit() {
        console.log(this.childCmp);
    }
}//component
import {
Component,
ViewChild,
ChangeDetectionStrategy,
AfterViewInit
} from '@angular/core';
@Component({
selector: 'my-app',
templateUrl: "app/app.component.html",
styleUrls: ["app/app.component.css"],
changeDetection: ChangeDetectionStrategy.OnPush
})
export class AppComponent implements AfterViewInit{
@ViewChild("childCmp")
private childCmp: HTMLElement;
ngAfterViewInit() {
console.log(this.childCmp);
}
}
//template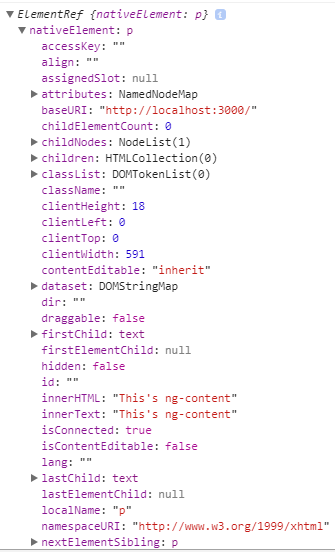
<child #childCmp></child>//child component
import {
Component,
ContentChild,
AfterContentInit
} from '@angular/core';
@Component({
selector: 'child',
template: `
<ng-content></ng-content>
<p>{{sharedStr}}</p>
`,
})
export class ChildComponent implements AfterContentInit{
public sharedStr: string = "shared string";
@ContentChild("content")
private currentContent: HTMLElement;
ngAfterContentInit(): void {
console.log(this.currentContent);
}
}
//parent template
<child>
    <p #content>This's ng-content</p>
</child>import { NgModule } from '@angular/core';
import { BrowserModule } from '@angular/platform-browser';
import { FormsModule } from '@angular/forms';
import { AppComponent } from './app.component';
@NgModule({
imports: [ BrowserModule, FormsModule ],
declarations: [ AppComponent ],
bootstrap: [ AppComponent ]
})
export class AppModule { }Every Angular app has a root module class. By convention, the root module class is called AppModule and it exists in a file named app.module.ts
NgModule: функциональность декоратора NgModule, без которой мы не сможем создать модуль
BrowserModule: модуль, необходимый для работы с браузером
FormsModule: модуль, необходимый для работы с формами html и, в частности, с элементами input. (Так как класс компонента работает с подобными элементами, то мы обязаны также импортировать этот модуль)
AppComponent: функциональность корневого компонента приложения
import { NgModule }      from '@angular/core';
import { BrowserModule } from '@angular/platform-browser';
import { FormsModule }   from '@angular/forms';
import { AppComponent }   from './app.component';

@NgModule({
    imports:      [ BrowserModule, FormsModule ],
    declarations: [ AppComponent ],
    bootstrap:    [ AppComponent ]
})
export class AppModule { }declarations: классы представлений (view classes), которые принадлежат модулю. Angular имеет три типа классов представлений: components, directives, pipes
exports: набор классов представлений, которые должны использоваться в шаблонах компонентов из других модулей
imports: другие модули, классы которых необходимы для шаблонов компонентов из текущего модуля
providers: классы, создающие сервисы, используемые модулем
bootstrap: корневой компонент, который вызывается по умолчанию при загрузке приложения
import { NgModule }      from '@angular/core';
import { BrowserModule } from '@angular/platform-browser';
import { FormsModule }   from '@angular/forms';
import { AppComponent }   from './app.component';

@NgModule({
    imports:      [ BrowserModule, FormsModule ],
    declarations: [ AppComponent ],
    bootstrap:    [ AppComponent ]
})
export class AppModule { }В Angular есть три типа директив:
Компоненты: компонент по сути также является директивой, а декоратор @Component расширяет возможности декоратора@Directive с помощью добавления функционала по работе с шаблонами.
Атрибутивные: они изменяют поведение уже существующего элемента, к которому они применяются. Например, ngModel, ngStyle, ngClass
Структурные: они изменяют структуру DOM с помощью добавления, изменения или удаления элементов hmtl. Например, это директивы ngFor и ngIf
<some-element [ngClass]="'first second'">...</some-element>

<some-element [ngClass]="['first', 'second']">...</some-element>

<some-element [ngClass]="{'first': true, 'second': true, 'third': false}">...</some-element>

<some-element [ngClass]="stringExp|arrayExp|objExp">...</some-element>

<some-element [ngClass]="{'class1 class2 class3' : true}">...</some-element>
How To Use
import { Directive, ElementRef, Input } from '@angular/core';

@Directive({ selector: '[myHighlight]' })
export class HighlightDirective {
    constructor(el: ElementRef) {
       el.nativeElement.style.backgroundColor = 'yellow';
    }
}
How To Use
Example: (let's switch on my local example)
Декоратор @HostListener позволяет связать события DOM и методы директивы. В частности, в декоратор передается название события, по которому будет вызываться метод.
import {
Component,
HostListener,
Renderer2,
ElementRef
} from '@angular/core';
@Component({
selector: 'child',
template: `
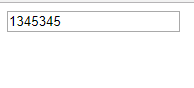
<input type="text" [(ngModel)]="textInput">
<br/>
<p *ngIf="textInput === '1'; else elseBlock">{{sharedStr}}</p>
<ng-template #elseBlock>
Alternate text while primary text is hidden
</ng-template>
`,
})
export class ChildComponent{
private renderer: Renderer2;
private element: ElementRef;
public sharedStr: string = "shared string";
constructor(renderer: Renderer2, element: ElementRef){
this.renderer = renderer;
this.element = element;
}
@HostListener("mouseenter") onMouseEnter() {
this.renderer.setStyle(this.element.nativeElement, "color","red");
}
@HostListener("mouseleave") onMouseLeave() {
this.renderer.removeStyle(this.element.nativeElement, "color");
}
}Декоратор @HostBinding позволяет связать обычное свойство класса со свойством элемента, к которому применяется директива
import {
    Component,
    HostBinding,
    HostListener,
    Renderer2,
    ElementRef
} from '@angular/core';

@Component({
    selector: 'child',
    template: `
        <input type="text" [(ngModel)]="textInput">
        <br/>
        <p *ngIf="textInput === '1'; else elseBlock">{{sharedStr}}</p>
        <ng-template #elseBlock>
            Alternate text while primary text is hidden
        </ng-template>
    `,
})
export class ChildComponent{
    private renderer: Renderer2;
    private element: ElementRef;
    private color = "yellow";
    public sharedStr: string = "shared string";

    constructor(renderer: Renderer2, element: ElementRef){
        this.renderer = renderer;
        this.element = element;
    }

    @HostBinding("style.color")
    private get getColor(){
        return this.color;
    }

    @HostBinding("style.cursor")
    private get getCursor(){
        return "pointer";
    }
@HostListener("mouseenter")
private onMouseEnter() {
this.renderer.setStyle(this.element.nativeElement, "color","red");
}
@HostListener("mouseleave")
private onMouseLeave() {
this.renderer.removeStyle(this.element.nativeElement, "color");
}
}Вместо применения декораторов HostListener и HostBinding для реагирования директивы на действия пользователя мы можем определить обработчики событий в декораторе Directive с помощью его свойства host.
import {Directive, ElementRef, Renderer2} from '@angular/core';

@Directive({
    selector: '[bold]',
    host: {
        '(mouseenter)': 'onMouseEnter()',
        '(mouseleave)': 'onMouseLeave()'
    },
})
export class BoldDirective{
    private elementRef: ElementRef;
    private renderer: Renderer2;

    constructor(elementRef: ElementRef, renderer: Renderer2){
        this.elementRef = elementRef;
        this.renderer = renderer;
    }

    public onMouseEnter(){
        this.renderer.setStyle(this.elementRef.nativeElement, "font-size", "40px");
    }

    public onMouseLeave() {
        this.renderer.removeStyle(this.elementRef.nativeElement, "font-size");
    }
}
Structural directives are responsible for HTML layout. They shape or reshape the DOM's structure, typically by adding, removing, or manipulating elements.
import {
    Directive,
    Input,
    TemplateRef,
    ViewContainerRef
} from '@angular/core';

@Directive({
    selector: '[if]'
})
export class IfDirective {
    private templateRef: TemplateRef<any>;
    private viewContainer: ViewContainerRef;

    constructor(templateRef: TemplateRef<any>,
                viewContainer: ViewContainerRef) {
        this.templateRef = templateRef;
        this.viewContainer = viewContainer;
    }

    @Input()
    public set if(condition: boolean) {
        if (condition) {
            this.viewContainer.createEmbeddedView(this.templateRef);
        } else {
            this.viewContainer.clear();
        }
    }
}
import { NgModule } from '@angular/core';
import { BrowserModule } from '@angular/platform-browser';
import { FormsModule } from '@angular/forms';
import { AppComponent } from './app.component';
import { ChildComponent } from "./child.component";
import { BoldDirective } from "./bold.directive";
import { IfDirective } from "./if.directive";
@NgModule({
imports: [ BrowserModule, FormsModule ],
declarations: [
AppComponent,
ChildComponent,
BoldDirective,
IfDirective
],
bootstrap: [ AppComponent ]
})
export class AppModule { }<p *if="condition">With true</p>
<p *if="!condition">With false</p>export class AppComponent {
public condition: boolean = true;
}Let's look at local example (if.directive.ts)
import {
Component
} from '@angular/core';
@Component({
selector: 'child',
template: `
<input type="text" [(ngModel)]="textInput">
<p *ngIf="textInput === '1'" bold>{{sharedStr}}</p>
`,
})
export class ChildComponent{
public sharedStr: string = "shared string";
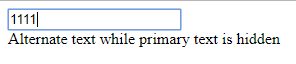
}//Only for Angular4!!!!!!
import {
Component
} from '@angular/core';
@Component({
selector: 'child',
template: `
<input type="text" [(ngModel)]="textInput">
<p *ngIf="textInput === '1'; else elseBlock">
{{sharedStr}}
</p>
<ng-template #elseBlock>
Alternate text while primary text is hidden
</ng-template>
`,
})
export class ChildComponent{
public sharedStr: string = "shared string";
}Директива ngIf позволяет удалить или, наоборот, отобразить элемент при определенном условии.
import { Component} from '@angular/core';

@Component({
    selector: 'my-app',
    template: `
        <ul>
            <li *ngFor="let item of items">{{item}}</li>
        </ul>`
})
export class AppComponent {

    items =[
        "Apple iPhone 7",
        "Huawei Mate 9",
        "Samsung Galaxy S7",
        "Motorola Moto Z"
    ];
}
Директива ngFor позволяет перебрать в шаблоне элементы массива.
В качестве значения директива принимает значение перебора аля-foreach: let item of items. Каждый перебираемый элемент помещается в переменную item, которую можно вывести на страницу.
При переборе элементов доступен текущий индекс элемента через переменную index, которую мы можно использовать.
<div>
    <p *ngFor="let item of items;
        let i = index">{{i+1}}.{{item}}</p>
</div>С помощью директивы ngSwitch можно встроить в шаблон конструкцию switch..case и в зависимости от ее результата выполнения выводить тот или иной блок
import { Component} from '@angular/core';

@Component({
    selector: 'my-app',
    template: `<div [ngSwitch]="count">
                  <template [ngSwitchCase]="1">{{count * 10}}</template>
                  <template [ngSwitchCase]="2">{{count * 100}}</template>
                  <template ngSwitchDefault>{{count * 1000}}</template>
                </div>`
})
export class AppComponent {
    public count: number = 5;
}
Директива ngSwitch в качестве значения принимает некоторое выражение. В данном случае это свойство count. В элемент templateпомещается инструкция ngSwitchCase, которая сравнивает значение выражения из ngSwitch с другим выражением. Если оба выражения равны, то используется данный элемент template. Иначе выполнение переходит к следующим инструкциям ngSwitchCase. Если же ни одна из инструкций ngSwitchCase не была выполнена, то вызывается инструкция ngSwitchDefault.
Стандартные задачи сервисов:
Предоставление данных приложению. Сервис может сам хранить данные в памяти, либо для получения данных может обращаться к какому-нибудь источнику данных, например, к серверу.
Сервис может представлять канал взаимодействия между отдельными компонентами приложения
Сервис может инкапсулировать бизнес-логику, различные вычислительные задачи, задачи по логгированию, которые лучше выносить из компонентов. Тем самым код компонентов будет сосредоточен непосредственно на работе с представлением. Кроме того, тем самым мы также можем решить проблему повторения кода, если нам потребуется выполнить одну и ту же задачу в разных компонентах и классах
Jupiter
Earth
Saturn
radius: number
turnaround() { ... }
radius: number
turnaround() { ... }
vortexAccelerate() { ... }radius: number
turnaround() { ... }
interiorRadius: numberSingle source of truth
Reusability
Maintainability
Testability
Earth
Jupiter
Saturn
SERVICE


radius: number
turnaround() { ... }
SERVICE
vortexAccelerate() { ... }SERVICE
interiorRadius: numberSERVICEEarth
Jupiter
Saturn
SERVICE


radius: number
turnaround() { ... }
SERVICE
vortexAccelerate() { ... }SERVICE
interiorRadius: numberSERVICE"|"
Bult in pipes
Custom pipes
Pure / Impure
Async
Data
date: Date = new Date(2017, 7, 9);
// '09/07/2017'

user: Object = {
    name: "John"
}
// '{"name":"john"}'
// Sat Aug 09 2017 00:00:00 GMT+0300 (Belarus Standard Time)
[object Object]
Data
date = formattedDate(date);
// formattedDate is not built-in function,

user = JSON.stringify(user);
'09/08/2017'
'{"name":"john"}'
Data
<p>{{ date | date: "dd/MM/yyyy"}}</p>

<p>{{ user | json }}</p>
'09/08/2017'
'{"name":"john"}'
Pipe
{{ value | pipe[:param1[:param2...]] }}Pipe
{{ value | pipe[:param1[:param2...]] }}single
chaining
{{ value | pipe1[:param1] | pipe2[:param2] }}Pipe
export interface PipeTransform {
    transform(value: any, ...args: any[]): any;
}
How it works
Pipe
import { UpperCasePipe } from 'angular/common'

@Component...

export class myComponent {
    text: string = 'little pony';
    upperCaseText: string = new UpperCasePipe().transform(this.text);
}
What is transform
Pipe
import { Component } from '@angular/core';

@Component({
  selector: 'hero-birthday',
  template: `<p>The hero's birthday is {{ birthday | date }}</p>`
})

export class HeroBirthdayComponent {
  birthday = new Date(1988, 3, 15); // April 15, 1988
}The browser is a familiar model of application navigation:
https://home/category1/page2
https://home/about
<head>
    <base href="/">
</head>
<head>
<script>document.write('<base href="' + document.location + '" />');</script>
</head>/about
server
about.html
#about
JUMP
<a name="about"><h1>About</h1></a>/about
import { RouterModule, Routes } from '@angular/router';const appRoutes: Routes = [
{ path: 'planetarium', component: PlanetsListComponent },
{ path: 'planet/:id', component: PlanetDetailComponent },
];
@NgModule({
imports: [
RouterModule.forRoot(
appRoutes,
{ enableTracing: true } // <-- debugging purposes only
)
// other imports here
],
...
})
export class AppModule { }<a routerLink="/planetarium" routerLinkActive="active">Planetarium</a>
<a routerLink="/planets" routerLinkActive="active">Planets</a><router-outlet></router-outlet> { path: '', redirectTo: '/planets', pathMatch: 'full' }{ path: '**', component: PageNotFoundComponent } { path: '', redirectTo: '/planets', pathMatch: 'prefix' }@NgModule({
imports: [
RouterModule.forChild(planetsRoutes)
],
exports: [
RouterModule
]
})
export class PlanetRoutingModule { }Что такое unit tests?
1) Fast
2) Isolated
3) Repeated
5) Timely
4) Self-verifying
Should
Should not
Angular,
Angular 2
1) Angular CLI
2) Manual setup (karma, karma-jasmine, karma-webpack)
1) karma init (karma.config.js - имя файла по умолчанию)
2) Изменение конфигурационного файла с использованием http://karma-runner.github.io/1.0/config/configuration-file.html
1) npm test
2) karma start
1) npm test
2) karma start
describe - описание компонента, может иметь древовидную структуру
describe('name', ()=>{})it - сам наш тест, листья дерева
it('should be', ()=>{})beforeEach, beforeAllafterEach, afterAllexpect - что-то должно выполнять наши ожидания
expect(something).toBe(0);expect(someObject).not.toEqual(otherObject);expect.not - противополжное expect
spyOn(object, 'methodName').and.returnValue() ||
.and.callThrough() || ...
spuOn - шпионы вешаются на методы, можем пускать вызов и смотреть как он пройдет, какие значния вернет, сколько раз был вызван, с какими параметрами.
TestBed.configureTestingModule().overrideComponent().compileComponents()ComponentFixture = TestBed.createComponent()TestBed - утилита, которая предоставляет возможность создать модуль, переписать компоненты, скомпилировать.
Service = TestBed.get()То, с чем мы рабтаем
ComponentFixture.componentInstanceComponentFixture.debugElementComponentFixture.nativeElementasyncinjectTest
Behavior
assert.equal(6, factorial(3));

assert.lengthOf(bevarages.tea, 3,
 'bevarages has 3 types of tea');
factorial(3).should.equal(6);
expect(factorial(3)).toBe(6);
beverages.should.have.property('tea')
.with.length(3);
expect(beverages.tea.length).toEqual(3);describe
it
xdescribe

fdescribe
xit
fit@amgular/core/testing
import { ComponentFixture, TestBed } from '@angular/core/testing'@amgular/platform-browser
import { By } from '@amgular/platform-browser'@amgular/core
import { DebugElement } from '@angular/core'describe('BannerComponent (inline template)', () => {
let comp: BannerComponent;
let fixture: ComponentFixture<BannerComponent>;
let de: DebugElement;
let el: HTMLElement;
beforeEach(() => {
TestBed.configureTestingModule({
declarations: [ BannerComponent ], // declare the test component
});
fixture = TestBed.createComponent(BannerComponent);
comp = fixture.componentInstance; // BannerComponent test instance
// query for the title <h1> by CSS element selector
de = fixture.debugElement.query(By.css('h1'));
el = de.nativeElement;
});
});it('should display original title', () => {
fixture.detectChanges();
expect(el.textContent).toContain(comp.title);
});
it('should display a different test title', () => {
comp.title = 'Test Title';
fixture.detectChanges();
expect(el.textContent).toContain('Test Title');
});import { Component } from '@angular/core';
@Component({
selector: 'app-banner',
templateUrl: './banner.component.html',
styleUrls: ['./banner.component.css']
})
export class BannerComponent {
title = 'Test Tour of Heroes';
}// async beforeEach
beforeEach(async(() => {
TestBed.configureTestingModule({
declarations: [ BannerComponent ], // declare the test component
})
.compileComponents(); // compile template and css
}));import { async } from '@angular/core/testing';beforeEach(() => {
// stub UserService for test purposes
userServiceStub = {
isLoggedIn: true,
user: { name: 'Test User'}
};
TestBed.configureTestingModule({
declarations: [ WelcomeComponent ],
providers: [ {provide: UserService, useValue: userServiceStub } ]
});
fixture = TestBed.createComponent(WelcomeComponent);
comp = fixture.componentInstance;
// UserService from the root injector
userService = TestBed.get(UserService);
// get the "welcome" element by CSS selector (e.g., by class name)
de = fixture.debugElement.query(By.css('.welcome'));
el = de.nativeElement;
});// async beforeEach
beforeEach( async(() => {
TestBed.configureTestingModule({
declarations: [ DashboardHeroComponent ],
})
.compileComponents(); // compile template and css
}));
// synchronous beforeEach
beforeEach(() => {
fixture = TestBed.createComponent(DashboardHeroComponent);
comp = fixture.componentInstance;
heroEl = fixture.debugElement.query(By.css('.hero')); // find hero element
// pretend that it was wired to something that supplied a hero
expectedHero = new Hero(42, 'Test Name');
comp.hero = expectedHero;
fixture.detectChanges(); // trigger initial data binding
});it('should raise selected event when clicked', () => {
let selectedHero: Hero;
comp.selected.subscribe((hero: Hero) => selectedHero = hero);
heroEl.triggerEventHandler('click', null);
expect(selectedHero).toBe(expectedHero);
});import { Component } from '@angular/core';
@Component({
template: `
<h2 highlight="skyblue">About</h2>
<twain-quote></twain-quote>
<p>All about this sample</p>`
})
export class AboutComponent { }beforeEach(() => {
fixture = TestBed.configureTestingModule({
declarations: [ AboutComponent, HighlightDirective],
schemas: [ NO_ERRORS_SCHEMA ]
})
.createComponent(AboutComponent);
fixture.detectChanges(); // initial binding
});
it('should have skyblue <h2>', () => {
const de = fixture.debugElement.query(By.css('h2'));
const bgColor = de.nativeElement.style.backgroundColor;
expect(bgColor).toBe('skyblue');
});describe('DependentService without the TestBed', () => {
let service: DependentService;
it('#getValue should return real value by way of the real FancyService', () => {
service = new DependentService(new FancyService());
expect(service.getValue()).toBe('real value');
});
it('#getValue should return faked value by way of a fakeService', () => {
service = new DependentService(new FakeFancyService());
expect(service.getValue()).toBe('faked value');
});
it('#getValue should return faked value from a fake object', () => {
const fake = { getValue: () => 'fake value' };
service = new DependentService(fake as FancyService);
expect(service.getValue()).toBe('fake value');
});
it('#getValue should return stubbed value from a FancyService spy', () => {
const fancy = new FancyService();
const stubValue = 'stub value';
const spy = spyOn(fancy, 'getValue').and.returnValue(stubValue);
service = new DependentService(fancy);
expect(service.getValue()).toBe(stubValue, 'service returned stub value');
expect(spy.calls.count()).toBe(1, 'stubbed method was called once');
expect(spy.calls.mostRecent().returnValue).toBe(stubValue);
});
});import { Pipe, PipeTransform } from '@angular/core';
@Pipe({name: 'titlecase', pure: false})
/** Transform to Title Case: uppercase the first letter of the words in a string.*/
export class TitleCasePipe implements PipeTransform {
transform(input: string): string {
return input.length === 0 ? '' :
input.replace(/\w\S*/g, (txt => txt[0].toUpperCase() + txt.substr(1).toLowerCase() ));
}
}describe('TitleCasePipe', () => {
// This pipe is a pure, stateless function so no need for BeforeEach
let pipe = new TitleCasePipe();
it('transforms "abc" to "Abc"', () => {
expect(pipe.transform('abc')).toBe('Abc');
});
it('transforms "abc def" to "Abc Def"', () => {
expect(pipe.transform('abc def')).toBe('Abc Def');
});
// ... more tests ...
});By Sergey Shalyapin
Angular 2 full presentation


