1. MV*的理解
2. Vue简介
3. Vue vs Regular
4. 在数据营销系统中的实践
MV*?
M:Model,数据模型
V:View,呈现在用户眼前的视图
*:用来连接M和V
MVC
MVC (Model-View-Controller) 是一种通过关注点分离优化项目结构的架构模式,它通过第三方(Controllers)强制把业务数据(Models)和交互界面(Views)分离。
- 域元素(domain-element)被称作Model,不关心交互界面(Views和Controllers)
- 呈现内容由Views和Controllers负责,并且不是只有一个View和Controller。每个呈现在屏幕上的元素都需要View-Controller,所以它们之间没有真正的分离。
- 在View-Controller对中,Controller用于处理用户输入,并进行合理的处理。
- View依赖观察者模式在Model改变时更新视图。(Observer)

var PhotoView = Backbone.View.extend({
    tagName:  "li",
    template: _.template($('#photo-template').html()),
    events: {
      "click img" : "toggleViewed"
    },
    initialize: function() {
      // Observer pattern
      _.bindAll(this, 'render');
      this.model.bind('change', this.render);
      this.model.bind('destroy', this.remove);
    },

    // Re-render the photo entry
    render: function() {
      $(this.el).html(this.template(this.model.toJSON()));
      return this;
    },
    toggleViewed: function() {
      this.model.viewed();
    }

});
Model 2

// routes.index.js
router.get('/setting/personal', function(req, res){
  // Model
  Account.find({account: req.session.account.account}, function(err, account){
    if(err){
      console.log(err);
    }else{
      Team.find({id: {$in: account[0].teams}}, function(err, teams){
        if(err){
          console.log(err);
        }else{
          // View
          res.render('personal', {
            account: account[0],
            teams: teams
          });
        }
      });
    }
  });
});
// models/teamModel.js
var mongoose = require('mongoose');
var teamSchema = require('../schemas/teamSchema');
var Team = mongoose.model('team', teamSchema);
Team.Clear = function(){
Team.remove({members: []}, function(err, res){
if(err){
console.log(err);
}else{
if(res.result.ok == 1){
console.log("cleared the empty teams...");
}else{
console.log("no empty teams :)");
}
}
});
}
module.exports = Team;MVC带来了什么?
- 提高整体可维护性. 当应用需要更新时,我们可以很清楚地知道是去修改数据模型,控制器,还是修改视图。
- View和Model解耦更利于对逻辑进行单元测试。
- 减少重复的底层Model和Controller代码。
- 根据应用大小和角色分工,这种模块化的方式能让负责核心逻辑和交互界面的开发者同时工作。
MVVM
Model–View–ViewModel也被称作model–view–binder
Model:表示真实状态内容的域模型
View: 同MVC种的View,是呈现在用户眼前的结构布局
ViewModel:ViewModel是暴露公共属性和指令的View的抽象。不像MVC中的Controller,MVVM有一个binder,在ViewModel中,binder协调View和data binder的通信。

MVVM支持View和View-Model之间的双向绑定,允许View-Model中的状态变化自动更新到View上。View-Model也是利用观察者模式将变化通知到View。
优点:
缺点:
如果数据绑定过多需要消耗更多内存。
数据驱动,正确的数据 === 正确的视图。
可测试性,独立针对vm测试。
Vue.js
The Progressive Javascript Framework
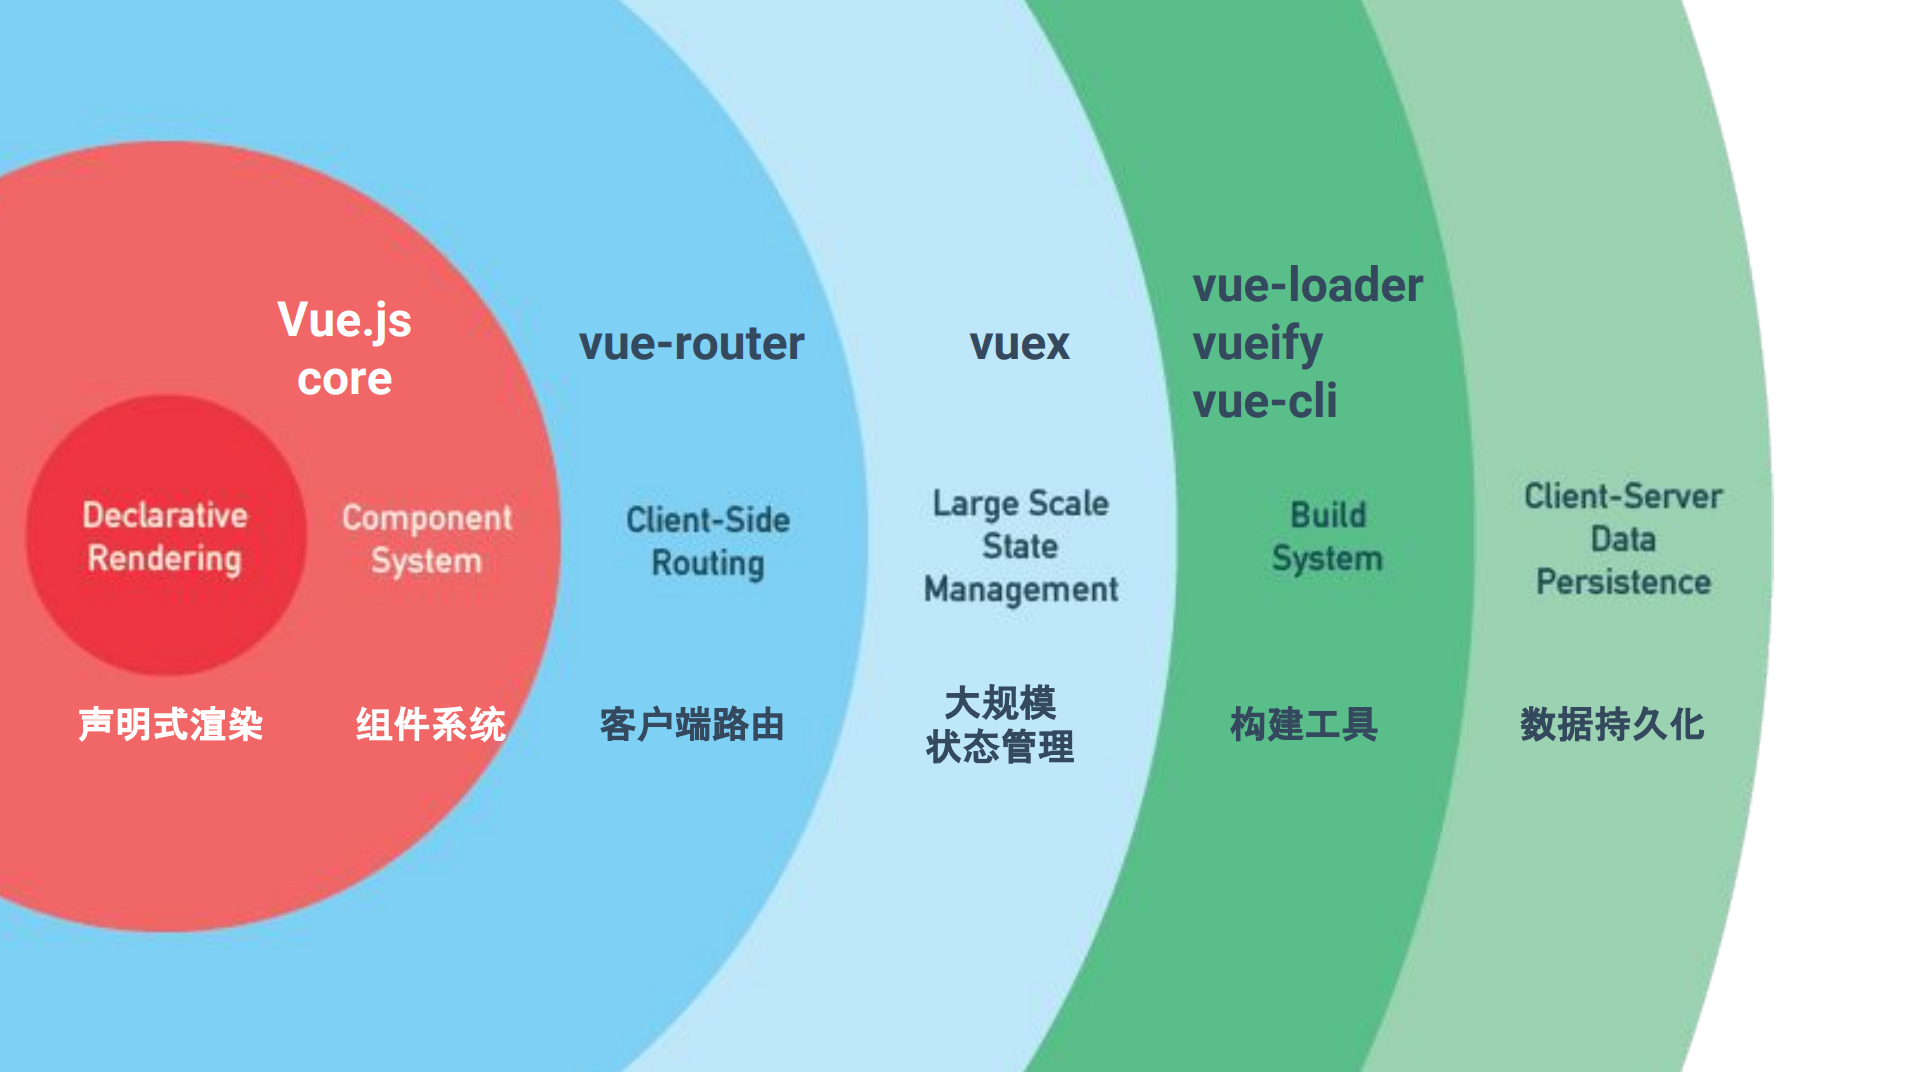
声明式渲染
// index.html
<script src="path/to/vue.js"></script>

<div id="app">
    {{message}}
</div>

// index.js
var app = new Vue({
    el: '#app',
    data: {
        message: 'Hey~'
    },
    props: {...},
    methods: {...},
    computed: {...},
    watches: {...},
    filters: {...},
    components: {...}
})

// render to
<div id="app">
    Hey~
</div>
模板语法
// 最基本的数据绑定使用mustache语法,也可以用v-text指令,
<span>Message: {{ msg }}</span>
// 等同于
<span v-text="'Message: ' + msg"></span>

仅绑定一次使用v-once指令
<span v-once>This will never change: {{ msg }}</span>

// 绑定原始HTML用v-html指令
<div v-html="rawHtml"></div>

// 可使用filter处理数据
<span>Message: {{ msg | formatter }}</span>

// 可以绑定其他属性
<div v-bind:id="dynamicId"></div>
// shorthand
<div :id="dynamicId"></div>

// 绑定事件
<a v-on:click="doSomething">
// shorthand
<a @click="doSomething">
// 事件支持修饰符
<form @submit.prevent="doSubmit">
ViewModel Object
const vm = new Vue({
    el: '#app',
    data: {
        innerState: ''
    },
    // Only accepts Function when used in a component definition.
    data() {
        return {}
    },
    props: {
        id: {
            type: String,
            default: ''
            // Only accepts Function when used in a component definition.
            default() {
                return {}
            }
        }
    },
    computed: {
        stateInfo() {
            return this.innerState ? `State: ${this.innerState}` : ''
        }
    },
    methods: {
        handleSubmit() {
            this.$http.post('/api/submit')
        }
    },
    watch: {
        innerState(value, oldValue){}
    },
    created() {
        this.$http.get('/api/list')
    },
    mounted() {
        this.$refs.input.focus()
        this.$refs.submit.addEventListener('click', this.handleSubmit)
    },
    beforeDestroy() {
        this.$refs.submit.removeEventListener('click', this.handleSubmit)
    }
})
// parent.vue
<div>
<child-component :info="content"></child-component>
</div>
<script>
import childComponent from 'childComponent'
export default {
data() {
return {
content: 'content from parent'
}
},
components: { childComponent }
}
</script>// childComponent.vue
<template>
<h1>{{info}}</h1>
</template>
<script>
export default{
name: 'child',
props: {
info: {
type: String,
default: ''
}
}
}
</script>Class and Style Binding
<div v-bind:class="classObject"></div>

data: {
  classObject: {
    active: true,
    'text-danger': false
  }
}

// or
computed: {
  classObject: function () {
    return {
      active: this.isActive && !this.error,
      'text-danger': this.error && this.error.type === 'fatal',
    }
  }
}

<div v-bind:class="[activeClass, errorClass]">

data: {
  activeClass: 'active',
  errorClass: 'text-danger'
}

<div class="active text-danger"></div>

// style binding
<div v-bind:style="styleObject"></div>

data: {
  styleObject: {
    color: 'red',
    fontSize: '13px'
  }
}
条件渲染 & 列表渲染
<div v-if="type === 'A'">
  A
</div>
<div v-else-if="type === 'B'">
  B
</div>
<div v-else-if="type === 'C'">
  C
</div>
<div v-else>
  Not A/B/C
</div>

<div v-show="type === 'A'">
  A
</div>
<ul id="example-1">
<!-- item -->
<li v-for="item in items">
{{ item.message }}
</li>
</ul>
<!-- item, index -->
<li v-for="(item, index) in items">
{{ parentMessage }} - {{ index }} - {{ item.message }}
</li>
<!-- of also work -->
<div v-for="item of items"></div>
var example1 = new Vue({
el: '#example-1',
data: {
items: [
{ message: 'Foo' },
{ message: 'Bar' }
]
}
})
<ul id="repeat-object" class="demo">
<li v-for="value in object">
{{ value }}
</li>
</ul>
new Vue({
el: '#repeat-object',
data: {
object: {
firstName: 'John',
lastName: 'Doe',
age: 30
}
}
})
=> John, Done, 30
<div v-for="(value, key, index) in object">
{{ index }}. {{ key }} : {{ value }}
</div>Vue
Global Config (Vue.config.xxx)
slient, devtools, keyCodes...
Global API (Vue.xxx)
extend, nextTick, set, delete, directive, filter, mixin...
Options/data
data, props, computed, methods, watch, el, template...
Lifecycle Hooks
beforeCreate, created, mounted, update, destroy...
Options/Assets
directives, filters, components
Optiosn/Misc
name, delimiters, inheritAttrs, comments
Instance Methods/Events(vm.xxx)
$watch, $set, $delete, $on, $once, $off, $emit
Directives(v-xxx)
text, html, model, show, if, else, else-if, for, on, bind...
Special Attributes
key, ref, slot, is

1. config配置一般不需要改动
2. Global API一般不会用到,因为每个api对应在实例中都有一个对应实现。使用this.$set而不是Vue.set。
3. el, template, render三选一,使用.vue文件开发用template更方便。
4. 生命周期就create, mounted, destroy比较常用。

Slot & is
// my-component.vue
<div>
  <h2>I'm the child title</h2>
  <slot>
    This will only be displayed if there is no content
    to be distributed.
  </slot>
</div>

// parent.vue
<div>
  <h1>I'm the parent title</h1>
  <my-component>
    <p>This is some original content</p>
    <p>This is some more original content</p>
  </my-component>
</div>

// output
<div>
  <h1>I'm the parent title</h1>
  <div>
    <h2>I'm the child title</h2>
    <p>This is some original content</p>
    <p>This is some more original content</p>
  </div>
</div>
// my-component.vue
<div>
<h2>I'm the child title</h2>
<slot>
This will only be displayed if there is no content
to be distributed.
</slot>
</div>
// parent.vue
<div>
<h1>I'm the parent title</h1>
<my-component>
</my-component>
</div>
// output
<div>
<h1>I'm the parent title</h1>
<div>
<h2>I'm the child title</h2>
This will only be displayed if there is no content
to be distributed.
</div>
</div><template>
<transition name="dialog-fade">
<div class="el-dialog__wrapper" v-show="visible" @click.self="handleWrapperClick">
<div
class="el-dialog"
:class="[sizeClass, customClass]"
ref="dialog"
:style="style">
<div class="el-dialog__header">
<!-- title slot -->
<slot name="title">
<span class="el-dialog__title">{{title}}</span>
</slot>
<button type="button" class="el-dialog__headerbtn" aria-label="Close"
v-if="showClose" @click="handleClose">
<i class="el-dialog__close el-icon el-icon-close"></i>
</button>
</div>
<!-- default slot -->
<div class="el-dialog__body" v-if="rendered"><slot></slot></div>
<div class="el-dialog__footer" v-if="$slots.footer">
<slot name="footer"></slot>
</div>
</div>
</div>
</transition>
</template>
<el-dialog
title="提示"
:visible.sync="dialogVisible"
size="tiny"
:before-close="handleClose">
<span>这是一段信息</span>
<span slot="footer" class="dialog-footer">
<el-button @click="dialogVisible = false">取 消</el-button>
<el-button type="primary" @click="dialogVisible = false">确 定</el-button>
</span>
</el-dialog>var vm = new Vue({
el: '#example',
data: {
currentView: 'home'
},
components: {
home: { /* ... */ },
posts: { /* ... */ },
archive: { /* ... */ }
}
})
<component v-bind:is="currentView">
<!-- component changes when vm.currentView changes! -->
</component>is
单文件组件
<template lang="html">
  <div id="app">
    {{title}}
    <child-component :content="info"></child-component>
  </div>
</template>

<script>
import ChildComponent from 'Child'

export default {
  data() {
    return {
      title: 'This is title',
      info: 'Info content'
    }
  },
  components: {
    ChildComponent
  }
}
</script>
<style lang="css" scoped>
#app{
  margin: 10px;
}
</style>
不喜欢混在一起可以用src将各个部分分离。
方便管理,一个文件就是一个独立的组件。
不用拼接模板字符串,可读性更好。
对预处理语言支持度好。
可能造成单一文件内容过多。
配合babel使用ES next 编写。
Router & Vuex
// 0. 如果使用模块化机制编程,導入Vue和VueRouter,
// 要调用 Vue.use(VueRouter)

// 1. 定义(路由)组件。
// 可以从其他文件 import 进来
const Foo = { template: '<div>foo</div>' }
const Bar = { template: '<div>bar</div>' }

// 2. 定义路由
// 每个路由应该映射一个组件。 其中"component" 可以是
// 通过 Vue.extend() 创建的组件构造器,
// 或者,只是一个组件配置对象。
// 我们晚点再讨论嵌套路由。
const routes = [
  { path: '/foo', component: Foo },
  { path: '/bar', component: Bar }
]

// 3. 创建 router 实例,然后传 `routes` 配置
// 你还可以传别的配置参数, 不过先这么简单着吧。
const router = new VueRouter({
  routes // (缩写)相当于 routes: routes
})

// 4. 创建和挂载根实例。
// 记得要通过 router 配置参数注入路由,
// 从而让整个应用都有路由功能
const app = new Vue({
  router
}).$mount('#app')

// 现在,应用已经启动了!
const store = new Vuex.Store({
state: {
count: 0
},
mutations: {
increment: state => state.count++,
decrement: state => state.count--
}
})
new Vue({
el: '#app',
computed: {
count () {
return store.state.count
}
},
methods: {
increment () {
store.commit('increment')
},
decrement () {
store.commit('decrement')
}
}
})
// 在模块化开发时,需要调用Vue.use(),并将store注入Vue实例,然后可以通过$store调用。
Vue.use(Vuex);
vm = new Vue({
store
})
vm.$store.commit('increment')
Vue & Regular
// 都支持大部分Js表达式

<span>{ variable }</span>

<span>{ variable + '.' }</span>

<span>{ condition ? trueValue : falseValue }</span>

// filter 通过 | 使用,可以链式调用
<span>{ variable | filter1 | filter2 }</span>

// 单次绑定语法不同
// Regular
<span>{ @(variable) }</span>
// Vue
<span v-once>{ variable }</span>
插值语法异同
// Regular的模板插值中有容错机制,不存在的属性会用undefined替代
<div>{this.methodNoFound(blog.user.name)}</div>

// this是指向组件的,但是方法调用需要显示写this.xxx
<custom-pager attr1={user} attr2=user on-nav={this.nav()}></custom-pager>

// 可以使用#include插入其他内容
<div class="modal-body">
  {#include content }
</div>

// 循环语法和if, else判断都有{#list}, {#if}这样的block包裹
{#list items as item}
    <span class='index'>{item_index}:{item}</span>
{/list}

{#if user.age >= 80 }
  you are too old
{#elseif user.age <= 10}
  you are too young
{#else}
  Welcome, Friend
{/if}
Regular
// 支持自增,自减,但是Vue会提示存在无限循环,并执行100次后强制终止
<span>{{ counter++ }}</span>

// 支持位运算
<span>{{ 100 & 111 }}</span>
<span>{{ (100 | 111) }}</span>

// 支持正则表达式字面量
<span>{{ /a/.test('abc') }}</span>

// 属性,方法都是自动绑定在vm上的,调用时只需要写方法名
<button @click="doSubmit">Submit</button>

// 循环,条件判断都是基于指令的
<ul>
    <li v-for="i in 3">{{i}}</li>
</ul>

<span v-if="condition">true</span>
<span v-else>else</span>
Vue
都有Lifecycle的概念,可以在不同阶段做不同的事情。
Regular暴露了config, init, destory三个生命周期函数,一般是在config阶段初始化data,init阶段发生在compile之后,所以可以通过$refs获取到DOM,但是仍未插入到页面中,无法通过选择器获取。
var Component = Regular.extend({
  template:
    `
    <div><h2 id="u" ref="u" on-click={this.changeTitle(title + '1')}>{title}</h2></div>
    `,
  config: function(data){
    data = { title: 'show' }
  },
  init: function(){
    console.log(document.querySelector('#u'), this.$refs.u)
  },
  changeTitle: function(title){
    this.data.title = title;
  }
})
Vue中暴露了一共10个生命周期函数,比较常用的是Observer Data和init Events完成后就触发的created,将vm.$el替换el完成后执行的mounted,和组件销毁时触发的destroyed。mounted中可以使用选择器获取DOM节点。


原理上的差异
Living Template Engine

Vue 2.x开始引入Virtual DOM的概念,因此在渲染阶段,无论是提供template,还是el,最终都会处理为render函数。
总体评价
Vue:语法更优雅,社区更活跃,功能更强(ssr),更可靠(github上bug更少,维护者更活跃),周边工具链更健壮(cli, ui component, router等),更多可能性(weex)。不支持IE9-。
Regular:支持低版本IE,对猪场内部体系(nej,nei)更友好。但特性相对较少。
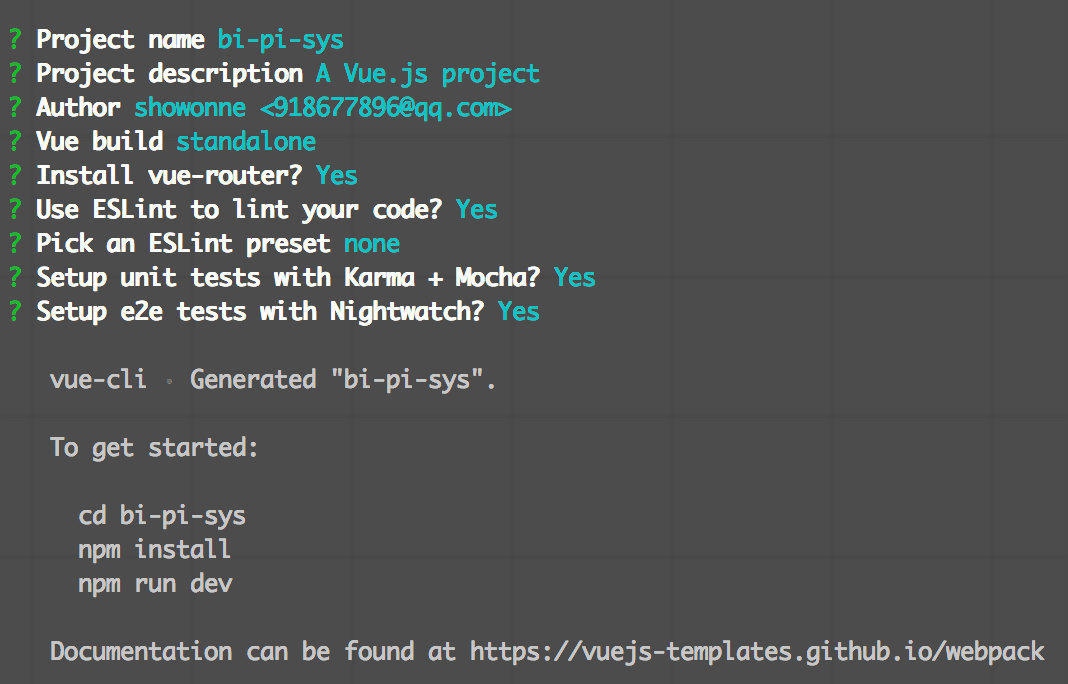
Vue in 数据营销系统
vue init webpack bi-pm-sys.
├── build // 构建脚本
├── config // webpack配置文件
├── mock // mock数据(后期新增)
├── src // 源码文件夹
│ ├── api // api定义文件夹
│ ├── common // 公共utils
│ ├── components //公共组件
│ ├── css // 样式文件
│ ├── page // 每个页面的入口组件
│ │ ├── error
│ │ ├── icon
│ │ ├── label
│ │ ├── program
│ │ └── user_portrait
│ ├── router // vue-router配置
│ └── store // vuex相关
│ └── modules
├── static // 静态资源
│ └── images
│ └── emojis
└── test
- element-ui
- axios
- vue-router
- vuex
- lodash
- moment
- hicharts
{
  "name": "data-marketing",
  "description": "数据营销系统",
  "scripts": {
    // 正常开发时执行的脚本
    "dev": "node build/dev-server.js",
    // 代理到测试服务器
    "proxy": "npm run dev 10.165.125.220:9999/",
    "analysis": "node build/dev-server.js -a",
    // 生产环境构建
    "build": "node build/build.js",
    "lint": "eslint --ext .js,.vue src test/unit/specs test/e2e/specs",
    "lint:fix": "eslint --fix --ext .js,.vue src test/unit/specs test/e2e/specs",
    "precommit": "lint-staged"
  },
  "lint-staged": {
    "gitDir": "../",
    "linters": {
      "webapp/src/**/*.{js,vue}": ["eslint --fix", "git add"]
    }
  },
  "dependencies": {
  },
  "devDependencies": {
  },
  "engines": {
  }
}
package.json
build/dev-server.js
var config = require('../config')
// 默认为development模式
if (!process.env.NODE_ENV) {
  process.env.NODE_ENV = JSON.parse(config.dev.env.NODE_ENV)
}

var opn = require('opn')
var path = require('path')
var express = require('express')
var webpack = require('webpack')
var webpackConfig = process.env.NODE_ENV === 'testing'
  ? require('./webpack.prod.conf')
  : require('./webpack.dev.conf')

// default port where dev server listens for incoming traffic
var port = process.env.PORT || config.dev.port
// automatically open browser, if not set will be false
var autoOpenBrowser = !!config.dev.autoOpenBrowser

// 实例化了一个基于express的web server
var app = express()
var compiler = webpack(webpackConfig)

// 使用代理中间件
app.use(require('./dev-proxy')())

// webpack-dev-middleware + webpack-hot-middleware 进行hot module reload
var devMiddleware = require('webpack-dev-middleware')(compiler, {
  publicPath: webpackConfig.output.publicPath,
  quiet: true
})

var hotMiddleware = require('webpack-hot-middleware')(compiler, {
  log: () => {}
})
// force page reload when html-webpack-plugin template changes
compiler.plugin('compilation', function (compilation) {
  compilation.plugin('html-webpack-plugin-after-emit', function (data, cb) {
    hotMiddleware.publish({ action: 'reload' })
    cb()
  })
})

// handle fallback for HTML5 history API
app.use(require('connect-history-api-fallback')())

// serve webpack bundle output
app.use(devMiddleware)

// enable hot-reload and state-preserving
// compilation error display
app.use(hotMiddleware)

// serve pure static assets
var staticPath = path.posix.join(config.dev.assetsPublicPath, config.dev.assetsSubDirectory)
app.use(staticPath, express.static('./static'))

// init error cb
app.use(function(error, request, response, next) {
  console.error(error.stack);
  response.status(500).send(error.stack);
})

var uri = 'http://localhost:' + port

devMiddleware.waitUntilValid(function () {
  console.log('> Listening at ' + uri + '\n')
})

module.exports = app.listen(port, function (err) {
  if (err) {
    console.log(err)
    return
  }

  // when env is testing, don't need open it
  if (autoOpenBrowser && process.env.NODE_ENV !== 'testing') {
    opn(uri)
  }
})
build/dev-proxy.js
const fs = require('fs')
const path = require('path')
const isIp = require('is-ip')
const chalk = require('chalk')
const isUrl = require('is-url')
const config = require('../config')
const urlParse = require('url-parse')
const proxyMiddleware = require('http-proxy-middleware')
const getFilePath = require('../mock/mockRouterMap').getFilePath

const initProxyMiddleware = function (toProxyAddress) {
  const proxyTable = config.dev.proxyTable

  var filter = function (pathname) {
    return !!getFilePath(pathname)
  };

  toProxyAddress = proxyTable[toProxyAddress] || toProxyAddress;

  if(!isUrl(toProxyAddress)){
    var urlObj = urlParse(`http://${toProxyAddress}`)
    if(!isIp(urlObj.hostname)){
      return function(){
        console.log('')
        console.log(chalk.yellow(`代理地址:${toProxyAddress} 错误`))
        console.log('')
      }
    }
    toProxyAddress = urlObj.href
  }
  function onProxyRes(proxyRes, req, res) {
  }
  function onProxyReq(proxyReq, req, res) {
  }
  return proxyMiddleware(filter, {
    target: toProxyAddress,
    onProxyRes: onProxyRes,
    onProxyReq: onProxyReq
  })
}

module.exports = function() {
  // 解析命令行参数,判断是否传递了proxy ip
  const processArgv = process.argv.slice(2)
  var index;
  index = processArgv.findIndex(arg => isUrl(`http://${arg}`));
  if (index === -1) {
    return require('../mock')
  } else {
    return initProxyMiddleware(processArgv[index]);
  }
}
build/webpack.base.js
module.exports = {
  entry: {
    app: './src/main.js'
  },
  output: {
    path: config.build.assetsRoot,
    filename: '[name].js',
    publicPath: process.env.NODE_ENV === 'production'
      ? config.build.assetsPublicPath
      : config.dev.assetsPublicPath
  },
  resolve: {
    extensions: ['.js', '.vue', '.json'],
    // https://webpack.js.org/configuration/resolve/#resolve-modules
    modules: [
      resolve('src'),
      resolve('node_modules')
    ]
  },
  module: {
    rules: [
      {
        test: /\.(js|vue)$/,
        loader: 'eslint-loader',
        // check source files, not modified by other loaders like `babel-loader`
        // https://github.com/MoOx/eslint-loader
        enforce: "pre",
        include: [resolve('src'), resolve('test')],
        options: {
          formatter: require('eslint-friendly-formatter')
        }
      },
      {
        test: /\.vue$/,
        loader: 'vue-loader',
        options: vueLoaderConfig
      },
      {
        test: /\.js$/,
        loader: 'babel-loader',
        include: [resolve('src'), resolve('test')].concat(
          process.env.NODE_ENV === 'production'
            ? [resolve('node_modules/element-ui/src/utils')]
            : []
        )
      },
      {
        test: /\.(png|jpe?g|gif|svg)(\?.*)?$/,
        loader: 'url-loader',
        query: {
          limit: 10000,
          name: utils.assetsPath('img/[name].[hash:7].[ext]')
        }
      },
      {
        test: /\.(woff2?|eot|ttf|otf)(\?.*)?$/,
        loader: 'url-loader',
        query: {
          limit: 10000,
          name: utils.assetsPath('fonts/[name].[hash:7].[ext]')
        }
      }
    ]
  }
}
// src/main.js
import Vue from 'vue';

import ElementUI from 'element-ui';

Vue.use(ElementUI);
import './css/index.css';
import ajax from './api/ajax';

import App from './App';
import router from './router';
import store from './store';
/* eslint-disable no-new */
new Vue({
    el: '#app',
    store,
    router,
    render: h => h(App)
});
// App.vue
<template>
  <router-view></router-view>
</template>

<script>
  export default {};
</script>
// page.vue
<template>
  <div id="app">
    <header-menu></header-menu>
    <div class="g-body" :class="{noHasSideNav: noHasSideNav}">
      <side-nav @toggle="toggleNav"></side-nav>
      <router-view></router-view>
    </div>
  </div>
</template>
页面布局
// page/*.vue
<template>
    <content-layout>
        <template slot="title">title</template>
        <template slot="content">title</template>
    </content-layout>
</template>
心得
- 组件之间使用props传递数据,如果组件嵌套过深再使用vuex,如果是可复用组件不应该用vuex管理状态。
- 处理vm的data时先拷贝一份,再对拷贝进行操作。(JSON.parse(JSON.stringify(this.data)))。
- 由于Object.defineProperty的限制,在数据初始化,操作数组和对象时要特别注意。
- methods可以为async函数。
- vuex的mutation-types单独放在一个文件。
- 善用动态组件和slot。
- store在划分modules建议开启namespaced: true。
- 未来可以尝试一下使用render function,能充分利用js的强大特性,也能更好地过渡到React。
Reference
END
MVVM
By showonne


