특강: Webpack & 모던JS
오늘의 우리의 목표는...
- Part 1
- Bundler의 의미와 필요성을 설명할 수 있다
- Webpack의 기본적인 기능들을 자유자재로 다룰 수 있다
- Loader와 Plugin들을 사용할 수 있다
- Part 2
- Array, Object를 자유자재로 다룰 수 있다
- fetch API를 사용할 수 있으며,
- Promise API에 대한 기본적인 이해를 가지고 있다
index.html 비교
어떤 차이, 장단점?
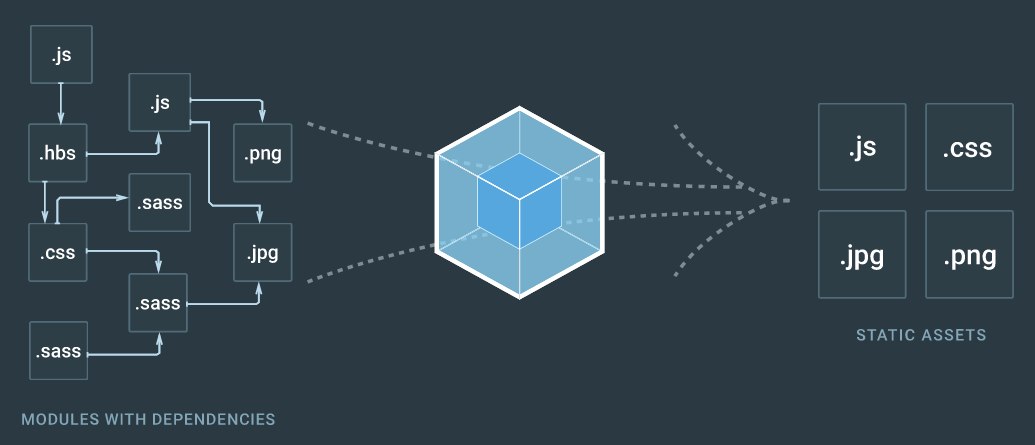
Bundle, Bundling, Bundler
Webpack v2
Gulp, Grunt...
Gulp is a task runner.
Webpack is an asset bundler.
Gulp operates on a more general level.
Webpack cares just about making those bundles.
Webpack로 할 수 있는 것
-
js 및 다양한 asset module들을 bundling하여 미리 정의해놓은 한 개 혹은 그 이상의 파일로 출력할 수 있습니다
-
다양한 플러그인들을 지원하여 모던 프론트엔드 개발 환경을 용이하게 해줍니다.
실습
(구)프로젝트를 Webpack을 사용하도록 바꿔기보기

Vue.js으로 작성되어있는 TodoApp
1. git clone
https://github.com/paulsoh/fastcampus_webpack_tutorial.git
2. git checkout Starting-Point
Step-0-NPM-setup
- Keywords: npm, node_modules, dependencies, scripts
- Instructions
- Clone todoapp
- Add node_modules folder to .gitignore
- Add http-server npm package as development dependencies
- Add dev script in package.json
Step-1-Init-Webpack
- Keywords: devDependencies, webpack options
- Instructions
- Add webpack as devDependencies
- Migrate index.html to use bundle.js instead of routes.js
- Add --watch options for webpack, (-p option)
- Add webpack-dev-server as devDependencies and modify script
Step-1-Init-Webpack
- Keywords: production settings, paths
- 이어서 - Instructions
- Add dist/ to .gitignore
- Tidy up path configurations
- Add publicPath to let webpack-dev-server know where to serve from
Step-2-Setup-Webpack-for-Production
- Keywords: source-map, eval, minify(uglify), env object
- Instructions
- Add build script for production
- Add devtool eval
- Change devtool to use source-map
- Change webpack.config to use env object to determine whether app is running in production mode or development mode
Step-3-Bundling-in-webpack
- Keywords: module.exports, bundling, require
- Instructions
- Refactor modules for bundling
- Add pathinfo for better debugging
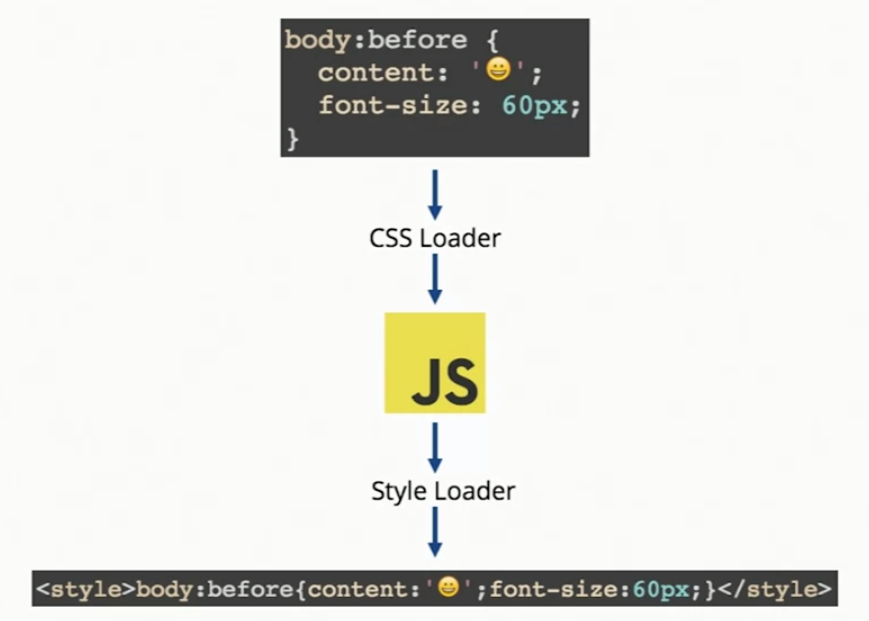
Step-4-Adding-Loaders
-
Keywords: babel-loader, css-loader, style-loader
- Instructions
- Add babel loader
- Add babel presets to use state of the art es6+
- Add sample es6 syntax to see if it works
- Add settings for loading css modules
- Refactor index.html to use css modules
Step-5-Adding-URL-loader
-
Keywords: url-loader, file-loader, data url
- Instructions
- Add image to todoApp
- Change image to be loaded by url-loader
- Specify paths for assets
Part 2.
- Array, Object를 자유자재로 다룰 수 있다
- fetch API를 사용할 수 있으며,
- Promise API에 대한 기본적인 이해를 가지고 있다
Zigbang API를 이용하여 Data Structure 다루기
- git checkout Manipulate-Zigbang-Data-Init
- 추가 / 변경된 파일 목록 확인
- routes.js
- manipulateZigbangData.js
- zigbangData.js
- Chrome console창 확인
- 추가 / 변경된 파일 목록 확인
DataStructure API
- .map
- .filter
- .forEach
- .reduce
- .sort
- .find
Simple Excercises
- agent_no가 26002인 사람이 올린 매물의 개수
- 보증금이 가장 비싼 방의 이미지
- 월세가 가장 비싼 방의 이미지
- 모든 매물의 조회수의 합
-
A modern JavaScript utility library delivering modularity, performance & extras.
import _ from 'lodash';

var users = [
  { 'user': 'fred',   'age': 48 },
  { 'user': 'barney', 'age': 36 },
  { 'user': 'fred',   'age': 40 },
  { 'user': 'barney', 'age': 34 }
];

_.sortBy(users, [function(o) { return o.user; }]);
// => objects for [['barney', 36], ['barney', 34], ['fred', 48], ['fred', 40]]

_.sortBy(users, ['user', 'age']);
// => objects for [['barney', 34], ['barney', 36], ['fred', 40], ['fred', 48]]
_.sortBy(collection, [iteratees=[_.identity]])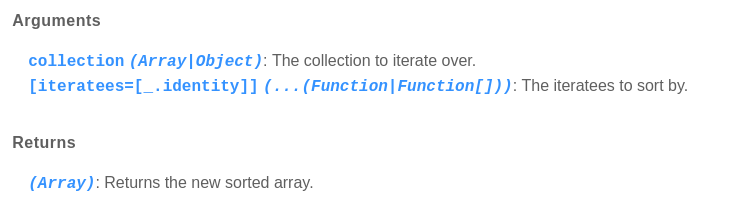
Challenging Excercises
- 등록한 매물의 순서대로 등록한 매물 개수, 중개사의 이름 및 전화번호 목록
- [{count: 10, name: 'abc, phone_number: '010-...'}, ...]
- 월세가 70만원 이상인 매물 개수를 기준으로 집값 비싼 지역구 목록
- [{local: 서초동, count: 15} , {잠원동: 12, ...}, ...]
- 제목에서 가장 빈번하게 나타나는 단어들 목록
- [{word: '초대박', count: 23, ...}, {...}, {...}, ...]
2. Asynchronous JS
(Fetch API, Promise API)
ES7: async, await
Promise API
1. Promise를 이용하여 Async 기능을 만드는 법
2. Promise API를 사용하는 법
Synchronous 와 Asynchronous의 차이
const functionOne = (a, b) => {
  return a + b;
}

const functionTwo = (a, b) => {
  let c;
  // Async action!
  setTimeout(() => {
    c = a + b;
  }, 1000)
  return c;
}
Promise의 기본 구조
결과를 당장 알 수 없는 경우, Promise를 Return
const asyncFunction = () => {
  return new Promise((resolve /* 성공시 실행할 함수 */, reject/* 실패시 성공할 함수*/) => {
    // 비동기 코드 수행부
    if (성공) resolve();
    else reject();
  })
}
Promise의 기본 구조
결과를 당장 알 수 없는 경우, Promise를 Return
const functionTwo = (a, b) => {
  let c;
  return new Promise((resolve, reject) => {
    // Async action!
    setTimeout(() => {
      c = a + b;
      if (c) resolve(c);
      else reject('error');
    }, 1000)
  })
}
Promise API 사용법
.then(), .catch()
const functionTwo = (a, b) => {
  let c;
  return new Promise((resolve, reject) => {
    // Async action!
    setTimeout(() => {
      c = a + b;
      if (c) resolve(c);
      else reject('error');
    }, 1000)
  })
}

functionTwo(1, 2)
  .then(/* resolve 된 값이 들어와서 호출되는 함수 */)
  .catch(/* reject 된 값이 들어와서 호출되는 함수 */)
Promise API 사용법
.then(), .catch()
const functionTwo = (a, b) => {
  let c;
  return new Promise((resolve, reject) => {
    // Async action!
    setTimeout(() => {
      c = a + b;
      if (c) resolve(c);
      else reject('error');
    }, 1000)
  })
}

functionTwo(1, 2)
  .then((resolvedValue) => {
    console.log('The answer is ' + resolvedValue);
  })
.catch(/* reject 된 값이 들어와서 호출되는 함수 */)Promise API를 사용할 수 있는 좋은 기회
Fetch API
fetch(url /* string */, options /* Object */)
  .then((response) => {
    // 요청 성공시 Response Object로 resolve!
  })
  .catch((err) => {
    console.error(err);
})Fetch API
fetch('https://jsonplaceholder.typicode.com/posts')
  .then((response) => {
    if (response.ok) return response.json();
    else return new Error('Failed');
  })
  .then(data => {
    console.log(data);
  })
  .catch((err) => {
    console.error(err);
  })
Fetch API Excercise
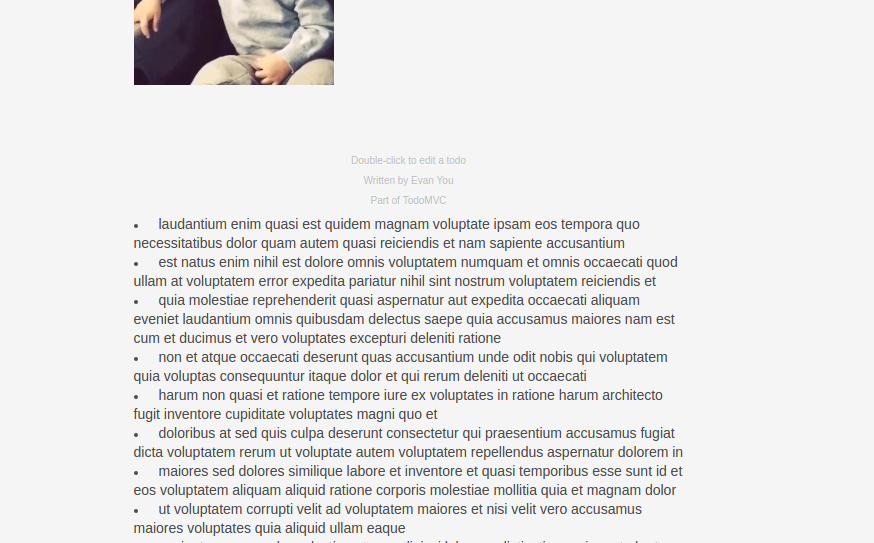
insertImageToHtml.js를 참고하여
todoapp하단에 FakeAPI로부터 fetch해온
comments들이 보이게 해보자
paulsoh.dev@gmail.com
Webpack-ES6-tutorial
By Soh Paul


