REDESIGN DEVELOPMENT


WHAT we will TRY TO cover:
- fixtures
- localhost testing against fixtures
- localhost testing against real backend
- build process
- deploy process
- jshint
GRUNT!
Everything in this presentation depends upon Grunt and assumes you have it working properly on your machine!
IDEAL Development Environment Setup


JSHint
A community-driven tool to detect errors and potential problems in JavaScript code.
Runs automatically on all your JavaScript files
when you save them.
Reports findings in your localhost grunt server window.
Heed its warnings and especially the errors!
Fix everything it complains about!
Does not catch everything. e.g., trailing commas
fixtures - why?
Allows you to do UI development without having to have the actual backend service layer in place.
Communicate with the backend developer doing the Java work and get a feel for what the response is going to look like at the very start and mock up a fixture (later) as soon as you're ready to code.
Allow unit testing for specific UI behaviors.
fixtures - HOw?
Single
<url>/web/wsawui/development?testData=success1
Multiple
<url>/web/wsawui/development?testData=01005,success1
Prompt
<url>/web/wsawui/development?testData=prompt
For every AJAX (server) call the UI makes, the fixtures framework will look for a fixture for the transaction ONLY if the testData=XXX URL parameter is present.
fixtures - what?
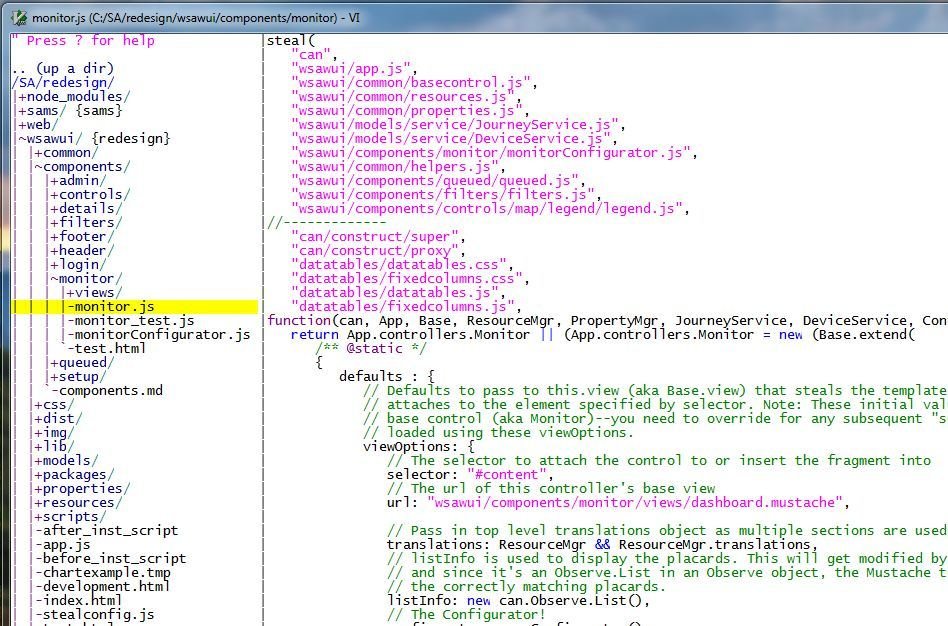
Setup the service in models\service\CXSsettings.js
Create the service/endpoint in models\service
Setup the fixture in fixtures.js
Put multiple responses in models\fixtures\responses\*.json
fixtures - EXAMPLE
models\service\CXSsettings.js
login: {
   uri: "/sasec/customerServices"+serverSuffix+
        "/rest/"+apiVersion+"/session",
   type: POST,
   timeout: 5000,
   cache: false
}
fixtures - EXAMPLE
models\service\CXSsettings.js
login: function(request, success, error) {
   var deferred = AjaxManager.callSvc({
      url: cxsSettings.profile.login.uri,
      request: request,
      timeOut: cxsSettings.profile.login.timeout,
      successHandler: success,
      errorHandler: error,
      bSync: false,
      fixtureParam: null,
      cache: cxsSettings.profile.login.cache
   });
   return deferred;
}
fixtures - EXAMPLE
models\fixtures\fixture.js
can.fixture("POST " + CXSsettings.profile.login.uri,
            function(originalOptions, response, options, responseHeaders) {
   var r = FixtureManager.getTestData(originalOptions, null);
   if (typeof r === "number")  {
      response(r);
   }
   else {
      return r;
   }
});
fixtures - EXAMPLE
models\fixtures\fixture.js
{
   "success1": {
      "statusCode": "01000",
      "statusMessage": "LOGIN SUCCESS",
      "member": {
         "emailAddress": "scott.erwin@fedex.com",
         "firstname": "Scott",
         "lastname": "Erwin",
         "orgId": "1",
         "orgName": "Dewey, Cheatem, & Howe",
         "organizations": [
            { "id": "2",
              "name": "Company-O-Fakes, Inc"
            }
         ]
      },
      "token": "ThisIsABigFatFakeTokenThatWontWorkInRealLife"
   }
localhost testing
You must have your system setup correctly to run Grunt.
Run "grunt" from the command line to start your localhost webserver.
http://localhost:2443/web/wsawui/development.html
http://localhost:2443/web/sams/development.html
localhost testing against fixtures
-
Setup your fixture & response data
-
Use a testData=XXX parameter
-
Optionally use realData=XXX parameter
XXX will be "prompt"
or
the ACTUAL endpoint (e.g., session, newpassword)
or
something you make up to make it unique (e.g., device.locationReadings, member.saveFilterPrefs)
This is what you JSON response file will be named!
e.g., device.locationReadings.json
localhost testing against backend
Same local development setup as localhost testing against fixtures
Setup your localhost web server
Do NOT use the testData=XXX URL parameter(s)
localhost testing against backend
connect: {
   server: {
      options: {
         ...
      },
      proxies: [
           /*
            * Set the WSAWUI SenseAware backend you want to hit here!
            * Set the host and port below with following
            * values:
            *
            *  L1 - Direct
            *     host: "sabase.idev.fedex.com",
            *     port: 2443
            *  L1 - Bypass Apache Server
            *     host: "sawareapp1-base.ute.fedex.com",
            *     port: 7417
            *  L2
            *     host: "sadev.idev.fedex.com",
            *     port: 2443
            *  L3
            *     host: "sadrt.idev.fedex.com",
            *     port: 443
            *  L4
            *     host: "sastress.dmz.idev.fedex.com",
            *     port: 443
            *  L6
            *     host: "sa.test.senseaware.com",
            *     port: 443
            *
localhost testing against backend
            *  DO NOT EVER HIT DIRECTLY UNLESS OTHERWISE INSTRUCTED/PERMITTED
            *  --------------------------------------------------------------
            *  LP
            *     host: "sa.senseaware.com",
            *     port: 443
            *  LP - EDC Cluster only
            *     host: "www-c.zmd.fedex.com"
            *     port: 2443
            *
            *  Note: Default to hit L1. If you change this to point to another test level,
            *  please don't check that code in and allow the default to always be L1.
            */
         {
            context: "/sasec/customerServices",  // or  context: "/sasec/samsServices",
            host: "sabase.idev.fedex.com",
            port: 2443,
            https: true,
            changeOrigin: false
         },
build process
YOU MUST HAVE GRUNT INSTALLED AND WORKING PLUS ALL THE SUPPORTING LIBRARIES/TOOLS installed.
C:\npm install
build process
For localhost development, there is no "build" process!
Just code...
grunt watches (html/js/css)...
and live-reloads your application.
Manually reload if you change a mustache file.
build process
Process is described in greater detail in README.md
Must have server access and Loadzilla account and permissions to be able to push loads.
DEPLOY process
Process is described in greater detail in README.md
Must have server access and Loadzilla account and permissions to be able to push loads.
REDESIGN DEVELOPMENT
By stephanieshusband