Wilford Conred
I'm Wilford Conrad, a tech enthusiast, developer, and designer who likes creating and investigating effective technologies. I rely on GUI format for quick FAT32 formatting, and anyone may easily get started using GUI Format Download.
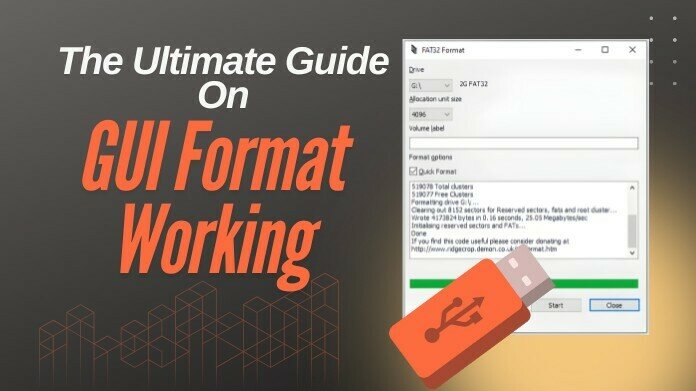
Formatting a USB drive seems simple: choose the device, hit "Start," and you're done. Have you ever wondered how programs like GUI Format prepare your drive behind the scenes? If so, you're in the right place.
This technical deep dive covers what happens behind the scenes when you utilize GUI Format, a lightweight, free software that successfully formats USB drives, SD cards, and large disks to FAT32. Most users simply see a brief progress meter, yet multiple crucial low-level processes are taking place inside the drive in succession.
Understanding these hidden procedures not only offers you greater control over debugging but also enables you to select the most suitable formatting method for your device.
This article explains how the GUI Format creates the FAT32 file system, manages large drives, and performs its essential internal operations, including boot sector construction, FAT setup, and verification, to maintain the tool's speed and reliability.
A little Windows-based tool called GUI Format, also known as FAT32 Format, helps users format storage devices to FAT32, even if they are larger than the 32GB default limit imposed by Windows.
Its simplicity conceals a potent underlying process that manages the creation of low-level structure, file system configuration, and partition access on your drive.
It remains lightweight and quick by avoiding unnecessary features, as it focuses solely on FAT32.
It is particularly well-suited for building drives for media players, gaming consoles, cameras, and older devices that require strict compatibility with the FAT32 file system.
When you run GUI Format, it immediately scans all attached storage devices to determine which are eligible for formatting. It collects information such as disk capacity, file system type, & hardware descriptor flags to ensure correct operation.
At this point, GUI Format also requests low-level access, thereby circumventing Windows' FAT32 size restrictions.
It then locks the selected volume, ensuring that no other application, such as Windows Explorer or background services, may disrupt or distort the formatting process. This provides a secure, isolated environment for developing a new file system.
GUI Format removes old structural data, including file tables and boot records, before writing any new data. This only deletes the metadata that describes how files were arranged; it is not a complete data wipe.
The program removes any remaining NTFS/exFAT headers, resets partition markers, and makes sure no conflicting structures are left.
This prevents the new FAT32 configuration from being hindered by outdated or corrupted data. In essence, it puts the drive in a neutral state, allowing the formatting procedure to begin without any issues.
The boot sector, which GUI Format creates from scratch, is the first crucial block of the FAT32 file system. It specifies fundamental settings such as the size of the FAT structure, bytes per sector, sectors per cluster, and reserved sectors.
To assist operating systems in quickly identifying the drive, GUI Format writes a valid BPB (BIOS Parameter Block), volume signature, & jump instructions.
Additionally, it ensures compatibility with a wide range of devices, including embedded systems, vintage media players, and modern PCs. The "blueprint" for how the entire drive will operate is contained in this boot sector.
The File Allocation Table is kept in two copies by FAT32: a primary copy and a backup. The GUI Format initializes both tables with structural metadata, cluster markers, and reserved items.
It ensures a practical layout and minimal fragmentation by allocating the precise size each FAT needs based on drive capacity.
To avoid unintentional overwrites, the utility also designates critical sectors as reserved. After they are constructed, these FAT tables serve as a roadmap for tracking each cluster on the disk.
Unlike previous FAT versions, FAT32 keeps the root directory as a cluster chain rather than a fixed place.
This chain is initialized by the GUI Format, which also sets up the root directory for upcoming file and folder entries.
It establishes the root's initial logical cluster, guaranteeing correct alignment and convenient access for operating systems.
The file hierarchy on your device is built upon this root directory. This is where all subsequent folders, system files, and user files begin to branch off.
Storage efficiency is determined by cluster size, which the GUI Format chooses based on disk capacity. Larger drives utilize larger clusters for faster performance, whereas smaller drives employ smaller clusters.
To prevent going beyond FAT32's file-count restrictions, GUI Format determines the most suitable cluster size.
Additionally, it enhances read/write performance across various devices by optimizing cluster alignment. This stage helps preserve FAT32 rule compatibility and speed.
GUI Format inserts a volume label directly into the file system metadata if one is supplied. As a result, every device can identify the drive.
Additionally, it creates or modifies the Volume ID, a special hexadecimal number required for mounting and tracking.
To maintain consistency, the utility saves the label in both the root directory and the boot sector. These IDs aid in the drive's speedy recognition and indexing by systems.
To ensure the file system is organized correctly, GUI Format conducts a verification pass before completion. It looks for problems in the root directory, FAT tables, cluster map, and boot sector.
This validation process makes sure there are no missing items, conflicts, or contradictions.
After confirmation, the utility uses the new FAT32 system to remount the drive. The drive appears ready right away, with your files arranged neatly and efficiently.
GUI Format works well because it:
Its lightweight nature means fewer complications and faster results.
Although the GUI Format appears straightforward, it carries out a precise series of low-level operations that effectively and consistently reconstruct the structure of your disk.
It is beneficial for large drives & device-specific formatting requirements because it can get beyond Windows' FAT32 limitations.
You can prepare storage for consoles, cameras, or embedded systems more intelligently if you know how it operates behind the scenes.
Additionally, it reassures you that the gadget is not just quick but also technically sound and long-lasting.
About the Author:
I'm Wilford Conrad, a web developer & storage-tech enthusiast who likes to make complicated technical subjects understandable to regular people.
I frequently test programs like GUI Format to gain an understanding of their inner workings, which I then convey through concise and practical manuals.
When I'm not writing or coding, I spend my time investigating new tools and improving workflows that make technology more straightforward and more effective for everyone.
Ref:
AndroidUzer. (2021, February 2). Guiformat FAT32 simple windows SD Card Format utility [Online forum post]. XDA Forums. https://xdaforums.com/t/guiformat-fat32-simple-windows-sd-card-format-utility.2960190/
By Wilford Conred