Principles of Computer Systems
Spring 2019
Stanford University
Computer Science Department
Lecturer: Chris Gregg

Lecture 17: HTTP Web Proxy and MapReduce
- Your next assignment, HTTP Web Proxy will officially go out tomorrow. In the meantime, we will take a look at the assignment in detail so that when you get to coding it, you will have an overall understanding.
- A web proxy server is a server that acts as a go-between from your browser to sites on the Internet. Proxies can serve many purposes:
- Block access to certain websites
- Block access to certain documents (big documents, .zip files, etc.)
- Block country access (e.g., no documents allowed from domains hosted in Liechtenstein)
- Act as an anonymizer to strip data from headers about what the real IP address of the client is, or by stripping out cookies or other identifying information. The Tor network, using onion routing performs this role (among other roles, such as protecting data with strong encryption)
- Intercept image requests, serving only upside-down versions of images.
- Intercept all traffic and redirect to kittenwar.com.
- Cache requests for static data (e.g., images) so it can later serve local copies rather than re-request from the web.
- Redirect to a paywall (e.g., what happens at airports)
Lecture 17: HTTP Web Proxy
- We have built a very basic proxy for you, and you need to set up Firefox (or another browser, but we suggest Firefox) to forward all web requests to the proxy:
Lecture 17: HTTP Web Proxy
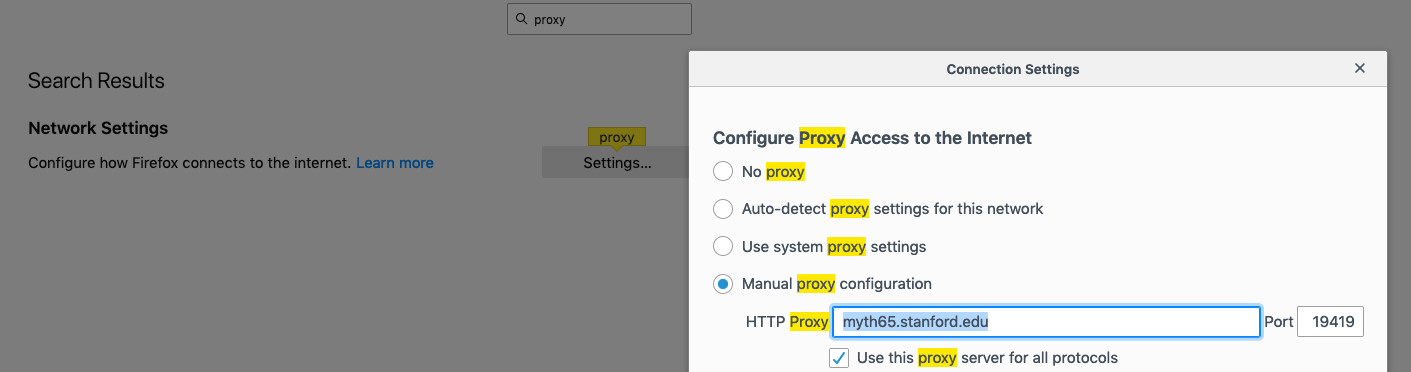
- To set up Firefox, go to Firefox->Preferences, then type "proxy" in the search box, then click on settings. You should have a window as above. Then, click on "Manual proxy configuration," and type in the myth machine and port number you get after starting your proxy:
$ ./proxy
Listening for all incoming traffic on port 19419.- Make sure you also select the checkbox for "Use this proxy server for all protocols."
- Once you have started the proxy (starter code), you should be able to go to any web site, and see the following:
Lecture 17: HTTP Web Proxy
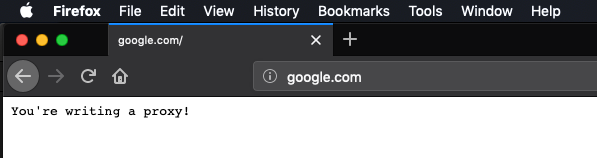
- Not much going on!
- After you have set up the proxy, you can leave it (if you browse with another browser), as long as you always ssh into the same myth machine each time you work on the assignment. If you change myth machines, you will need to update the proxy settings (always check this first if you run into issues)
- You should also frequently clear the browser's cache, as it can locally cache elements, too, which means that you might load a page without ever going to your proxy.
- If you want to avoid the browser, you can use
telnet, instead:
Lecture 17: HTTP Web Proxy
- After the "Host: api.ipify.org" line, you need to hit enter, twice.
- If you are off-campus, you will need to log into the Stanford VPN in order to access the proxy.
myth51:$ telnet myth65.stanford.edu 19419
Trying 171.64.15.30...
Connected to myth65.stanford.edu.
Escape character is '^]'.
GET http://api.ipify.org/?format=json HTTP/1.1
Host: api.ipify.org

HTTP/1.0 200 OK
content-length: 23

You're writing a proxy!Connection closed by foreign host.
myth51:$- If you want to see how the solution behaves, run samples/proxy_soln and then test:
Lecture 17: HTTP Web Proxy
myth51:$ telnet myth65.stanford.edu 19419
Trying 171.64.15.30...
Connected to myth65.stanford.edu.
Escape character is '^]'.
GET http://api.ipify.org/?format=json HTTP/1.1
Host: api.ipify.org

HTTP/1.1 200 OK
connection: keep-alive
content-length: 21
content-type: application/json
date: Wed, 22 May 2019 16:56:33 GMT
server: Cowboy
vary: Origin
via: 1.1 vegur

{"ip":"172.27.64.82"}Connection closed by foreign host.
myth51:$- Version 1: Sequential Proxy
- You will eventually add a
ThreadPoolto your program, but first, write a sequential version. - You will be changing the starter code to be a true proxy, that intercepts the requests and passes them on to the intended server. There are three HTTP methods you need to support:
- GET: request a web page from the server
- HEAD: exactly like GET, but only requests the headers
- POST: send data to the website
- The request line will look like this:
- You will eventually add a
GET http://www.cornell.edu/research/ HTTP/1.1
-
- For this example, your program forwards the request to www.cornell.edu, with the first line of the request as follows:
GET /research/ HTTP/1.1
-
- You already have a fully implemented
HTTPRequestclass, although you will have to update theoperator<<function at a later stage.
- You already have a fully implemented
Lecture 17: HTTP Web Proxy
- There are a couple of extra request headers that you will need to add when you forward the page:
- You should add a new request header entity named
x-forwarded-protoand set its value to behttp. Ifx-forwarded-protois already included in the request header, then simply add it again. - You should add a new request header entity called
x-forwarded-forand set its value to be the IP address of the requesting client. Ifx-forwarded-foris already present, then you should extend its value into a comma-separated chain of IP addresses the request has passed through before arriving at your proxy. (The IP address of the machine you’re directly hearing from would be appended to the end). - You need to be familiar with the
header.h/ccfiles to utilize the functions, e.g.,
- You should add a new request header entity named
string xForwardedForStr = requestHeader.getValueAsString("x-forwarded-for");
-
- You need to manually add the extra x-forwarded-for value, by the way.
- Most of the code for the sequential version will be in
request-handler.h/cc, and some inrequest.h/cc. - After you've written this version, test all the
HTTP://sites you can find!
Lecture 17: HTTP Web Proxy
- Version 2: Adding blacklisting and caching
-
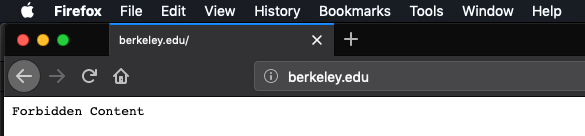
Blacklisting means to block access to certain websites
- You have a
blocked-domains.txtfile that lists domains that should not be let through your proxy. When the server in the blacklist is requested, you should return to the client a status code of403, and a payload of "Forbidden Content":
- You have a
-
Blacklisting means to block access to certain websites
Lecture 17: HTTP Web Proxy
- You should understand the functionality of the (short)
blacklist.ccfile, e.g.,
if (!blacklist.serverIsAllowed(request.getServer()) { ...
- If you respond with your own page, use
"HTTP/1.0"as the protocol.
- Version 2: Adding blacklisting and caching
-
Caching means to keep a local copy of a page, so that you do not have to re-request the page from the Internet.
- You should update your
HTTPRequestHandlerto check to see if you've already stored a copy of a request -- if you have, just return it instead of forwarding on! You can use theHTTPCacheclass to do this check (and to add sites, as well). - If it isn't in the cache, forward on as usual, but if the response indicates that it is cacheable (e.g.,
cache.shouldCache(request, response)), then you cache it for later.
- You should update your
-
Caching means to keep a local copy of a page, so that you do not have to re-request the page from the Internet.
- Make sure you clear your own browser's cache often when testing this functionality, and also clear the program's cache often, as well:
Lecture 17: HTTP Web Proxy
myth51:$ ./proxy --clear-cache
Clearing the cache... wait for it.... done!
Listening for all incoming traffic on port 19419.
- I put together a tiny web page that simply returns the server time, but it actually allows a cache (not a good thing, but useful for testing): http://ecosimulation.com/cgi-bin/currentTime.php
- Version 3: Concurrent proxy with blacklisting and caching
- Now is the time to leverage your
ThreadPoolclass (we give you a working version in case yours still has bugs) - You will be updating the scheduler.h/cc files, which will be scheduled on a limited amount (64) threads.
- Now is the time to leverage your
- You will be building a scheduler to handle the requests, and you will be writing the
HTTPProxySchedulerclass.- Keep this simple and straightforward! It should have a single
HTTPRequestHandler, which already has a singleHTTPBlacklistand a singleHTTPCache. You will need to go back and add synchronization directives (e.g.,mutexes) to your prior code to ensure that you don't have race conditions.- You can safely leave the blacklist functions alone, as they never change, but the cache certainly needs to be locked when accessed.
- Keep this simple and straightforward! It should have a single
- You can only have one request open for a given request. If two threads are trying to access the same document, one must wait.
Lecture 17: HTTP Web Proxy
- Version 3: Concurrent proxy with blacklisting and caching
- Don't lock the entire cache with a single mutex -- this is slow!
- Instead, you are going to have an array of 997
mutexes.- What?
- Yes -- every time you request a site, you will tie the request to a particular mutex. How, you say? Well, you will hash the request (it is easy:
size_t requestHash = hashRequest(request);) - The hash you get will always be the same for a particular request, so this is how you will ensure that two threads aren't trying to download the same site concurrently. Yes, you will have some collisions with other sites, but it will be rare.
- You should update the cache.h/cc files to make it easy to get the hash and the associated mutex, and then return the mutex to the calling function.
- It is fine to have different requests adding their cached information to the cache or checking the cache, because it is thread-safe in that respect. You should never have the same site trying to update the cache at the same time.
- Instead, you are going to have an array of 997
- The
client-socket.h/ccfiles have been updated to include thread-safe versions of their functions, so no need to worry about that.
- Don't lock the entire cache with a single mutex -- this is slow!
Lecture 17: HTTP Web Proxy
- Version 4: Concurrent proxy with blacklisting, caching, and proxy chaining
-
Proxy chaining is where your proxy will itself use another proxy.
- Is this a real thing? Yes! Some proxies rely on other proxies to do the heavy lifting, while they add more functionality (better caching, more blacklisting, etc.). Some proxies do this to further anonymize the client.
- Example:
- On myth63, we can start a proxy as normal, on a particular port:
-
Proxy chaining is where your proxy will itself use another proxy.
Lecture 17: HTTP Web Proxy
myth63:$ samples/proxy_soln --port 12345
Listening for all incoming traffic on port 12345.- On myth65, we can start another proxy that will forward all requests to the myth63 proxy:
myth65:$ samples/proxy_soln --proxy-server myth63.stanford.edu --proxy-port 12345
Listening for all incoming traffic on port 19419.
Requests will be directed toward another proxy at myth63.stanford.edu:12345.- Now, all requests will go through both proxies (unless cached!):
- You will have to update a number of method signatures to include the possibility of a secondary proxy.
- If you are going to forward to another proxy:
- Check to see if you've got a cached request -- if so, return it
- If you notice a cycle of proxies, respond with a status code of 504.
- How do you know you have a chain? That's why you have the
"x-forwarded-for"header! You analyze that list to see if you are about to create a chain.
- How do you know you have a chain? That's why you have the
- If not, forward the request exactly, with the addition of your
"x-forwarded-proto"and"x-forwarded-for"headers.
- We provide you with a
run-proxy-farm.pyprogram that can manage a chain of proxies (but it doesn't check for cycles -- you would need to modify the python code to do that).
Lecture 17: HTTP Web Proxy
- Whew! That is a lot of moving parts.
- As always, one step at a time.
- If you want to support
https://sites, you will have to implement the CONNECT HTTP method, which is not required for the assignment, but also not that much more work to add. We can give you some information if you want to add that support. - Test often, and remember to check your proxy settings, myth number, and to clear both your browser cache and your own proxy server cache often.
- The files you will likely have to modify are as follows (with major/minor/very minor changes listed below):
Lecture 17: HTTP Web Proxy
| file | changes |
|---|---|
| cache.cc | (very minor) |
| cache.h | (very minor) |
| proxy.cc | (very minor) |
| request.cc | (minor) |
| request.h | (minor) |
| request-handler.cc | (major) |
| request-handler.h | (major) |
| scheduler.cc | (minor) |
| scheduler.h | (very minor) |
Lecture 17: MapReduce Overview
- MapReduce is a parallel, distributed programming model and implementation used to process and generate large data sets.
- The map component of a MapReduce job typically parses input data and distills it down to some intermediate result.
- The reduce component of a MapReduce job collates these intermediate results and distills them down even further to the desired output.
- The pipeline of processes involved in a MapReduce job is captured by the below illustration:
- The processes shaded in yellow are programs specific to the data set being processed, whereas the processes shaded in green are present in all MapReduce pipelines.
- We'll invest some energy over the next several slides explaining what a mapper, a reducer, and the group-by-key processes look like.

Lecture 17: MapReduce Overview
- Here is an example of a map executable—written in Python—that reads an input file and outputs a line of the form
<word> 1for every alphabetic token in that file.
- The above script can be invoked as follows to generate the stream of words in Anna Karenina:
import sys
import re

pattern = re.compile("^[a-z]+$") # matches purely alphabetic words
for line in sys.stdin:
    line = line.strip()
    tokens = line.split()
    for token in tokens:
        lowercaseword = token.lower()
        if pattern.match(lowercaseword):
            print '%s 1' % lowercaseword
myth61:$ cat anna-karenina.txt | ./word-count-mapper.py
happy 1
families 1
are 1
... // some 340000 words omitted for brevity
to 1
put 1
into 1
Lecture 17: MapReduce Overview
-
group-by-keycontributes to all MapReduce pipelines, not just this one. Ourgroup-by-key.pyexecutable—presented on the next slide—assumes the mapper's output has been sorted so multiple instances of the same key are more easily grouped together, as with:
myth61:$ cat anna-karenina.txt | ./word-count-mapper.py | sort
a 1
a 1
a 1
a 1
a 1 // plus 6064 additional copies of this same line
...
zigzag 1
zoological 1
zoological 1
zoology 1
zu 1
myth61:$ cat anna-karenina.txt | ./word-count-mapper.py | sort | ./group-by-key.py
a 1 1 1 1 1 // plus 6064 more 1's on this same line
...
zeal 1 1 1
zealously 1
zest 1
zhivahov 1
zigzag 1
zoological 1 1
zoology 1
zu 1
Lecture 17: MapReduce Overview
- Presented below is a short (but dense) Python script that reads from an incoming stream of key-value pairs, sorted by key, and outputs the same content, save for the fact that all lines with the same key have been merged into a single line, where all values themselves have been collapsed to a single vector-of-values presentation.
- The implementation relies on some nontrivial features of Python that don't exist in C or C++. Don't worry about the implementation too much, as it's really just here for completeness.
- Since you know what the overall script does, you can intuit what each line of it must do.
from itertools import groupby
from operator import itemgetter
import sys

def read_mapper_output(file):
    for line in file:
        yield line.strip().split(' ')

data = read_mapper_output(sys.stdin)
for key, keygroup in groupby(data, itemgetter(0)):
    values = ' '.join(sorted(v for k, v in keygroup))
    print "%s %s" % (key, values)
Lecture 17: MapReduce Overview
- A reducer is a problem-specific program that expects a sorted input file, where each line is a key/vector-of-values pair as might be produced by our
./group-by-key.pyscript.
- The above reducer could be fed the sorted, key-grouped output of the previously supplied mapper if this chain of piped executables is supplied on the command line:
import sys

def read_mapper_output(file):
    for line in file:
        yield line.strip().split(' ')

for vec in read_mapper_output(sys.stdin):
    word = vec[0]
    count = sum(int(number) for number in vec[1:])
    print "%s %d" % (word, count)
myth61:$ cat anna-karenina.txt | ./word-count-mapper.py | sort \
| ./group-by-key.py | ./word-count-reducer.py
a 6069
abandon 6
abandoned 9
abandonment 1
...
zoological 2
zoology 1
zu 1
Lecture 17: HTTP Web Proxy and MapReduce
By Chris Gregg


