


Tony Pigram
Slides for presentations of things that I like talking about
How to create a Native Android App using Wikitude
All content in these presentations is for example learning exercises, it has no official support from IBM and if you wish to use this material, you must make sure it is fit for your purpose. No warranty is implied or given.
"How do I create a new App using Eclipse&ADT and stop pointing me to the SDK Example!"
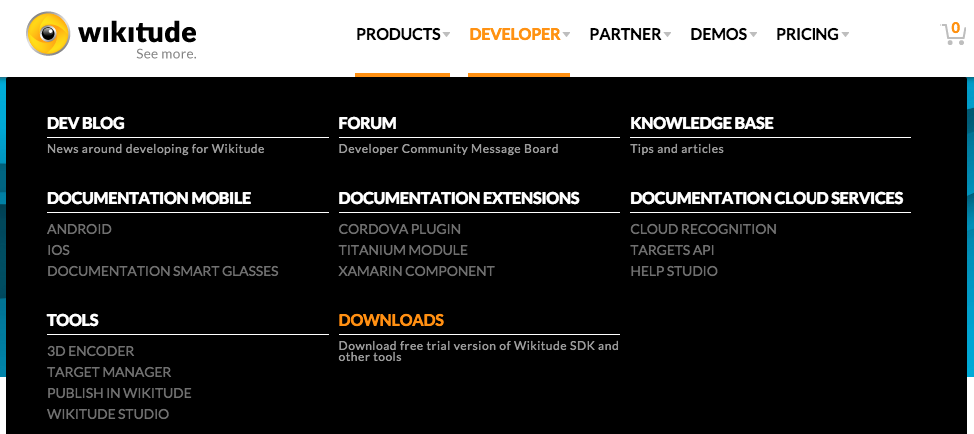
Visit the Wikitude website and download the SDK
http://www.wikitude.com/downloadYou should be asked to Sign up for an account - doing so gets you your SDK Trial key emailed to you. (Hint: you need that, so sign-up)
Believe it or not, you're almost there......
(Did I just point you at the Documentation?!?!)
Okay, here's what will happen: You'll download the SDK Sample, you'll import it into Eclipse, you'll complain as it won't compile properly, you won't read the documentation, you'll briefly glance at the page above, it won't make sense, you'll call this software all sorts of names..... and then......
..and then you'll search Google and find stackoverflow questions and problems. Then you'll be smart and think, "Hey, there's a \bin folder with an APK file already made, I'll just copy it to the device!".
Which you do.
..and then, you'll be amazed and overwhelmed by the shear number of samples that are included in the SDK Sample.
...and when you see the Solar System demo, you'll be having all sorts of idea's about how you're going to make "The killer AR app" and retire off of the riches....
...but to do that, you have to create you're own Android app first...
There are numerous stackoverflow and Wikitude forum entries that have the response: "Take the SDK Sample and extend what you want to do from there"... but you don't want to do that, you want to make your own isolated Mobile app, just include the SDK library and code some stuff to make it work...
You'll spend some time trying to make sense of how the SDK Sample app is written, how it works and try and get your head around what is going on.
You may even refer back to that documentation page, but it still won't make much sense (yet)....
You may also start to get a bit confused as to why there is reference to HTML5 and JavaScript, this is an Android SDK, isn't it?
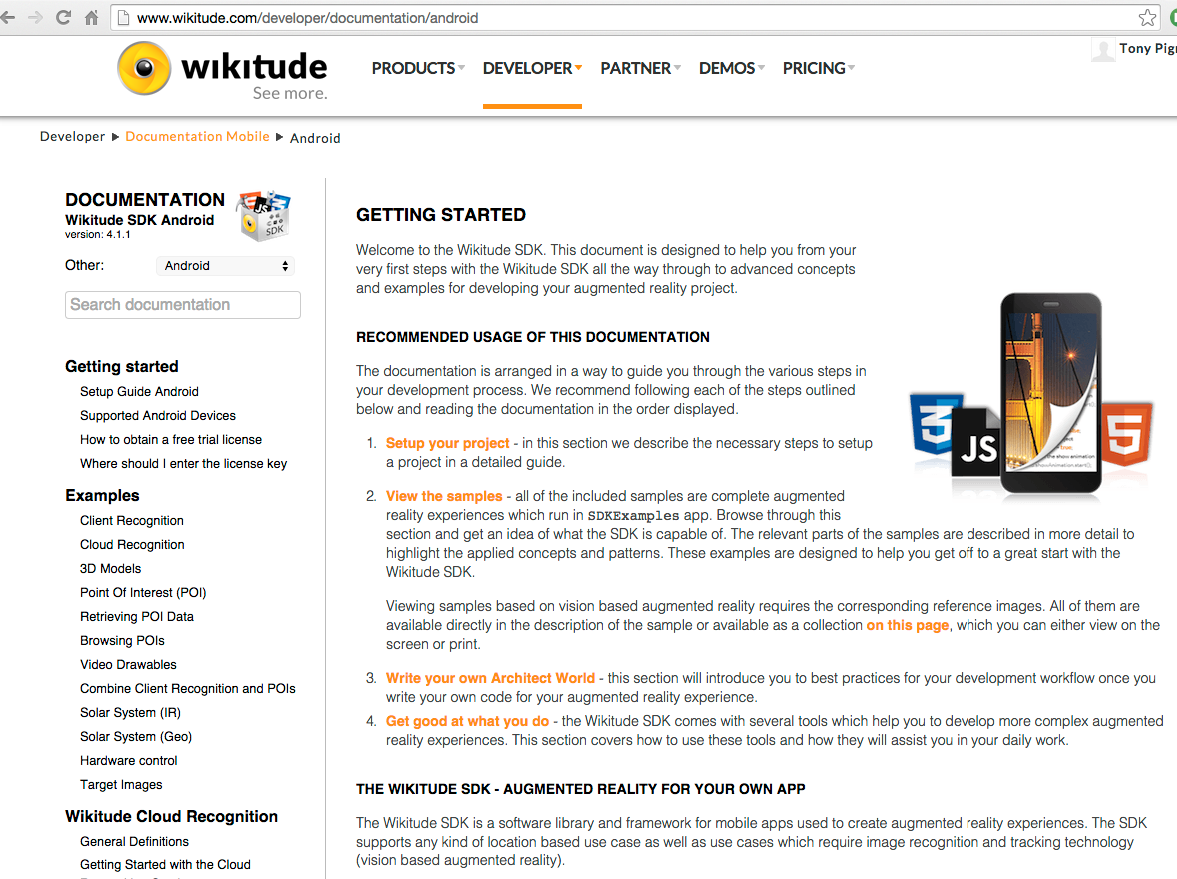
There is actually a good write-up on how to setup your Android environment here:
http://www.wikitude.com/developer/documentation/androidIf you miss this step, you will get build errors about files not be compatible with your device and you will then spend time Googling again, just get this step done once and it'll all be fine.
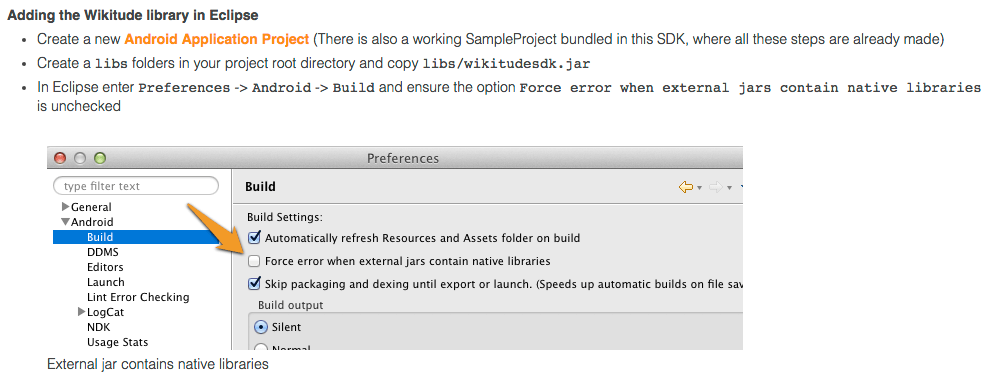
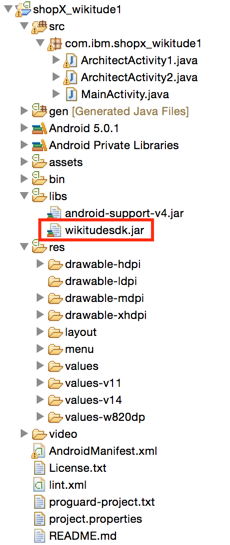
My new Android application project is created, I added the sdk.jar file as instructed and I made the eclipse preferences modification.
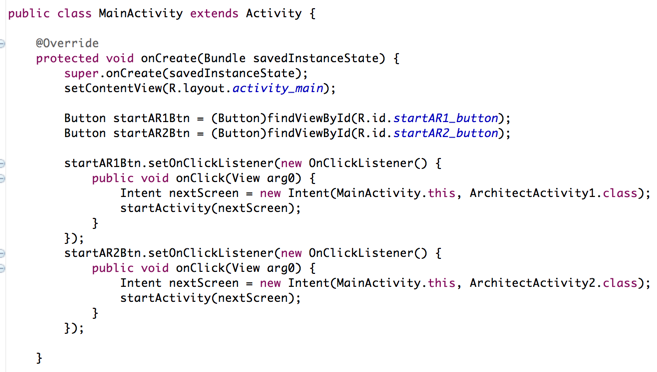
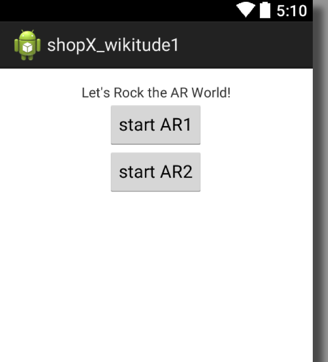
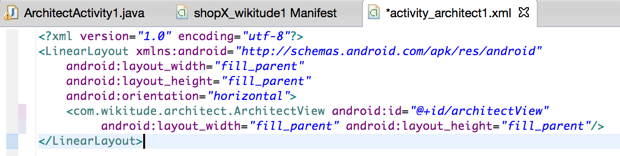
I wanted to make a MainActivity page where I could invoke the Wikitude AR from as this would emulate normal usage, ie. in a real app, something would invoke starting the AR and I wanted to split the code out to it's own Activity.
MainActivity contains 2 buttons:
[Button1] invokes the SDK sample
[Button2] invokes a sample, I made!
One thing to note: Most of this information "IS" documented on the Documentation page, but, you're likely to only refer back to it, "after" you've got it all working and say, "Ohhh...so that's what that meant".
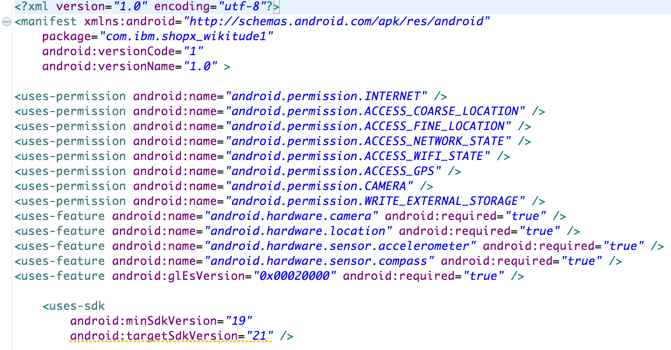
http://www.wikitude.com/developer/documentation/androidWe now need to make some changes to the AndroidManifest.xml:
Obviously, lots of permissions are needed to be set.
The extra Activities we shall use need to have some setting to hide the keyboard and make them fullscreen
Now, it's at this point in the documentation, it starts to become a little bit unclear what is going on, what you are meant to do and where you are meant to do it...
You'll get lost trying to figure out where to put this at this point. Just getting a key is all you need for now
Hang on, I have to put JavaScript somewhere? What HTML files is it referring to, I only have .java files in my Android project so far....?!?!?.... (I'll explain later)
Ah, we get this bit, this makes sense.
Right, let's write some code for out Activity...
The Documentation provides us with the following code:
Whilst that's all fine and dandy, it leaves out a few crucial bits of information. Like what do I include in my project to use .ArchitectView and .StartupConfiguration?
Some smart people, will refer back to the SDK Sample project and attempt to work it out from there. It is true, it is all there, you just need to sift through it all to know what is the 'gold' and what is not.
Now, let's write some code for our Activity...
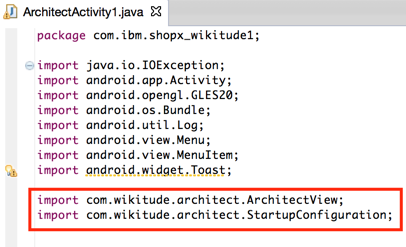
To start off with, we need to import the 2 libraries as shown here.
It is possible to not use StartupConfiguration, but, I'm being good and referring back to the Documented way of using this.
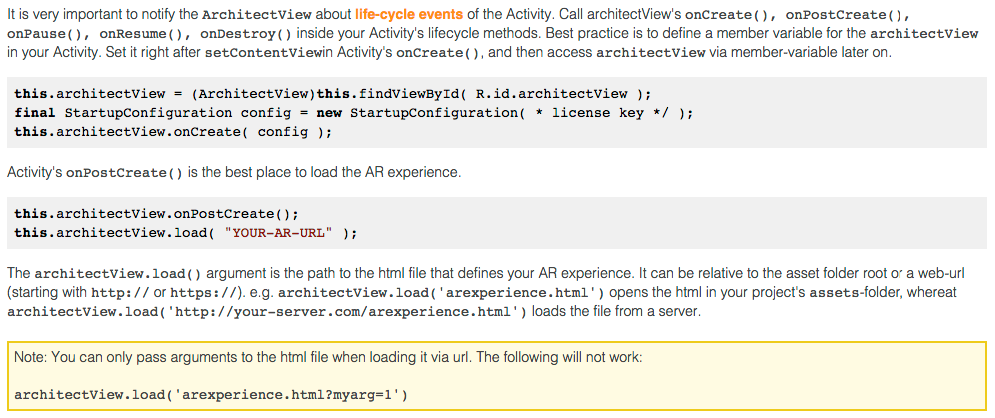
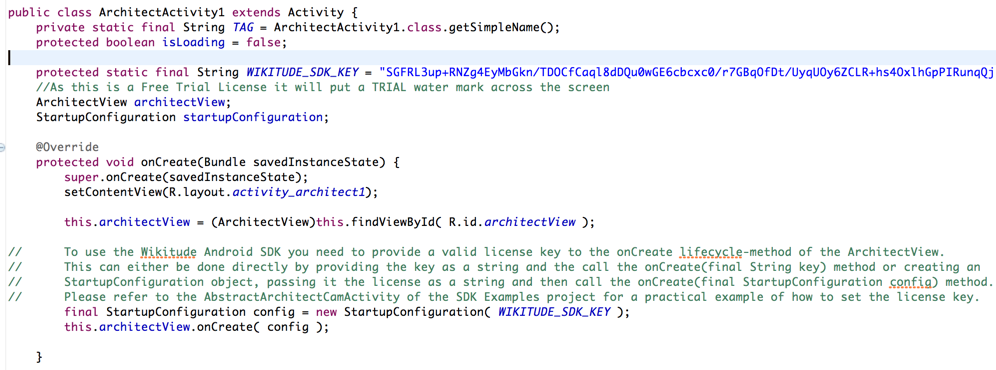
First, we create some variables and objects to use later on in our Activity
Then we bind to the view in our layout
We then setup the SDK Key and create the AR View
Well, that was simple, what was all the fuss about?
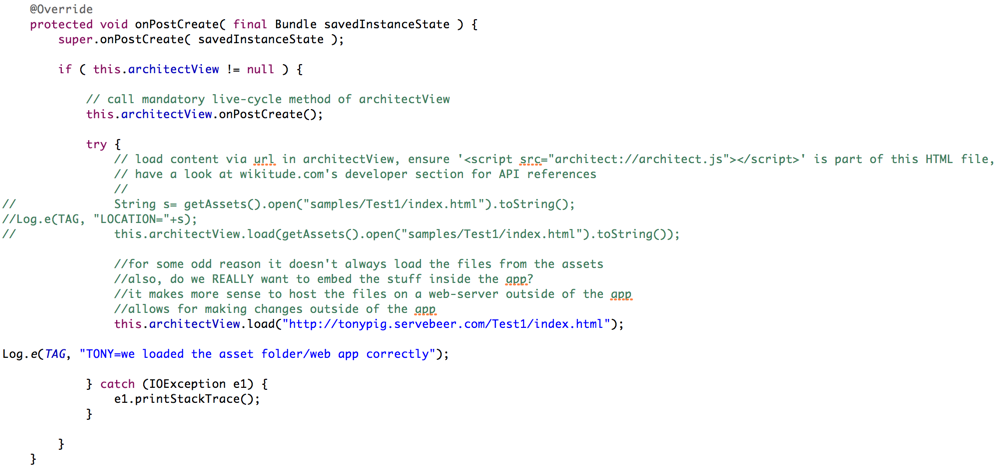
Okay, so all we have done so far is to initialise the View, now we need to load the content.
This is the "bit", where the HTML5/JavaScript side of things come into the equation. As you can see in the code comments, this is where I initially had some problems loading the index.html from the /assets folder. I "solved" the problem by hosting the code on a web-server, then it all worked fine. It also meant I could separate the Android app code from the AR code.
Hang on a minute, roll back, we have the Image Recognition stuff for the AR Wikitude SDK in HTML and JavaScript files? How does that work?!
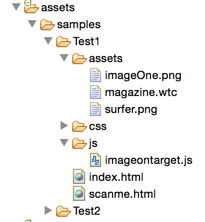
Well, the index.html file contains a link to the imageontarget.js file - the content of which is shown above. What isn't too obvious is how this all ties together.
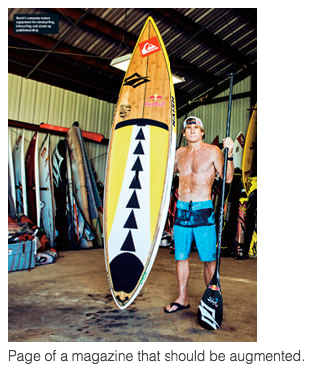
The files, imageOne.png and magazine.wtc were pre-built and whilst we can see that imageOne.png is the surf board, how does it detect "seeing" the surfer-dude and his surf-board?
http://www.wikitude.com/external/doc/documentation/latest/android/clientrecognition.html#client-recognitionBefore we carry on, there are just a few more @Overrides that are needed in the Activity code:
That is all the "code" that is needed for our Activity to work properly.
We have the .onCreate() that sets our SDK Key.
The .onPostCreate() now loads our content to actually perform the Image Recognition.
These @Overrides perform the remaining work needed.
We could deploy our app, press [Button1], point the Phone at the surfer-dude and "see" the surf-board appear. Or, we could start to wonder what that .wtc file was and how that JavaScript code works?!...
Back to the Documentation...
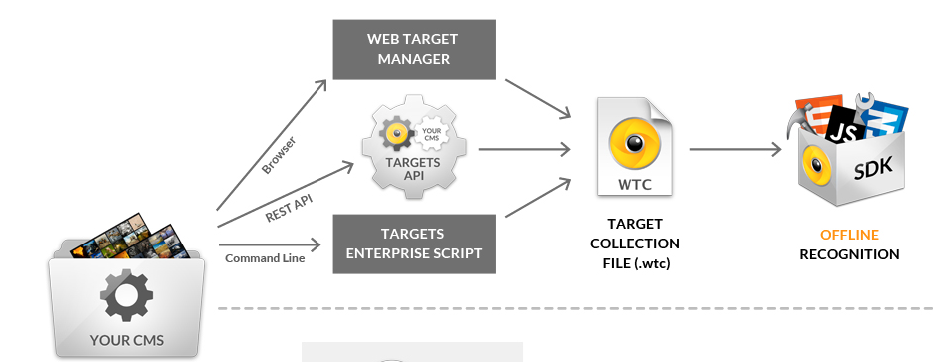
http://www.wikitude.com/external/doc/documentation/latest/android/targetmanagement.htmlWe need to make a .wtc file using the 'Web Target Manager' web application
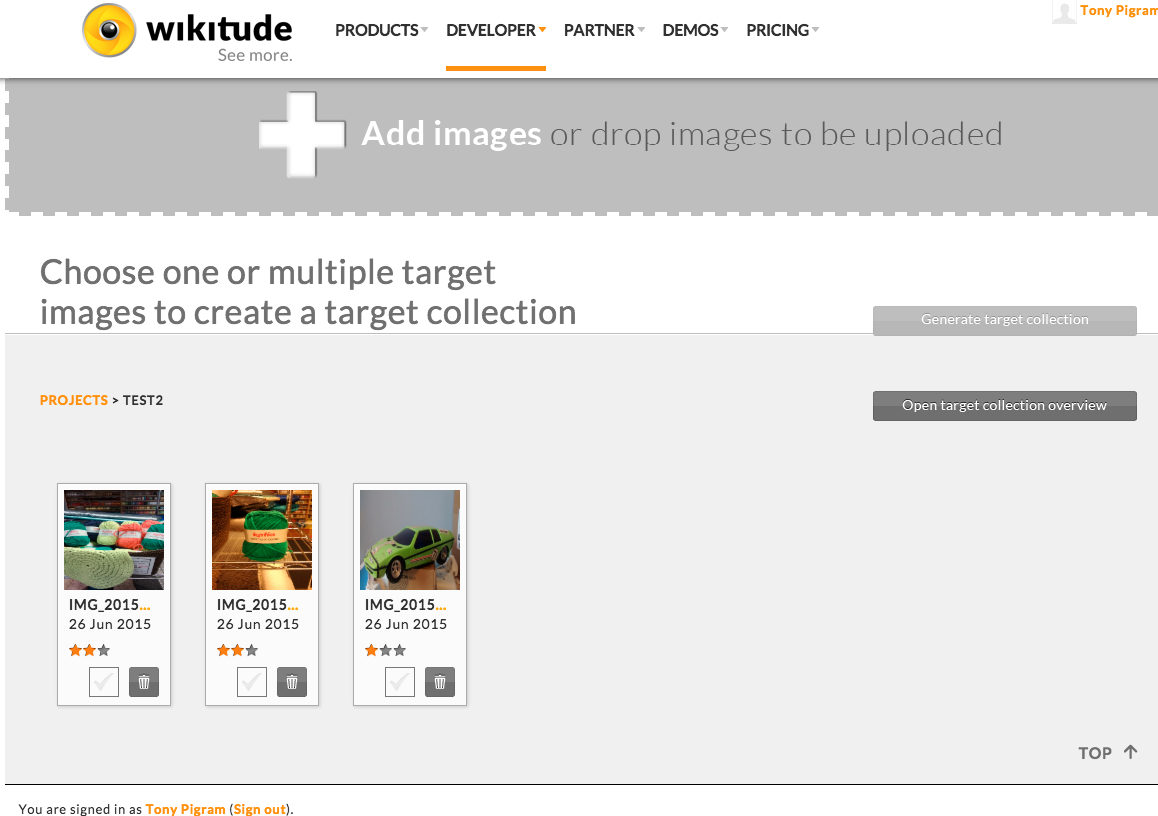
I followed the instructions and created a new Project.
I added a couple of images.
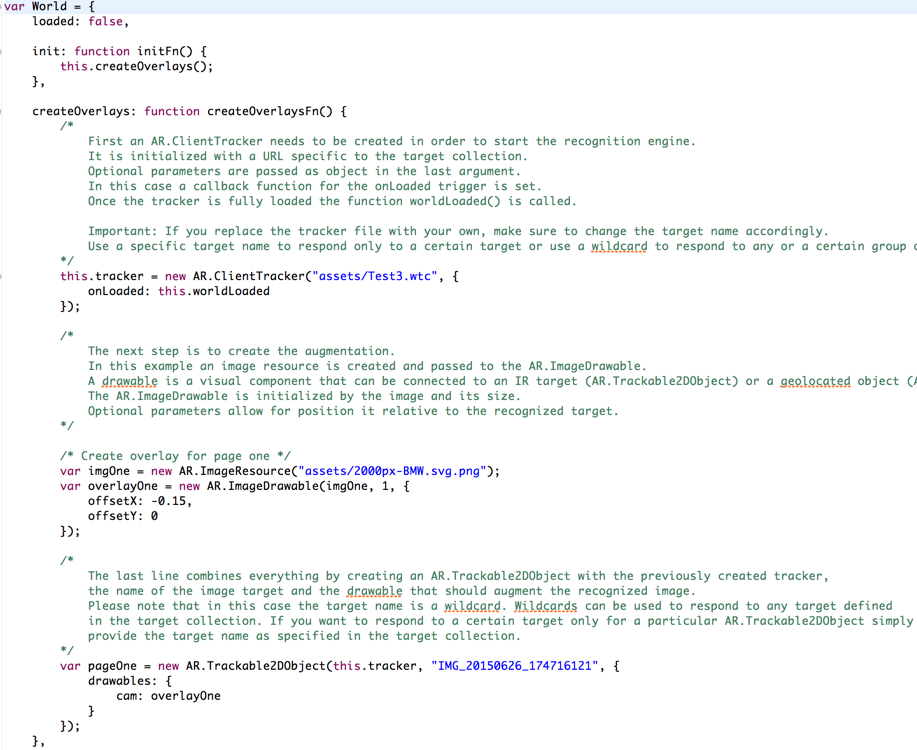
I clicked on the 'green car' and pressed [Generate target collection], gave it a name 'Test3.wtc', selected the latest SDK version and saved the file.
From now on I'll refer to Test2 (even though I did save the .wtc as Test3!)
As I said previously, I created the sample in the /assets folder within the app. I have moved this to a web-server for easier maintenance.
It also means that I have to have a WiFi or network connection now for my Image Recognition to work.
If you can get it to read these files locally and you need the ability to work offline then you could leave these files as part of the app.
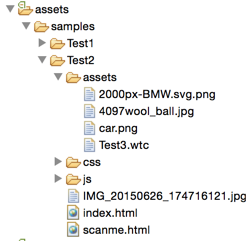
Keeping the same folder setup as before.
I copied the Test3.wtc into place.
I copied 2000px-BMW.svg.png into place.
I also created a scanme.html web page to show the .jpg image.
The JavaScript file that does the work:
Test3.wtc contains the Image that needs to be recognised.
2000px-BMW.svg.png is the Image that is going to be displayed to the user.
IMG_xxxx is the name of the file that was added to the Test3.wtc file. This is crucial to get correct. You can add a wildcard and it'll attempt to match against all of the images in the .wtc file.
The JavaScript file that does the work:
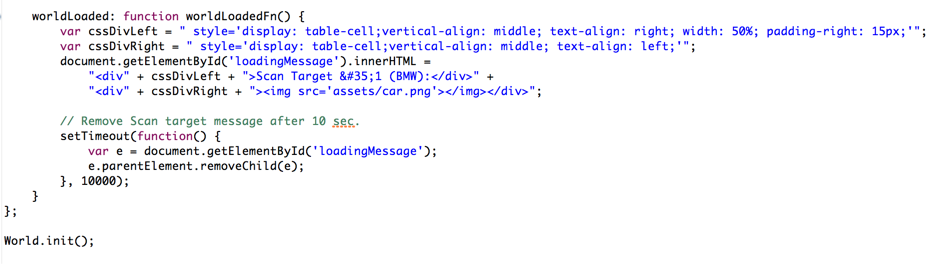
This part of the JavaScript just outputs some dynamicHTML to show a small image to the user (for 10 seconds), showing them the Image that they need to be looking to scan (/car.png).
You probably wouldn't need to do this after the sample usage, but it does show that we are still only working with HTML/JavaScript, so you have full capabilities to do anything you want when the Android View is loaded.
What happens now if we run the mobile app and press [Button2]?
We'll see a Splashscreen for wikitude and the diagonal word 'Trial' repeated across the screen. Note: The non-trial SDK Key does not show the Splashscreen or the word 'Trial', so it is a much better user experience.
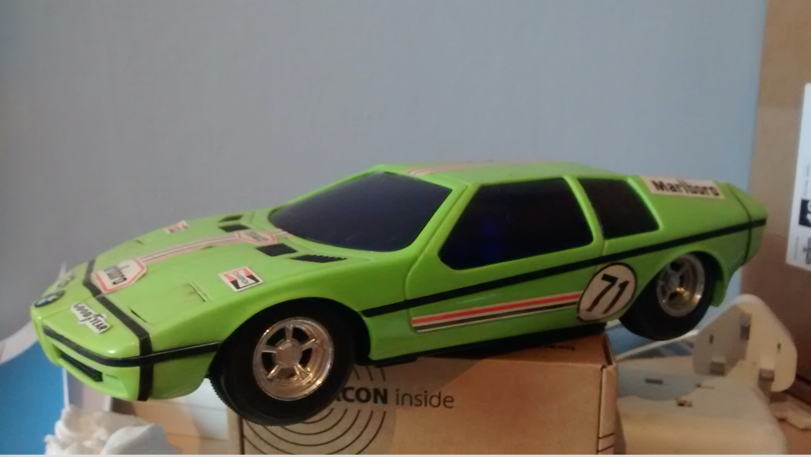
The Camera control will take over the screen on the device and it will be attempting to do "Image Recognition" for what we told it to look for. Now, that could be an "Image" or even, the "Real Thing!".
When it detects a match it will overlay the "BMW" logo at the location we told it in the JavaScript code.
Can I see an example of that in action?...Sure!
We've only touched on 'Sample1' of the amount of things that you can do with this SDK, there is so much more that you can now go off and investigate.
My goal was to be able to create a standalone Android project in Eclipse that will allow me to create an Activity where I could invoke the Wikitude AR SDK and perform some Image Recognition.
Now that we have this Base-project, we can start to extend it to perform more advanced techniques. (I "really" like the Solar System sample, it's mind-blowing!!!)
I hope it makes sense to you now and looking back at the Wikitude Documentation, it should now start to make more sense!
Oh, you want the code?! (Everyone always wants the code!)... sure thing, do a git clone from here:
git clone https://hub.jazz.net/git/tonypigram/shopX_wikitude1By Tony Pigram
How to use the Wikitude SDK and build an Android Mobile Application (from scratch)


