AJAX
What is AJAX?
AJAX stands for Asynchronous JavaScript and XML.
-
ASYNCHRONOUS means that the client can request new pieces of information from the server at ANY TIME
- This means content on a page is updated without having to re-render the entire page, making it a “seamless” experience.
Intro exercise
Create a new rails project called ajax-sample
$ rails new ajax-sample
$ rails g scaffold Post content:text
$ rake db:migrate
Create a method inside your Posts controller called ajax
# posts_controller.rb

def ajax
end
Create the corresponding ajax view and route.
# routes.rb

root 'posts#ajax'
<!-- ajax.html.erb -->
<h1>Ajax Testing 1, 2, 3</h1>
Making the ajax call
Create a new rails project called ajax-sample
<h1>Ajax Testing 1, 2, 3</h1>

<script type="text/javascript">
  function loadPosts(){
    $.getJSON("/posts.json", function(data){
      var html = "";
      $.each(data, function (index){
	// alert(data[index].content);
	html += "<b><i>" + data[index].content + "</i></b><br>";
	});
	// update our div
	  $("#posts").html(html);
	});
       }
</script>

<div id="posts">
  <a href="javascript:loadPosts();">This is where blog posts go</a>
</div>
Explanation
-
We created a JQuery function called “.getJSON”:
FIRST ARGUMENT PASSED = “/posts.json”. This is the URL that we’ll be working with.
-
SECOND ARGUMENT PASSED = anonymous function with the argument data
In this case, data is the JSON that comes back via the request.
The OUTPUT of this URL call is LOADED INTO DATA (i.e., JSON is loaded into data)
-
We created another JQuery function that uses the each method to loop through each of our posts. This is like a loop that we saw with Ruby.
Here, we’re using the data variable that the JSON was stored into.
Then, we’re pulling an attribute of the Post class with .content
-
Notice that we created a variable called html that would store all the information that we had outputted in the last function
At first, it’s simply an empty string. However, after iterating through all of the posts in our database, it is populated by the content information
-
This is achieved by calling the variable within our function:
html += "<b><i>" + data[index].content + "</i></b><br>";
-
Finally, we plug our variable “html” into the DIV element below using JQuery:
We target the ID of the DIV tag with “#posts”.
Then, we use the .html method to render our results into HTML by passing in the variable, html.
Notice that this DIV element contains a HYPERLINK reference that triggers the loadPosts(); JavaScript function that we created earlier.
To Do List
Let's create a new app called "todo_list"
-
Scaffold 1 resource: Task
-
description:string
-
deadline:datetime
-
Add some data.
Part 1:
Creating a New Task on the Index Page
hijacking a link
Here we pass the remote: true option to disable the default Rails mechanism that would have otherwise navigated us to /tasks/new.
# index.html.erb

...

<%= link_to 'New Task', new_task_path, remote: true %>

...
Let's reconfigure our "new" link to load a hidden form.
controller configs
# tasks_controller.rb

class TasksController < ApplicationController
  before_action :all_tasks, only: [:index, :create]
  before_action :set_task, only: [:show, :edit, :update, :destroy]

  # index and show actions removed

  def new
    @task = Task.new
  end

  def create
    #@task = Task.new(task_params)
    @task  = Task.create(task_params)
  end

  private

    # new action
    def all_tasks
      @tasks = Task.all
    end

    def set_task
      @task = Task.find(params[:id])
    end

    def task_params
      params.require(:task).permit(:description, :deadline)
    end
end
Next let’s set up our Task Controller and to create new tasks with ajax:
The before_action filter on all_tasks creates the @tasks instance variable for us automatically.
Because we no longer have any logic in our index action, we can remove it.
Rails will automatically render the correct template, even without the presence of the action.
Behind the scenes
# index.html.erb

...

<div id="task-form" style="display:none;"></div>
...
Now, choose a place on the index page to hide your form by passing a style attribute with the following:
This will hide our form when the page is initially loaded.
jquery time
# new.js.erb

$('#task-form').html("<%= j (render 'form') %>");
$('#task-form').slideDown(350);
This is just an ERB template that generates Javascript instead of the HTML we’re used to. It basically translates to: “Find the element with an id attribute of task-form and at that point render the html in the form partial.”
It takes the place of:
Next, create new.js.erb :
# new.html.erb

<%= render 'form' %>
A gem and a form
# _form.html.erb

<%= simple_form_for @task, remote: true do |f|   %>
  <%= f.input  :description                      %>
  <%= f.input  :deadline                         %>
  <%= f.button :submit                           %>
<% end %>
This is the ‘form’ being rendered in new.js.erb. The remote: true option being is passed in that will execute an ajax POST request.
gem 'simple_form'$ bundle installLet's add a gem to help us with our form:
(and restart the server)
rendering tasks
# index.html.erb

<%= link_to 'New Task', new_task_path, remote: true %>

<div id="task-form" style="display:none;"></div>

<h2>Tasks</h2>
<div id="tasks">
  <ul>
    <%= render @tasks %>
  </ul>
</div>
Next we'll render our task list on the index page.
# _task.html.erb

<li>
  <%= task.description %>
  <%= task.deadline %>
</li>
Create.js.erb
# create.js.erb

$('#tasks').html("<%= j (render @tasks) %>");
$('#task-form').slideUp(350);
And we update our task list and hide our form with create.js.erb:
Now we should be able to dynamically add tasks to our list! AWESOME!
Part 2:
Updating a Task on the Index Page
Updates
# tasks_controller.rb

class TasksController < ApplicationController
  before_action :all_tasks, only: [:index, :create, :update]
  before_action :set_task, only: [:edit, :update, :destroy]

  def update
     @task.update(task_params)
  end
Let’s revisit our Task Controller and set it up for updates:
Edit link
# _task.html.erb

<li>
  <%= task.description %>
  <%= task.deadline %>
  <%= link_to "Edit", edit_task_path(task), remote: true %>
</li>
And add an edit link to the task list.
edit and update
# edit.js.erb

$('#task-form').html("<%= j (render 'form') %>");
$('#task-form').slideDown(350);
Our edit.js.erb is the same as our new.js.erb. Our update.js.erb is the same as our create.js.erb
# update.js.erb

$('#tasks').html("<%= j (render @tasks) %>");
$('#task-form').slideUp(350);
update.js.erb & create.js.erb.
edit.js.erb & new.js.erb
# new.js.erb

$('#task-form').html("<%= j (render 'form') %>");
$('#task-form').slideDown(350);
# create.js.erb
$('#tasks').html("<%= j (render @tasks) %>");
$('#task-form').slideUp(350);Part 3:
Deleting a Task on the Index Page
Deleting
# tasks_controller.rb

class TasksController < ApplicationController
  before_action :all_tasks, only: [:index, :create, :update, :destroy]
  before_action :set_task, only: [:show, :edit, :update, :destroy]

  def destroy
    @task.destroy
  end
Finally, we set up our controller for deleting (aka destroying):
Two more steps
# _task.html.erb

<li>
  <%= task.description %>
  <%= task.deadline %>
  <%= link_to "Edit", edit_task_path(task), remote: true %>
  <%= link_to "Delete", task, remote: true, method: :delete,
        data: { confirm: 'Are you sure?' } %>
</li>
When adding our delete link, two additional steps are required:
Add the link on the task partial:
# destroy.js.erb

$('#tasks').html("<%= j (render @tasks) %>");
And create destroy.js.erb:
We did it you guys!
You should now be able to add, update and delete tasks all without leaving the comfort of your index page!

Take a break!!
Part four:
Beautification

Bootstrap gem
Let's add bootstrap in a different way: using a gem!
gem 'bootstrap-sass', '~> 3.3.3'$ bundle installThen restart your server to make the files available through the pipeline.
The stylesheet
- We have to change our application.css to application.scss.
- Then, remove all the //=require and //=require_tree statements from the file.
- Instead, use @import to import Sass files.
/* application.css.scss */

@import "bootstrap-sprockets";
@import "bootstrap";
Don't forget to delete the contents of your scaffolds.css file
The js
Now we have to require Bootstrap Javascripts in app/assets/javascripts/application.js
// application.js

//= require jquery
//= require jquery_ujs
//= require turbolinks
//= require bootstrap-sprockets
//= require_tree .
add some structure
Now that we have Bootstrap alive and kickin' let's add some structure to our site.
<!-- application.html.erb -->
<body>
<div class="row">
<div class="col-sm-6 col-sm-offset-3">
<%= yield %>
</div>
</div>
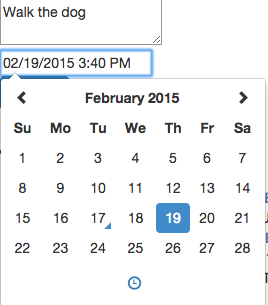
</body>Datepicker gem
Let's add another gem that helps us display a better UI for choosing dates.
gem 'momentjs-rails', '>= 2.9.0'
gem 'bootstrap3-datetimepicker-rails', '~> 4.0.0'
$ bundle installThen restart your server once again.
css & JS updates
/* application.css.scss */

@import "bootstrap-sprockets";
@import "bootstrap";
@import 'bootstrap-datetimepicker';
Update the application css and js as follows:
// application.js

//= require moment
//= require bootstrap-datetimepicker
Datetimepicker.js
// _datetimepicker.js

$(document).ready(function() {
  $('#datetimepicker1').datetimepicker();
});
Let's add a partial that applies the datetimepicker method provided by the gem. We'll target an id called "datetimepicker1"
# new.js.erb

$('#task-form').html("<%= j (render 'form') %>");
$('#task-form').slideDown(350);

<%= render 'datetimepicker' %>
# edit.js.erb
$('#task-form').html("<%= j (render 'form') %>");
$('#task-form').slideDown(350);
<%= render 'datetimepicker' %>New and edit updates
We now have to render to the datepicker partial in our new and edit js files.
form update
<!-- _form.html.erb -->

<%= form_for @task, remote: true do |f|   %>
  <%= f.text_area  :description, placeholder: "Describe your task!" %>
 <br/>
  <%= f.text_field :deadline, id: "datetimepicker1", placeholder: "When's it due?" %>
  <br/>
  <%= f.button :submit %>
<% end %>
Now we'll add the datepicker id to our form so javascript knows where to work it's magic.
test it out
Cleaning up the form
<%= form_for @task, remote: true do |f|   %>
  <div class="form-group">
    <%= f.text_area  :description, placeholder: "Describe your task!", class: "form-control" %>
  </div>
  <div class="form-group">
    <%= f.text_field :deadline, id: "datetimepicker1", placeholder: "When's it due?", class: "form-control" %>
  </div>
  <div class="form-group">
    <%= f.button :Submit, class: "btn btn-primary" %>
  </div>
<% end %>
Cleaning up the index
 <div class="row">
  <div class="col-md-3">
  <%= link_to new_task_path, remote: true do %>
    <button class="btn btn-default"><span class="glyphicon glyphicon-plus"></span> Add Task </button>
  <% end %>

   <div id="task-form" style="display:none;"></div>
  </div>
  <div class="col-md-8">
    <h2>JP's Tasks</h2>
    <div id="tasks">
      <div class="row">
        <%= render @tasks %>
      </div>
    </div>
  </div>
Cleaning up the task list
<div class="col-md-12">
  <div class="well">
    <h3><%= task.description %></h3>
    <p><%= task.deadline.strftime('%B %d, %Y') %></p>
    <p class="pull-right">
      <%= link_to "Edit", edit_task_path(task), remote: true %>
      <%= link_to "Delete", task, remote: true, method: :delete, data: { confirm: 'Are you sure?' } %>
    </p>
  </div>
</div>
adding some style
body {
background: rgb(197, 221, 224);
}
h2 {
color: lightslategrey;
font-weight:bold;
text-transform: uppercase;
}
#task-form {
margin:10px 0;
background: lightslategrey;
padding: 10px 10px 5px;
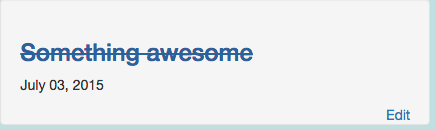
}Fancy deleting
a {
  text-decoration: none;
}

a:hover {
  background: none;
  text-decoration:line-through;
  color: #336699;
}
What if we wanted to delete an item simply by clicking on it?
<div class="col-md-12">
  <div class="well">
  <h3><%= link_to task.description, task,  remote: true, method: :delete, data: { confirm: 'Are you sure?' } %></h3>
  <p><%= task.deadline.strftime('%B %d, %Y') %></p>
  <p class="pull-right">
  	 <%= link_to "Edit", edit_task_path(task), remote: true %>
	</p>
    </div>
</div>
Homework
- Get ajax working on your site
- List tasks in ascending order by date
- If multiple tasks fall on the same date list the date once with each task underneath
- Style it up (add google fonts, maybe?)
- Push to Github - future employers will want to see that you know how to use ajax!
- Add a condition to check if there are any tasks
- if none are listed display a silly image and instruct the user to add a task!
- Add validation and get error messages to print to the page
- Add the pagination gem
Need More?
Intro to Ajax
By tts-jaime


