Google Maps API
What's an API?
Application Programming
Interface
A set of programming instructions and standards for accessing a Web-based software application.
Google maps api
Google Maps is simply a combination of HTML, CSS and Javascript working together. The map tiles are images that are loaded into the background.
The Maps API let's us create our own map and use Javascript to tell it how to behave.
adding a map
Let's add a map to our good ol' travel site? Here are the basic steps:
- Go to https://developers.google.com/maps/
- Click Javascript under the Web menu
- Click the blue "Get started" button
- Obtain an API Key
- Add the API Key to the script tag in the <head>
- Create a div for our map in the html & css
- Pass some coordinates to the javascript
- Customize our awesome map
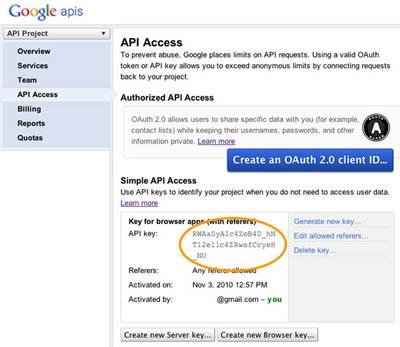
get an api key
- Have a Google account? Great! If not, create one.
- Visit the Google API Console:
https://code.google.com/apis/console - Click the Services link from the left-hand menu
- Activate the Google Maps JavaScript API v3 service
- Click the API Access link from the left-hand menu.
 <script type="text/javascript"
      src="https://maps.googleapis.com/maps/api/js?key=API_KEY">
 </script>
Apply the api key
Let's go back to our developer docs, copy the script tag and plug our API key into the part that says API_KEY:
application.html.erb
<div id="map-canvas"></div>#map-canvas {
width: 100%;
height: 500px;
}Map div
We'll need a place for our map to live so let's add a div to our welcome index page and give it an id.
Remember that divs kind of dumb; they don't come with any built-in properties. Let's write a style to give it an exact size. I'm actually ignoring the docs and putting this in an external stylesheet to be reusable (also it's more proper).
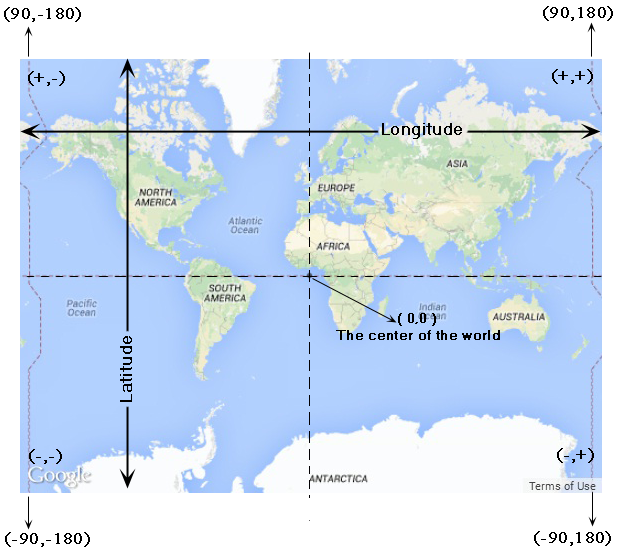
Coordinates
Coordinates are used to express latitude (south to north) and longitude (west to east) values. This data is fed to the javascript function.
Add the js
I'm going to go against the docs on this one too and add the javascript to our application.js file for more extensibility. Since we're running a web application and not a one page website we should write code that can be used on any page. We'll need to wrap this all in a document.ready function so the js will run on page load.
$(document).ready(function (){

    function initialize() {
      var mapOptions = {
      center: { lat: -34.397, lng: 150.644},
      zoom: 8
      };

      var map = new google.maps.Map(document.getElementById('map-canvas'),
                mapOptions);
    }

    google.maps.event.addDomListener(window, 'load', initialize);
});
Voila - map!
Ok.. after all this we should be able to see our map in our sites. Fire up the server and have a look.
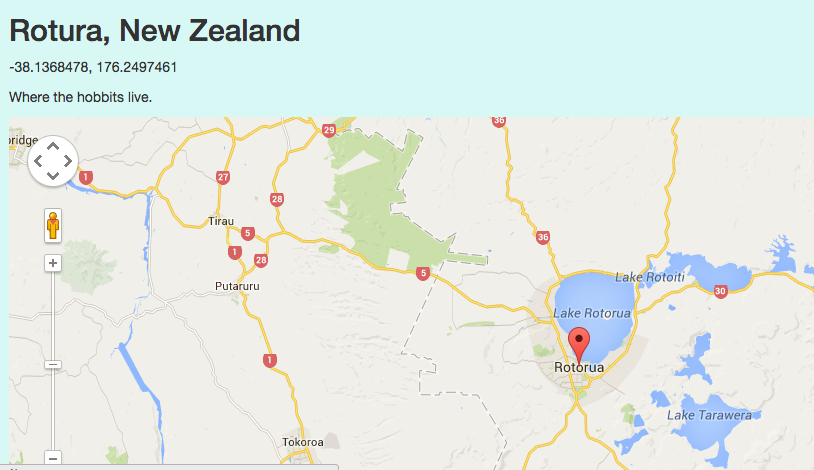
It's a map of Sydney though, because that's the sample Google provided for us. Let's change up the coordinates to center the map someplace else. Pick a city in your travel site, for example.
How do we find a city's coordinates? We could probably just Google it, right? Or...
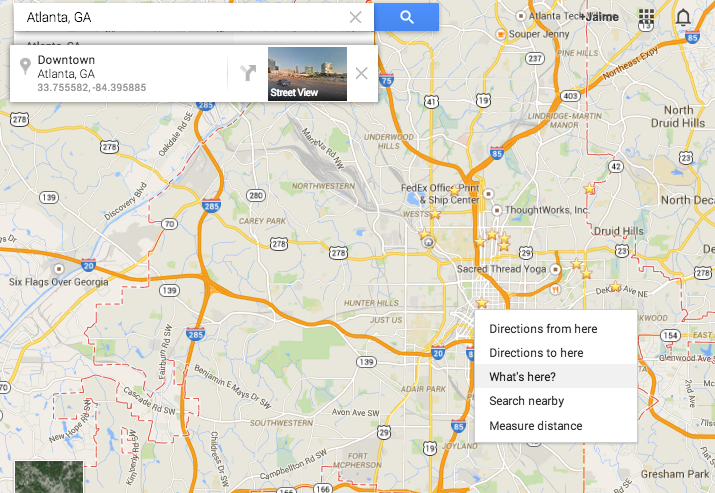
Choose your own
Right clicking on Google Maps and selecting "What's here" will get you the coordinates of anywhere on earth. Enter these numbers into your javascript file and see how your map changes.
Disable turbolinks
Do you have to refresh the page several times for the map to load? This is because of turbolinks. Turbolinks is rails gem that conflicts with our javascript.
Funny, because its intended purpose is to load pages faster. Let's kill it.
- Remove the gem 'turbolinks' line from your Gemfile.
- Remove the //= require turbolinks from your app/assets/javascripts/application.js.
- Remove the two "data-turbolinks-track" => true hash key/value pairs from yourapp/views/layouts/application.html.erb.

zoom: 15
zoom: 5
Zoooooooooom
Zoom levels
Let's play with the zoom levels. Low numbers correspond to larger swaths of land with lower resolution imagery. A zoom of 0 will show the entire earth. Higher numbers will narrow in on specific areas displayed in high resolution. The max zoom is 21.
var mapOptions = {
   center: { lat: -36.848738, lng: 174.752173},
   zoom: 15,
   scrollwheel: false
}
Disable zoom on scroll
Let's add this attribute to disable zoom on scroll because it's super annoying when we're trying to scroll down the page.
Set a variable
We can also set the coordinates as a variable as so:
function initialize() {
  var myLatlng = new google.maps.LatLng(-36.848738, 174.752173);

  var mapOptions = {
    zoom: 15,
    center: myLatlng,
    scrollwheel: false
  }

  var map = new google.maps.Map(document.getElementById('map-canvas'), mapOptions);
}

google.maps.event.addDomListener(window, 'load', initialize);
This will make our lives easier when we get to the next topic...
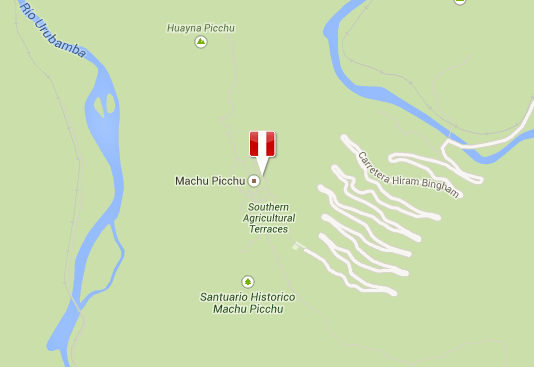
Markers
We've all used markers to pinpoint a location on Google Maps. Let's drop a marker on our map in the same spot as our center coordinates.
Go back to the documentation. On the left nav select Drawing on the Map and then Simple markers.
Add a new marker instance to our initialize function:
var marker = new google.maps.Marker({
  position: myLatlng,
  map: map,
  title: 'Machu Picchu'
});
Icon challenge
Use the documentation and figure out how to change the marker from the universal pin to something different. Maybe the country flag? Or something silly like a dog paw print.
Hint: Do an image search and select 'icons'. Remember where to save your image and how to reference it?
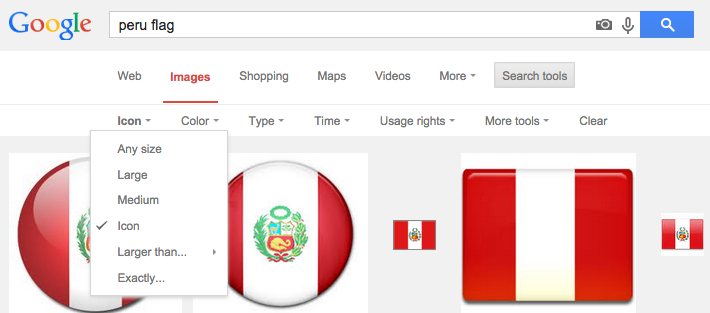
Icon Solution
Remember ERB? We need to save our js file as js.erb and use an asset path method to reference our image.
application.js.erb
 var image = "<%= asset_path 'peru-icon.png'%>"
    var marker = new google.maps.Marker({
      position: myLatlng,
      map: map,
      icon: image
  });
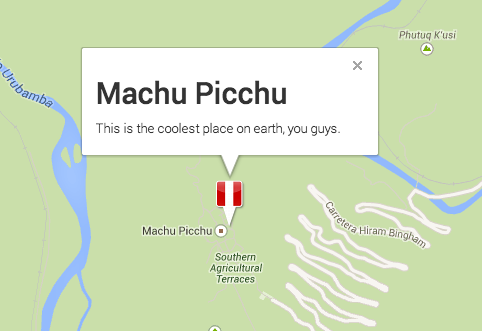
Info yo
Say we want to provide some information to the user when they click the marker. Let's add 3 elements to our initialize function:
 var contentString = '<h2>Machu Picchu</h2>' +
   '<p>This is the coolest place on earth, you guys.</p>'
 ;

 var infowindow = new google.maps.InfoWindow({
   content: contentString
 });

 google.maps.event.addListener(marker, 'click', function() {
    infowindow.open(map,marker);
 });
Make it bounce
Let's make our pointers drop and bounce on page load! Simply add the animation attribute to our marker instance in the for loop.
var marker = new google.maps.Marker({
  position: myLatlng,
  map: map,
  animation: google.maps.Animation.DROP
}
Hmmm....
This looks pretty cool but we can definitely do better. Instead of hardcoding the data in the javascript...
Question: Could we map data from our destination database?
ANSWER: YES!
Rest your brains for 10
Add coordinates to existing data
This part should be a review. Let's add 3 columns to our destinations resource: latitude, longitude and address.
**** Note the datatype of the coordinates ****
$ rails g migration AddCoordinatesToDestinations latitude:float longitude:float address:string
$ rake db:migrate
def destination_params
params.require(:destination).permit(:city, :country, :description, :latitude, :longitude, :address)
endRemember to add the variables to the permitted list at the bottom of the destinations controller.
Add input fields
Remember this stuff? Again, a review:
  <div class="field form-group">
    <%= f.label :address %><br>
    <%= f.text_field :address, class: "form-control" %>
  </div>
  <div class="field form-group">
    <%= f.label :latitude %><br>
    <%= f.text_field :latitude, class: "form-control" %>
  </div>
   <div class="field form-group">
    <%= f.label :longitude %><br>
    <%= f.text_field :longitude, class: "form-control" %>
  </div>
<h1><%= @destination.address %></h1>
<p><%= @destination.latitude %>, <%= @destination.longitude %></p>
<p><%= @destination.description %></p>views/destinations/_form.html.erb
views/destinations/show.html.erb
add data to your destination db
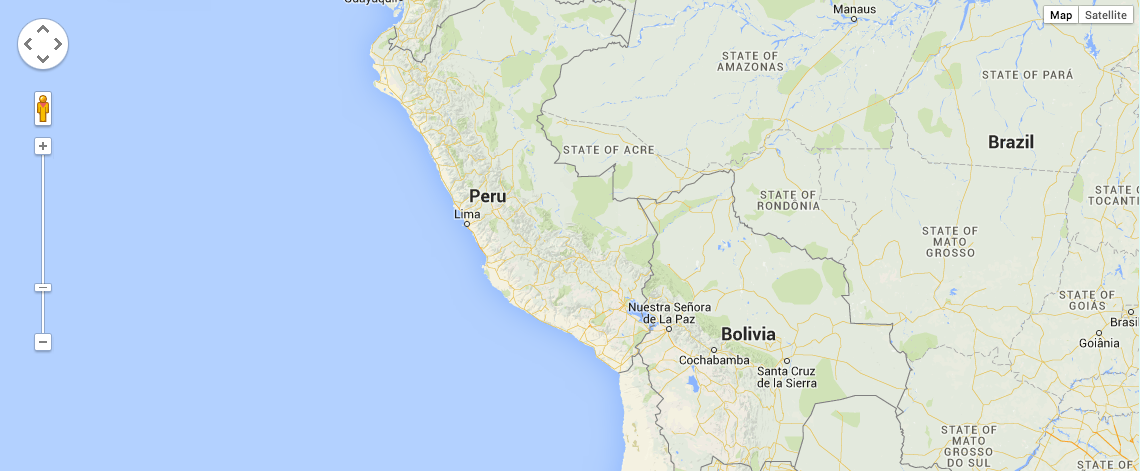
Go ahead and add some latitudes and longitudes to your destinations. I'll just daydream about Peru...
html/css
We'll need to use a different id name in our html and css as not to overwrite the map we created on our welcome index page.
#map-canvas, #destination-map {
  width: 100%;
  height: 500px;
}
<div id="destination-map"></div>
views/destinations/show.html.erb
assets/stylesheets/application.css.erb
<%= javascript_tag do %>
   latitude = '<%= j @destination.latitude.to_s %>';
   longitude = '<%= j @destination.longitude.to_s %>';
   address = '<%= j @destination.address %>';
   description = '<%= j @destination.description %>';
<% end %>
send data to js
Since we're being good front-end developers and not including a script tag in our view we have to find a way to pass our destination data to the javascript file. Here's how:
views/destinations/show.html.erb
$(document).ready(function (){

function initialize() {
    var myLatlng = new google.maps.LatLng(latitude,longitude);

    var mapOptions = {
       zoom: 15,
       scrollwheel: false,
       center: myLatlng
    }

    var map = new google.maps.Map(document.getElementById('destination-map'), mapOptions);

    var marker = new google.maps.Marker({
      position: myLatlng,
      map: map,
      title: address
    });

    var contentString = '<h2>'+ address + '</h2>' +
    '<p>' + description + '</p>'
    ;

      var infowindow = new google.maps.InfoWindow({
      content: contentString
  });

      google.maps.event.addListener(marker, 'click', function() {
    infowindow.open(map,marker);
  });
}

google.maps.event.addDomListener(window, 'load', initialize);
});
Destinations.js
Let's copy the code from application.js and drop it in destinations.js (remove the .coffee extension). Then we'll replace hardcoded values with the variables we just created.
Change element to destination-map!
Congrats

You're now pulling data from the database!
Geocoder
class Destination < ActiveRecord::Base
  geocoded_by :address
  after_validation :geocode
end
gem 'geocoder'Typing in our own coordinates is such a bore. Thankfully there's the geocoder gem that will determine latitude and longitude for us based on address. Yay!
gemfile:
models/destination.rb
Like Magic
Take a few minutes to add or update addresses in your database. You can leave out Latitude and Longitude because they will be magically calculated for us!

API Key privacy
When we push to Github we'll want to make sure our API key isn't public. To achieve this let's add a gem called Figaro to our Gemfile.
gem 'figaro'This creates a commented config/application.yml file and adds it to your .gitignore. Now we'll add our own configuration to this file.
$ figaro installAPI Key privacy
<script src="https://maps.googleapis.com/maps/api/js?key=<%= ENV['google_api_key'] %>">
</script>
views/layouts/application.html.erb
google_api_key: AIzaSyAd2gc7vvjv0iul3mDVDdik3z-JAIMEconfig/application.yml
Now we'll add our API Key to the newly generated yml file and update our application layout to reference this value.
.gitignoreD
When you push your files to github you'll notice your application.yml file isn't in the repo. Hooray! No one can steal your API Key!
Production
When pushing to Heroku you can use the following command to configure the API Key.
$ heroku config:set google_api_key=AIzaSyAd2gc7vvjv0iul3mDVDdik3z-JAIMEActivity/homework
Try out some advanced features using the Google Maps API documentation. Some topics to explore:
- Draggable markers
- Plotting multiple markers
- Switch the view to satellite
Look up the gmaps4rails gem to pull coordinates from the database and plot multiple markers on the same map.
Multiple Markers
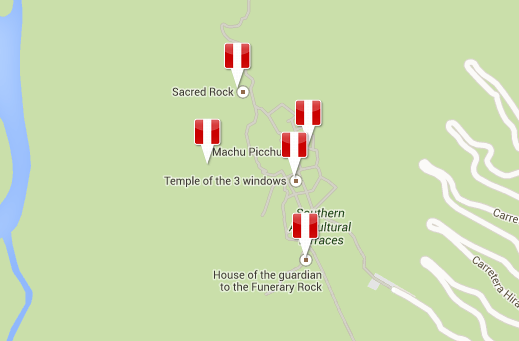
Ok how about plotting many markers on the same page? It's a little tricky but totally doable.
$(document).ready(function (){

function initialize() {

    // Create an array of sites
	var sites = [
	  ['Machu Picchu', -13.163047, -72.544566, 4],
	  ['Temple of the 3 Windows', -13.163726, -72.544881, 5],
	  ['House of the Guardian to the Funerary Rock', -13.165398, -72.544624, 3],
	  ['Sacred Rock', -13.161846, -72.546104, 2],
	  ['Intihuatana', -13.163439, -72.546732, 1]
	];

	var mapOptions = {
	  zoom: 15,
	  scrollwheel: false,
	  center: new google.maps.LatLng(-13.163081, -72.545200)
	}

    var map = new google.maps.Map(document.getElementById('map-canvas'), mapOptions);
    var image = "<%= asset_path 'peru-icon.png'%>"

	// Loop over all sites and display marker images
    var marker, i;

    for (i = 0; i < sites.length; i++) {
      marker = new google.maps.Marker({
        position: new google.maps.LatLng(sites[i][1], sites[i][2]),
        map: map,
        icon: image
      });
  }
}

google.maps.event.addDomListener(window, 'load', initialize);


});
Multiple Markers
First we create an array of arrays in our js file. The inner array contains title, coordinates & z-index items. Then we loop over all the sites and output our custom markers.
Google Maps API (PT)
By tts-jaime
Google Maps API (PT)
PT


