Riding the Rails

What? Why? Huh?
Rails is...
...a Platform for creating dynamics websites,
using the Ruby programming language.
Rails allows us to utilize Ruby in the Back-End and Front-End
MVC Framework
Start a New Project
$ rails new my_awesome_project

...

$ cd my_awesome_project
Some Ground Rules:
1. Appropriately Name
* what does the project
do as a whole?
2. Starts with a letter
3. All Lowercase
3. Underscores for Spaces
Why Did We Do This?
Why didn’t we just open up Sublime and create each of the individual files for our application? Rails is just Ruby source code, and we all know how to use Ruby.
Well, Rails does a lot of “magic” behind the scenes to get our applications up and running. It generates all of the necessary directories (folders) for us to write our code but it will be up to us to populate these directories with the code that will make them run.
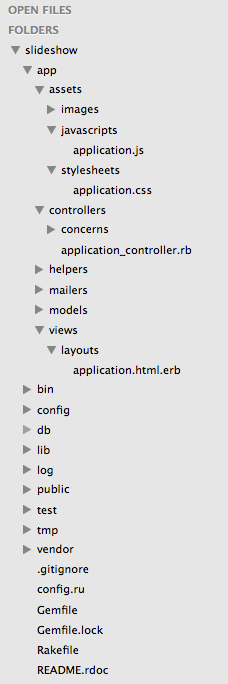
Peak Under the Hood
These are the directories that we just generated with one line of code! Each one is essential to creating a working application and many of them contain other subdirectories as well.
Let's explore them!

Make sure you're in your "my_awesome_project" directory and type "ls"
Gemfile
A gem is a Ruby program or library in a standard format available through RubyGems.
Each gem has a name, version, and platform. For example, the rails gem has a 4.2.0 version.
Your Gemfile is a list of all gems that you want to include in the project. It is used with bundler (also a gem) to install, update, remove and otherwise manage your gems.
README.rdoc
This file contains basic details about the Rails Application and a description of the different directories in an application.
This file can be converted to an .md file to display on Github.
Rakefile
This file helps with building, packaging and testing the Rails code. It will be used by rake utility supplied along with Ruby installation.
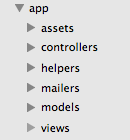
app/
This organizes your application components. It's got subdirectories that hold the view (views and helpers), controller (controllers), and the backend logic (models) as well as assets and mailers.
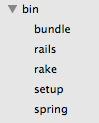
bin/
This directory contains the commands and utilities that you use day to day. These are executable binary ruby files - hence the the directory name bin.
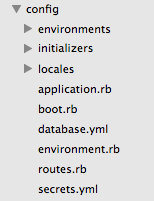
config/
The config/ contains the small amount of configuration code that your application will need, including your database configuration (in database.yml), your Rails environment structure (environment.rb), and routing of incoming web requests (routes.rb).
db/
Your Rails application will have model objects that interact with relational database tables. You can manage the relational database with code that you would add to this directory.
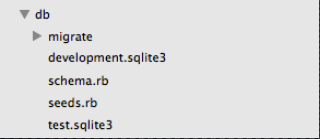
You probably don't have a migration folder yet. This will appear once we tell rails to add a database to our application.
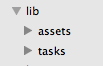
lib/
This is a space for application specific libraries. These include any kind of custom code that doesn’t fit in anywhere else. Think of these files as extended features for our application that aren’t available in Rubygems.
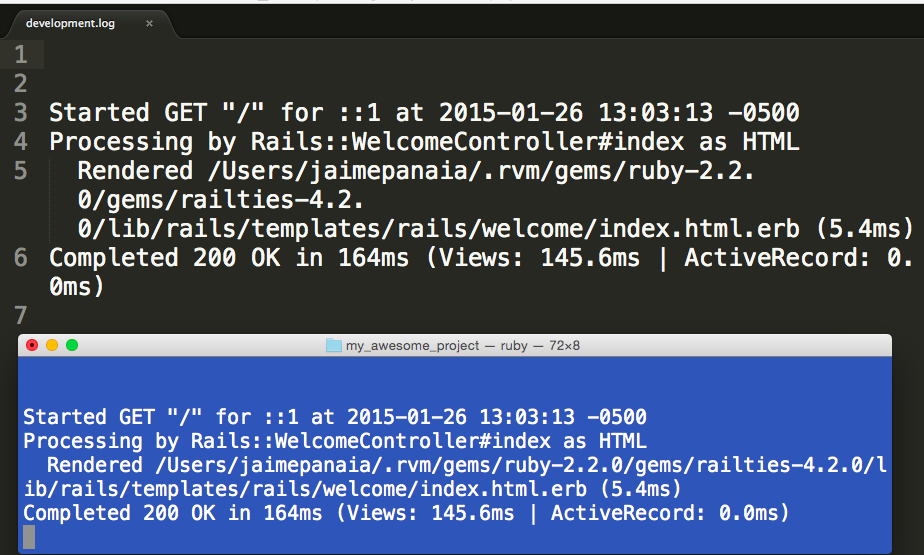
log/
The log files from your application. Literally everything we do with our application will be recorded here.
A great place to debug your code or just see how it is working. You can also see your code run in terminal.
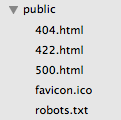
public/
Like the public directory for a web server, this directory has web files that don't change, such as JavaScript files (public/javascripts), graphics (public/images), stylesheets (public/stylesheets), and HTML files (public).
You should store your assets in the app/assets/images directory locally. In production, Rails precompiles these files to public/assets by default.
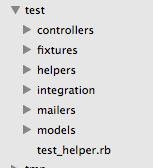
test/
All of the tests that Rails created for us as well as ones that we will write ourselves are stored here.
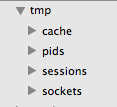
tmp/
The tmp directory holds temporary files.
Caching involves temporarily storing recently used information, which can improve application performance.
vendor/
Libraries provided by third-party vendors (such as security libraries or database utilities beyond the basic Rails distribution) go here.

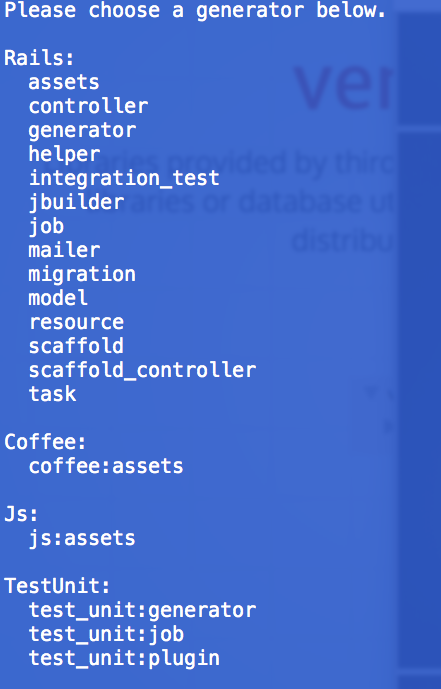
rails g
$ rails g The rails generate command uses templates to create lots of things in Rails. By itself it generates a list of all available generators. Try it!
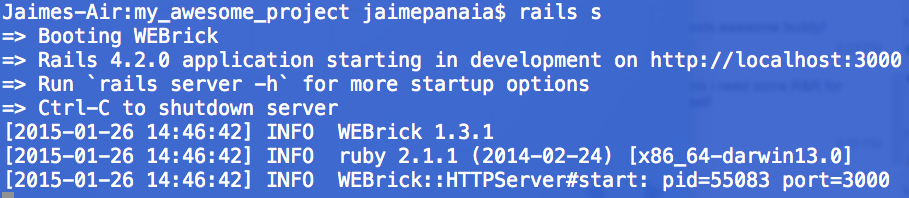
Starting the Server
$ rails s In order to run our shiny new web application we have to start our local server. We'll do this in the terminal.
The output tells us a bunch of good stuff:
- The version of Rails (4.2.0)
- Where to browse our app locally (http://localhost:3000)
- How to shutdown the server (Ctrl-C)
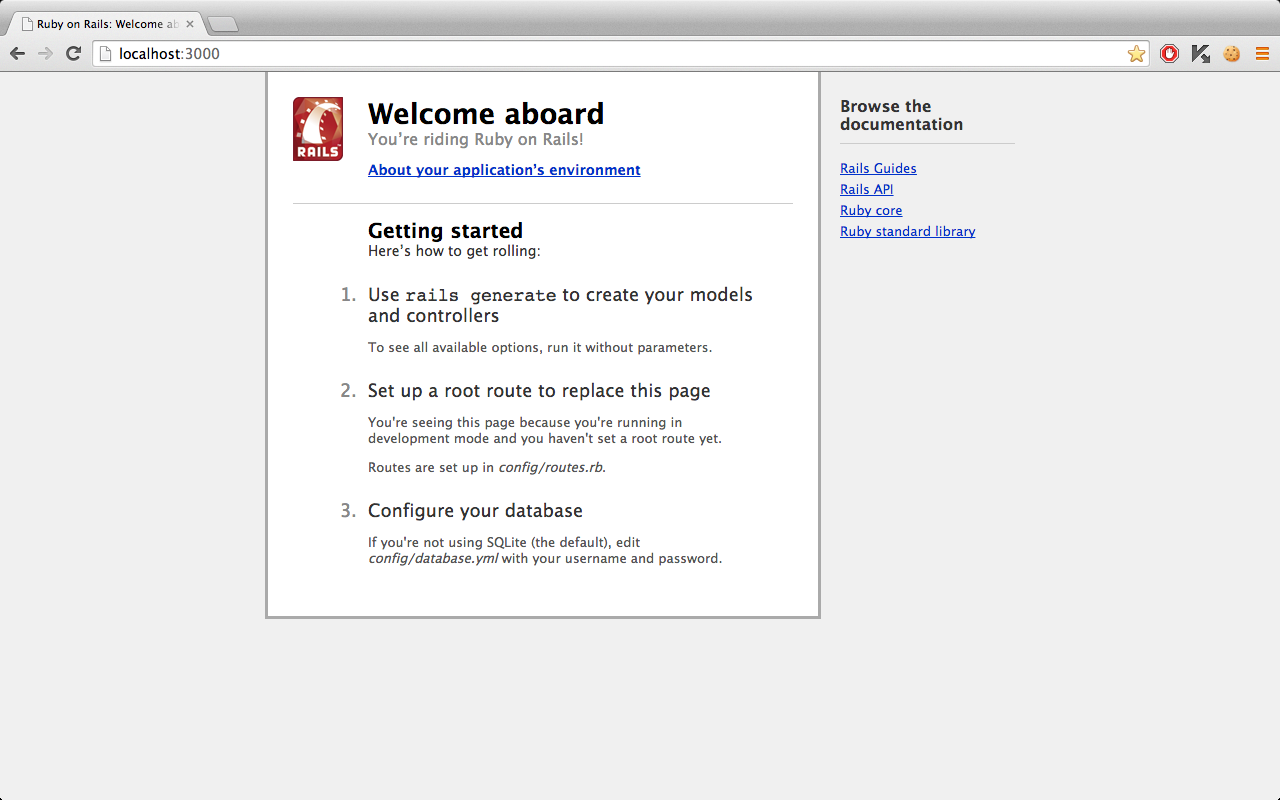
Browsing our Site!
If all went well you should see Rails' underwhelming generic welcome page.
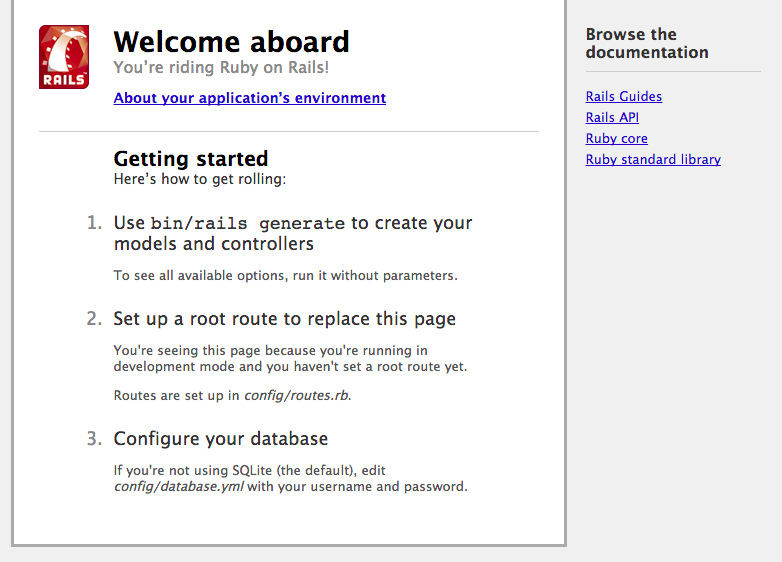
We will soon replace this with our own custom page.
Creating a Controller
$ rails g controller Welcome index about contactg = generate
Welcome = the name of the controller
(but it you can call it whatever you like; capitalized, camelcase)
index about contact = views
(or, html pages) that you want associated with this controller (lowercase, with underscores)

Routes and Roots
When you generate a Controller, Rails provides the routes.
The Root path is your landing (or, home) page.
Call it by it's associated controller action!
# [railsprojectname]/config/routes.rb

Rails.application.routes.draw do
  get 'welcome/index'

  get 'welcome/about'

  get 'welcome/contact'
end
Rails.application.routes.draw do
root 'welcome#index'
get 'welcome/about'
get 'welcome/contact'
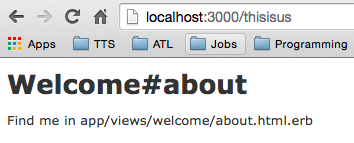
endCustomize Your Routes
No one wants a long URL!
Rails.application.routes.draw do

  get 'homepage' => 'welcome#index'

  get 'thisisus' => 'welcome#about'

  get 'drop_us_a_line' => 'welcome#contact'

  root 'welcome#index'

end
Format:
'custom URL' => 'controller#action'
Updating a View
In Sublime open up welcome/index.html.erb from the views folder.
OMG it's HTML again! You remember this, right?
Go ahead and customize the <h1> and <p> tags, then reload your page.
<!-- app/views/welcome/index.html.erb -->

<h1>Jaime's Jubilant Homepage</h1>
<p>For now it's under construction...</p>
Challenge
Might as well update the other 2 views we created!
Add some dummy content to the about and contact pages and holler when you've got it!

Let's Scaffold for a Second
$ rails g scaffold Pet name:string breed:string age:integerRemember when you created an Object 'class' in Ruby?
Doesn't this seem awfully similar to that?!
$ rails destroy scaffold PetMistype something or hit enter too soon?
That's OK. Just delete your scaffold and try again.
A Database is Born!
$ rails g scaffoldThe Rails command to create a new database
$ rails g scaffold Pet'Pet' (notice it's capitalized, and singular), will be the name of our database
$ rails g scaffold Pet name:string
breed:string age:integer'name', 'breed' and 'age' will be the attributes of your 'Pet'; each is assigned a data type
Amazing Attributes
Think of your Database as a table...
...and your Attributes as the columns.
Each time you create a new instance of the Resource, you create a new row in the table
Buy Any One Column,
Get Three More Free!
Rails is a generous framework, and it gives three extra columns, just for stopping by...
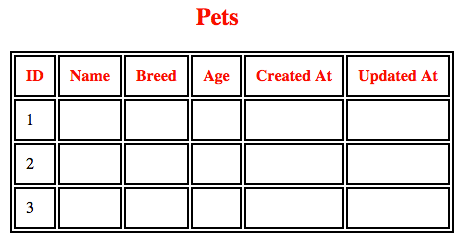
- You get...
- id - an integer from 1 thru ...
- created_at - datetime when row was created
- updated_at - datetime when the row was updated
New Route(s)
Rails also handles routing for us after we scaffold a resource. We see one simple line added to routes.rb.
resources :pets
That tiny bit of code actually maps to several pages. We'll explore what's going on behind the scenes here tomorrow.
Browse to:
localhost:3000/pets
(notice pets is plural and lowercase)
Add Data
Go ahead and add a few pets using the form fields in your browser. Play around and get a feel for the various pages.
list all pets
/pets

show a pet
/pets/1
edit a pet
/pets/1/edit
new pet
/pets/1/new
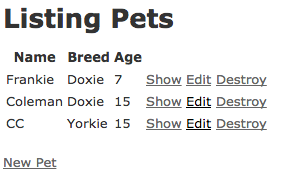
Pets Index (/pets)
Let's take a look at the generated code on each page.
<h1>Listing Pets</h1>

<table>
  <thead>
    <tr>
      <th>Name</th>
      <th>Breed</th>
      <th>Age</th>
      <th colspan="3"></th>
    </tr>
  </thead>

  <tbody>
    <% @pets.each do |pet| %>
      <tr>
        <td><%= pet.name %></td>
        <td><%= pet.breed %></td>
        <td><%= pet.age %></td>
        <td><%= link_to 'Show', pet %></td>
        <td><%= link_to 'Edit', edit_pet_path(pet) %></td>
        <td><%= link_to 'Destroy', pet, method: :delete, data: { confirm: 'Are you sure?' } %></td>
      </tr>
    <% end %>
  </tbody>
</table>

<br>

<%= link_to 'New Pet', new_pet_path %>
my_awesome_project/app/views/pets/index.html.erb
Pets Index (/pets)
Rails uses tables to display the data on this page.
Table headings hold the names of the 3 attributes we scaffolded (name, breed and age).
<table>
  <thead>
    <tr>
      <th>Name</th>
      <th>Breed</th>
      <th>Age</th>
      <th colspan="3"></th>
    </tr>
</thead>
Pets Index (/pets)
The show page consists of paragraphs with ERB to display the value of each specific pet.
<p id="notice"><%= notice %></p>

<p>
  <strong>Name:</strong>
  <%= @pet.name %>
</p>

<p>
  <strong>Breed:</strong>
  <%= @pet.breed %>
</p>

<p>
  <strong>Age:</strong>
  <%= @pet.age %>
</p>

<%= link_to 'Edit', edit_pet_path(@pet) %> |
<%= link_to 'Back', pets_path %>
Pets Show (/pets/:id)
The show page consists of paragraphs with ERB to display the value of each specific pet.
<p id="notice"><%= notice %></p>

<p>
  <strong>Name:</strong>
  <%= @pet.name %>
</p>

<p>
  <strong>Breed:</strong>
  <%= @pet.breed %>
</p>

<p>
  <strong>Age:</strong>
  <%= @pet.age %>
</p>

<%= link_to 'Edit', edit_pet_path(@pet) %> |
<%= link_to 'Back', pets_path %>
my_awesome_project/app/views/pets/show.html.erb
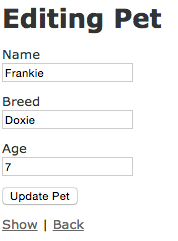
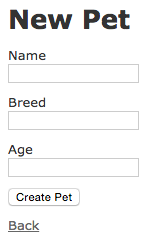
Pets New (/pets/:id/new)
Pets Edit (/pets/:id/edit)
The new and edit pages are a little sparse. That's because the actual guts of the page are located on "form". The render tag is what displays the content on these views.
<h1>Editing Pet</h1>

<%= render 'form' %>

<%= link_to 'Show', @pet %> |
<%= link_to 'Back', pets_path %>
<h1>New Pet</h1>

<%= render 'form' %>

<%= link_to 'Back', pets_path %>my_awesome_project/app/views/pets/new.html.erb
my_awesome_project/app/views/pets/edit.html.erb
Form
The "_form" page is what's called a partial . A partial (denoted by an underscore) is reusable code that can be 'render'ed in many locations which keeps our code DRY. This code drops a form into our view and gathers data from the user.
my_awesome_project/app/views/pets/_form.html.erb
<%= form_for(@pet) do |f| %>
  <% if @pet.errors.any? %>
    <div id="error_explanation">
      <h2><%= pluralize(@pet.errors.count, "error") %> prohibited this pet from being saved:</h2>

      <ul>
      <% @pet.errors.full_messages.each do |message| %>
        <li><%= message %></li>
      <% end %>
      </ul>
    </div>
  <% end %>

  <div class="field">
    <%= f.label :name %><br>
    <%= f.text_field :name %>
  </div>
  <div class="field">
    <%= f.label :breed %><br>
    <%= f.text_field :breed %>
  </div>
  <div class="field">
    <%= f.label :age %><br>
    <%= f.number_field :age %>
  </div>
  <div class="actions">
    <%= f.submit %>
  </div>
<% end %>
Adding an ID
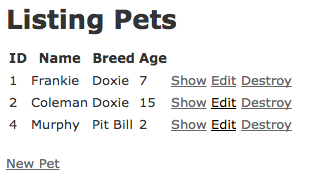
Each pet id exists in our database but doesn't show by default in the view. Let's add an id column to our index.
<table>
  <thead>
    <tr>
      <th>ID</th>
      <th>Name</th>
      <th>Breed</th>
      <th>Age</th>
      <th colspan="3"></th>
    </tr>
  </thead>

  <tbody>
    <% @pets.each do |pet| %>
      <tr>
        <td><%= pet.id %></td>
        <td><%= pet.name %></td>
        <td><%= pet.breed %></td>
        <td><%= pet.age %></td>
        <td><%= link_to 'Show', pet %></td>
        <td><%= link_to 'Edit', edit_pet_path(pet) %></td>
        <td><%= link_to 'Destroy', pet, method: :delete, data: { confirm: 'Are you sure?' } %></td>
      </tr>
    <% end %>
  </tbody>
</table>my_awesome_project/app/views/pets/index.html.erb
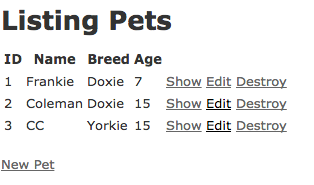
http://localhost:3000/pets
Deleting a Record
Go ahead and delete the last pet record in your list. Then add a new pet.
Notice the id skips to the next number incrementally. Once an id is deleted the database does not reuse it.
Homework/Classwork
- Create a brand new rails app called "scaffold_practice"
- Create a custom controller with 2 actions: index & about
- Update each view / make it look good (html only)
- Scaffold 2 resources with 2 attributes each:
- City
- name
- population
- Activity
- name
- duration
- City
- Add a new id column to each index view
- Create a route that takes the url "http://0.0.0.0:3000/ilovetocode" to your index page
Intro to Rails
By tts-jaime
Intro to Rails
Starting a project, generating controllers, generating scaffolds, and routing.


