Intro to the Ionicframework
by
Todd Shelton (Dev Workshop)

What is it?
Free and open source, Ionic offers a library of mobile-optimized HTML, CSS and JS components, gestures, and tools for building highly interactive apps. Built with Sass and optimized for AngularJS.
Site URL
You need to have Node installed. If you don't you won't be able to follow along in the browser. To follow along and push to the phone you will need Android SDK, xCode
What we will cover
- Ionic CLI tools to install ionic
- How to create a project
- Build a project from scratch
- Add platforms to our project
- Emulate or Simulate your app if you can
- Add plugins to the app
- Look at other default setups
Tools you need installed
- NodeJS for the npm
- Android SDK all platforms up-to-date
- xCode
- Mac users can do both
Install Ionic
- Open up Terminal or Command Line
- That is all there is to it
npm install -g cordova ionicCreate a blank project
- Stay in terminal or command line
- Type CD
- Then open up an explorer window and drag the folder, where you want to create your project, into the terminal or command line tool
- Now you should have CD then full path to your folder
- Once you are in the directory type
- ionic start dwBlank blank
- This will create a new blank project
Tada a new Blank Project
Now lets cover the folder structure
Now open up your favorite editor and load your new proect
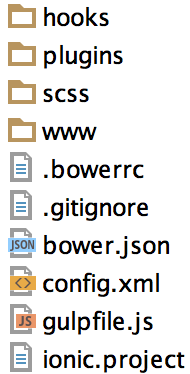
This is where all your plugins for your app will live
This is where your Sass file is located
All the HTML/CSS/JS files are located here. This is where we will be doing all our coding.
This file is what details your mobile app. Title, Splashscreen, plugins, description, version, etc..
Project Folder Structure
Open up the config.xml
You need to change some information in here
<name>Dev Workshop App</name>

<description>
    An app made at our workshop.
</description>

<author email="info@devworkshop.org" href="http://devworkshop.org/">
    Dev Workshop Team
</author>
Change the tags listed below to your own information
Next open your index.html and replace the body tag and everything in it with the one listed below
<body ng-app="app">

    <ion-nav-view></ion-nav-view>

</body>
Here we are bootstrapping our application. You can find out more here
We are also adding an ionic nav view to our app
You can add content in here as well, but I want to show you how the ion-nav-view works and add a side menu.
Now let's create a home view to load into the page
• Create a new directory in your WWW folder called "views"
This is where your views and controllers will be located.
• Next you need to create a new directory (folder) inside the views directory called "home".
• Now create a new HTML page inside the "home" directory called "home.html". These are also known as templates.
• Highlight any text that is generated in your HTML page and delete it.
Creating a home view continued
• Now that our HTML is blank insert the code below to add content to our template or view.
<ion-view title="Home Page">
    <ion-content>
        <div>
            <h1>This is my home page.</h1>
        </div>
</ion-view>
• After you insert the code we are ready to set up our routing.
Setting up the routing in Ionic
• Open up your app.js file located in your js folder. We need to change and add a few things in here.
//CHANGE THIS
angular.module('starter', ['ionic'])

//TO THIS
angular.module('app', ['ionic'])
• The word "app" ties the DOM to our AngularJS
• Now that we are hooked to the DOM let's add the routing.
Setting up the routing in Ionic continued
• We need to add the routing code to our app. Add the code below to your app.js file right after the .run function.
.config(function ($stateProvider, $urlRouterProvider) {
        $urlRouterProvider.otherwise('/');
});
• This is our routing and it will detect our states and the url
• The otherwise function sends the URL to "/" if it does not match any of the states that we are getting ready to define.
Setting up the routing in Ionic continued
• Now lets set up a state so our "home" view shows.
.config(function ($stateProvider, $urlRouterProvider) {
        $urlRouterProvider.otherwise('/');
});
• This is our routing and it will detect our states and the url
• The otherwise function sends the URL to "/" if it does not match any of the states that we are getting ready to define.
Here is what the app.js should look like at this point.
// Ionic Starter App

// angular.module is a global place for creating, registering and retrieving Angular modules
// 'starter' is the name of this angular module example (also set in a <body> attribute in index.html)
// the 2nd parameter is an array of 'requires'
angular.module('app', ['ionic'])

    .run(function ($ionicPlatform) {
        $ionicPlatform.ready(function () {
            // Hide the accessory bar by default (remove this to show the accessory bar above the keyboard
            // for form inputs)
            if (window.cordova && window.cordova.plugins.Keyboard) {
                cordova.plugins.Keyboard.hideKeyboardAccessoryBar(true);
            }
            if (window.StatusBar) {
                StatusBar.styleDefault();
            }
        });
    })

    .config(function ($stateProvider, $urlRouterProvider) {
        $urlRouterProvider.otherwise('/');
    });
Setting up the routing in Ionic continued
• Now lets set up a state so our "home" view shows.
.config(function ($stateProvider, $urlRouterProvider) {
        $urlRouterProvider.otherwise('/');

        $stateProvider

            .state("/", {
                url:"/",
                templateUrl: "views/home/home.html"
            });
    });
• We want the home view to show when the URL is at "/" so you notice that we set the state to load the template when the url matches "/".
• Then it loads the home.html template. Now test the index.html
Exercise for creating a view and routing
- Create a new view or template called "about". Don't forget to create the directories
- Setup the routing to when you type the word "about" after "/" in the URL it changes to the about view.
- The URL may look like this depending on how your viewing the index file.
localhost/dwBlank/index.html#/aboutExercise Result
• After you created a directory called "about" in your "views" directory. You should have created an HTML page (template) called "about.html".
.config(function ($stateProvider, $urlRouterProvider) {
        $urlRouterProvider.otherwise('/');

        $stateProvider

            .state("/", {
                url:"/",
                templateUrl: "views/home/home.html"
            })

            .state("/about", {
                url:"/about",
                templateUrl: "views/about/about.html"
            });
    });
• Next you should have changed your app.js routing to look like this.
Exercise Result
• Once you type the url http://localhost/dwBlank/www/index.html#/about
The page should slide from the home view to the about view.
• If it didn't you need to check your routing. Make sure your template path is correct.
So how do I build the app?
• Now that we have a couple views to show we need to add the platforms and run the app.
cd dwBlank• To add platforms you will need to go back into Terminal or Command line. Make sure you CD into your project.
• If you are in PHPStorm or something that has a terminal built in you can use that as well.
• To add an iOS platform type.
ionic platform add ios• To add an android platform type.
ionic platform add android• Once you add the platforms you should see a new platforms directory in your project. You can take the iOS right into xcode and work on it there, and the same with Android.
So how do I build the app?
• Now that the platforms are added we need to build the apps.
• If you don't have the Android SDK or iOS xCode you will have to install those to get each app to build.
• To build the iOS app.
ionic build ios• To build android app.
ionic build android• Once you add the platforms you should see a new platforms directory in your project. You can take the iOS right into xcode and work on it there, and the same with Android.
• If you are encountering errors. Don't panic. You can still test in the browser.
Now let's run or emulate the app
• Now that you have built the app we need to test it. You can either push it to your phone, Android is easiest, or emulate the app. If you want to emulate the app. You will have had to installed the Android SDK with the emulator. Android emulator takes forever. Now the iOS simulator is so much faster. Sorry PC users.
• To emulate your app.
ionic emulate ios• To build android app.
ionic build android• To run the app on your phone type.
ionic run android(Android Only Tonight)
or
ionic emulate androidFrom this point forward we will only be running on Android
Navigation
At this point we need to add some navigation to go between views, not to mention something to control those views.
• Create a "menu" directory
• Add a "menu.html" file and insert the code below in the menu file.
<ion-side-menus>
    <ion-side-menu-content>
        <ion-nav-bar class="bar-positive">
            <ion-nav-buttons>
                <button side="left" menu-toggle="left" class="button button-icon icon ion-navicon"></button>
            </ion-nav-buttons>
        </ion-nav-bar>
        <ion-nav-view name="menuContent"></ion-nav-view>
    </ion-side-menu-content>
</ion-side-menus>
Navigation
Now we need to change our routing and app.js
• Insert the code below in the routing area of the app.js
.state("app", {
      url:"/app",
      abstract: true,
      templateUrl: "views/menu/menu.html"
   })

   .state("app.home", {
      url:"/home",
      views:{
         "menuContent":{
              templateUrl: "views/home/home.html"
          }
        }
    })
Notice that we changed the hashtag to include the word app. Then we changed the default home to app.home.
Notice the abstract in the menu .state. Since the menu does not have an ion view we have to put abstract true.
Navigation
Now we need to test this in the browser again. As you can see we now have a header bar at the top of our app the title is in the header and our home page displays. We don't have a menu yet but we are getting to that.
On the next page you will copy the code and replace the code we already have in our "menu.html" page.
. This will give us the menu we need.
<ion-side-menus>
    <ion-side-menu-content>
        <ion-nav-bar class="bar-positive">
            <ion-nav-buttons>
                <button side="left" menu-toggle="left" class="button button-icon icon ion-navicon"></button>
            </ion-nav-buttons>
        </ion-nav-bar>
        <ion-nav-view name="menuContent"></ion-nav-view>
    </ion-side-menu-content>

    <ion-side-menu side="left">
        <ion-header-bar class="bar-stable">
            <h1 class="title">MENU</h1>
        </ion-header-bar>
        <ion-content>
            <ion-list>
                <ion-item menu-close href="#/app/home"><i class="menuIcon icon ion-home"></i>HOME
                </ion-item>
            </ion-list>
        </ion-content>

    </ion-side-menu>

</ion-side-menus>
Full Menu Code
Now lets get our About to load
Now that we have a menu let's add an about link and display the about page.
• In our menu we need to add the About menu item. Just add the code below right under the Home item
<ion-item menu-close href="#/app/about"><i class="menuIcon icon ion-information-circled"></i>ABOUT
</ion-item>
<ion-content>
<ion-list>
<ion-item menu-close href="#/app/home"><i class="menuIcon icon ion-home"></i>HOME
</ion-item>
<ion-item menu-close href="#/app/about"><i class="menuIcon icon ion-information-circled"></i>ABOUT
</ion-item>
</ion-list>
</ion-content>It should now look like this
Now lets get our About to load
Now when you test the app we should have an About menu item.
• Now we need to add the routing to make this work.
• Below is the new .state for the about page. Replace your current about .state with the code below.
.state("app.about", {
    url:"/about",
    views:{
        "menuContent":{
            templateUrl: "views/about/about.html"
        }
    }
});
Exercise for Creating More Views
- Create 3 more views ("shows", "sponsors", "plugin")
- Create directories
- Add content to the pages
- Add the menu items
- Add the routing to make these work
You have created an app with Ionic
If we have time left I am going to be adding controllers and plugins to your app.
Thank you and I hope you enjoyed the workshop.
deck
By tweenout