


/f/42126/800x505/56d264e58b/angular-react-vue-learning-curve.jpg)


yamoo9
Web Design/Develop - Instructor
Front-End 개발 로드맵
Front-End 오픈 소스 프레임워크 비교
Front-End 웹 애플리케이션 오픈 소스 프레임워크 ( 2010 ~ )
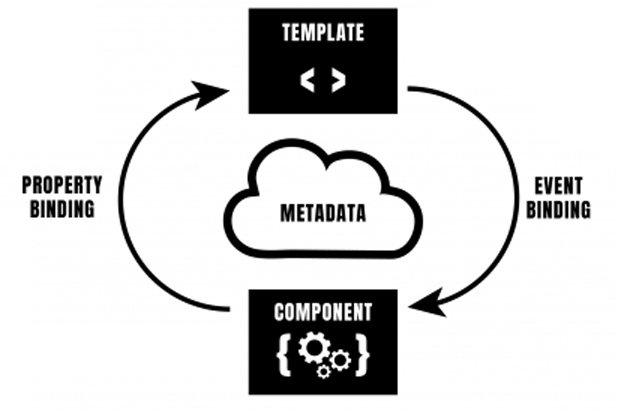
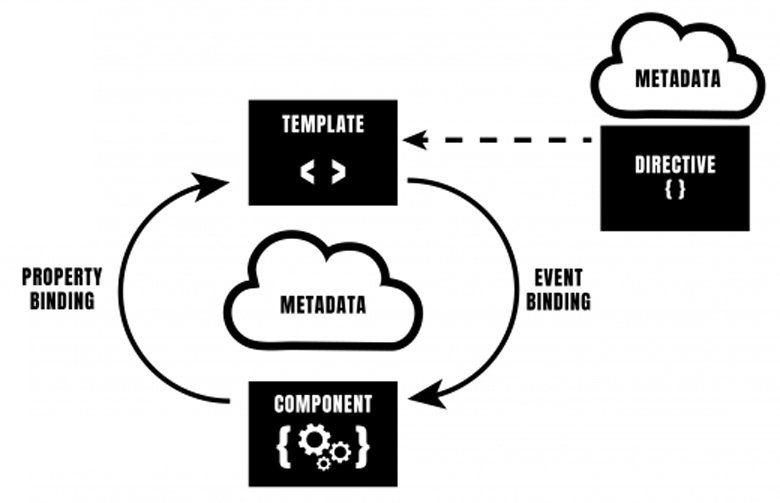
컴포넌트 기반 시스템
릴리즈 로드맵
학습 난이도
브라우저 호환성 ⟹ IE 9+
통합 개발 환경 도구
Visual Studio Code 확장
타입스크립트
커멘드 라인 인터페이스
Angular CLI 설치
# Angular CLI를 설치하기 위해 다음 명령을 입력합니다.
# Node.js, NPM 등이 운영체제에 설치 되어 있어야 합니다.

# npm install --global @angular/cli@latest
$ npm i -g @angular/cli


# Yarn을 사용해 Angular CLI를 설치하려면
# Yarn을 설치한 이후 다음 명령을 입력합니다.
$ npm i -g yarn
$ yarn global add @angular/cli버전 정보
# ng 명령어 뒤에 -v 옵션을 붙여 실행하면, Angular 버전 정보가 출력됩니다.
# ng --version
$ ng -v
_ _ ____ _ ___
/ \ _ __ __ _ _ _| | __ _ _ __ / ___| | |_ _|
/ △ \ | '_ \ / _` | | | | |/ _` | '__| | | | | | |
/ ___ \| | | | (_| | |_| | | (_| | | | |___| |___ | |
/_/ \_\_| |_|\__, |\__,_|_|\__,_|_| \____|_____|___|
|___/
Angular CLI: 6.0.0
Node: 8.11.1
OS: darwin x64
Angular:
...
Package Version
------------------------------------------------------
@angular-devkit/architect 0.6.0
@angular-devkit/core 0.6.0
@angular-devkit/schematics 0.6.0
@schematics/angular 0.6.0
@schematics/update 0.6.0
rxjs 6.1.0
typescript 2.7.2도움말
# ng 명령어 뒤에 -h 옵션을 붙여 실행합니다. 사용 가능한 명령 목록을 확인할 수 있습니다.
# ng --help
$ ng -h
사용 가능한 명령:
add 라이브러리를 프로젝트에 추가
new 새로운 디렉토리에 신규 angular 프로젝트 생성
generate 설계도(schematic)를 기반을 파일을 생성/수정
update 애플리케이션, 의존성 모듈 업데이트
build 아웃풋(기본 값: dist) 경로에 앱을 빌드
serve 파일 변경 시, 앱을 빌드하고 서브(serve)
test 유닛 테스트 실행
e2e e2e 테스트 실행
lint 코드 린트 수행
xi18n 소스 코드에서 i18n 메시지 추출
run 설계 타겟(Architect targets)을 실행
eject 일시적으로 중지
config 구성(configuration) 값을 읽고 쓰기
help 도움말
version Angular CLI 버전 출력
doc 키워드로 공식 Angular API 문서 열기
각 명령 사용에 대한 자세한 도움말은 "ng [command name] --help" 코드를 통해 살펴보세요.환경 설정
CLI 패키지 매니저
# 글로벌 패키지 매니저 확인 ————————————————————————————————————————————————
$ ng config --global cli.packageManager

No config found. # Angular CLI 기본 패키지 매니저는 NPM 입니다.


# 글로벌 패키지 매니저 변경 ————————————————————————————————————————————————
# [ yarn, cnpm, npm ]
$ ng config -g cli.packageManager yarn

# Facebook에서 개발한 패키지 관리자 Yarn을 사용하는 이유는 속도 때문 입니다.
# NPM을 사용하는 것보다 보다 빠르게 설치할 수 있습니다.

# 중국에서 서비스 할 목적으로 Angular CLI를 사용하려면, CNPM을 사용해야 합니다.
# 중국은 만리방화벽(Great Firewall)으로 대표되는 황금방패(Golden Shield)
# 시스템을 이용해 인터넷을 검열하기 때문입니다.


# .angular-config.json 파일 ———————————————————————————————————————————
$ cat ~/.angular-config.json           # Mac OSX 사용자
$ Get-Content .₩.angular-config.json # Windows 사용자신규 프로젝트
프로젝트 생성
# ng new 명령어 뒤에 <프로젝트-이름> 입력 후 실행합니다.
# 개발에 필요한 의존 모듈들을 다운로드 받기 때문에 적지 않은 시간이 소요됩니다.
# 의존 모듈을 설치하지 않고 프로젝트 스케폴딩 하길 원한다면 --skip-install 옵션을 추가해 설치합니다.


# ng new <프로젝트-이름>
$ ng new ng6project

# 의존 모듈을 설치하지 않고 스캐폴딩
$ ng new ng6project --skip-install

# 유닛 테스트 제외(--skip-tests) 설정
$ ng new ng6project -S

# Git 버전관리 제외(--skip-git) 설정
$ ng new ng6project -g

# 인라인 템플릿(--inline-template) 설정
$ ng new ng6project -t

# 인라인 템플릿(--inline-style) 설정
$ ng new ng6project -s

# app(기본)이 아닌, 프로젝트 접두사(-p) 설정
$ ng new ng6project --prefix <프로젝트-접두사>프로젝트 스캐폴딩
.
├── README.md
├── angular.json
├── e2e/
├── node_modules/
├── package-lock.json
├── package.json
├── src/
│   ├── app/
│   │   ├── app.component.css
│   │   ├── app.component.html
│   │   ├── app.component.spec.ts
│   │   ├── app.component.ts
│   │   └── app.module.ts
│   ├── assets/
│   ├── browserslist
│   ├── environments/
│   │   ├── environment.prod.ts
│   │   └── environment.ts
│   ├── favicon.ico
│   ├── index.html
│   ├── karma.conf.js
│   ├── main.ts
│   ├── polyfills.ts
│   ├── styles.css
│   ├── test.ts
│   ├── tsconfig.app.json
│   ├── tsconfig.spec.json
│   └── tslint.json
├── tsconfig.json
└── tslint.json개발 환경 정보
개발 모드
라이브 개발 서버 구동
# ng serve 명령을 사용하면 라이브 개발 서버(localhost:4200)가 실행됩니다.
# 기본 웹 브라우저로 바로 실행 시키려면 --open 옵션을 명령에 추가합니다.
# 라이브 개발 서버가 실행된 이후, 소스 파일을 수정/저장하면 자동으로
# 애플리케이션 페이지가 새로고침 됩니다.


# 라이브 개발 서버 구동
# http://localhost:4200/
$ ng serve

# 라이브 개발 서버 구동 후, 기본 웹 브라우저로 바로 실행
# ng serve --open
$ ng serve -o

# 포트번호 변경
$ ng serve --port 9900Angular 프로젝트는 내부적으로 Webpack Dev Server를 사용하고, HMR(Hot Module Replacement, 빠른 모듈 교체)를통해 브라우저를 개발 중 실시간으로 새로고침 처리 합니다. HMR의 M은 각 JavaScript 파일(모듈)을 말합니다.
모듈 자동 생성
컴포넌트 자동 생성
# Angular CLI의 생성(generate) 명령은 매우 유용합니다.
# Angular 공식 가이드를 따르는 코드를 자동으로 생성해주기 때문이죠.
# 자동 생성되는 코드는 컴포넌트, 디렉티브, 파이프, 서비스, 인터페이스, 클래스 등 입니다.


# ng generate component <컴포넌트-이름>
$ ng g c header

app
└── header
     ├── header.component.css     // 컴포넌트 스타일시트 파일
     ├── header.component.html    // 컴포넌트 템플릿 파일
     ├── header.component.spec.ts // 컴포넌트 유닛 테스트 파일
     └── header.component.ts      // 컴포넌트 로직 파일


# 프로젝트 디렉토리에 바로 컴포넌트 생성
$ ng g c header --flat -tsS

app
└── header.component.ts // 인라인 템플릿,스타일 컴포넌트 로직 파일Angular 구성품 자동 생성
# ng generate component <컴포넌트-이름>
$ ng g c me # MeComponent 생성


# ng generate directive <디렉티브-이름>
$ ng g d me # MeDirective 생성


# ng generate service <서비스-이름>
$ ng g s me # MeService 생성


# ng generate pipe <파이프-이름>
$ ng g p me # MePipe 생성


# ng generate class <클래스-이름>
$ ng g class me # Me 클래스 생성


# ng generate interface <인터페이스-이름>
$ ng g i me # Me 인터페이스 생성


# ng generate enum <이넘-이름>
$ ng g e me # Me 이넘 객체 생성Angular 구성품 자동 생성 도움말
usage: ng generate  [options]
Available schematics:
    serviceWorker
    application
    class
    component
    directive
    enum
    guard
    interface
    module
    pipe
    service
    universal
    appShell
    library

To see help for a schematic run: ng generate --help프로젝트 빌드
프로젝트 빌드
# 빌드
$ ng build


dist/
└── <프로젝트-이름>
     ├── 3rdpartylicenses.txt
     ├── favicon.ico
     ├── index.html
     ├── main.js
     ├── main.js.map
     ├── polyfills.js
     ├── polyfills.js.map
     ├── runtime.js
     ├── runtime.js.map
     ├── styles.js
     ├── styles.js.map
     ├── vendor.js
└── vendor.js.map프로젝트 구동
# 빌드 된 자료를 로컬 테스트 서버로 구동하면 Angular 애플리케이션이 구동됩니다.
# 별도로 사용 중인 테스트 서버 모듈이 없다면 live-server 설치 후, 다음과 같이 명령을 입력합니다.


# live-server 글로벌 설치
# npm install --global live-server
$ npm i -g live-server

# 프로젝트 구동
$ live-server dist/<프로젝트-이름>배포를 위한 빌드
# 코드를 최적화 한 빌드를 수행하려면 --prod 옵션을 추가해 실행해야 합니다.
# 코드 최적화를 위해 uglify, tree-shaking이 수행됩니다.


# 배포 빌드(코드 최적화)
$ ng build --prod


dist/
└── <프로젝트-이름>
     ├── 3rdpartylicenses.txt
     ├── favicon.ico
     ├── index.html
     ├── main.40da80692f280989728d.js
     ├── polyfills.7a0e6866a34e280f48e7.js
     ├── runtime.a66f828dca56eeb90e02.js
└── styles.ca60c8bdb366c68153e1.css테스트
Angular 애플리케이션이 구동되는 방식에 대한 이해
엔트리 포인트
파일 구조
.
├── README.md
├── angular.json
├── e2e/
├── node_modules/
├── package-lock.json
├── package.json
├── src/
│   ├── app/
│   │   ├── app.component.css
│   │   ├── app.component.html
│   │   ├── app.component.spec.ts
│   │   ├── app.component.ts
│   │   └── app.module.ts
│   ├── assets/
│   ├── browserslist
│   ├── environments/
│   │   ├── environment.prod.ts
│   │   └── environment.ts
│   ├── favicon.ico
│   ├── index.html
│   ├── karma.conf.js
│   ├── main.ts
│   ├── polyfills.ts
│   ├── styles.css
│   ├── test.ts
│   ├── tsconfig.app.json
│   ├── tsconfig.spec.json
│   └── tslint.json
├── tsconfig.json
└── tslint.json엔트리 포인트 — 인덱스
<!doctype html>
<html lang="ko-KR">
<head>
  <meta charset="utf-8">
  <title>Angular 6 아키텍쳐</title>
  <meta name="viewport" content="width=device-width, initial-scale=1">
  <link rel="icon" type="image/x-icon" href="favicon.ico">
  <base href="/">
</head>
<body>

  <!--
    Angular 프레임워크 라우팅을 통해 동적으로 페이지가 생성됩니다.
    <app-root> 뷰(View)에 대응하는 컴포넌트는 app.component.ts 파일입니다.
  -->
  <app-root></app-root>

</body>
</html>엔트리 포인트 — 루트 모듈
import { enableProdMode }         from "@angular/core";
import { platformBrowserDynamic } from '@angular/platform-browser-dynamic';

// 루트 모듈 파일 `app/app.module.ts` 로드
import { AppModule }              from './app/app.module';
import { environment }            from './environments/environment';

if (environment.production) { enableProdMode() }

// AppModule을 불러들여 부트스트랩 모듈에 설정
platformBrowserDynamic().bootstrapModule(AppModule)
.catch(err => console.log(err));Angular 부트스트래핑
부트스트래핑 — 앱 모듈
// BrowserModule은 웹 브라우저를 위한 모듈
// 웹 애플리케이션 프로젝트일 경우, 반드시 로드해야 함.
import { BrowserModule } from '@angular/platform-browser';
import { NgModule }      from '@angular/core';

// 컴포넌트 로드
import { AppComponent }  from './app.component';

// NgModule 데코레이터에 메타데이터 설정
@NgModule({
  // 사용할 컴포넌트, 디렉티브, 파이프 등록
  //  컴포넌트를 "선언"에 추가해야 사용 가능
  declarations: [
    AppComponent
  ],
  // 필요한 모듈 등록
  //  예) BrowserModule, FormsModule, HttpModule 등
  imports: [
    // 브라우저 모듈
    BrowserModule
  ],
  // 서비스 등록
  //  이 곳에 등록된 서비스는 모든 컴포넌트에서 접근 사용 가능
  providers: [],
  // 부트스트래핑
  //  컴포넌트 트리를 구성하는 루트 컴포넌트 설정
  //  필요한 경우 2개 이상 설정 가능하지만,
  //  일반적으로 1개의 루트 컴포넌트 설정
  bootstrap: [AppComponent]
})
export class AppModule { }부트스트래핑 — 루트 컴포넌트
// 컴포넌트 데코레이트를 사용하기 위한 모듈 로드
import { Component } from '@angular/core';


// 컴포넌트 데코레이터에 메타데이터 설정
@Component({
  selector: 'app-root',                // <app-root> 커스텀 요소 이름
  templateUrl: './app.component.html', // HTML 템플릿 파일
  styleUrls: ['./app.component.css']   // CSS 스타일링 리스트
})
export class AppComponent {

  title = 'Angular 프론트엔드 애플리케이션'; // public 속성은 접근 제어자 생략 가능

}디버깅
외부 모듈 설치 및 설정
로컬 모듈 설치
# Yarn
yarn add moment @types/moment


# NPM
npm i moment @types/moment모멘트 JS 사용
import * as moment from 'moment'; // 모멘트 JS 모듈 로드
import 'moment/local/ko';         // 한국어 로케일 모듈 로드


moment().format();                          // 2018-08-05T22:24:22+09:00
moment().format('YYYY년 MMMM Do, a h:mm:ss') // 2018년 8월 5일, 오후 10:22:19
moment().format("YYYY년 MMM Do");            // 2018년 8월 5일
moment().format('dddd'); // 목요일글로벌 모듈 설치
# Yarn
yarn add jquery @types/jquery


# NPM
npm i jquery @types/jqueryjQuery 모듈 등록
{
  ...
  "architect": {
    ...
    "build": {
      ...
      "options": {
        ...
        "styles": [
          "src/styles.css"
        ],
        "scripts": [
          "node_modules/jquery/dist/jquery.min.js"
        ]
      }
      ...
    }
  }
}
import * as $ from 'jquery';
// jQuery 버전 출력
$(document).ready(
() => console.log($.fn.jquery)
);
// jQuery 유틸리티 메서드 확장
// [오류] 발생!!!!
// Property 'patch' does not exist on type 'JQueryStatic'.
$.patch = (
url:string,
data:Object,
success?: (data) => void,
fail?: (error) => void
):void => {
$.ajax({
url,
data
}).then(success, fail);
};jQuery 사용
// `모듈 증강` 방법으로 문제 해결 방법
declare global {
  interface JQueryStatic {
    patch(
      url:string,
      data:Object,
      success?: (data) => void,
      fail?: (error) => void
    ): void;
  }
}


// 오류 해결!!!!
$.patch = (
  url:string,
  data:Object,
  success?: (data) => void,
  fail?: (error) => void
):void => {
  $.ajax({
    url,
    data
  }).then(success, fail);
};JQueryStatic 인터페이스 글로벌 선언
// `모듈 증강` 방법으로 jQuery 플러그인 추가

declare global {
  interface JQuery {
    radioClass(name:string): JQuery;
  }
}


// radioClass() 플러그인 추가
$.fn.radioClass = (name:string): JQuery => {
  let parent = this.parent();
  parent.siblings(`.${name}`).removeClass(name);
  return this.addClass(name);
};JQuery 인터페이스 글로벌 선언
프리프로세서 활용
신규 프로젝트에서 Sass 사용 설정
# Angular CLI 명령어 --style 옵션(sass,scss 중 택 1)
$ ng new <프로젝트-이름> --style scss


               ⬇︎


# styles.css 대신 styles.scss 파일이 생성됨
src/
└── styles.scssAngular 프로젝트에서 호출할 수 있도록 설정
{
  "projects": {
    "angular-project": {
      "architect": {
        "build": {

          "options": {
            // ...
            "styles": [ "src/styles.scss" ],
            "stylePreprocessorOptions": {
              "includePaths": ["src/"]
            },
            // ...
          }

        }
      }
    }
  }
}Angular 프로젝트 테스트에서 호출할 수 있도록 설정
{
  "projects": {
    "angular-project": {
      "architect": {
        // ...
        "test": {

          "options": {
            // ...
            "styles": [ "src/styles.sass" ],
            "stylePreprocessorOptions": {
              "includePaths": ["src/"]
            },
            // ...
          }

        }
      }
    }
  }
}
Sass 모듈 시스템 구축
src/
├── app/
├── assets/
├── index.html
# src 내부에 sass 디렉토리를 만든 후
# Sass 변수, 믹스인, 메인 파일을 생성
└── sass/
  ├── _mixins.scss
  ├── _variables.scss
  └── main.scss
/// main.scss
@import "./variables";
@import "./mixins";/// _variable.scss
$container: (
width: 960px,
padding: 10px
);/// _mixins.scss
@mixin size($width: null, $height: null) {
width: $width;
height: $height;
}
Angular 컴포넌트 스타일에서 Sass 모듈 사용
@import "./sass/main";

.container {
  $w: map-get($container, width);
  @include size($w, auto);
}사용자 인터페이스 프레임워크
부트스트랩 프레임워크
Bootstrap 프레임워크 설치
# npm install --save bootstrap font-awesome
$ npm i bootstrap font-awesome방법 1 : Bootstrap CSS 파일 경로 등록
{

  "styles": [
    "node_modules/bootstrap/dist/css/bootstrap.min.css",
    "node_modules/font-awesome/css/font-awesome.css",
    "src/styles.css"
  ],

}방법 2 : Bootstrap / font-awesom 모듈 로드
@import "~bootstrap/dist/css/bootstrap.css";
@import "~font-awesome/css/font-awesome.css";앵귤러 메테리얼 프레임워크
앵귤러 메테리얼 설치
# Angular Material을 프로젝트에 사용하기 위해서는
# material, cdk 2개의 개발 모듈을 설치해야 합니다.
$ npm i @angular/material @angular/cdk


# 애니메이션(animations) 모듈을 설치 합니다.
# Angular Material 컴포넌트 중 일부는 애니메이션에
# 의존하기 때문에 애니메이션 모듈 설치가 필요합니다.
$ npm i @angular/animationsAngular Material 애니메이션 모듈 등록
// Angular Material 애니메이션 모듈 로드
import { BrowserAnimationsModule } from '@angular/platform-browser/animations';


@NgModule({
  ...
  imports: [
    BrowserModule,
    // 모듈 등록
    BrowserAnimationsModule,
  ],
  ...
})
export class AppModule { }Angular 메테리얼 체크박스 모듈 등록
// 모든 컴포넌트에서 Checkbox 컴포넌트를 사용하기 위해
// MatCheckboxModule를 @NgModule 모듈 imports 항목에 추가합니다.

// Angular Material 체크박스 모듈 로드
import { MatCheckboxModule } from '@angular/material';

@NgModule({
  ...
  imports: [
    BrowserModule,
    BrowserAnimationsModule,
    // 모듈 등록
    MatCheckboxModule,
  ],
  ...
})
메테리얼 체크박스 컴포넌트 사용
<mat-checkbox>Angular Material 사용에 동의합니다.</mat-checkbox>Angular 메테리얼 테마 적용
/*

  Angular Material Theme
  ———————————————————————————————————————————————————————————————

  deeppurple-amber.css
  indigo-pink.css
  pink-bluegrey.css
  purple-green.css

*/

@import "~@angular/material/prebuilt-themes/deeppurple-amber.css";컴포넌트
컴포넌트 트리
<!-- DOM Tree : 요소 객체 계층 구조 -->

<div class="parent">
  <div class="child"></div>
  <div class="child"></div>
</div>


<!-- Component Tree : 컴포넌트 계층 구조 -->

<app-tabs>
  <app-tab></app-tab>
  <app-tab></app-tab>
</app-tabs>컴포넌트 데코레이터 / 클래스
// 컴포넌트 데코레이터를 사용하기 위한 모듈 로드
import { Component } from "@angular/core";


// 컴포넌트 데코레이터
@Component()
export class ButtonComponent {
  // 버튼 컴포넌트 클래스
}import { Component } from "@angular/core";
// 메타 데이터 설정
let metadata = {
selector : 'app-button',
templateUrl : 'app.component.html',
styleUrls : ['app.component.css']
};
// Component 데코레이터 팩토리
@Component(metadata)
export class ButtonComponent {
}컴포넌트 메타데이터
<button type="button">버튼 컴포넌트</button>컴포넌트 템플릿
button {
  cursor: pointer;
  border: none;
  border-radius: 4px;
  padding: 0.8em 1em;
  background: #efefef;
  color: #212121;
}

button.is-small {
  font-size: 12px;
}

button.is-big {
  font-size: 18px;
}
컴포넌트 스타일
// 버튼 컴포넌트 로드
import { ButtonComponent } from "./button/button.component";


@NgModule({
  declarations: [
    AppComponent,
    // 버튼 컴포넌트 등록
    ButtonComponent
  ],
  ...
})
export class AppModule { }
컴포넌트 등록
<app-button></app-button>컴포넌트 객체 사용
컴포넌트 셀렉터 설정
import { Component } from '@angular/core';

@Component({

  // case 1: <app-custom> 요소
  selector: 'app-custom',

  // case 2: <div class="app-custom"> 요소
  selecor: '.app-custom',

  // case 3: <div data-app-custom> 요소
  selector: '[data-app-custom]',

  ...

})
export class CustomComponent { }인라인 템플릿 / 스타일 설정
import { Component } from '@angular/core';

@Component({
  selector: 'app-checkbox',
  template: `
    <label class="checkbox">
      <input type="checkbox"> 체크박스 컴포넌트
    </label>
  `,
  styles: [
    `.checkbox {
        color: #900;
      }
      input[type="checkbox"] {
        vertical-align: middle;
      }`
  ]
})
export class CheckboxComponent {}뷰 인캡슐레이션 설정
// ViewEncapsulation 모듈 로드
import { Component, ViewEncapsulation } from '@angular/core';

@Component({
  selector: 'app-checkbox',
  template: `
    <label class="checkbox">
      <input type="checkbox"> 체크박스 컴포넌트
    </label>
  `,
  styles: [
    `.checkbox {
        color: #900;
      }
      input[type="checkbox"] {
        vertical-align: middle;
      }`
  ],
  // 뷰 인캡슐레이션 설정
  // Emulated(기본 값), None, Native, ShadowDom
  encapsulation: ViewEncapsulation.None
})
export class CheckboxComponent { }컴포넌트 자동 생성 명령
ng generate component
# ng geterate component <컴포넌트-이름>
$ ng g c checkbox

CREATE src/app/checkbox/checkbox.component.css (0 bytes)
CREATE src/app/checkbox/checkbox.component.html (27 bytes)
CREATE src/app/checkbox/checkbox.component.spec.ts (642 bytes)
CREATE src/app/checkbox/checkbox.component.ts (277 bytes)
UPDATE src/app/app.module.ts (532 bytes)데이터 바인딩
app/button.component
@Component(metadata)
export class ButtonComponent {

  public content:string;

  constructor() {

    this.content = '메뉴 토글';

  }

}
<button
type="button"
class="btn btn-primary">
{{ content }}
</button>데이터 바인딩 ⟹ 비공개 속성과 메서드 활용
@Component(metadata)
export class ButtonComponent {

  constructor( private _content:string = '메뉴 토글' ) { }

  getContent(): string {
    return this._content;
  }

}
<button
type="button"
class="btn btn-primary">
{{ getContent() }}
</button>데이터 바인딩 ⟹ [속성]="값"
@Component(metadata)
export class ButtonComponent {

  public content:     string  = '메뉴 토글';
  public type:        string  = 'button';
  public is_disabled: boolean = false;

}
<button
class="btn btn-primary"
[type]="type"
[disabled]="is_disabled">
{{ content }}
</button>데이터 바인딩 ⟹ 대체 방법
<button
  class="btn btn-primary"
  type="{{ type }}"
  disabled="{{ is_disabled }}">

  {{ content }}

</button>
<button
  class="btn btn-primary"
  [type]="type"
  [innerText]="content">

</button>데이터 바인딩 ⟹ (이벤트) 연결
@Component(metadata)
export class ButtonComponent {

  public content:     string  = '토글 ON';
  public type:        string  = 'button';
  public is_disabled: boolean = false;

  // 토글 상태 변경 메서드
  public onChangeStateToggle(): void {
    this.content = this.content.includes('ON') ? '토글 OFF' : '토글 ON';
  }

}
<button
class="btn btn-primary"
[type]="type"
[disabled]="is_disabled"
(click)="onChangeStateToggle()">
{{ content }}
</button>데이터 바인딩 ⟹ 이벤트 객체 전달
@Component(metadata)
export class InputComponent {

  public label_id:            string = 'y9-username';
  public label_conetnt:       string = '사용자 이름';
  public type:                string = 'text';
  private pass_by_user_input: string = '';

  onPasssingByUserInput($event): void {
    this.pass_by_user_input = $event.target.value;
  }

}
<div class="input-group mb-3">
<div class="input-group-prepend">
<label
class="input-group-text"
[for]="label_id"
[attr.aria-label]="label_content">@</label>
</div>
<input
class="form-control"
[id]="label_id"
[type]="type"
[placeholder]="label_content"
(input)="onPasssingByUserInput($event)">
</div>
<!-- 사용자 입력 내용 출력 -->
<p class="lead">
사용자 입력 내용: <b>{{ pass_by_user_input }}</b>
</p>양방향 바인딩
양방향 데이터 바인딩
import { BrowserModule }  from '@angular/platform-browser';
import { NgModule }       from '@angular/core';

// 양방향 데이터 바인딩을 사용하려면 FormsModule을 불러와 등록합니다.
import { FormsModule }    from "@angular/forms";

import { AppComponent }    from './app.component';
import { ButtonComponent } from "./button/button.component";
import { InputComponent }  from "./input/input.component";


@NgModule({
  declarations: [
    AppComponent,
    ButtonComponent,
    InputComponent,
  ],
  imports: [
    BrowserModule,
    // FormsModule 모듈 등록
    FormsModule
  ],
  providers: [],
  bootstrap: [AppComponent]
})
export class AppModule { }
@Component(metadata)
export class InputComponent {
public label_id: string = 'y9-username';
public label_conetnt: string = '사용자 이름';
public type: string = 'text';
private pass_by_user_input: string = '';
}<div class="input-group mb-3">
<div class="input-group-prepend">
<label class="input-group-text"
[for]="label_id"
[attr.aria-label]="label_content">@</label>
</div>
<input class="form-control"
[id]="label_id"
[type]="type"
[placeholder]="label_content"
[(ngModel)]="pass_by_user_input">
</div>
<!-- 사용자 입력 내용 출력 -->
<p class="lead">
사용자 입력 내용: <b>{{ pass_by_user_input }}</b>
</p>양방향 데이터 바인딩
@Component({ ... })
export class InputComponent {

  public label_id:            string = 'y9-username';
  public label_conetnt:       string = '사용자 이름';
  public type:                string = 'text';
  private pass_by_user_input: string = '';

  // 이벤트 바인딩 메서드
  onPasssingByUserInput($event): void {
    this.pass_by_user_input = $event.target.value;
  }

}
<div class="input-group mb-3">
<div class="input-group-prepend">
<label class="input-group-text"
[for]="label_id"
[attr.aria-label]="label_content">@</label>
</div>
<input class="form-control"
[id]="label_id"
[type]="type"
[placeholder]="label_content"
(input)="onPasssingByUserInput($event)"
[value]="pass_by_user_input">
</div>
<p class="lead">
사용자 입력 내용:
<b>{{ pass_by_user_input }}</b>
</p>유니코드 문자 양방향 데이터 바인딩
빌트-인 디렉티브
디렉티브는
뷰가 없는 컴포넌트
컴포넌트는
뷰가 있는 디렉티브
구조 디렉티브 (반복처리)
import { Component } from '@angular/core';

@Component({ ... })
export class AppComponent {

  public title:string     = 'Angular *ngFor 디렉티브';
  public buttons:string[] = ['보임', '감춤', '토글'];

}
<app-button *ngFor="let button of buttons"></app-button>DOM 렌더링 반복 처리
<!--

*ngFor 디렉티브는 템플릿에서 사용 가능한 로컬 변수를 제공합니다.

  index : 개별 항목 인덱스
  odd   : 홀수 항목
  even  : 짝수 항목
  first : 첫번째 항목
  last  : 마지막 항목

-->

<app-button
  *ngFor="
    let button of buttons;
    let i = index;
    first as is_first;
  "
  [title]="`${i}번째 요소는 첫번째 버튼 요소가 ${is_first ? '맞습니다.': '아닙니다.'}`">
  {{ button }}
</app-button>
ngFor 디렉티브 로컬 변수
import { Component } from '@angular/core';

interface NewsInterface { headline:string, articles: { title:string, category:string }[] };

@Component({...})
export class NestingNgForDemoComponent {

  public news:NewsInterface[] = [
    {
      headline: '정치',
      articles: [
        { title: `총 40편의 영화 출연, '국민배우' 황정민의 흥행史`, category: '한국영화' },
        { title: `적수 없는 '미션 임파서블: 폴아웃', 2주 연속 왕좌 차지`, category: '해외영화' },
      ]
    },
    {
      headline: '스포츠',
      articles: [
        { title: '쿠르투아, 레알 마드리드 팬들 앞에 첫 선', category: '해외축구' },
        { title: `'영입제로' 토트넘, 포체티노 감독의 생각은?`, category: '해외축구' },
        { title: `'가장 빠른 홈런' 스탠튼, 로켓 같은 122마일 홈런포`, category: '해외야구' },
      ]
    }
  ];

}중첩 ngFor
<section class="news" *ngFor="let content of news">
  <h2 class="news-headline">{{ content.headline }}</h2>
  <ul class="news-articles">

    <!-- 중첩 *ngFor -->
    <li class="news-article" *ngFor="let article of content.articles">
      <span class="news-category">{{ article.category }}</span>
      <h3 class="news-title">{{ article.title }}</h3>
    </li>

  </ul>
</section>
중첩 ngFor
구조 디렉티브 (조건처리)
DOM 렌더링 조건 처리
<p *ngIf="is_renderting; then ifStatement else elseStatement"></p>

<!-- 화면에 그려지지 않는 템플릿 : 조건에 따라 선택적으로 화면에 그려집니다. -->
<ng-template #ifStatement>is_renderting 값이 참이면 화면에 렌더링 됩니다.</ng-template>
<ng-template #elseStatement>is_renderting 값이 거짓이면 화면에 렌더링 됩니다.</ng-template>
<p *ngIf="is_renderting; else elseStatement">
is_renderting 값이 참이면 화면에 렌더링 됩니다.
</p>
<ng-template #elseStatement>
<p>is_renderting 값이 거짓이면 화면에 렌더링 됩니다.</p>
</ng-template>구조 디렉티브 사용 시 주의할 점
하나의 요소에 구조 디렉티브 ngFor, ngIf를 연결하면?
@Component({ ... })
export class AppComponent {
  // 홀수 여부
  is_odd:boolean = true;
  // 숫자 데이터
  numbers:number[] = [1, 2, 3, 4, 5];
  // 홀짝 숫자 데이터 토글 메서드
  private toggleOddEvenNumbers(): void {
    this.is_odd = !this.is_odd;
  }
}
<button
  class="btn btn-primary"
  (click)="toggleOddEvenNumbers()">홀/짝 숫자 토글</button>

<ul class="list-group">
  <li class="list-group-item"
      *ngFor="let number of numbers; let odd = odd;"
      *ngIf="is_odd === odd">
    {{number}}
  </li>
</ul>템플릿 해석 오류 발생!
compiler.js:215 Uncaught Error: Template parse errors:
Can't have multiple template bindings on one element.
Use only one attribute prefixed with * ("odd = odd"> -->
  <li
    class="list-group-item"
    *ngFor="let number of numbers; let odd = odd"
    [ERROR ->]*ngIf="is_odd === odd">
    {{number}}
  </li>
"): ng:///AppModule/AppComponent.html@6:84문제 해결책
<button
  class="btn btn-primary"
  (click)="toggleOddEvenNumbers()">홀/짝 숫자 토글</button>

<ul class="list-group">
  <!-- *ngFor 디렉티브 -->
  <ng-container *ngFor="let number of numbers; let odd = odd">
    <!-- *ngIf 디렉티브 -->
    <li class="list-group-item" *ngIf="is_odd === odd">
      {{number}}
    </li>
  </ng-container>
</ul>속성 디렉티브 (조건처리)
속성 디렉티브 NgSwitch와 구조 디렉티브 NgSwitchCase, NgSwitchDefault
<p [ngSwitch]="type_is">
  <ng-container *ngSwitchCase="'string'">type_is 값은 string 입니다.</ng-container>
  <ng-container *ngSwitchCase="'number'">type_is 값은 number 입니다.</ng-container>
  <ng-container *ngSwitchDefault>type_is 값은 string, number 가 아닙니다.</ng-container>
</p>
<ng-container [ngSwitch]="type_is">
<p *ngSwitchCase="'string'">type_is 값은 string 입니다.</p>
<p *ngSwitchCase="'number'">type_is 값은 number 입니다.</p>
<p *ngSwitchDefault>type_is 값은 string, number 가 아닙니다.</p>
</ng-container>속성 디렉티브 (스타일 설정)
NgStyle 속성 디렉티브를 사용한 인라인 스타일 설정
import { Component } from "@angular/core";

@Component({...})
export class ButtonComponent {

  public content:string;
  public is_disabled:boolean;

  // 컴포넌트 생성 과정에서 속성 값 초기화
  constructor() {
    this.is_disabled = Math.random() > 0.5 ? true : false;
    this.content = this.is_disabled ? '활성' : '비활성';
  }

  // is_disabled 상태에 딸 설정할 컬러 값을 반환하는 메서드
  public assignBgColor(): string {
    return this.is_disabled ? '#6c5ce7' : '#b2bec3';
  }

}
NgStyle 속성 디렉티브를 사용한 인라인 스타일 설정
<button
  type="button"
  [disabled]="is_disabled"
  [ngStyle]="{
    'background-color': assignBgColor()
  }"
>
  {{ content }}
</button>
NgStyle 속성 디렉티브를 사용한 인라인 스타일 설정
<!-- NgStyle 디렉티브 대신, 속성 바인딩을 사용해도 결과는 동일합니다. -->

<button
  type="button"
  [disabled]="is_disabled"
  [style.backgroundColor]="assignBgColor()"
>
  {{ content }}
</button>


<!-- 다음과 같은 방법으로 단위를 설정할 수 있습니다.  -->

<p [ngStyle]="{'font-size.rem', 1.434}">{{ content }}</p>

<p [style.fontSize.rem]="1.434">{{ content }}</p>속성 디렉티브 (클래스 설정)
NgClass 속성 디렉티브를 사용한 클래스 스타일 설정
@Component({...})
export class ButtonComponent {

  public is_disabled:boolean;

  constructor() {
    this.is_disabled = Math.random() > 0.5 ? true : false;
  }

  toggle():void {
    this.is_disabled = !this.is_disabled;
  }

}
<button
type="button"
class="btn"
(click)="toggle()"
[disabled]="is_disabled"
[ngClass]="{
'btn-primary': !is_disabled,
'btn-secondary': is_disabled
}"
>
{{ content }}
</button>NgClass 속성 디렉티브를 사용한 클래스 스타일 설정
메서드를 사용한 동적 클래스 설정
@Component({...})
export class ButtonComponent {

  public is_disabled:boolean;

  constructor() {
    this.is_disabled = Math.random() > 0.5 ? true : false;
  }

  toggle():void {
    this.is_disabled = !this.is_disabled;
  }

  assignClasses(): Object {
    let disabled = this.disabled;
    return { 'btn-primary': !disabled, 'btn-secondary': disabled };
  }

}
<button
type="button"
class="btn"
[ngClass]="assignClasses()"
>
{{ content }}
</button>메서드를 사용한 동적 클래스 설정
바인드 해제
데이터 바인드 해제
<p ngNonBindable>
  {{ '데이터 바인딩이 해제 됩니다.' }}
</p>컴포넌트 간 통신
부모 - 자식 컴포넌트 간 통신
부모 컴포넌트 ➟ 자식 컴포넌트 : 데이터 전달
데이터를 가진 부모 컴포넌트
import { Component } from "@angular/core";

interface food {
  type:string;
  name:string;
  content:string;
};

@Component({
  selector: 'app-parent',
  templateUrl: 'app-parent.component.html',
  styleUrls: ['app-parent.component.css']
})
export class ParentComponent {

  // 부모가 가진 데이터
  public foods:food[] = [
    {
      type: '중식',
      name: '짜장면',
      content: '달콤한 짜장 소스에 면을 버무려 먹으면 참 맛있어요!'
    }
  ];

}데이터 전달 : 부모 ➟ 자식
<!-- food 값을 [element] 속성 데이터 바인딩을 통해 자식 컴포넌트로 전달 -->
<app-child *ngFor="let food of foods" [element]="food"></app-child>@Input을 통해 부모로부터 데이터를 전달 받음
// Input 모듈 로드
import { Component, Input } from "@angular/core";

@Component({
  selector: 'app-child',
  templateUrl: 'app-child.component.html',
  styleUrls: ['app-child.component.css']
})
export class AppChildComponent {

  // @Input() 데코레이터를 통해 부모 컴포넌트의 데이터를 전달 받음
  @Input()
  element: {
    type: string,
    name: string,
    content: string
  };

}
<!-- 부모 컴포넌트로부터 전달 받은 element를 사용해 데이터 바인딩 -->
<div class="item">
<h4>{{ element.name }}</h4>
<p>{{ element.content }}</p>
</div>자식 컴포넌트 템플릿에서 데이터 바인딩
@Input( 별칭 등록 )
<!-- [element] 속성에서 [food] 속성으로 변경 -->
<app-child *ngFor="let food of foods" [food]="food"></app-child>element ➟ food로 변경
@Input() 별칭 문자열 설정
import { Component, Input } from "@angular/core";

@Component({
  selector: 'app-child',
  templateUrl: 'app-child.component.html',
  styleUrls: ['app-child.component.css']
})
export class AppChildComponent {

  // @Input()에 별칭 문자열 설정
  @Input('food')
  element: {
    type: string,
    name: string,
    content: string
  };

}자식 컴포넌트 ➟ 부모 컴포넌트 : 이벤트 방출
// EventEmitter, Output 모듈 로드
import { Component, EventEmitter, Output } from "@angular/core";

@Component({ ... })
export class ChildComponent {

  // @output() 데코레이트를 사용해 자식 컴포넌트에서 부모 컴포넌트로 데이터 출력
  // 제너릭(Generics) 문법을 사용해 이벤트 데이터로 방출할 타입 지정
  @output()
  addFooded = new EventEmitter<{type:string, name:string, content:string}>();

  public food_type:    string = '';
  public food_name:    string = '';
  public food_content: string = '';

  constructor(){}

  // onAddFood 메서드 실행 시,
  onAddFood():void {
    // 커스텀 이벤트 addFooded를 통해 부모 컴포넌트로 데이터 방출
    this.addFooded.emit({
      type: this.food_type,
      name: this.food_name,
      content: this.food_content
    });
  }

}이벤트 방출 : 자식 ➟ 부모
사용자로부터 폼 데이터를 입력 받음
<div class="row">
  <div class="col-xs-12">
    <h2>식사 추가</h2>
    <div class="form-group">
      <label for="food-name">식사 유형</label>
      <input
        type="text"
        id="food-type"
        class="form-control"
        placeholder="식사 유형 입력"
        [(ngModel)]="food_type">
    </div>
    <div class="form-group">
      <label for="food-name">식사</label>
      <input
        type="text"
        id="food-name"
        class="form-control"
        placeholder="식사 이름 입력"
        [(ngModel)]="food_name">
    </div>
    <div class="form-group">
      <label for="food-content">설명</label>
      <input
        type="text"
        id="food-content"
        class="form-control"
        placeholder="식사 설명 입력"
        [(ngModel)]="food_content">
    </div>
    <button
      type="button"
      class="btn btn-danger"
      (click)="onAddFood()">식사 추가</button>
  </div>
</div> <!-- // .row -->자식 컴포넌트의 이벤트 에미터 출력 결과를 수신
<!-- 자식 컴포넌트로부터 방출된 이벤트를 부모 컴포넌트에서 수신 -->
<app-child (addFooded)="onFoodAdded($event)"></app-child>데이터를 가진 부모 컴포넌트
import { Component } from "@angular/core";

interface food {
  type:string;
  name:string;
  content:string;
}

@Component({ ... })
export class ParentComponent {

  public foods:food[] = [
    {
      type: '중식',
      name: '짜장면',
      content: '달콤한 짜장 소스에 면을 버무려 먹으면 참 맛있어요!'
    }
  ];

  // 이벤트 에미터 수신 메서드
  public onFoodAdded(foodData: {type:string, name:string, content:string}):void {
    let { type, name, content } = foodData;
    this.foods.push({ type, name, content });
  }

}@Output( 별칭 등록 )
출력 이벤트 에미터 별칭 등록
interface I_Food {
  type:string;
  name:string;
  content:string
}

@Component({ ... })
export class ChildComponent {

  // 커스텀 이벤트 속성 별칭 설정
  @output('af') addFooded = new EventEmitter<I_Food>();

  // ...

}출력 이벤트 에미터 별칭 적용
<!-- 커스텀 이벤트 별칭 사용 -->
<app-child (af)="onFoodAdded($event)"></app-child>콘텐츠 투영 (끼워넣기)
부모 - 자식 컴포넌트 템플릿
<!-- 자식 컴포넌트 템플릿 -->

<li class="list-group-item">
  <h4>{{ item.title }}</h4>
  <p>{{ item.description }}</p>
</li>
<!-- 부모 컴포넌트 템플릿 -->
<app-list-item *ngFor="let item of lists" [item]="item"></app-list-item><ng-content>는 콘텐츠를 끼워 넣음
<!-- 자식 컴포넌트 템플릿 -->

<li class="list-group-item">
  <ng-content>
</li>
<!-- 부모 컴포넌트 템플릿 -->
<app-list-item *ngFor="let item of lists" [item]="item">
<!-- 슬롯 콘텐츠 -->
<h4>{{ item.title }}</h4>
<p>{{ item.description }}</p>
<!--// 슬롯 콘텐츠 -->
</app-list-item><ng-content>의 select 속성은 끼워 넣을 콘텐츠를 식별
<!-- 자식 컴포넌트 템플릿 -->

<li class="list-group-item">
  <ng-content select=".item-title"></ng-content>
  <ng-content select=".item-description"></ng-content>
</li>
<!-- 부모 컴포넌트 템플릿 -->
<app-list-item *ngFor="let item of lists" [item]="item">
<!-- 슬롯 콘텐츠 -->
<h4 class="item-title">{{ item.title }}</h4>
<p class="item-description">{{ item.description }}</p>
<!--// 슬롯 콘텐츠 -->
</app-list-item>컴포넌트 라이프 사이트 훅
라이프 사이클 훅 설정
// OnInit 라이프 사이클 훅 인터페이스 로드
import { Component, OnInit } from '@angular/core';

@Component({
  selector: 'my-app',
  templateUrl: './app.component.html',
  styleUrls: ['./app.component.css']
})
export class AppComponent implements OnInit { // 컴포넌트 클래스 인터페이스 확장
  constructor() {}

  // 라이프 사이클 훅 함수 설정
  ngOnInit() {
    // 컴포넌트 초기화 시, 처리할 일 호출
    this.setupData();
    this.doStuff();
    // ...
  }

  setupData() {}
  doStuff() {}
}멀티 라이프 사이클 훅 설정
// OnDestroy 라이프 사이클 훅 인터페이스 로드
import { Component, OnInit, OnDestroy } from '@angular/core';

@Component({
  selector: 'my-app',
  templateUrl: './app.component.html',
  styleUrls: ['./app.component.css']
})
export class AppComponent implements OnInit, OnDestroy { // 인터페이스 추가 확장

  constructor() {}

  ngOnInit() {
    console.log('컴포넌트 초기화 시 실행');
  }

  // 라이프 사이클 훅 함수 추가
  ngOnDestroy() {
    console.log('컴포넌트 파괴 시 실행');
  }

}템플릿 참조 변수
템플릿 #참조변수
<div class="form-group">
  <label for="food-name">식사</label>
  <input
    type="text"
    id="food-name"
    class="form-control"
    placeholder="식사 이름 입력"
    #foodName>
</div>

<!-- ... -->

<button
  type="button"
  class="btn btn-danger"
(click)="onAddFood(foodName.value)">식사 추가</button>뷰 차일드, 뷰 칠드런 데코레이터
#템플릿-참조-변수를 사용해 DOM 객체에 접근하기
<div class="form-group">
  <label for="pizza-toping">피자 토핑</label>
  <input
    #pizzaToping
    type="text"
    class="form-control"
    name="pizza-toping"
    id="pizza-toping"
    aria-describedby="pizza-toping-desc"
    placeholder="좋아하는 피자 토핑 입력">
  <span id="pizza-toping-desc" class="form-text text-muted">좋아하는 피자 토핑을 입력해주세요.</span>
</div>
// ViewChild, ElementRef, AfterViewInit 로드
import { Component, ViewChild, ElementRef, AfterViewInit } from "@angular/core";
@Component({ ... })
export class AppComponent implements AfterViewInit { // 라이프 사이클 훅 확장
// ViewChild 데코레이터를 사용해 템플릿 참조 변수를 토대로 ElementRef를 사용해 참조
@ViewChild('pizzaToping') pizzaToping: ElementRef;
ngAfterViewInit() {
// ElementRef의 nativeElement 속성을 통해
// DOM 객체 접근 가능
this.pizzaToping.nativeElement.value = '앤쵸비! 🍕🍕';
}
}#템플릿-참조-변수를 사용해 DOM 객체에 접근하기
// ViewChild, AfterViewInit 로드
import { Component, ViewChild, AfterViewInit } from "@angular/core";

// ChildComponent 컴포넌트 로드
import { ChildComponent } from './child/child.component';

@Component({ ... })
export class AppComponent implements AfterViewInit {

  // ChildComponent 컴포넌트 참조
  @ViewChild(ChildComponent) child: ChildComponent;

  ngAfterViewInit() {
    console.log(this.child.whoAmI()); // "👶 자식 컴포넌트 입니다."
  }

}자식 컴포넌트에 접근하기
// ViewChildren, QueryList, AfterViewInit 로드
import { Component, ViewChildren, QueryList, AfterViewInit } from "@angular/core";

// ChildComponent 컴포넌트 로드
import { ChildComponent } from './child/child.component';

@Component({ ... })
export class AppComponent implements AfterViewInit {

  // ViewChildren 데코레이터를 사용해 자식 컴포넌트 리스트 참조
  @ViewChildren(ChildComponent) children: QueryList<ChildComponent>;

  ngAfterViewInit() {
    console.log(this.children.toArray()); // "👶👶👶 자식 컴포넌트 리스트 입니다."
  }

}자식 컴포넌트들에 접근하기
콘텐츠 차일드, 콘텐츠 칠드런 데코레이터
// ContentChild, ElementRef, AfterContentInit 로드
import { Component, ContentChild, ElementRef, AfterContentInit } from "@angular/core";

@Component({ ... })
export class AppComponent implements AfterContentInit { // 라이프 사이클 훅 확장

  // ViewChild 데코레이터를 사용해 템플릿 참조 변수를 토대로 ElementRef를 사용해 참조
  @ContentChild('pizzaToping') pizzaToping: ElementRef;

  ngAfterViewInit() {
    // ElementRef의 nativeElement 속성을 통해
    // DOM 객체 접근 가능
    this.pizzaToping.nativeElement.textContent = '앤쵸비! 🍕🍕';
  }
}투영된 DOM 객체에 접근하기
// ContentChild, AfterContentInit 로드
import { Component, ContentChild, AfterContentInit } from "@angular/core";

// ChildComponent 컴포넌트 로드
import { ChildComponent } from './child/child.component';

@Component({ ... })
export class AppComponent implements AfterViewInit {

  // ChildComponent 컴포넌트 참조
  @ContentChild(ChildComponent) childContent: ChildComponent;

  ngAfterContentInit() {
    console.log(this.childContent); // <ng-content>로 투영된 자식 컴포넌트에 접근
  }

}투영된 자식 컴포넌트에 접근하기
// ContentChildren, AfterContentInit, QueryList 로드
import { Component, ContentChildren, AfterContentInit, QueryList } from "@angular/core";

// ChildComponent 컴포넌트 로드
import { ChildComponent } from './child/child.component';

@Component({ ... })
export class AppComponent implements AfterViewInit {

  // ChildComponent 컴포넌트 참조
  @ContentChildren(ChildComponent) childrenContent: QueryList<ChildComponent>;

  ngAfterContentInit() {
    console.log(this.childrenContent.toArray()); // <ng-content>로 투영된 자식 컴포넌트 리스트에 접근
  }

}투영된 자식 컴포넌트들에 접근하기
사용자 정의 디렉티브
디렉티브는
뷰가 없는 컴포넌트
컴포넌트는
뷰가 있는 디렉티브
@Directive()
@Component()
커스텀 디렉티브 자동 생성 명령
ng generate directive
# ng geterate directive <디렉티브-이름>
$ ng g d hide

CREATE src/app/show.directive.ts (138 bytes)
UPDATE src/app/app.module.ts (633 bytes)


# 프리픽스 설정 --prefix
$ ng g d hide -p y9
import { Directive } from '@angular/core';
@Directive({
selector: '[y9Show]'
})
export class ShowsDirective {
constructor() { }
}
제너레이트 명령 결과 : 커스텀 디렉티브 자동 등록
import { BrowserModule } from '@angular/platform-browser';
import { NgModule } from '@angular/core';

import { AppComponent } from './app.component';
import { HideDirective } from './hide.directive';

@NgModule({
  declarations: [
    AppComponent,
    HideDirective
  ],
  imports: [
    BrowserModule
  ],
  providers: [],
  bootstrap: [AppComponent]
})
export class AppModule { }
디렉티브가 연결된 네이티브 엘리먼트 참조
사용자 정의 디렉티브
// Directive, ElementRef 로드
import { Directive, ElementRef } from '@angular/core';

// Directive 데코레이터
@Directive({
  selector: '[y9Hide]', // 메타데이터
})
// 클래스
export class HideDirective {

  constructor(
    // 의존성 모듈 주입(DI)
    private el:ElementRef
  ) {

    this.el.nativeElement.hidden = true;

  }

}
<p class="text-primary" y9Hide>
사용자 정의 디렉티브 설정으로
해당 텍스트는 화면에서 감춰집니다.
</p>사용자 정의 디렉티브 선택자
import { Directive, ElementRef } from '@angular/core';


@Directive({
  selector: '.y9Hide', // 클래스 선택자
})
export class HideDirective {

  constructor( private el:ElementRef ) {

    let elem = this.el.nativeElement;

    elem.hidden = true;

  }

}
<p class="text-primary y9Hide">
사용자 정의 디렉티브 설정으로
해당 텍스트는 화면에서 감춰집니다.
</p>플랫폼에 제한 없이 Angular 애플리케이션이 구동되도록 하는 렌더러
렌더러2 로드 및 활용
// Renderer2 로드
// - 모든 플랫폼에서 Angular 애플리케이션이 구동되도록 제공되는 클래스
import { Directive, ElementRef, Renderer2 } from '@angular/core';

@Directive({
  selector: '[y9Hide]'
})
export class HideDirective {

  constructor(
    private el:ElementRef,
    private renderer:Renderer2
  ) {

    // 렌더러 객체 메서드 활용
    this.renderer.setAttribute('hidden', 'true');

  }

}렌더러2 메서드 : DOM API와 유사
import { Directive, ElementRef, Renderer2 } from '@angular/core';

@Directive({
  selector: '[y9Hide]'
})
export class HideDirective {

  constructor(
    private el:ElementRef,
    private renderer:Renderer2
  ) {

    const r = this.renderer;
    const elem = this.el.nativeElement;

    const div = r.createElement('div');
    const text = r.createTextNode('커스텀 디렉티브 with Renderer2');

    r.appendChild(div, text);
    r.appendChild(elem, div);

    r.setAttribute(elem, 'aria-hidden', false);

  }

}렌더러2 메서드 : jQuery API와 유사
import { Directive, ElementRef, Renderer2 } from '@angular/core';

@Directive({
  selector: '[y9Hide]'
})
export class HideDirective {

  constructor(
    private el:ElementRef,
    private renderer:Renderer2
  ) {

    const renderer = this.renderer;
    const elem = this.el.nativeElement;

    renderer.addClass(elem, 'y9-hide');
    renderer.removeClass(elem, 'y9-show');

  }

}렌더러2 API
import { Directive, ElementRef, Renderer2 } from '@angular/core';

@Directive({
  selector: '[y9Hide]'
})
export class HideDirective {

  constructor(
    private el:ElementRef,
    private renderer:Renderer2
  ) {

    const renderer = this.renderer;
    const elem = this.el.nativeElement;

    renderer.setStyle(elem, 'border-left', '4px double #990');
    renderer.removeStyle(elem, 'border-left');

    renderer.setProperty(elem, 'border-left', '4px double #990');

  }

}디렉티브가 연결된 요소의 이벤트를 수신하기 위한 데코레이터
@HostListener 데코레이터 사용법
import { Directive, HostListener } from '@angular/core';

@Directive({
  selector: '[y9Hide]'
})
export class HideDirective {

  constructor() {}

  // @HostListener 데코레이터 사용법

  @HostListener('mouseenter')
  pressedKey():void {
    console.log( `'마우스진입' 이벤트가 발생되었습니다.` );
  }

  @HostListener('keydown', ['$event.keyCode', '$event'])
  pressedKey(code:number, e:KeyboardEvent):void {
    e.stopPropagation();
    if ( code === 27 ) { console.log('Esc 키를 눌렀습니다.'); }
  }

  @HostListener('document:keydown.enter', ['$event'])
  pressedKey(e:KeyboardEvent):void {
    console.log('Enter 키를 눌렀습니다.');
  }

}디렉티브가 연결된 요소의 이벤트에 응답하기 위한 데코레이터
@HostBinding 데코레이터 사용법
import { Directive, HostListener, HostBinding } from '@angular/core';

@Directive({
  selector: '[y9HostBinding]'
})
export class HostListenerDirective {

  // @HostBinding 데코레이터를 사용해 활성화 클래스 속성 컨트롤
  @HostBinding('class.active') active:boolean;

  constructor() { }

  // 호스트 이벤트 수신 결과에 따라 활성, 비활성화 설정
  @HostListener('mouseenter') onMouseEnter():void {
    console.log('마우스 진입: 활성화');
    this.active = true;
  }
  @HostListener('mouseleave') onMouseLeave():void {
    console.log('마우스 진출: 비활성화');
    this.active = false;
  }

}
@HostListener, @HostBinding 데코레이터 활용 예시
레인보우 인풋 디렉티브
import { Directive, HostBinding, HostListener } from '@angular/core';

@Directive({ selector: '[y9RainbowInput]' })
export class RainbowInputDirective {

  colors:string[] = [
    'darksalmon', 'hotpink', 'lightskyblue',
    'goldenrod', 'peachpuff', 'mediumspringgreen',
    'cornflowerblue', 'blanchedalmond', 'lightslategrey'
  ];

  @HostBinding('style.color') color:string;
  @HostBinding('style.border-color') borderColor:string;

  @HostListener('keydown') rainbowColor() {
    const pick = Math.floor(Math.random() * this.colors.length);
    this.color = this.borderColor = this.colors[pick];
  }

}
<input type="text" y9RainbowInput>인풋 데코레이터 & 환경 설정
디렉티브에서 사용자 설정을 인풋 받기 위한 설정
import { Directive, HostListener, HostBinding, Input } from '@angular/core';

@Directive({
  selector: '[y9RainbowInput]'
})
export class Y9RainbowInputDirective {

  @Input() colors:string[] = `red orange green blue deepblue violet pink`.split(' ');

  @HostBinding('style.color') color:string;
  @HostBinding('style.borderColor') borderColor:string;

  @HostListener('input', ['$event.target'])
  onInput():void {
    let random_num = Math.floor(Math.random() * this.colors.length);
    this.color = this.borderColor = this.colors[random_num];
  }

}
<input
  type="text"
  y9RainbowInput
[colors]="['#d14748', '#8047cf', '#42a5f5', '#d28445', '#d28445']">커스텀 구조 디렉티브
커스텀 구조 디렉티브
// ViewContainerRef, TemplateRef 클래스 로드
import { Directive, Input, ViewContainerRef, TemplateRef } from '@angular/core';

@Directive({
  selector: '[y9Unless]'
})
export class UnlessDirective {

  private hasView:boolean = false;

  constructor(
    private vc:ViewContainerRef,
    private templ:TemplateRef<any>
  ){}

  // selector 값과 이름이 동일
  @Input() set y9Unless(hidden:boolean) {
    if (hidden && !this.hasView) {
      this.vc.createEmbededView(this.templ);
      this.hasView = true;
    } else {
      this.vc.clear();
      this.hasView = false;
    }
  }

}
<div *y9Unless="false">
<p>unless는 '~이 아니면' 의미를 가집니다.</p>
<p>즉, unless는 if의 반대로 작동합니다.</p>
</div>CSS Grid 디렉티브
grid-container / grid-item
import { Directive, AfterViewInit, Input, HostBinding, ElementRef, Renderer2 } from '@angular/core';


/// Grid Container ------------------------------------------------------------------
@Directive({
  selector: 'grid-container'
})
export class GridDirective implements AfterViewInit {

  @Input() columns:string = null;
  @Input() rows:string    = null;
  @Input() areas:string   = null;

  @HostBinding('style.display')
  @Input() display:string = 'grid';

  @HostBinding('style.gap')
  @Input() gap:string = null;

  @HostBinding('style.justify-content')
  @Input('justify-content') justifyContent:string = null;

  @HostBinding('style.align-content')
  @Input('align-content') alignContent:string = null;

  @HostBinding('style.justify-items')
  @Input('justify-items') justifyItems:string = null;

  @HostBinding('style.align-items')
  @Input('align-items') alignItems:string = null;


  constructor(
    private readonly el:ElementRef,
    private readonly renderer:Renderer2
  ) {}

  ngAfterViewInit():void {
    console.log(this.rowGap);
    let render = this.renderer;
    let elem = this.el.nativeElement;
    render.setStyle(elem, 'grid-template-columns', this.columns);
    render.setStyle(elem, 'grid-template-rows', this.rows);
    render.setStyle(elem, 'grid-template-areas', this.areas);
  }

}


/// Grid Item ---------------------------------------------------------------------
@Directive({
  selector: 'grid-item'
})
export class GridAreaDirective {

  @HostBinding('style.grid-area')
  @Input('grid-area') area:string = null;

  @HostBinding('style.justify-self')
  @Input('justify-self') justify:string = null;

  @HostBinding('style.align-self')
  @Input('align-self') align:string = null;

  @HostBinding('style.order')
  @Input() order:string = null;

}
<grid-container
columns="repeat(3, 1fr)"
rows="repeat(3, 1fr)"
areas="
'header header header'
'sidebar1 center sidebar2'
'footer footer footer'
"
gap="10px"
justify-content="center"
>
<grid-item class="header" grid-area="header"> header </grid-item>
<grid-item grid-area="center"> center </grid-item>
<grid-item grid-area="footer"> footer </grid-item>
<grid-item grid-area="sidebar1"> sidebar1 </grid-item>
<grid-item grid-area="sidebar2"> sidebar2 </grid-item>
</grid-container>파이프
비동기 파이프
1. 콜백 결과 대기 후, 비동기 실행
2. 비동기적으로 템플릿 내부 변수에 데이터 바인딩
3. 스토어(Store) 결과 값을 변수에 비동기 할당
async 파이프는 어떨 때 사용할까?
비동기 통신: 프로미스
import { Component, OnInit } from '@angular/core';

@Component({...})
export class AsyncDemoComponent implements OnInit {

  public promiseData:string;

  ngOnInit():void {
    this
      .getPromise(1500)
      .then(data => this.promiseData = data);
  }

  getPromise(ms:number = 1000):Promise {
    return new Promise(resolve => {
      window.setTimeout(()=>resolve('프로미스 비동기 데이터 전송 완료'), ms);
    });
  }

}
<p>{{ promiseData }}</p>비동기 파이프
import { Component, OnInit } from '@angular/core';

@Component({...})
export class AsyncDemoComponent implements OnInit {

  public promise:Promise<string>;

  ngOnInit():void {
    this.promise = this.getPromise(1500);
  }

  getPromise(ms:number = 1000):Promise<string> {
    return new Promise(resolve => {
      window.setTimeout(()=>resolve('프로미스 비동기 데이터 전송 완료'), ms);
    });
  }

}
<p>{{ promise | async }}</p>RxJS 옵저버블
import { Component, OnDestroy } from '@angular/core';
import { Observable, Subscription, interval } from 'rxjs';
import { take, map } from 'rxjs/operators';

@Component({
  selector: 'async-demo',
  template: `
    <p>{{ observable_data }}</p>
  `
}) export class AsyncDemoComponent implements OnDestroy {
  observable_data:number;
  subscription:Subscription;
  constructor() {
    this.getSubscription();
  }
  getObservable():Observable<number> {
    return interval(1000).pipe(take(5)).pipe(map(v => v * v));
  }
  getSubscription() {
    this.subscription = this.getObservable().subscribe(v => this.observable_data = v);
  }
  ngOnDestroy() {
    if ( this.subscription ) {
      this.subscription.unsubscribe();
    }
  }

}
RxJS 옵저버블 | async 파이프
import { Component } from '@angular/core';
import { Observable, interval } from 'rxjs';
import { take, map } from 'rxjs/operators';

@Component({
  selector: 'async-demo',
  template: `
    <p>{{ observable | async }}</p>
  `
}) export class AsyncDemoComponent {
  observable:Observable<number>;
  constructor() {
    this.observable = this.getObservable();
  }
  getObservable():Observable<number> {
    return interval(1000).pipe(take(5)).pipe(map(v => v * v));
  }
}Async 파이프 + Observable에 대한 자세한 내용은 RxJS 파트에서 계속...
사용자 정의 파이프
커스텀 파이프 자동 생성 명령
ng generate pipe
# ng geterate pipe <파이프-이름>
$ ng g d reading-zero

CREATE src/app/reading-zero.pipe.ts (211 bytes)
UPDATE src/app/app.module.ts (718 bytes)
import { ReadingZeroPipe } from './reading-zero.pipe';
@NgModule({
declarations: [
// ...
ReadingZeroPipe,
],
// ...
})
export class AppModule {}
리딩 제로 파이프
// reading-zero.pipe.ts
import { Pipe, PipeTransform } from '@angular/core';

@Pipe({
  name: 'readingZero'
})
export class ReadingZeroPipe implements PipeTransform {
  transform(value:number):string {
    return value < 10 ? `0${value}` : String(value);
  }
}
<p>{{ 9 | readingZero }}</p> <!-- 09 -->텍스트 생략 파이프
// ellipsis.pipe.ts
import { Pipe, PipeTransform } from '@angular/core';

@Pipe({
  name: 'ellipsis'
})
export class EllipsisPipe implements PipeTransform {
  transform(value:string, limit:number = 300):string {
    if ( value.length > limit ) {
      return `${value.slice(0, limit+1)}...`;
    } else {
      return value;
    }
  }
}


// app.module.ts
import { EllipsisPipe } from './pipe/ellipsis.pipe';

@NgModule({
  declarations: [
    // ...
    EllipsisPipe
  ]
});
<p>
{{ '텍스트 생략 ...' | ellipsis: 80 }}
</p>대한민국 화폐(원) 파이프
// won.pipe.ts
import { Pipe, PipeTransform } from '@angular/core';
import { DecimalPipe } from '@angular/common';

@Pipe({
  name: 'won'
})
export class WonPipe implements PipeTransform {
  transform(value:number):string {
    let d = new DecimalPipe('en');
    return `${d.transform(value, '1.0-0')}원`;
  }
}


// app.module.ts
import { WonPipe } from './pipe/won.pipe';

@NgModule({
  declarations: [
    // ...
    WonPipe
  ]
});
<p>
{{10000 | won}} <!-- 10,000원 -->
</p>이미지 기본 URL 설정 파이프
// default-img-url.pipe.ts
import { Pipe, PipeTransform } from '@angular/core';

@Pipe({
  name: 'defaultImgUrl'
})
export class DefaultImgUrlPipe implements PipeTransform {
  transform(
    url:string,
    default_url:string='https://angular.io/assets/images/logos/angular/angular.svg',
    forceHttps:boolean = false
  ):string {
    let result_url:string = url ? url || default_url;
    if ( focueHttps && !result.includes('https://') ) {
     result_url = result_url.replace(/(http:\/\/|\/\/)/, 'https://');
    }
    return result_url;
  }
}


// app.module.ts
import { DefaultImgUrlPipe } from './pipe/default-img-url.pipe';

@NgModule({
  declarations: [
    // ...
    DefaultImgUrlPipe
  ]
});
<img
[src]="image_path | defaultImgUrl: '' : true"
alt="대체 텍스트">리엑티브 프로그래밍
리엑티브 프로그래밍 = 스트림 + 오퍼레이터
리엑티브 프로그래밍 = 스트림 + 오퍼레이터
Stream은 시간의 흐름에 따라 변경되는 연속된 값 입니다.
앵귤러 × 리엑티브 프로그래밍
DOM API를 사용해 문서 객체 이벤트 핸들링
import { Component, OnInit } from "@angular/core";

@Component({
  selector: 'rxjs-demo',
  template: `<button type="button">RxJS</button>`
}) export class RxJSDemoComponent implements OnInit {

  ngOnInit():void {
    let btn:HTMLButtonElement = document.querySelector('button');
    btn.addEventListener(e => console.log(e.target));
  }

}DOM API를 사용해 문서 객체 이벤트 핸들링
import { Component, OnInit } from "@angular/core";

@Component({
  selector: 'rxjs-demo',
  template: `<button type="button">RxJS</button>`
}) export class RxJSDemoComponent implements OnInit {

  ngOnInit():void {

    let count:number = 0;
    let late:number = 1000;
    let lastClick:number = Date.now() - late;
    let btn:HTMLButtonElement = document.querySelector('button');

    btn.addEventListener(e => {
      let now:number = Date.now();
      if ( now - lastClick > late ) {
        console.log(count++);
        lastClick = now;
      }
    });

  }

}DOM API를 사용해 문서 객체 이벤트 핸들링
import { Component, OnInit } from "@angular/core";
import { fromEvent } from 'rxjs';
import { throtleTime } from 'rxjs/operators';

@Component({
  selector: 'rxjs-demo',
  template: `<button type="button">RxJS</button>`
}) export class RxJSDemoComponent implements OnInit {

  ngOnInit():void {

    let count:number = 0;
    let late:number = 1000;
    let btn:HTMLButtonElement = document.querySelector('button');

    // RxJS 라이브러리 코드
    fromEvent(btn, 'click')       // 이벤트 데이터를 옵저버블로 변경
      .pipe(throttleTime(late))   // 파이프(트랜스폼) | late 밀리초 만큼 시간 제어(막음)
      .subscribe((e:Event) => {   // 옵저버블을 구독하는 옵저버의 next() 콜백 함수
        console.log(count++);
        console.log('버튼 클릭');
      });
  }

}옵저버블 × 옵저버
TV 방송국
TV
TV
TV
TV
TV
TV
next()
error()
complete()
subscribe()
옵저버블 객체 생성
가입자 설정 함수
구독 메서드
오퍼레이터
서브스크립션
RxJS 정리
next()
error()
complete()
subscribe()
unsubscribe()
옵저버블 | async 파이프 다시 보기
RxJS 옵저버블
import { Component, OnInit, OnDestroy } from '@angular/core';
import { Observable, Subscription, interval } from 'rxjs';
import { take, map } from 'rxjs/operators';

@Component({
  selector: 'async-demo',
  template: `<p>{{ observable_data }}</p>`
}) export class AsyncDemoComponent implements OnInit, OnDestroy {
  observable_data:number;    // 옵저버블이 처리하는 데이터 타입
  subscription:Subscription; // 구독 취소를 위한 속성
  ngOnInit():void { this.getSubscription(); }
  // 옵저버블 객체 생성 후 반환
  getObservable():Observable<number> {
    return interval(1000).pipe(take(5)).pipe(map(v => v * v));
  }
  // 구독 설정
  getSubscription() {
    this.subscription = this.getObservable().subscribe(v => this.observable_data = v);
  }
  // 컴포넌트 파괴 과정에서 구독 취소
  ngOnDestroy() {
    if ( this.subscription ) { this.subscription.unsubscribe(); }
  }

}
RxJS 옵저버블 | async 파이프
import { Component, OnInit } from '@angular/core';
import { Observable, interval } from 'rxjs';
import { take, map } from 'rxjs/operators';

@Component({
  selector: 'async-demo',
  template: `
    <!-- async 파이프를 사용하면 코드 양이 확연히 줄어듭니다. -->
    <p>{{ observable | async }}</p>
  `
})
export class AsyncDemoComponent implements OnInit {

  observable:Observable<number>; // 옵저버블 객체 참조 (타입 설정)

  ngOnInit():void {
    this.observable = interval(1000).pipe(take(5)).pipe(map(v => v * v));
  }

}RxJS를 Angular 프로그래밍에서 어떻게 사용할까요?
By yamoo9
Angular 학습을 위한 슬라이드.


