

yamoo9
Web Design/Develop - Instructor
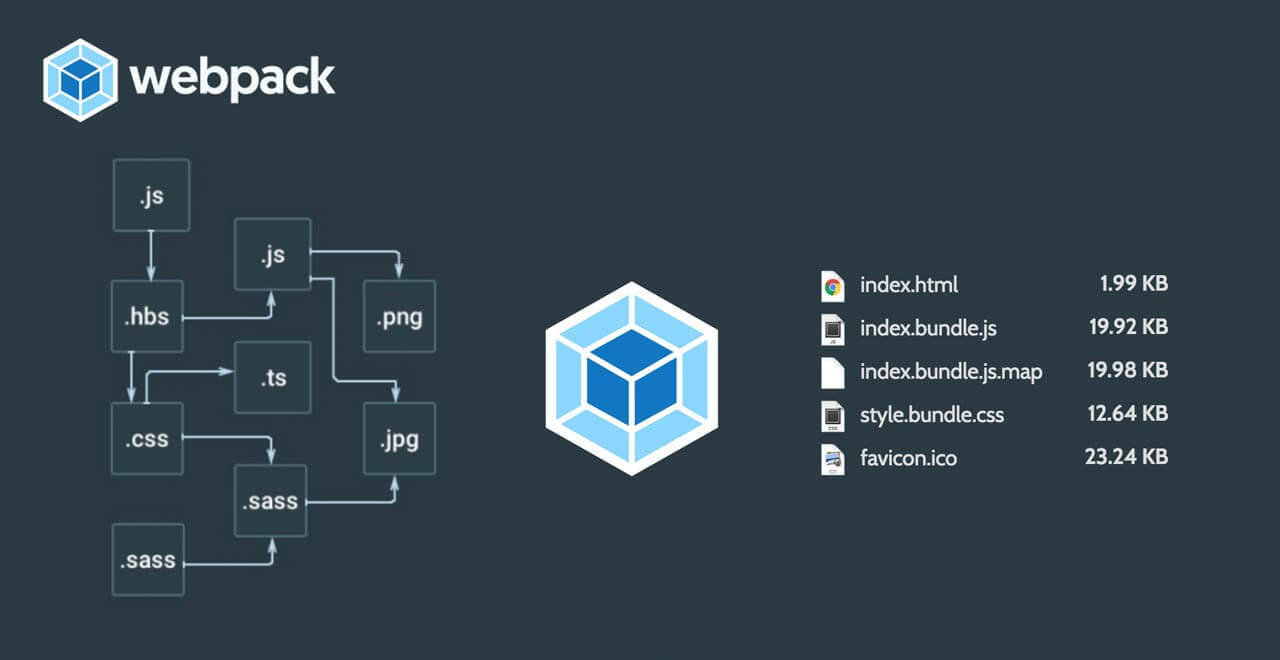
Webpack은 모듈 번들러 도구로 JavaScript 파일들을 브라우저에서 사용하기 위해 묶는 것이지만
모든 리소스 또는 에셋(Assets)을 변형, 번들링 또는 패키징 할 수 있습니다.
Webpack과 같은 도구를 사용하여 번들링 하는 이유는 웹이 오랜 시간 사용해왔던 HTTP/1.1의 비효율적인 요청 때문입니다.
2015년 2월 표준 승인된 HTTP/2 사용이 가능한 브라우저에서는
이러한 문제가 해결됩니다. HTTP/1.1과 달리 리소스를 한 번에 하나씩이 아니라, 동시 다발적으로 요청/응답할 수 있습니다. 다시 말해 리소스 요청 횟수가 많아지더라도 속도가 크게 느려지지 않습니다.
HTTP/1.1은 서버에 리소스를 하나씩 요청한 후, 응답을 받고 나서야
다른 리소스를 또 하나 요청합니다. 예를 들어 index.html 요청/응답이 끝난 후에야 style.css 요청/응답. 다음은 script.js 요청/응답 ...... 즉, 리소스 개수가 많아질 수록 사이트/애플리케이션 속도는 느려집니다.
하지만 IE에서는 HTTP/2를 지원하지 않으므로 IE를 사용하지 않는
환경이 아니라면 서버에 요청하는 리소스 횟수를 줄여야 합니다.
참고로 IE11은 HTTP/2를 지원하지만... Windows10에 한정됩니다.
Webpack을 사용하면 리소스 개수를 현저하게 줄일 수 있어 서버에 요청 횟수를 줄일 수 있어 속도를 향상시킬 수 있습니다.
ES 모듈 , CommonJS 혹은 AMD 모듈을 번들로 제공합니다.
런타임 시, 비동기(Async) 적으로 불러들이는 단일 번들(Bundle, 묶음) 또는
여러 청크(Chunk, 덩어리)를 생성하여 초기 로드 시간을 줄여줍니다.
컴파일 시, 종속성(Dependancy) 문제를 해결하여 런타임 크기 줄입니다.
다양한 로더 (Loader)를 지원하며, 컴파일하는 동안 파일을 전처리 할 수 있습니다.
(예: Babel/TypeScript, Sass/LESS, Pug 등)
모듈 (Module, 독립성이 보장된 재사용 가능한 코드 묶음) 단위 플러그인 시스템을 지원합니다.
HMR (Hot Module Replacement) 지원하여 코드 수정 시 자동 번들링 및 페이지 업데이트를 수행할 수 있습니다.
CSS, Images, Fonts 리소스 또한 모듈 단위로 묶어 배포 가능합니다.
  # 프로젝트 디렉토리 생성 및 생성된 디렉토리로 이동
  # mkdir = make directory
  # cd    = change directory
  $ mkdir <project_directory> && cd <project_directory>


  # 프로젝트 초기화
  # package.json 파일 생성
$ npm init -yWebpack 실습을 위한 프로젝트 디렉토리를 생성하고, 생성된 디렉토리로 이동해 봅시다.
프로젝트를 초기화하여 package.json 파일을 생성한 후, webpack 개발 모듈을 로컬 설치합니다.
  # 지역 설치
  # 대부분 프로젝트에서 로컬로 설치하는 것이 좋습니다.
  # 변경 내용을 도입 할 때 프로젝트를 개별적으로 쉽게 업그레이드 할 수 있기 때문이죠.
  # webpack의 로컬 설치를 실행하기 위해서는 bin버전에 액세스해야 합니다.
  # node_modules/.bin/webpack

  $ npm install --save-dev webpack            # npm i -D webpack
  $ npm install --save-dev webpack@<version>  # npm i -D webpack@3.6.0


  # 전역 설치
  # 이 방법은 권장되지 않습니다.
  # 전역으로 설치하면 특정 버전만 사용 가능하기 때문입니다.

  $ npm install --global webpack  # npm i -g webpack


  # 설치 가능한 버전 확인

$ npm show webpack@3.* versionWebpack을 설치하기 위해서는 사전에 Node.js가 필요합니다.
설치 방법은 전역 또는 지역 설치가 가능합니다. 아래 코드를 참고하여 설치해 봅니다.
    <project_directory>
    |- package.json
  + |- index.html
  + |- /src
+ |- main.js간단한 DOM 스크립트를 처리하는 코드를 src/main.js 에 작성해 봅니다.
해당 코드는 Lodash 라이브러리에 의존합니다.
  // src/main.js
  ((global = window, document = window.document, _ = window._) => {

    const heading_message = ['Hello', 'Webpack', ':)'];

    function component() {
      let el = document.createElement('h1');
      // Lodash 라이브러리 join() 메서드 사용
      el.innerHTML = _.join(heading_message, ' ');
      return el;
    }

    document.body.appendChild( component() );

  }());
    <project_directory>
    |- package.json
  + |- index.html
  + |- /src
+ |- main.js웹 브라우저에서 해석되어 처리될 index.html 마크업을 작성합니다.
Lodash 라이브러리(CDN)를 head 요소 내부에서 호출하고, src/main.js 파일을 body 요소 끝 부분에서 호출해 봅니다.
  <!DOCTYPE html>
  <html lang="ko-KR">
  <head>
    <meta charset="UTF-8">
    <meta name="viewport" content="width=device-width, initial-scale=1.0">
    <meta http-equiv="X-UA-Compatible" content="ie=edge">
    <title>Webpack 프로젝트 설정</title>
    <script src="https://unpkg.com/lodash"></script>
  </head>
  <body>

    <script src="./src/main.js"></script>
  </body>
</html>지금까지 사용한 방법은 일반적인 프론트엔드 환경에서 JavaScript를 프로젝트에 사용한 예시입니다.
이와 같은 방법을 사용할 경우 문제가 발생할 수 있습니다.
✔︎ 스크립트가 외부 라이브러리에 의존한다는 점이 명시적이지 않습니다.
✔︎ 종속된 개발 모듈이 호출되지 않았거나 호출되는 순서가 잘못된 경우, 애플리케이션이 올바르게 작동하지 않습니다.
✔︎ 종속된 개발 모듈이 호출 되었지만 애플리케이션에서 사용 되지 않아도, 웹 브라우저는 불필요한 파일을 무조건 다운로드 하게 됩니다.
  <project_directory>
  |- package.json
  + |- /dist
  +   |- index.html
  - |- index.html
  |- /src
|- main.js앞서 거론 했던 문제를 해결하기 위해 Webpack을 사용하여 프로젝트를 관리하는 방법을 학습해 봅시다.
index.html을 dist/ 디렉토리를 생성한 후 내부로 이동 시킵니다. 이어서 Lodash 개발 모듈을 로컬 설치한 후, src/main.js 파일을 수정합니다.
  # Lodash 모듈을 설치합니다.
  npm i -S lodash
  import _ from 'lodash';

  const heading_message = ['Hello', 'Webpack', ':)'];

  function component() {
    let el = document.createElement('h1');
    el.innerHTML = _.join(heading_message, ' ');
    return el;
  }

  document.body.appendChild( component() );
  <project_directory>
  |- package.json
  + |- /dist
  +   |- index.html
  - |- index.html
  |- /src
|- main.jsdist/index.html 에서 기존의 JavaScript 파일 호출 코드를 모두 제거한 후,
bundle.js 파일을 호출하는 코드를 추가합니다.
  <!DOCTYPE html>
  <html lang="ko-KR">
  <head>
    <meta charset="UTF-8">
    <meta name="viewport" content="width=device-width, initial-scale=1.0">
    <meta http-equiv="X-UA-Compatible" content="ie=edge">
    <title>Webpack 프로젝트 설정</title>
  </head>
  <body>

    <!-- bundle.js 호출 코드로 변경합니다. -->
    <script src="./bundle.js"></script>
  </body>
  </html>
  # Webpack 모듈 명령을 사용하여 src/index.js 파일을 dist/bundle.js로 번들링 하여 출력합니다.
  # webpack의 로컬 설치를 실행하기 위해서는 bin버전에 액세스해야 합니다.
  # node_modules/.bin/webpack

  # webpack <엔트리(입력)_파일> <아웃풋(출력)_파일>

  $ ./node_modules/.bin/webpack src/main.js dist/bundle.js

  # npx 개발 모듈 설치 시
  # $ npm i -g npx
  $ npx webpack src/main.js dist/bundle.js
Webpack CLI 명령을 사용하여 src/index.js 파일을 dist/bundle.js 파일로 번들링하여 생성 출력해 봅니다.
  webpack 3.6.0
  Usage: https://webpack.js.org/api/cli/
  Usage without config file: webpack <entry> [<entry>] <output>
  Usage with config file: webpack

  Config options:
    --config       Path to the config file
                              [문자열] [기본: webpack.config.js or webpackfile.js]
    --config-name  Name of the config to use                              [문자열]
    --env          Environment passed to the config, when it is a function

  Basic options:
    --context    The root directory for resolving entry point and stats
                                            [문자열] [기본: The current directory]
    --entry      The entry point                                          [문자열]
    --watch, -w  Watch the filesystem for changes                           [여부]
    --debug      Switch loaders to debug mode                               [여부]
    --devtool    Enable devtool for better debugging experience (Example:
                --devtool eval-cheap-module-source-map)                  [문자열]
    -d           shortcut for --debug --devtool eval-cheap-module-source-map
                --output-pathinfo                                          [여부]
    -p           shortcut for --optimize-minimize --define
                process.env.NODE_ENV="production"                          [여부]
    --progress   Print compilation progress in percentage                   [여부]

  Module options:
    --module-bind       Bind an extension to a loader                     [문자열]
    --module-bind-post                                                    [문자열]
    --module-bind-pre                                                     [문자열]

  Output options:
    --output-path                 The output path for compilation assets
                                            [문자열] [기본: The current directory]
    --output-filename             The output filename of the bundle
                                                        [문자열] [기본: [name].js]
    --output-chunk-filename       The output filename for additional chunks
            [문자열] [기본: filename with [id] instead of [name] or [id] prefixed]
    --output-source-map-filename  The output filename for the SourceMap   [문자열]
    --output-public-path          The public path for the assets          [문자열]
    --output-jsonp-function       The name of the jsonp function used for chunk
                                  loading                                 [문자열]
    --output-pathinfo             Include a comment with the request for every
                                  dependency (require, import, etc.)        [여부]
    --output-library              Expose the exports of the entry point as library
                                                                          [문자열]
    --output-library-target       The type for exposing the exports of the entry
                                  point as library                        [문자열]

  Advanced options:
    --records-input-path       Path to the records file (reading)         [문자열]
    --records-output-path      Path to the records file (writing)         [문자열]
    --records-path             Path to the records file                   [문자열]
    --define                   Define any free var in the bundle          [문자열]
    --target                   The targeted execution environment         [문자열]
    --cache                    Enable in memory caching
                              [여부] [기본: It's enabled by default when watching]
    --watch-stdin, --stdin     Exit the process when stdin is closed        [여부]
    --watch-aggregate-timeout  Timeout for gathering changes while watching
    --watch-poll               The polling interval for watching (also enable
                              polling)                                   [문자열]
    --hot                      Enables Hot Module Replacement               [여부]
    --prefetch                 Prefetch this request (Example: --prefetch
                              ./file.js)                                 [문자열]
    --provide                  Provide these modules as free vars in all modules
                              (Example: --provide jQuery=jquery)         [문자열]
    --labeled-modules          Enables labeled modules                      [여부]
    --plugin                   Load this plugin                           [문자열]
    --bail                     Abort the compilation on first error
                                                              [여부] [기본: null]
    --profile                  Profile the compilation and include information in
                              stats                           [여부] [기본: null]

  Resolving options:
    --resolve-alias         Setup a module alias for resolving (Example:
                            jquery-plugin=jquery.plugin)                  [문자열]
    --resolve-extensions    Setup extensions that should be used to resolve
                            modules (Example: --resolve-extensions .es6,.js)[배열]
    --resolve-loader-alias  Setup a loader alias for resolving            [문자열]

  Optimizing options:
    --optimize-max-chunks      Try to keep the chunk count below a limit
    --optimize-min-chunk-size  Try to keep the chunk size above a limit
    --optimize-minimize        Minimize javascript and switches loaders to
                              minimizing                                   [여부]

  Stats options:
    --color, --colors               Enables/Disables colors on the console
                                                  [여부] [기본: (supports-color)]
    --sort-modules-by               Sorts the modules list by property in module
                                                                          [문자열]
    --sort-chunks-by                Sorts the chunks list by property in chunk
                                                                          [문자열]
    --sort-assets-by                Sorts the assets list by property in asset
                                                                          [문자열]
    --hide-modules                  Hides info about modules                [여부]
    --display-exclude               Exclude modules in the output         [문자열]
    --display-modules               Display even excluded modules in the output
                                                                            [여부]
    --display-max-modules           Sets the maximum number of visible modules in
                                    output                                  [숫자]
    --display-chunks                Display chunks in the output            [여부]
    --display-entrypoints           Display entry points in the output      [여부]
    --display-origins               Display origins of chunks in the output [여부]
    --display-cached                Display also cached modules in the output
                                                                            [여부]
    --display-cached-assets         Display also cached assets in the output[여부]
    --display-reasons               Display reasons about module inclusion in the
                                    output                                  [여부]
    --display-depth                 Display distance from entry point for each
                                    module                                  [여부]
    --display-used-exports          Display information about used exports in
                                    modules (Tree Shaking)                  [여부]
    --display-provided-exports      Display information about exports provided
                                    from modules                            [여부]
    --display-optimization-bailout  Display information about why optimization
                                    bailed out for modules                  [여부]
    --display-error-details         Display details about errors            [여부]
    --display                       Select display preset (verbose, detailed,
                                    normal, minimal, errors-only, none)   [문자열]
    --verbose                       Show more details                       [여부]

  옵션:
    --help, -h     도움말을 보여줍니다                                      [여부]
    --version, -v  버전 넘버를 보여줍니다                                   [여부]
    --json, -j     Prints the result as JSON.                               [여부]
Webpack CLI 도움말을 확인해 봅니다.
$ webpack --help, -h
  # webpack <엔트리(입력)_파일> <아웃풋(출력)_파일>
  # webpack 명령어 옵션: -p, --optimize-minimize

$ npx webpack src/main.js dist/bundle.js -p번들링 후, 코드를 압축하여 생성 출력하는 옵션 플래그(Option Flag)를 사용해 봅시다.
  # webpack <엔트리(입력)_파일> <아웃풋(출력)_파일>
  # webpack 명령어 옵션: -d, --debug --devtool sourcemap --output-pathinfo

$ npx webpack src/main.js dist/bundle.js -d번들링 한 파일의 코드를 내비게이션 할 수 있도록 소스맵 파일을 생성하는 옵션 플래그(Option Flag)를 사용해 봅시다.
  # webpack <엔트리(입력)_파일> <아웃풋(출력)_파일>
  # webpack 명령어 옵션: -w, --watch

$ npx webpack src/main.js dist/bundle.js -wsrc/main.js 파일을 저장할 때 마다, 이를 관찰하여 자동으로 Webpack 명령을 실행하는 옵션 플래그(Option Flag)를 사용해 봅시다.
  {

    "scripts": {
      "bundle": "webpack src/main.js dist/bundle.js",
      "map": "npm run bundle -- -d",
      "watch": "npm run bundle -- -w",
      "watch:map": "npm run bundle -- -wd",
      "build": "npm run bundle -- -p"
    }

}지금까지 다뤄 본 Webpack CLI를 pakcage.json 파일에 scripts 로 등록해 봅시다.
  # Babel을 사용하기 위한 개발 모듈
  # babel-core
  # babel-loader
  # babel-preset-env

$ npm i -D babel-core babel-loader babel-preset-envECMASCript 2015(이하 ES6)를 지원하지 않는 클라이언트 환경에서 ES6를 사용하려면, Babel 트랜스파일러를 사용하여 변환해야 합니다.
Babel을 프로젝트에 사용하기 위해 필요한 개발 모듈을 로컬 설치해 봅시다.
  {

    "scripts": {
      "bundle": "webpack src/main.js dist/bundle.js --module-bind 'js=babel-loader'",
      "map": "npm run bundle -- -d",
      "watch": "npm run bundle -- -w",
      "watch:map": "npm run bundle -- -wd",
      "build": "npm run bundle -- -p"
    },

    "babel": {
      "presets": ["env", {
        "targets": {
          "browsers": ["last 2 versions", "safari >= 7", "ie >= 8"]
        }
      }]
    }

}package.json 파일 bundle 스크립트에 Webpack 옵션 --module-bind 를 사용하여 'js=babel-loader'를 설정합니다.
이어서 .babelrc 파일에 작성하는 코드와 동일한 코드를 "babel"에 추가합니다. (참고: https://goo.gl/RD15AU)
  # CSS 번들링을 위한 개발 모듈
  # style-loader
  # css-loader

npm i -D style-loader css-loader웹팩을 사용해 CSS 번들링을 수행하고자 한다면 style-loader, css-loader를 설치/설정 사용합니다.
  {

    "scripts": {
      "bundle": "webpack src/main.js dist/bundle.js
                  --module-bind 'css=style-loader!css-loader'
                  --module-bind 'js=babel-loader'
                ",
      "map": "npm run bundle -- -d",
      "watch": "npm run bundle -- -w",
      "watch:map": "npm run bundle -- -wd",
      "build": "npm run bundle -- -p"
    },

}package.json 파일 bundle 스크립트에 Webpack 옵션 --module-bind 를 사용하여 'css=style-loader!css-loader'를 설정합니다.
설정을 마친 후에는 src/main.js 파일에 import 구문을 사용하여 CSS 파일을 호출합니다. (번들링 수행)
  // src/main.js
  import './css/main.css';
    <project_directory>
    |- package.json
  + |- webpack.config.js
    |- /node-modules
    |- /dist
    |- /src
대부분의 프로젝트는 좀 더 복잡한 설정이 필요합니다 . 설정 파일이 필요한 이유죠.
이것은 터미널에 많은 명령을 입력해야하는 것보다 훨씬 효율 적이므로 CLI 옵션을 대체 할 설정 파일을 만들어 봅시다.
  // ——————————————————————————————————————
  // 의존성 개발 모듈 로드
  // ——————————————————————————————————————
  const path = require('path');

  // ——————————————————————————————————————
  // Webpack 환경설정
  // ——————————————————————————————————————
  module.exports = {

    // 입력 설정
    entry: './src/main.js',

    // 출력 설정
    output: {
      path: path.resolve(__dirname, './dist'),
      filename: 'bundle.js'
    }

  };
  {
    "scripts": {
      "webpack": "webpack --config webpack.config.js"
    },
}package.json 파일에 환경설정(Configuration) 파일을 사용하여 Webpack을 실행하는 스크립트 구문을 추가합니다.
참고: https://goo.gl/1gyx3C
  # NPM 스크립트 명령 실행
  $ npm run webpack
    <project_directory>
    |- package.json
    |- webpack.config.js
    |- /node-modules
    |- /dist
    |- /src
ES6를 ES5로 변환하기 위한 babel-loader 설정을 webpack.config.js 파일에 추가해 봅니다.
이어서 실험적인 Babel 프리셋 Stage에 대해 알아본 후, 설치/설정 해봅시다.
  module.exports = {

    // 로더 설정
    module: {
      // 규칙 설정
      rules: [
        // Babel
        {
          test: /\.js$/,
          exclude: /node_modules/,
          use: {
            loader: 'babel-loader',
            options: {
              // https://goo.gl/KHtTU1
              cacheDirectory: true,
              presets: ['env']
            }
          }
        }
      ]
    }

  };
$ npm i -D babel-preset-stage-0
  module.exports = {

    // 로더 설정
    module: {
      // 규칙 설정
      rules: [
        // Babel
        {
          test: /\.js$/,
          exclude: /node_modules/,
          use: {
            loader: 'babel-loader',
            options: {
              // https://goo.gl/KHtTU1
              cacheDirectory: true,
              presets: ['env', 'stage-0']
            }
          }
        }
      ]
    }

  };
    <project_directory>
    |- package.json
    |- webpack.config.js
    |- /node-modules
    |- /dist
    |- /src
Babel 플러그인을 추가하고자 할 경우 options 항목에 plugins 배열을 추가한 후, 설정합니다.
  module.exports = {

    module: {
      rules: [
        {
          test: /\.js$/,
          exclude: /node_modules/,
          use: {
            loader: 'babel-loader',
            options: {
              cacheDirectory: true,
              presets: ['env'],
              plugins: [ require('babel-plugin-transform-object-rest-spread') ]
            }
          }
        }
      ]
    }

  };
$ npm i -D babel-plugin-transform-object-rest-spread
    <project_directory>
    |- package.json
    |- webpack.config.js
    |- /node-modules
    |- /dist
    |- /src
  module.exports = {

    // 로더 설정
    module: {

      // 규칙 설정
      rules: [

        // CSS
        {
          test: /\.css$/,
          use: ['style-loader', 'css-loader']
        }

      ]

    }

  };
CSS 번들링을 위한 css-loader 설정을 webpack.config.js 파일에 추가해 봅니다.
    <project_directory>
    |- package.json
    |- webpack.config.js
    |- /node-modules
    |- /dist
    |- /src
  // CSS
  {
    test: /\.css$/,
    // 로더 마다 개별 설정
    use: [
      {
        loader: 'style-loader'
      },
      {
        loader: 'css-loader',
        options: {
          sourceMap: true
        }
      }
    ]
  }
로더 마다 개별 설정이 필요한 경우, use 설정 배열 내부에 로더 마다 객체를 통해 설정합니다.
아래 코드를 참고하여 설정을 작성해 봅니다.
이미지 및 폰트 파일을 번들 과정에서 base64로 인코딩된 URL로 변경합니다. | 필요한 객체를 파일로 내보내고 공개 URL을 반환하도록 webpack에 지시합니다.
  module.exports = {

    module: {
      rules: [
        // 이미지 파일
        {
          test: /\.(jpe?g|png|gif|svg)$/i,
          use: [
            {
              loader: 'url-loader',
              options: {
                name: [name].[hash].[ext], // 출력 이름
                limit: 10000, // 단위 바이트(Byte)
                fallback: 'file-loader' // 기본 값
              }
            },
          ]
        }
      ]
    }

  };
$ npm i -D url-loader file-loader
  module.exports = {

    module: {
      rules: [
        // 폰트 파일
        {
          test: /\.(woff2?|eot|ttf|otf)(\?.*)?$/,
          use: 'file-loader',
        }
      ]
    }

};이미지 파일을 압축합니다.
  module.exports = {
    module: {
      rules: [
        {
          test: /\.(jpe?g|png|gif|svg)$/i,
          use: [
            {
              loader: 'url-loader',
              options: {
                name: [name].[hash].[ext],
                limit: 10000,
              }
            },
            {
              loader: 'img-loader',
              options: { enabled: true }
            }
          ]
        }
      ]
    }
  };
$ npm i -D img-loader
  // webpack.config.js
  module.exports = {

    // 리졸브(결정) 설정
    // https://goo.gl/NnR9ME
    resolve: {
      // 모듈을 해석 할 때 검색해야 할 디렉토리 설정
      // 배열 값의 인덱스가 작을 수록 우선권이 높음
      // 기본 값: ['node_modules']
      modules: [path.reslove(__dirname, './src'), 'node_modules'],
      // 생략 가능한 확장자 설정
      // 기본 값: ['.js', '.json']
      extensions: ['.js', '.json', '.es6', '.ts', '.css'],
      // 모듈을 쉽게 불러오기 위한 별칭 설정
      alias: {
        '@': path.resolve(__dirname, 'src/js/'),
        '@css': path.resolve(__dirname, 'src/css/'),
      }
    }

  }
이 옵션은 모듈이 어떻게 해석되는지를 변경합니다.
Webpack은 적절한 기본값을 제공하지만, 기본 값을 사용자 설정에 따라 변경할 수 있습니다.
    <project_directory>
    |- package.json
    |- webpack.config.js
    |- /node-modules
    |- /dist
    |- /src
  module.exports = {

    // 소스맵 설정
    // https://webpack.js.org/configuration/devtool/
    devtool: 'cheap-module-eval-source-map',

    // 관찰 모드
    // https://webpack.js.org/configuration/watch/
    watch: true

  };
변경된 파일이 저장될 때 마다 파일을 관찰하여 webpack 명령을 재 실행하기 위한 옵션과,
다수의 코드를 번들링하되 효율적으로 관리하기 위한 소스맵 설정을 추가합니다.
  {
    "scripts": {
      "start": "npm run webpack",
      "webpack": "webpack --config webpack.config.js",
      "webpack:watch": "npm run webpack -- -w"
    },
}package.json 파일에 환경설정(Configuration) 파일을 사용하여 Webpack을 실행하는 스크립트 구문을 추가합니다.
webpack:watch 스크립트는 watch 옵션을 외부에서 명령에 따라 실행할 수 있도록 설정할 수 있습니다.
과거에는 번들링 할 때 webpack의 트레이드 오프 중 하나는 번들의 각 모듈이 개별 함수 클로저로 래핑 된다는 것이었습니다.
하지만 개별 래퍼 함수를 사용하면 브라우저에서 실행되는 속도가 느려집니다. 이에 반해 Rollup과 같은 도구는 모든 모듈의 범위를
하나의 개별 함수 클로저로 래핑하기에 브라우저에서 실행되는 속도가 빠릅니다. 이 플러그인은 webpack에서 동일한 연결 동작을 활성화합니다.
  // ——————————————————————————————————————
  // 모듈 로드
  // ——————————————————————————————————————

  // 웹팩
  const webpack = require('webpack');

  // 웹팩 플러그인
  // 모듈 결합: https://goo.gl/Qd5zzw
  const ModuleConcat = webpack.optimize.ModuleConcatenationPlugin;


  // ——————————————————————————————————————
  // Webpack 환경설정
  // ——————————————————————————————————————
  module.exports = {

    // 플러그인 설정
    plugins: [
      new ModuleConcat()
    ]

};번들된 텍스트(예 CSS 코드)를 별도의 파일로 추출합니다.
  // 모듈 텍스트 출력: https://goo.gl/gWLzmL
  const ExtractText = require('extract-text-webpack-plugin');

  module.exports = {
    module: {
      rules: [
        {
          test: /\.css$/,
          // ExtractTextWebpackPlugin 플러그인 extract() 설정
          use: ExtractText.extract({
            fallback: 'style-loader',
            use: [{ loader: 'css-loader', options: { sourceMap: true } }]
          }),
        }
      ]
    },
    plugins: [
      // ExtractTextWebpackPlugin 플러그인 설정
      new ExtractText('bundle.css'),
    ]

  };
$ npm i -D extract-text-webpack-plugin이 플러그인은 UglifyJS v3 (uglify-es) 을 사용 하여 자바 스크립트를 축소합니다.
  // JavaScript 파일 압축: https://goo.gl/ZVM2Gj
  const UglifyJS = require('uglifyjs-webpack-plugin');

  module.exports = {
    module: { ... },
    plugins: [
      // UglifyJS 웹팩 플러그인 설정
      new UglifyJS(),
    ]
  };
$ npm i -D uglifyjs-webpack-plugin
  // JavaScript 파일 압축: https://goo.gl/ZVM2Gj
  const UglifyJS = require('uglifyjs-webpack-plugin');

  module.exports = {
    module: { ... },
    plugins: [
      // 옵션 설정
      new UglifyJS({
        cache: true,
        sourceMap: true,
        uglifyOptions: {
          ie8: false,
          ecma: 8,
          output: {
            comments: false,
            beautify: false,
          },
          warnings: false,
        }
      }),
    ]
};이 플러그인은 UglifyJS v3 (uglify-es) 을 사용 하여 자바 스크립트를 축소합니다.
  {
    "scripts": {
      "dev": "webpack",
      "build": "BUILD=true webpack",
      "clear": "rm -rf dist"
    }
  }
  // BUILD 환경설정 변수
  let BUILD = process.env.BUILD || false;

  // 웹팩 환경설정 객체
  let config = { ... };

  // 빌드 환경일 경우, 조건 처리
  if (BUILD) {
    config.plugins.push(new new UglifyJS({
      // ...
    }));
  }

  // 배포
module.exports = config;환경설정 변수를 손쉽게 등록해주는 플러그인 입니다.
  const webpack = require('webpack');

  // 웹팩 플러그인
  // 환경설정 변수 등록: https://goo.gl/hLcUNY
  const Env = webpack.EnvironmentPlugin;

  module.exports = {
    // 플러그인 설정
    plugins: [
      new Env({
        // 기본 값 설정
        DEV: 'dev'
      })
    ]
  };
  const webpack = require('webpack');

  // 환경설정 변수 설정
  let DEV = process.env.DEV ||'dev';
  // `entry` 파일
  // src/main.js

  // 환경 변수 DEV 값이 true일 경우 처리
  if ( process.env.DEV === 'dev' ) {
    // ...
  }


  // 빌드 환경에서는 해당 변수가 설정 값으로 변경
  // DEV=build npm run build
  // ※ 브라우저 환경에서는 process.env에 접근 X
  if ( 'build' === 'dev' ) {
    // ...
}웹팩은 다양한 플러그인을 제공합니다. 용도에 따라 필요한 플러그인을 조합하여 프로젝트에 구성할 수 있습니다.
  # webpack-dev-server 개발 모듈 로컬 설치
  # npm install --save-dev webpack-dev-server
npm i -D webpack-dev-serverwebpack 설정을 통해 파일 변경 저장 시, 번들링은 수행되어 편리하지만, 파일 변경이 발생할 때 마다 웹 브라우저를 매번 새로고침 해야 하기에 번거롭습니다.
webpack-dev-server는 간단한 웹 서버(Node.js + Express.js 를 기반으로 작동하는 개발용 서버)로 설치하면 파일 변경 시마다 매번 새로고침 하지 않아도 되어 편리 합니다.
    <project_directory>
    |- package.json
    |- webpack.config.js
    |- /node-modules
    |- /dist
    |- /src
  let dist = path.resolve(__dirname, './dist');

  module.exports = {

    // webpack-dev-server 설정
    // https://webpack.js.org/configuration/dev-server/
    devServer: {
      contentBase: dist, // 콘텐츠 제공 서버 설정
      port: 9000,        // 요청을 수신 대기 할 포트 번호 설정
      compress: true,    // gzip 압축 사용 설정
      https: true,       // https 사용 설정
      inline: true,      // 인라인 모드 사용 설정
      hot: true,         // HMR(핫 모듈 리플레이스먼트) 모드 사용 설정
      open: true,        // 기본 브라우저 자동 열림 설정
      overlay: true,     // 경고,오류 발생 시 브라우저 전체화면 표시 설정
    },

  };
변경된 파일이 저장될 때 마다 파일을 관찰하여 webpack 명령을 재 실행하기 위한 옵션과,
다수의 코드를 번들링하되 효율적으로 관리하기 위한 소스맵 설정을 추가합니다.
    <project_directory>
    |- package.json
    |- webpack.config.js
    |- /node-modules
    |- /dist
    |- /src
  const webpack = require('webpack');

  module.exports = {

    // webpack-dev-server 설정
    devServer: {
      hot: true,
    },

    // 플러그인 설정
    plugins: [
      new webpack.HotModuleReplacementPlugin()
    ],

  };
핫 모듈 교체(HMR)는 webpack이 제공하는 가장 유용한 기능 중 하나 입니다.
완전히 새로 고침 할 필요없이 런타임에 모든 종류의 모듈을 업데이트 할 수 있습니다.
  {
    "scripts": {
      "start": "webpack-dev-server",
      "webpack": "webpack --config webpack.config.js",
      "webpack:watch": "npm run webpack -- -w --progress"
    },
}package.json 파일에 환경설정(Configuration) 파일을 사용하여 webpack-dev-server를 실행하는 스크립트 구문을 추가합니다.
start 스크립트는 npm start 명령으로 실행할 수 있습니다.
Sass는 CSS 프리프로세서(Pre-Processor)로 CSS의 비효율적인 부분을 커버 하는 스타일 스크립트입니다.
  # SASS 번들링을 위한 개발 모듈
  # node-sass
  # sass-loader

npm i -D node-sass sass-loaderSass 프리프로세서(전처리기)를 사용하고자 한다면, 다음의 개발 모듈을 설치해야 합니다.
필요한 개발 모듈을 로컬 설치해 봅시다.
    <project_directory>
    |- package.json
    |- webpack.config.js
    |- /node-modules
    |- /dist
    |- /src
  // SASS
  {
    test: /\.s(c|a)ss$/,
    use: [
      {
        loader: 'style-loader'
      },
      {
        loader: 'css-loader',
        options: {
          sourceMap: true
        }
      },
      {
        loader: 'sass-loader',
        options: {
          sourceMap: true
        }
      }
    ]
  }
webpack.config.js 파일에 sass-loader 설정을 추가합니다.
scss, sass 파일의 경우, sass-loader를 사용하도록 설정합니다.
PostCSS는 JS 플러그인을 사용하는 CSS 컴파일러입니다.
미래의 CSS 문법을 오늘 날 바로 사용할 수 있도록 만들어 줍니다.
  # PostCSS 개발 모듈 설치
npm i -D postcss-loaderPostCSS 컴파일러를 사용하고자 한다면, 다음의 개발 모듈을 설치해야 합니다.
필요한 개발 모듈을 로컬 설치해 봅시다.
Webpack의 기본 사용법을 넘어 보다 전문적으로 사용하고자 한다면 가이드를 살펴보고 실습해보는 것이 좋습니다.
By yamoo9
Webpack 학습을 위한 슬라이드.


