Web 0x1
點開你的網頁技能樹
講者:YuKAi

Outline
- 認識網頁組成
- HTML
- CSS
- Git & GitHub
環境設定


Live Server 另一種安裝方式
從 VS Code 插件安裝
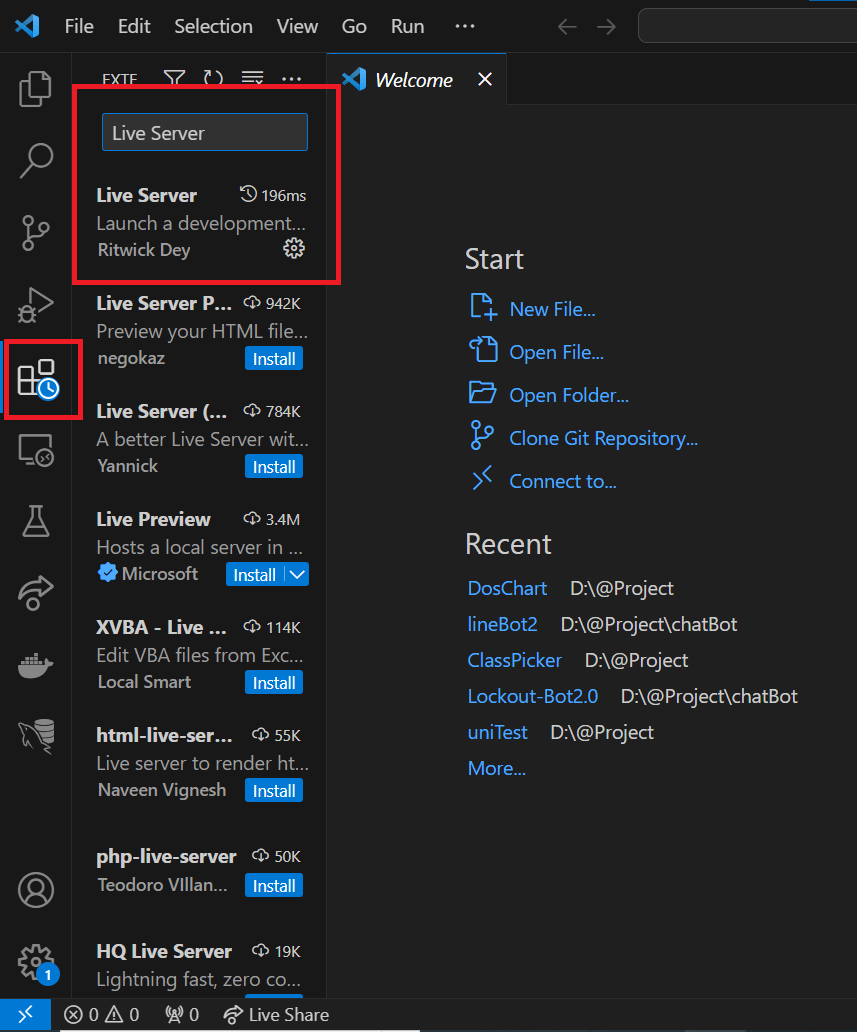
於 VS Code 擴充元件搜尋 Live Server

將 Live Server 設為 Enabled
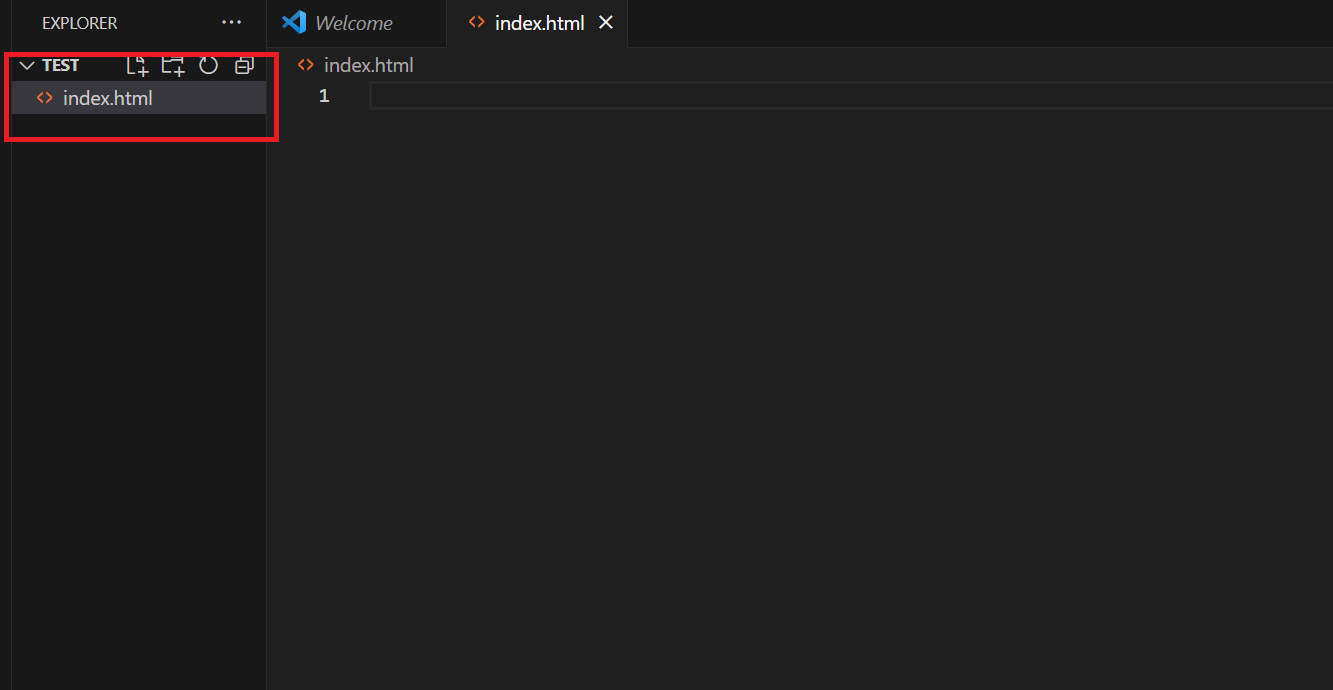
開啟資料夾並創建 index.html 檔案

可以點擊右下角的 Go Live 來查看網頁畫面
接下來每修改完程式記得要 Ctrl + S 存檔,瀏覽器才會自動幫你重新整理


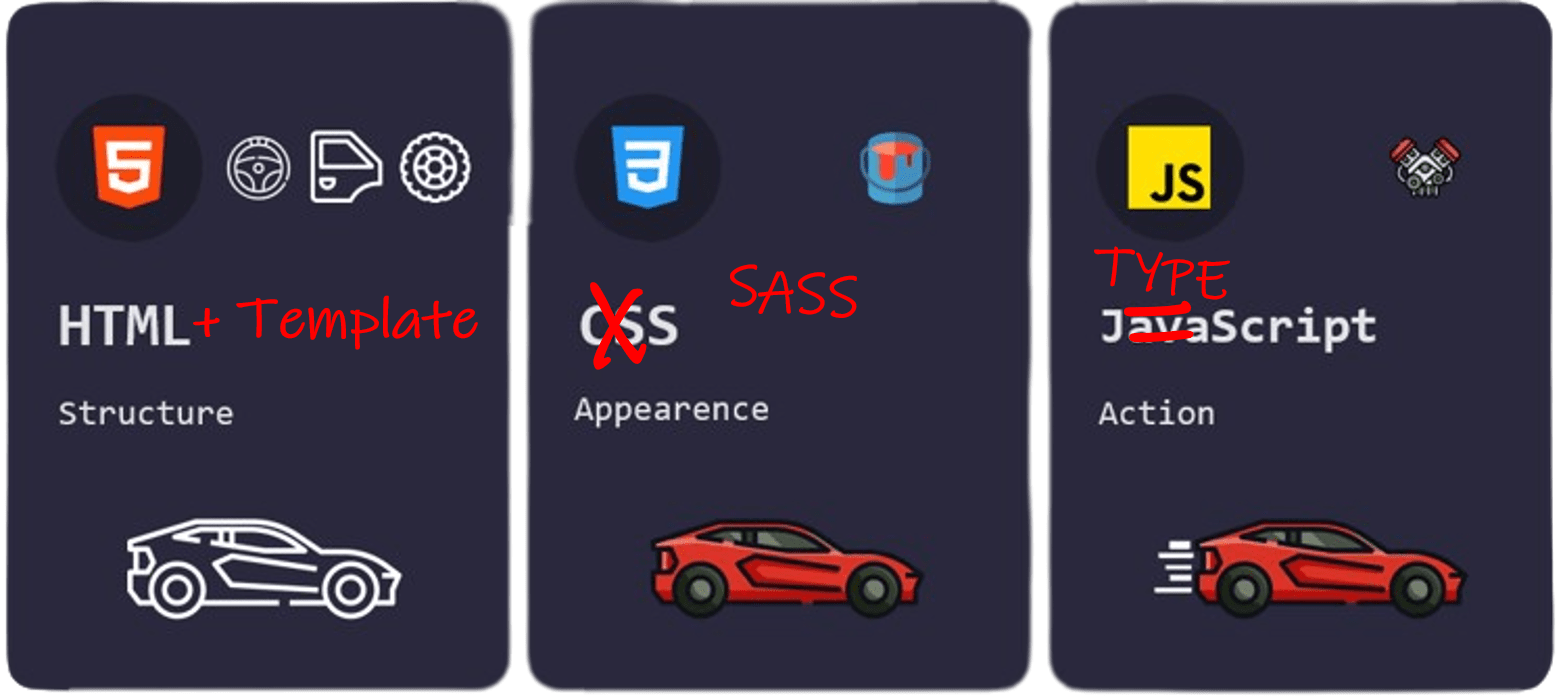
網頁組成
網頁前端三寶
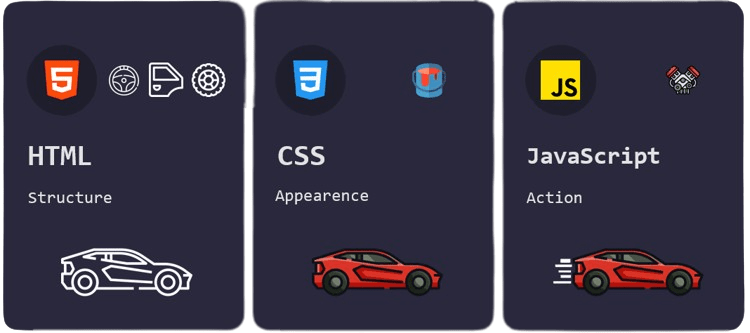
當你寫網頁越久後會發現...
Hyper Text Markup Language
- 組成網頁的架構
- 由許多 Element 組成
程式語言

HTML 語法結構

Opening Tag
Closing Tag
Content
Element
Attribute
來寫億點 HTML 吧
HTML Base
<!DOCTYPE html>
<html lang="en">
<head>
    <meta charset="UTF-8">
    <meta name="viewport" content="width=device-width, initial-scale=1.0">
    <title>Document</title>
</head>
<body>
    <!--網頁內容的 HTML 寫在這裡-->
</body>
</html>
# HTML CODE
VS Code 小技巧 html:5

HTML Base 到底寫了啥
<!DOCTYPE html>
<html lang="en">
<head>
    <meta charset="UTF-8">
    <meta name="viewport" content="width=device-width, initial-scale=1.0">
    <title>Document</title>
</head>
<body>
    <!--網頁內容的 HTML 寫在這裡-->
</body>
</html>
HTML Base - Doctype
用來定義這份 HTML 是基於什麼規則寫的
其他例如:定義以 XML 1.0 寫成
<!DOCTYPE html PUBLIC
  "-//W3C//DTD XHTML Basic 1.0//EN"
  "http://www.w3.org/TR/xhtml-basic/xhtml-basic10.dtd">
<!DOCTYPE html>
<html lang="en">
<head>
<meta charset="UTF-8">
<meta name="viewport" content="width=device-width, initial-scale=1.0">
<title>Document</title>
</head>
<body>
<!--網頁內容的 HTML 寫在這裡-->
</body>
</html>HTML Base - html
HTML 的根元素(Root Element),也就是最外層
常見 Attribute
- lang:表示網頁以什麼語言為主
<!DOCTYPE html>
<html lang="en">
<head>
    <meta charset="UTF-8">
    <meta name="viewport" content="width=device-width, initial-scale=1.0">
    <title>Document</title>
</head>
<body>
    <!--網頁內容的 HTML 寫在這裡-->
</body>
</html>
HTML Base - head
存放網頁的重要資訊
以下為幾種常見重要資訊的類型
- Metadata
- Title
- Link
<!DOCTYPE html>
<html lang="en">
<head>
    <meta charset="UTF-8">
    <meta name="viewport" content="width=device-width, initial-scale=1.0">
    <title>Document</title>
</head>
<body>
    <!--網頁內容的 HTML 寫在這裡-->
</body>
</html>
HTML Base - metadata
用來提供網頁附加訊息,不會顯示在網頁上
- charset:字元編碼方式
- viewport:網頁縮放規則
- author:作者
- description:網頁說明
- keywords:網頁關鍵字
<!DOCTYPE html>
<html lang="en">
<head>
    <meta charset="UTF-8">
    <meta name="viewport" content="width=device-width, initial-scale=1.0">
    <title>Document</title>
</head>
<body>
    <!--網頁內容的 HTML 寫在這裡-->
</body>
</html>
HTML Base - metadata
網頁的標題,用於搜尋結果、網頁的 Tab、書籤
<!DOCTYPE html>
<html lang="en">
<head>
    <meta charset="UTF-8">
    <meta name="viewport" content="width=device-width, initial-scale=1.0">
    <title>Document</title>
  	<link rel="stylesheet" href="style.css">
    <link rel="icon" href="favicon.ico" />
</head>
<body>
    <!--網頁內容的 HTML 寫在這裡-->
</body>
</html>
HTML Base - link
網頁引入外部檔案
- rel:與網頁的關係
- stylesheet:樣式表
- icon:網頁圖標
- href:外部檔案來源
<!DOCTYPE html>
<html lang="en">
<head>
    <meta charset="UTF-8">
    <meta name="viewport" content="width=device-width, initial-scale=1.0">
    <title>Document</title>
  	<link rel="stylesheet" href="style.css">
    <link rel="icon" href="favicon.ico" />
</head>
<body>
    <!--網頁內容的 HTML 寫在這裡-->
</body>
</html>
HTML Base - body
主要寫網頁 HTML 的地方
<!DOCTYPE html>
<html lang="en">
<head>
    <meta charset="UTF-8">
    <meta name="viewport" content="width=device-width, initial-scale=1.0">
    <title>Document</title>
  	<link rel="stylesheet" href="style.css">
    <link rel="icon" href="favicon.ico" />
</head>
<body>
    <!--網頁內容的 HTML 寫在這裡-->
</body>
<style></style>
<script src="main.js"></script>
</html>
HTML Base - style、script
- style:可以在 HTML 裡面寫 CSS 的地方
- script:可以在 HTML 裡面寫 JavaScript 的地方,也可以用來 引入外部 JavaScript 檔案
常見的 HTML Element
Text: <h1> ~ <h6>、<p>
# HTML CODE
<!DOCTYPE html>
<html lang="en">
<head>
    <meta charset="UTF-8">
    <meta name="viewport" content="width=device-width, initial-scale=1.0">
    <title>Document</title>
</head>
<body>
    <h1>I'm H1</h1>
    <h2>I'm H2</h2>
    <h3>I'm H3</h3>
    <h4>I'm H4</h4>
    <h5>I'm H5</h5>
    <h6>I'm H6</h6>
    <p>I'm p</p>
</body>
</html>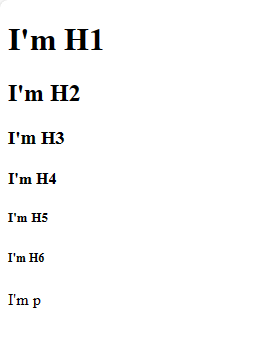
Link: <a>
# HTML CODE
<!DOCTYPE html>
<html lang="en">
<head>
    <meta charset="UTF-8">
    <meta name="viewport" content="width=device-width, initial-scale=1.0">
    <title>Document</title>
</head>
<body>
    <a href="https://hackersir.org">黑客社網站</a>
</body>
</html>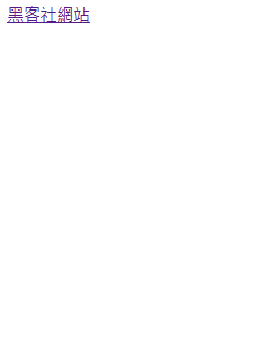
Image: <img>
# HTML CODE
<!DOCTYPE html>
<html lang="en">
<head>
    <meta charset="UTF-8">
    <meta name="viewport" content="width=device-width, initial-scale=1.0">
    <title>Document</title>
</head>
<body>
    <img src="https://truth.bahamut.com.tw/s01/202208/30977096791cc69a2e9cf793266c9623.JPG?w=1000" width="300" height="300"/>
</body>
</html>
<a> + <img>
# HTML CODE
<!DOCTYPE html>
<html lang="en">
<head>
    <meta charset="UTF-8">
    <meta name="viewport" content="width=device-width, initial-scale=1.0">
    <title>Document</title>
</head>
<body>
    <a href="https://http.cat/" target="_blank">
        <img width="300" height="300" src="https://imgur.com/syuF8BI.jpg">
    </a>
</body>
</html>
區塊的 HTML Element
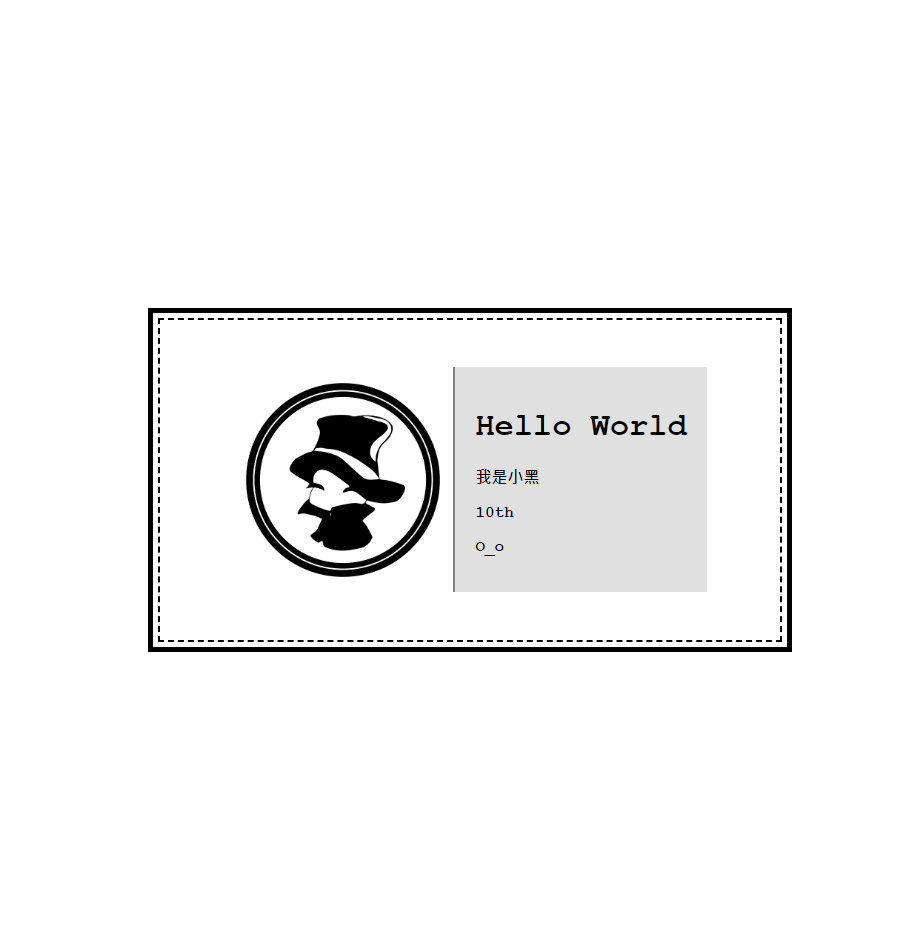
<div>
# HTML CODE
<!DOCTYPE html>
<html lang="en">
<head>
    <meta charset="UTF-8">
    <meta name="viewport" content="width=device-width, initial-scale=1.0">
    <title>Document</title>
</head>
<body>
    <div>
        <img width="200" height="200" src="https://hackersir.org/2022/static/image/HackerSir_Circle.png" alt="">
    </div>
    <div>
        <h1>小黑</h1>
        <p>他很可愛</p>
    </div>
</body>
</html>
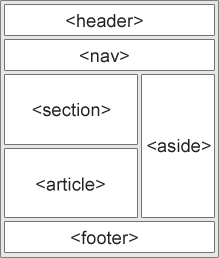
其他區塊類型的 Element
section
header
footer
span
nav
article
...
互動類的 Element
input
button
dialog
textarea
form
...
Cascading Style Sheets
- 讓你的網頁好看很多
- 定義 Element 長怎樣
- 也不是程式語言,所以我都寫 SASS
CSS 語法結構
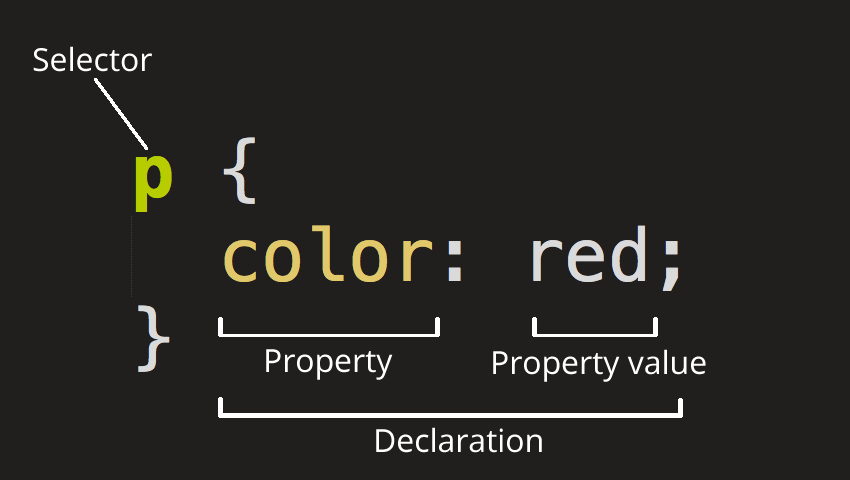
來寫「億」點 CSS 吧
將 CSS 加入 HTML
在 HTML 的 <style>
<style>
    h1{
        color: red;
        background-color:cyan;
    }
    p{
        color:green;
    }
</style>
用 Attribute 設定
<body>
    <div>
        <img width="200" height="200" src="https://hackersir.org/2022/static/image/HackerSir_Circle.png" alt="">
    </div>
    <div>
        <h1 style="color: red; background-color: cyan;">小黑</h1>
        <p style="color: green">他很可愛</p>
    </div>
</body>
外部引入 CSS
h1{
    color: red;
    background-color:cyan;
}
p{
    color:green;
}
<head>
<meta charset="UTF-8">
<meta name="viewport" content="width=device-width, initial-scale=1.0">
<title>Document</title>
<link rel="stylesheet" href="style.css"/>
</head>style.css
index.html
CSS Selector
CSS Selector - 直接選定特定的 Tag
# PRESENTING CODE
用 HTML Tag 選取
CSS Selector - 透過 id 選取
# PRESENTING CODE
用 # 來選取,主要設定單個 Element
CSS Selector - 透過 class 選取
# PRESENTING CODE
用 . 來選取,可以設定多個 Element
CSS Selector - hover 效果
# PRESENTING CODE
當鼠標放到 Element 上,樣式會改變
CSS Selector 小技巧
CSS Selector - Element1 > Element2
# PRESENTING CODE
選取外層是 Element1 的所有 Element2
CSS Selector - Element1 + Element2
# PRESENTING CODE
選取 Element1 之後的第一個 Element2
CSS Selector - Element1 ~ Element2
# PRESENTING CODE
選取 Element1 之後的所有 Element2
超級多的 CSS 樣式
CSS - color、background-color
# PRESENTING CODE
設定顏色樣式
CSS - width、height
# PRESENTING CODE
設定大小樣式
CSS - border
# PRESENTING CODE
設定邊框樣式
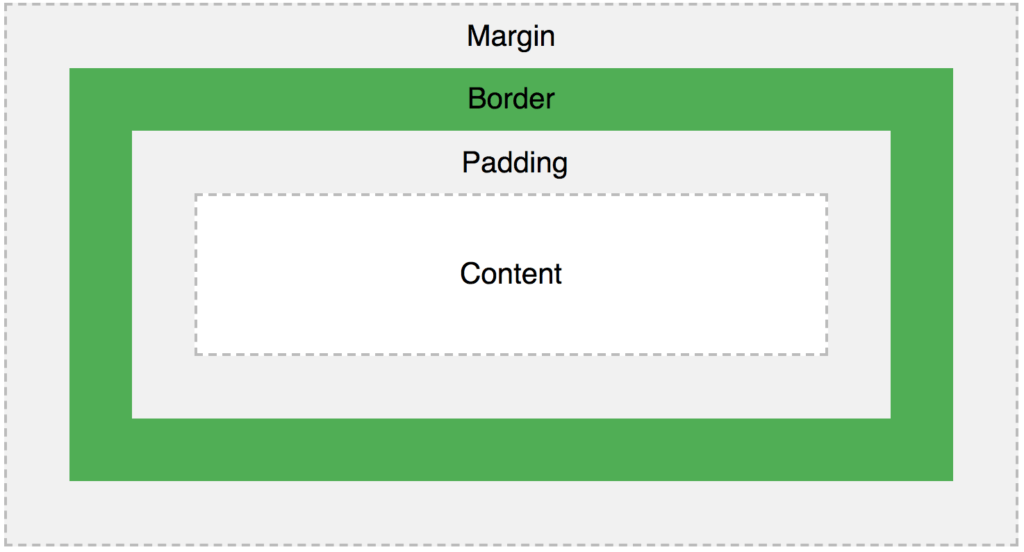
CSS - margin、padding
# PRESENTING CODE
設定邊界大小
什麼是 margin、padding
CSS - display
# PRESENTING CODE
設定排列方式
CSS - display 使用 flex
# PRESENTING CODE
display:flex 可以對區塊內的 Element 排列
其他 CSS 樣式
font-weight
cursor
position
overflow
transform
word-break
...
其他 CSS 資源
推薦 CSS 筆記
CSS 小遊戲
DevTools
開發者工具
按下 F12 或是
Ctrl + Shift + I
DevTools 開啟畫面
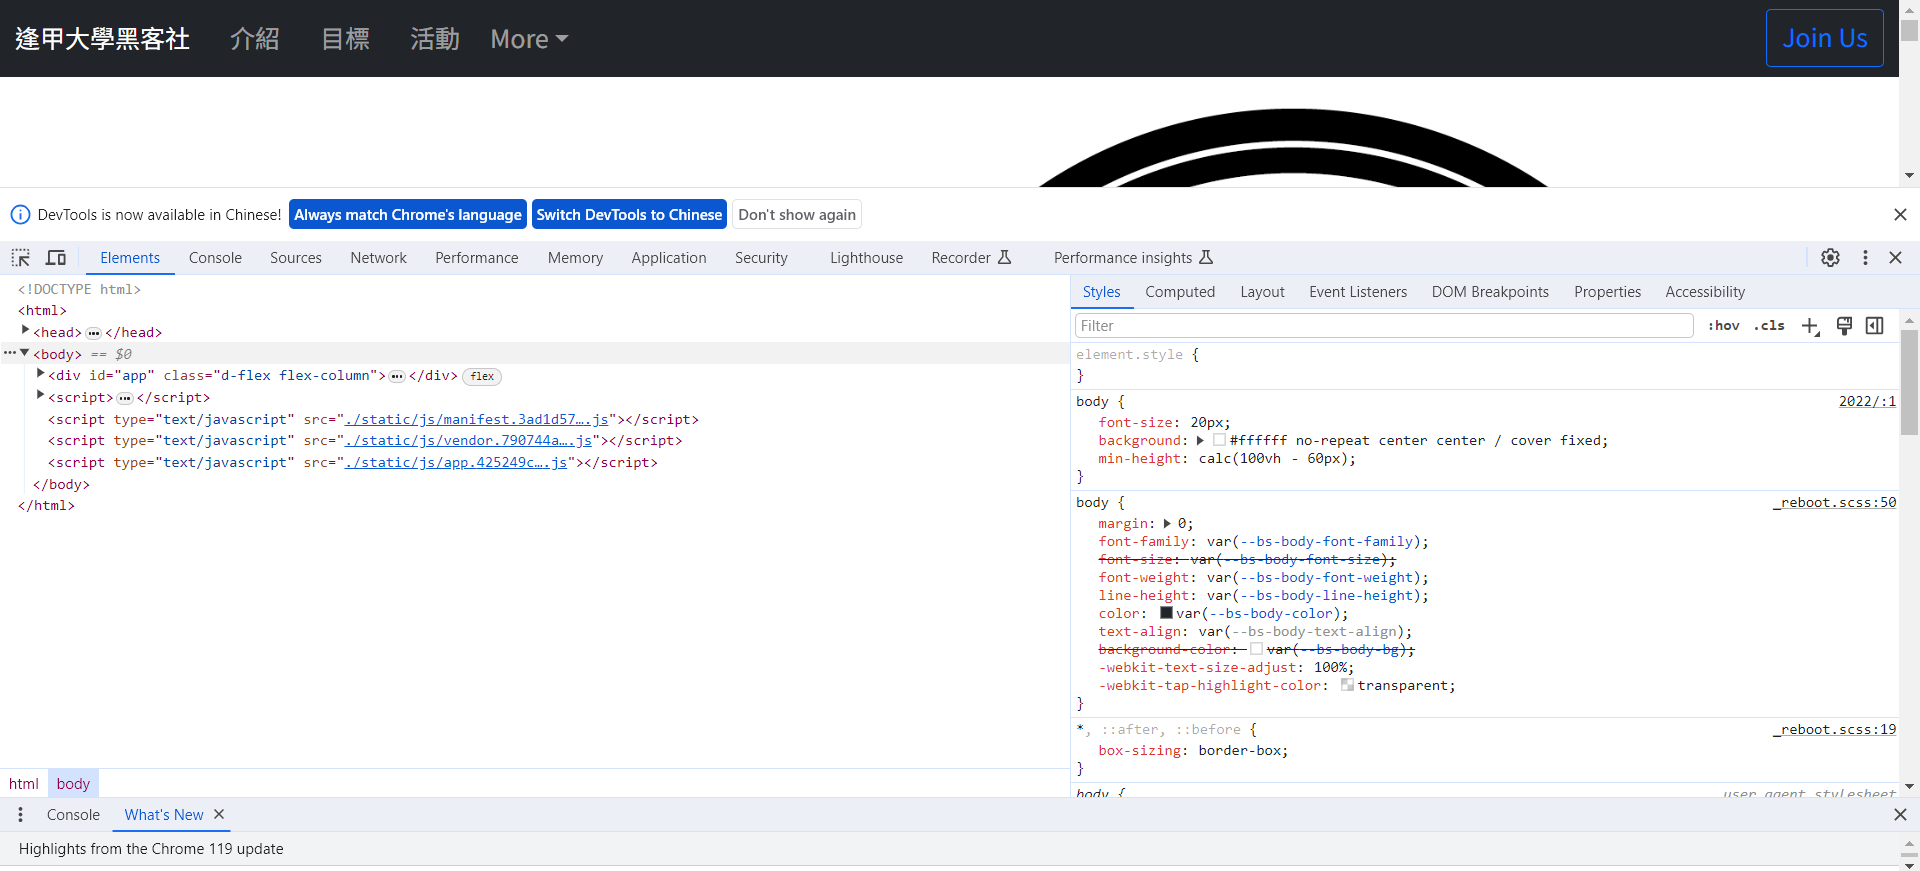
DevTools 功能列
- Element:查看 Html 程式碼
- Console:測試 JavaScript 程式
- Sources:組成網頁的所有檔案
- Network:網頁載入的過程
- Application:網頁相關的應用
快速找到我要的 Element
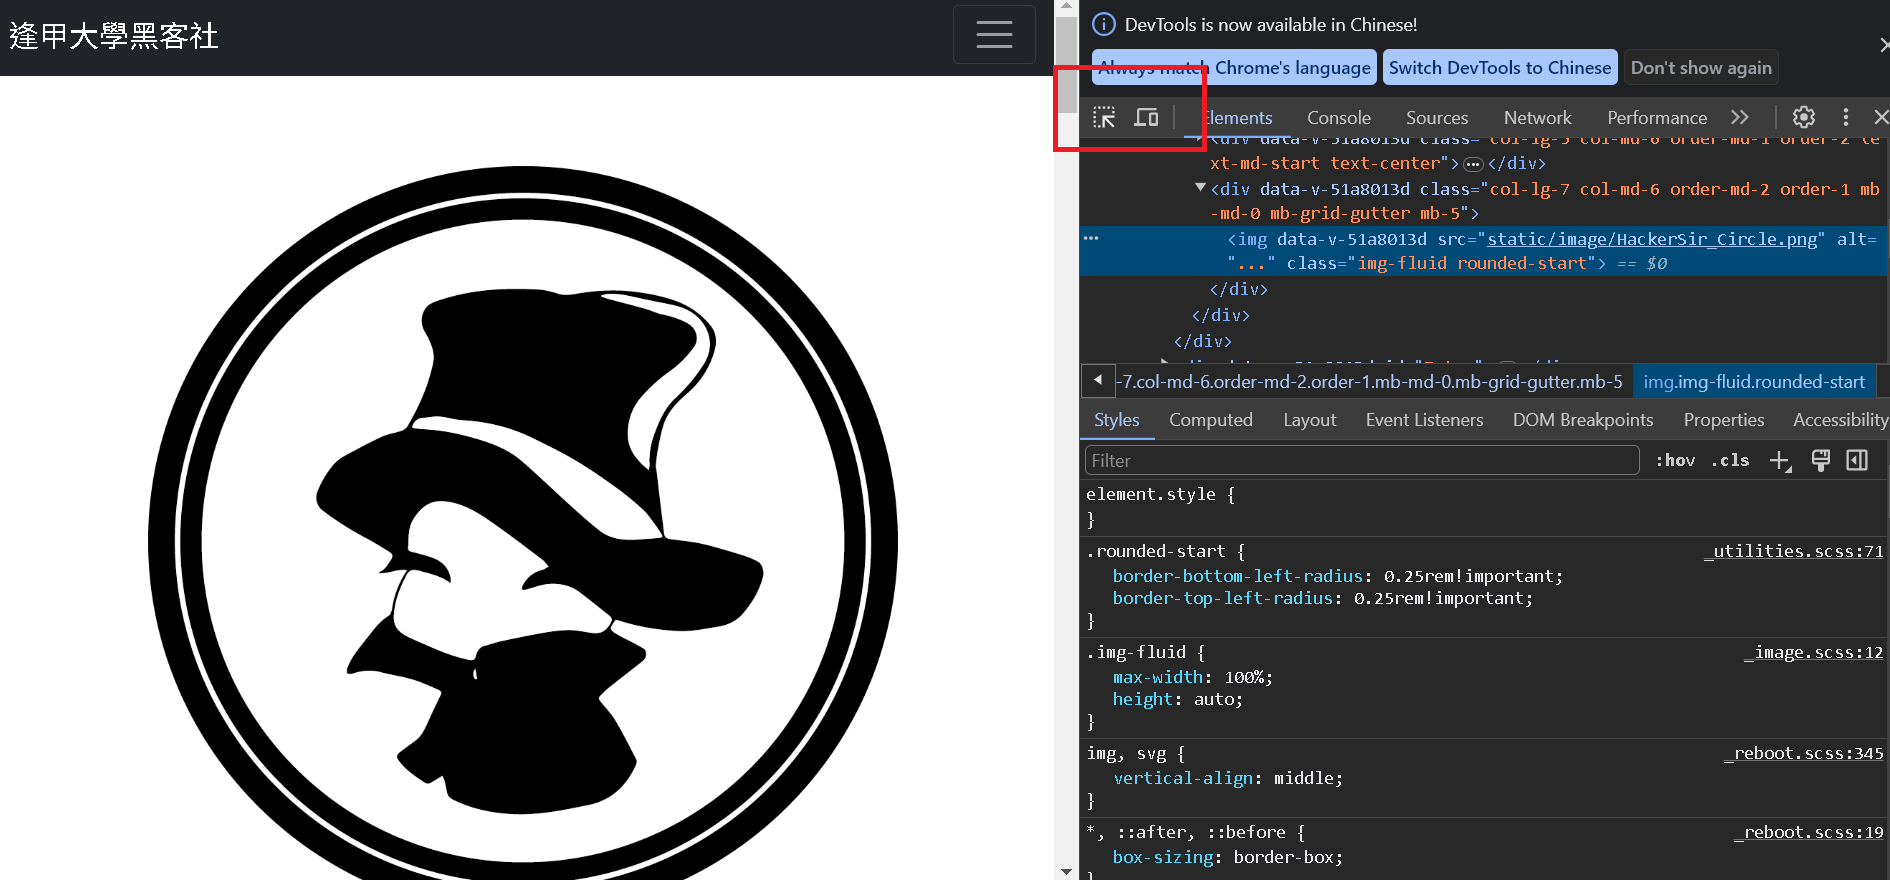
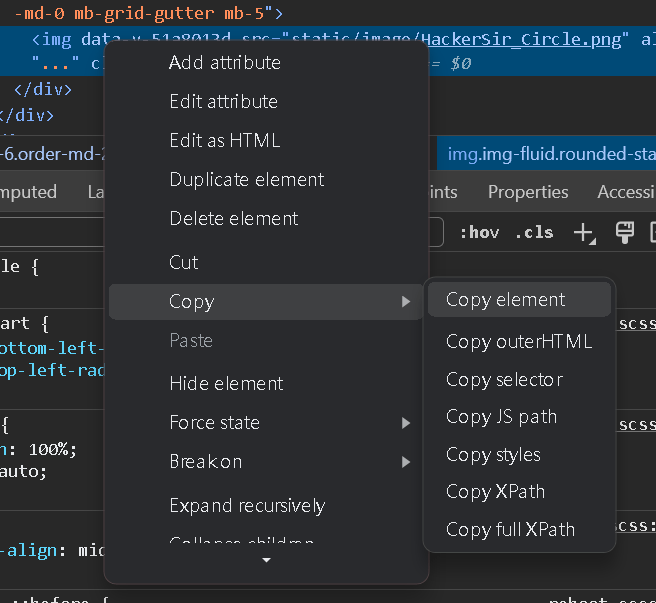
快速找到我要的 Element
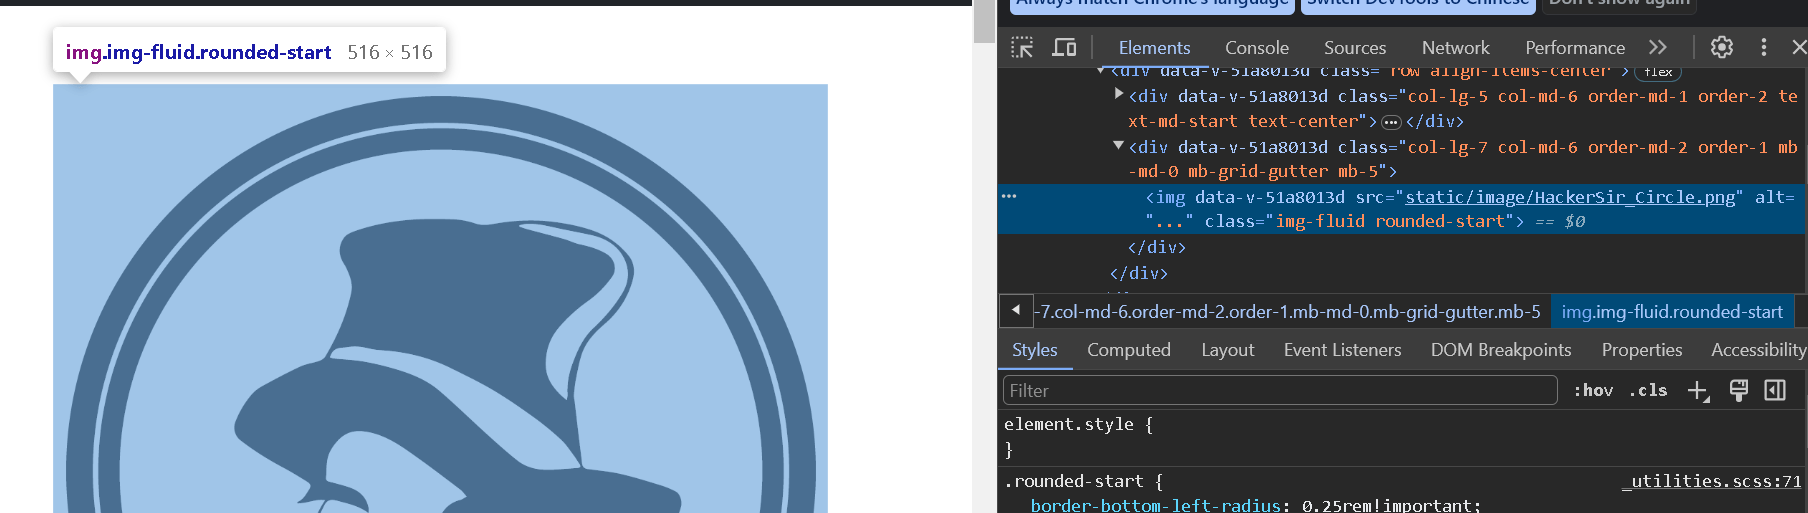
按右鍵跑出功能列複製 Selector
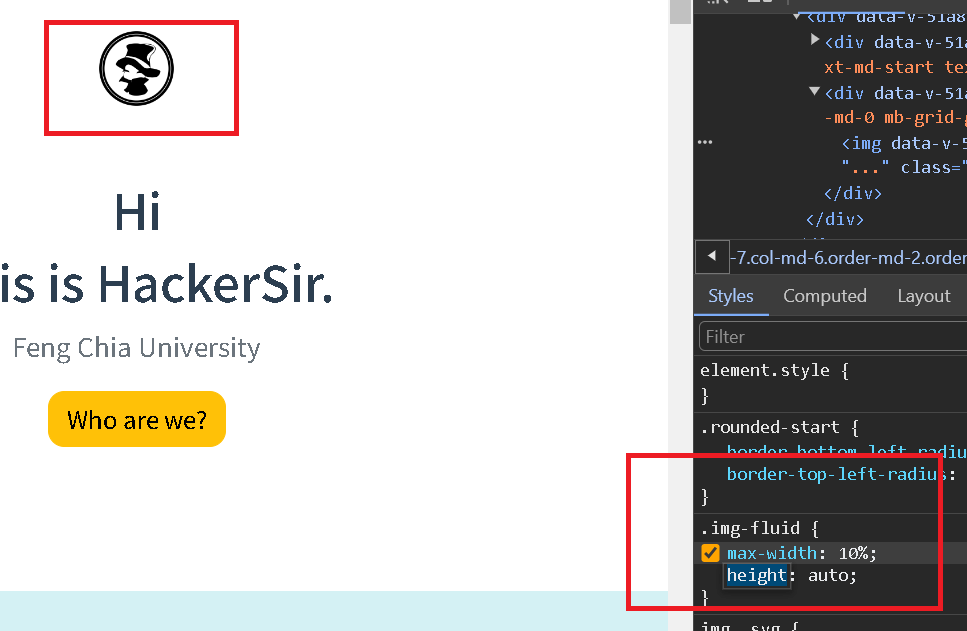
修改 HTML

修改 CSS
Git & Github
什麼是 Git
- 一種分散式版本控制
- 方便追蹤及管控不同版本的程式
什麼是 GitHub
存放大量程式碼的網站
Git 原理簡述
工作區
暫存區
本機數據庫
Working Directory
Staging
Area
Local
Repository
git add
git commit
上傳網頁前要做的事
Git 帳號設定
git config --global user.name "your_username"
git config --global user.email "your_email_address@example.com"
- 設定你的使用者名稱(跟 github 的一樣)
- 設定你的 email(跟 github 的一樣)
git config --global --list
- 列出設定訊息,檢查你有沒有設定好
上傳網頁吧
1
在 Github 上創建 repository
2
Git 初始化後,
將程式加入 Git 暫存區
3
對暫存區的操作
進行 commit
5
將程式上傳至 Github repository
4
連結 Github 的 repository
6
調整 github page 要使用的 branch
Command Line
如果要用指令方式往下走
VS code Git GUI
如果不會用指令的往右走
第一步:Github 創建 repository
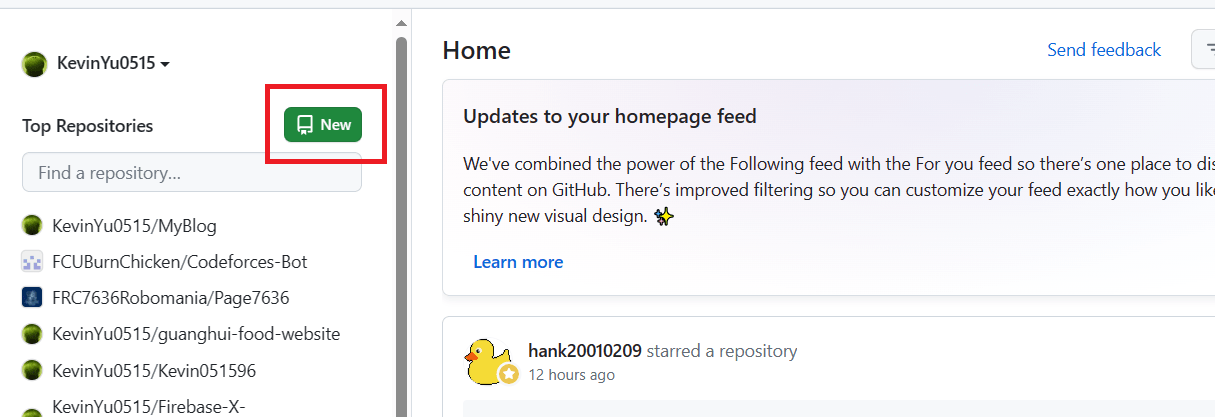
到 Github 首頁點擊 New 按鈕
第一步:Github 創建 repository
填寫 repository name 和選取公不公開
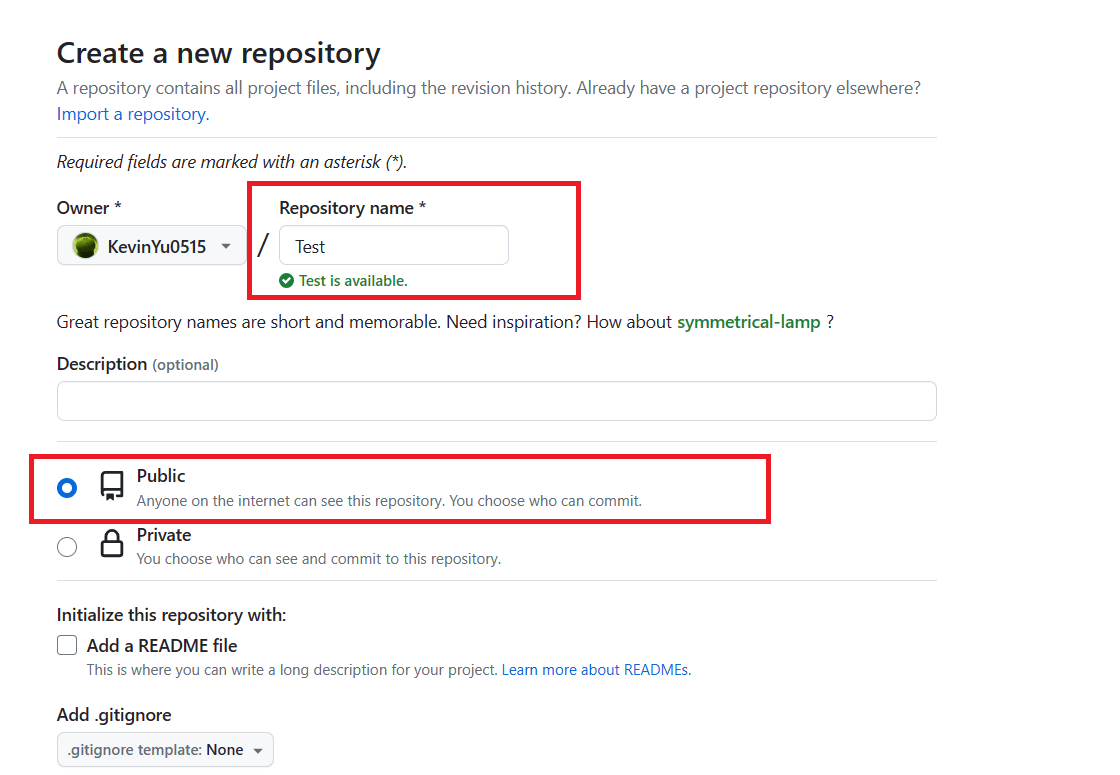
第一步:Github 創建 repository
填好就按下面 create 按鈕
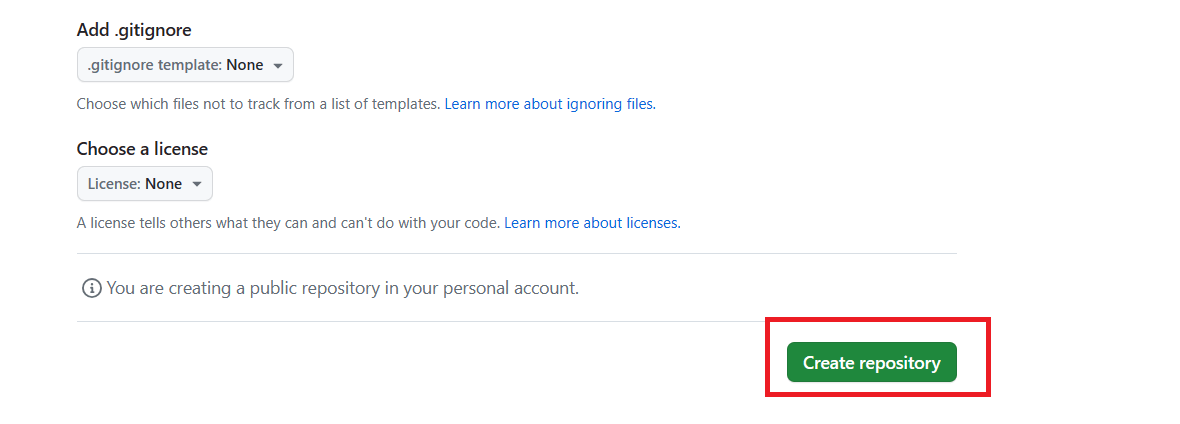
第一步:Github 創建 repository
有跑出這畫面就代表你創建成功了

第二步:Git 初始化並將程式加入暫存

先切換到你要上傳的資料夾,接著用 git init 初始化
第二步:Git 初始化並將程式加入暫存
- git add .
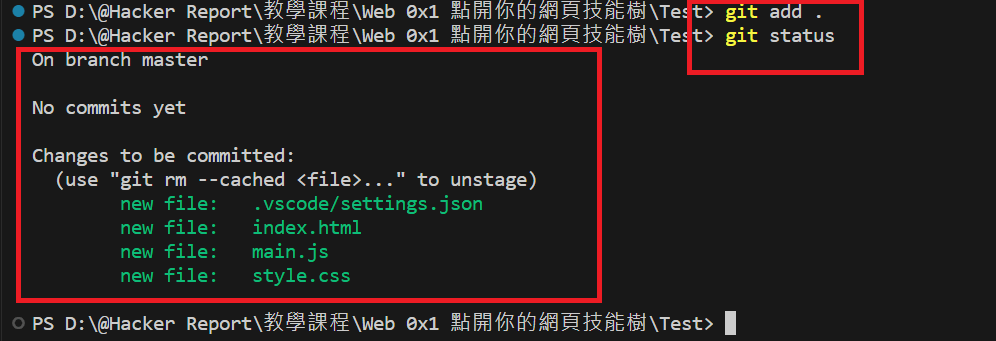
將所有在工作區的操作加入暫存區
- git status
查看暫存區狀態
第三步:對暫存操作進行 Commit

- git commit . -m "這個版本是什麼"
對暫存區操作 commit 成一個版本
第四步:連接 Github repository

- git remote add [網址縮寫] [Github repository 網址]
第五步:將程式上傳 repository

先確定你要上傳哪個 branch
- git branch
- git push [上傳網址縮寫] -u [你的 branch 名稱]
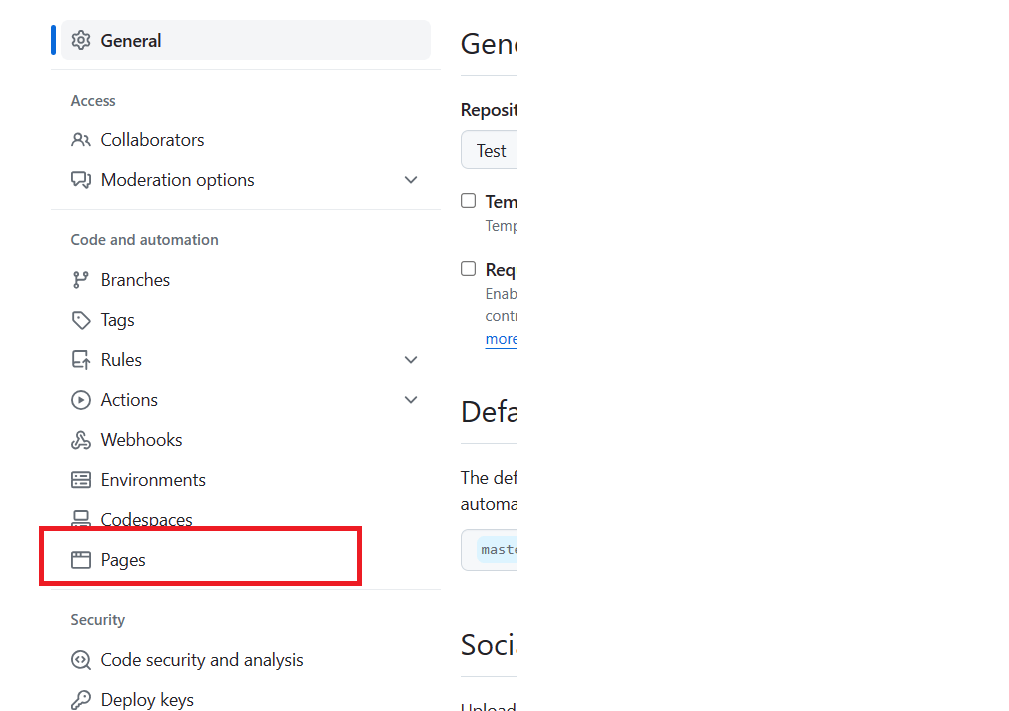
第六步:調整 github page 的 branch

重整你的 repository,接著點擊 Settings 按鈕
第六步:調整 github page 的 branch
點擊左側功能列的 Pages
第六步:調整 github page 的 branch
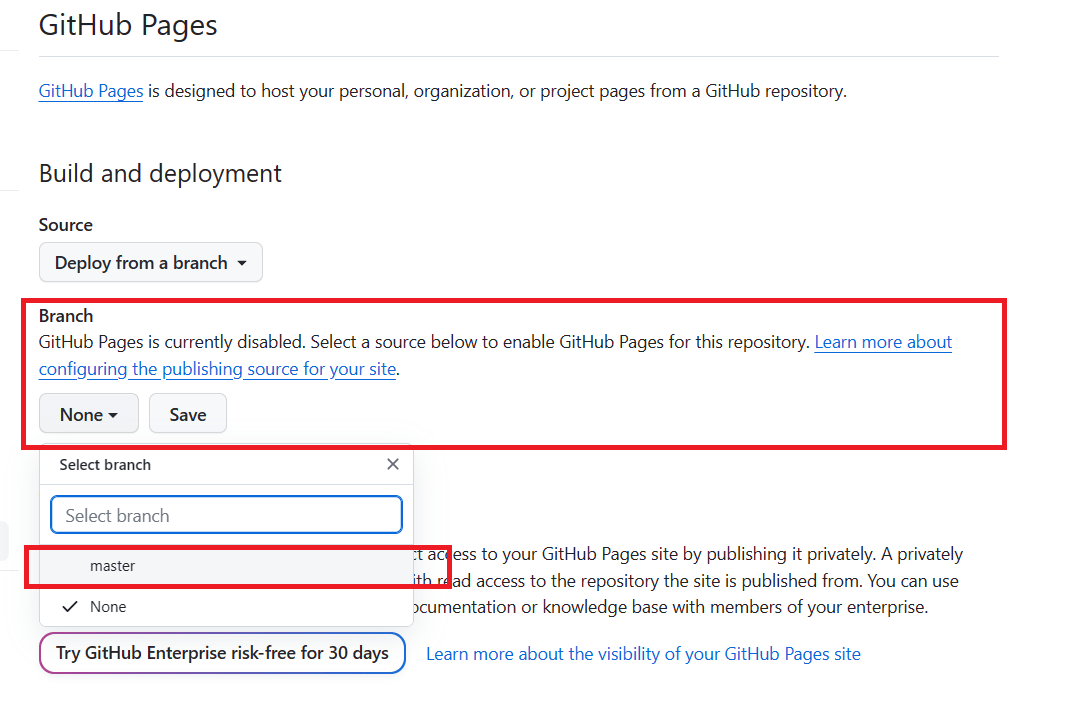
點開 Branch 功能,選取你要呈現網頁的 branch
第六步:調整 github page 的 branch
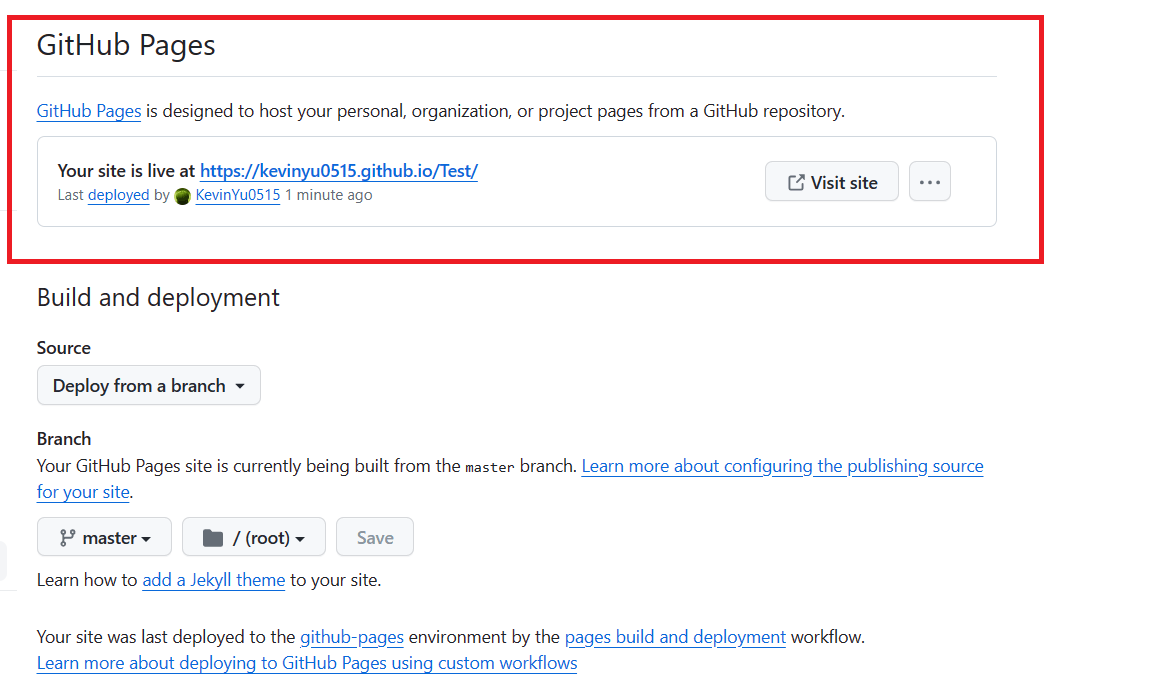
重新整理完後,就可以透過 github.io 這個網址看到你的網頁ㄌ
噹啦~可以透過網址找到啦
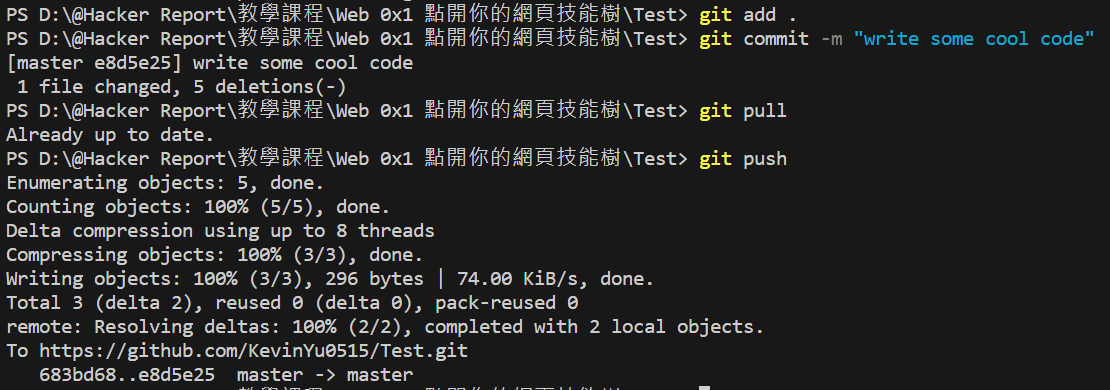
如果我要重新上傳檔案
- 修改完後 git add . 加入暫存
- 對暫存操作 commit 成一個新版本
- git pull 從 Github repository 抓取最新版本
- git push 上傳
如果我要重新上傳檔案
如果我要重新上傳檔案
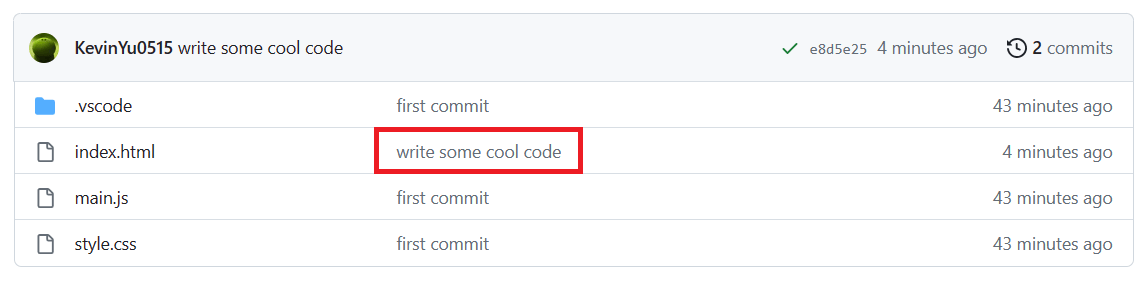
可以看到 第二個版本的 commit 成功傳上去了
如果我要從 Github 上抓下來
方法一:以壓縮檔形式下載下來
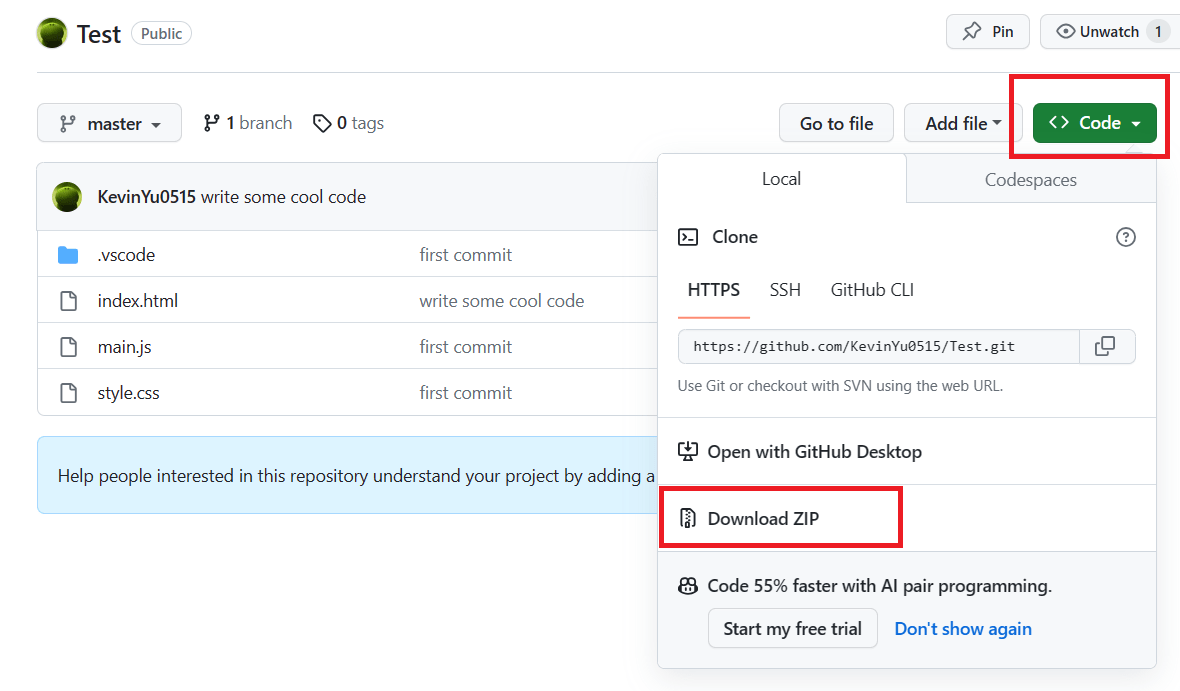
如果我要從 Github 上抓下來
(推)方法二:用 git clone 載下來
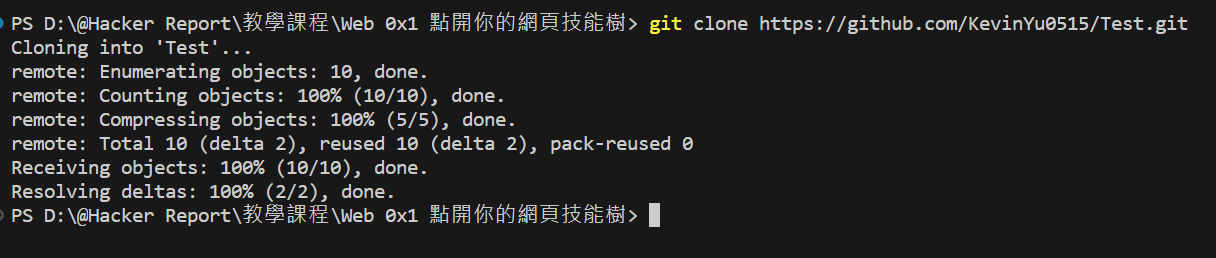
- 先找好一個位置用來放抓下來的資料夾
- git clone [你要載的 github 網址]
VS code Git GUI
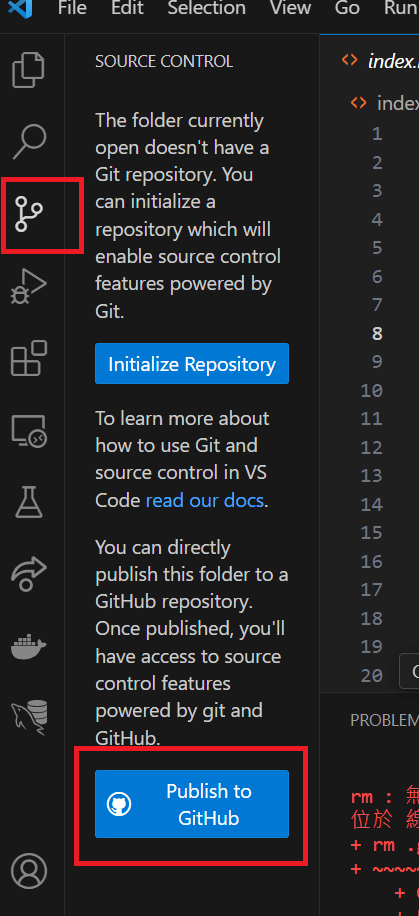
點擊右邊的 git 功能後
點擊下面的 Publish to Github
VS code Git GUI
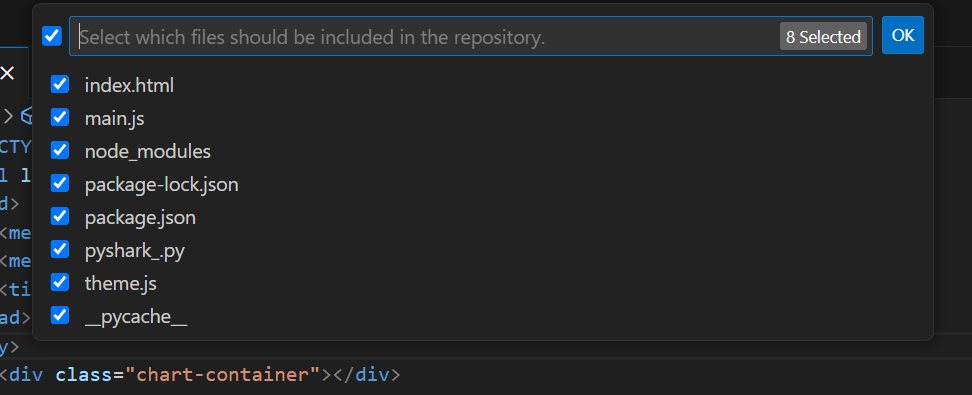
幫你要上傳的程式創建一個 Github Repository

VS code Git GUI
選擇要上傳的檔案,選好後就點 OK
VS code Git GUI
到這裡就成功上傳到 Github 了,
接下來請接回左邊的第六步

Web 0x1 點開你的網頁技能樹
By yukaislides

