React

A JavaScript library for building user interfaces


How to try
Online sandbox
Basic usage with HTML
React with Webpack
# Install react
npm i react react-dom

# Install babel + babel-loader
npm i babel-loader @babel/core @babel/preset-env @babel/preset-react --save-dev
Add .babelrc config
{
    "presets": ["@babel/preset-env", "@babel/preset-react"]
}
Add loader to the webpack config
module: {
    rules: [
      {
        test: /\.(js|jsx)$/,
        exclude: /node_modules/,
        use: {
          loader: 'babel-loader',
        },
      },
    ],
},npx create-react-app my-app
cd my-app
npm startJSX
const element = <h1>Hello, world!</h1>;

/* Babel transformation ===> */

const element = React.createElement(
  "h1",
  null,
  "Hello, world!"
);JSX Represents Objects
const element = (
  <h1 className="greeting">
    Hello, world!
  </h1>
);

==>

const element = React.createElement(
  'h1',
  {className: 'greeting'},
  'Hello, world!'
);

==>

// Note: this structure is simplified
const element = {
  type: 'h1',
  props: {
    className: 'greeting',
    children: 'Hello, world!'
  }
};
Expressions in JSX
const name = 'Dan Abramov';
const element = <h1>Hello, {name}</h1>;

ReactDOM.render(
  element,
  document.getElementById('root')
);
Expressions in JSX
function formatName(user) {
  return user.firstName + ' ' + user.lastName;
}

const user = {
  firstName: 'Harper',
  lastName: 'Perez'
};

const element = (
  <h1>
    Hello, {formatName(user)}!
  </h1>
);

ReactDOM.render(
  element,
  document.getElementById('root')
);
Specifying Attributes with JSX
const element1 = <div tabIndex="0"></div>;

const user = {
    name: 'admin',
    avatarUrl: './img1.jpg'
};

const element2 = <img src={user.avatarUrl}></img>;
Since JSX is closer to JavaScript than to HTML, React DOM uses camelCase property naming convention instead of HTML attribute names.
⚠️
⚠️
⚠️
⚠️
⚠️
⚠️
Render components to DOM
To render a React element into a root DOM node, pass both to ReactDOM.render():
const element = <h1>Hello, world</h1>;

ReactDOM.render(element, document.getElementById('root'));
Components and Props

Functional component
Class component
function Welcome(props) {
  return <h1>Hello, {props.name}</h1>;
}


const Welcome = (props) => <h1>Hello, {props.name}</h1>;
class Welcome extends React.Component {
render() {
return <h1>Hello, {this.props.name}</h1>;
}
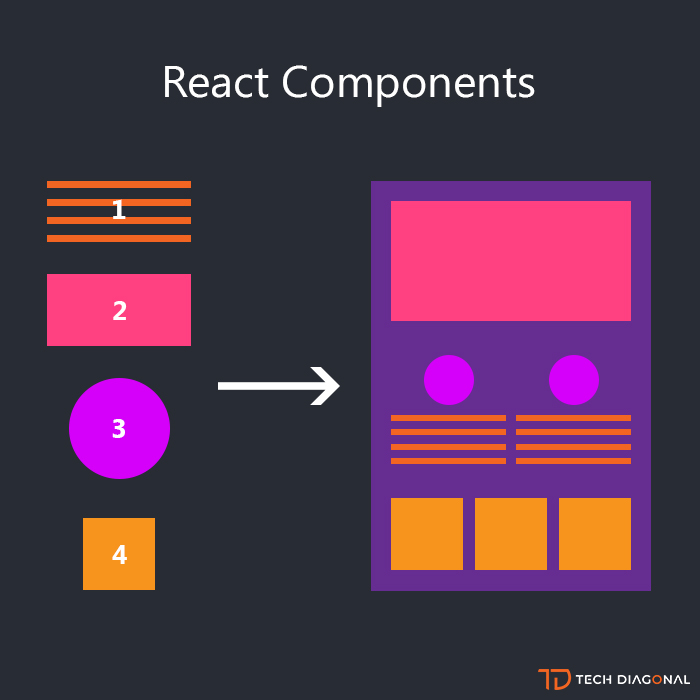
}Composing Components
function Welcome(props) {
  return <h1>Hello, {props.name}</h1>;
}

function App() {
  return (
    <div>
      <Welcome name="Max" />
      <Welcome name="Oleg" />
      <Welcome name="Slava" />
    </div>
  );
}

ReactDOM.render(
  <App />,
  document.getElementById('root')
);
Props are Read-Only
function Welcome(props) {
  props.name = 'Andrey'; // never mutate your props!!!!
  return <h1>Hello, {props.name}</h1>;
}


ReactDOM.render(
  <Welcome name="Pasha"/>,
  document.getElementById('root')
);
State and Lifecycle
Consider the ticking clock example. To update UI call ReactDOM.render() to change the rendered output:
function tick() {
  const element = (
    <div>
      <h1>Hello, world!</h1>
      <h2>It is {new Date().toLocaleTimeString()}.</h2>
    </div>
  );

  ReactDOM.render(
    element,
    document.getElementById('root')
  );
}

setInterval(tick, 1000);
We can start by encapsulating how the clock looks:
function Clock(props) {
  return (
    <div>
      <h1>Hello, world!</h1>
      <h2>It is {props.date.toLocaleTimeString()}.</h2>
    </div>
  );
}

function tick() {
  ReactDOM.render(
    <Clock date={new Date()} />,
    document.getElementById('root')
  );
}

setInterval(tick, 1000);
Ideally we want to write this once and have the Clock update itself:
ReactDOM.render(
  <Clock />,
  document.getElementById('root')
);
Convert our functional component to class:
class Clock extends React.Component {
  render() {
    return (
      <div>
        <h1>Hello, world!</h1>
        <h2>It is {this.props.date.toLocaleTimeString()}.</h2>
      </div>
    );
  }
}
Adding Local State to a Class:
class Clock extends React.Component {
  constructor(props) {
    super(props);
    this.state = {date: new Date()};
  }

  render() {
    return (
      <div>
        <h1>Hello, world!</h1>
        <h2>It is {this.state.date.toLocaleTimeString()}.</h2>
      </div>
    );
  }
}
Adding Lifecycle Methods:
In applications with many components, it’s very important to free up resources taken by the components when they are destroyed.
We want to set up a timer whenever the Clock is rendered to the DOM for the first time. This is called “mounting” in React.
We also want to clear that timer whenever the DOM produced by the Clock is removed. This is called “unmounting” in React.
Adding Lifecycle Methods:
class Clock extends React.Component {
  constructor(props) {
    super(props);
    this.state = {date: new Date()};
  }

  componentDidMount() {

  }

  componentWillUnmount() {

  }

  render() {
    return (
      <div>
        <h1>Hello, world!</h1>
        <h2>It is {this.state.date.toLocaleTimeString()}.</h2>
      </div>
    );
  }
}
Adding Lifecycle Methods:
The componentDidMount() method runs after the component output has been rendered to the DOM. This is a good place to set up a timer:
  componentDidMount() {
    this.timerID = setInterval(
      () => this.tick(),
      1000
    );
  }
We will tear down the timer in the componentWillUnmount() lifecycle method:
  componentWillUnmount() {
    clearInterval(this.timerID);
  }
Implement the tick method:
  tick() {
    this.setState({
      date: new Date()
    });
  }
Every second the browser calls the tick() method. Inside it, the Clock component schedules a UI update by calling setState() with an object containing the current time. Thanks to the setState() call, React knows the state has changed, and calls the render() method again to learn what should be on the screen. This time, this.state.date in the render() method will be different, and so the render output will include the updated time. React updates the DOM accordingly.
Work With State
Do Not Modify State Directly
// Wrong
this.state.comment = 'Hello';

// Correct
this.setState({comment: 'Hello'});
State Updates May Be Asynchronous
// Wrong
this.setState({
  counter: this.state.counter + this.props.increment,
});


// Correct
this.setState((state, props) => ({
  counter: state.counter + props.increment
}));
React may batch multiple setState() calls into a single update for performance.
Because this.props and this.state may be updated asynchronously, you should not rely on their values for calculating the next state.
State Updates are Merged
  constructor(props) {
    super(props);
    this.state = {
      posts: [],
      comments: []
    };
  }

  componentDidMount() {
    fetchPosts().then(response => {
      this.setState({
        posts: response.posts
      });
    });

    fetchComments().then(response => {
      this.setState({
        comments: response.comments
      });
    });
  }
Handling Events
- React events are named using camelCase, rather than lowercase.
- With JSX you pass a function as the event handler, rather than a string.
// HTML
<button onclick="activateLasers()">
  Activate Lasers
</button>


// React(JSX)
<button onClick={activateLasers}>
  Activate Lasers
</button>
Binding context (this) to a handler
  constructor(props) {
    super(props);
    this.state = {isToggleOn: true};

    // This binding is necessary to make `this` work in the callback
    this.handleClick = this.handleClick.bind(this);
  }

  handleClick() {
    this.setState(state => ({
      isToggleOn: !state.isToggleOn
    }));
  }
Bind inside constructor:
Binding context (this) to a handler
  // This syntax ensures `this` is bound within handleClick.
  // Warning: this is *experimental* syntax.
  handleClick = () => {
    console.log('this is:', this);
  }
If you are using the experimental public class fields syntax, you can use class fields to correctly bind callbacks:
Conditional rendering
function Greeting(props) {
  const isLoggedIn = props.isLoggedIn;
  if (isLoggedIn) {
    return <UserGreeting />;
  }
  return <GuestGreeting />;
}

ReactDOM.render(
  // Try changing to isLoggedIn={true}:
  <Greeting isLoggedIn={false} />,
  document.getElementById('root')
);React
By Aleh Lipski


