Introduction to Git
TOC
Part 1 - The Basics
Part 2 - Branching & Merging
-
What is Version Control?
-
Why Use Version Control
-
Getting Ready
-
The Basic Workflow
-
Starting with an Unversioned Project
-
Starting with an Existing Project
-
Working on Your Project
-
Branching can Change Your Life
-
Working With Branches
-
Saving Changes Temporarily
-
Checking Out a Local Branch
-
Merging Changes
-
Branching Workflows
TOC
Part 3 - Sharing Work via Remote Repositories
Part 4 - Advanced Topics
-
Undoing Things
-
Inspecting Changes with Diffs
-
Dealing With Merge Conflicts
-
Rebase as an Alternative to Merge
-
Submodules
-
Workflows with git-flow
-
Handling Large Files with LFS
-
Authentication with SSH Public Keys
-
Introduction to Remote Repositories
-
Connecting a Remote Repository
-
Inspecting Remote Data
-
Integrating Remote Changes
-
Publishing a Local Branch
-
Deleting Branches
TOC
Part 5 - Tools & Services
References
-
Desktop GUIs
-
Diff & Merge Tools
-
Code Hosting Services
-
More Learning Resources
Part 1
The Basics
What is Version Control?
You can think of a version control system (short: "VCS") as a kind of "database". It lets you save a snapshot of your complete project at any time you want. When you later take a look at an older snapshot (let's start calling it "version"), your VCS shows you exactly how it differed from the previous one.

Version control is independent of the kind of project / technology / framework you're working with:
What is Version Control?
- It works just as well for an HTML website as it does for a design project or an iPhone app
- It lets you work with any tool you like; it doesn't care what kind of text editor, graphics program, file manager or other tool you use
Also, don't confuse a VCS with a backup or a deployment system. You don't have to change or replace any other part of your tool chain when you start using version control.
A version control system records the changes you make to your project's files. This is what version control is about. It's really as simple as it sounds.
Why Use a Version Control System?
-
Collaboration
-
Storing Versions (Properly)
-
Restoring Previous Versions
-
Understanding What Happened
-
Backup
Collaboration
Without a VCS in place, you're probably working together in a shared folder on the same set of files. Shouting through the office that you are currently working on file "xyz" and that, meanwhile, your teammates should keep their fingers off is not an acceptable workflow

Collaboration
With a VCS, everybody on the team is able to work absolutely freely - on any file at any time. The VCS will later allow you to merge all the changes into a common version. There's no question where the latest version of a file or the whole project is.
Other benefits of using a VCS are even independent of working in a team or on your own.

Storing Versions (Properly)
Saving a version of your project after making changes is an essential habit. But without a VCS, this becomes tedious and confusing very quickly:
- How much do you save?
- How do you name these versions?
- How do you know what exactly is different in these versions?

Storing Versions (Properly)
A version control system acknowledges that there is only one project. Therefore, there's only the one version on your disk that you're currently working on. Everything else - all the past versions and variants - are neatly packed up inside the VCS. When you need it, you can request any version at any time and you'll have a snapshot of the complete project right at hand.
Restoring Previous Versions
Being able to restore older versions of a file (or even the whole project) effectively means one thing: you can't mess up! If the changes you've made lately prove to be garbage, you can simply undo them in a few clicks. Knowing this should make you a lot more relaxed when working on important bits of a project.

Understanding What Happened
Every time you save a new version of your project, your VCS requires you to provide a short description of what was changed. Additionally (if it's a code / text file), you can see what exactly was changed in the file's content. This helps you understand how your project evolved between versions.
Backup
A side-effect of using a distributed VCS like Git is that it can act as a backup; every team member has a full-blown version of the project on his disk - including the project's complete history. Should your beloved central server break down (and your backup drives fail), all you need for recovery is one of your teammates' local Git repository.

Getting Ready
Command Line or GUI?
There are two main ways of working with Git: either via its "Command Line Interface" or with a GUI application. Neither of these are right or wrong.
On the one hand, using a GUI application will make you more efficient and let you access more advanced features that would be too complex on the command line.
On the other hand, however, I recommend learning the basics of Git on the command line first. It helps you form a deeper understanding of the underlying concepts and makes you independent from any specific GUI application.
Setting Up Git on Your Computer
Installing Git on Windows
On Windows, you can download the "Git for Windows" package from here

When running the installer EXE, you should choose the default options in each screen. After finishing the installation, you can begin working with Git by starting the "Git Bash" application. You'll find it in the Windows START menu, inside the "Git" folder
Setting Up Git on Your Computer
Installing Git on Mac OS
On Windows, you can download the "Git for Windows" package from here
Once this is installed, you can jump right into Git by starting "Terminal.app" on your Mac. You'll find this in the "Utilities" subfolder of your "Applications" folder in Finder

Setting Up Git on Your Computer
Configuring Git
A couple of very basic configurations should be made before you get started. You should set your name and email address as well as enable coloring to pretty up command outputs:
> git config --global user.name "John Doe"
> git config --global user.email "john@doe.org"
> git config --global color.ui auto
The Basic Workflow of Version Control
Before we get lost in Git commands, you should understand what a basic workflow with version control looks like. We'll walk through each step in detail later in this book. But first, let's get an understanding of what the workflow in general is like.
Repository
Think of a repository as a kind of database where your VCS stores all the versions and metadata that accumulate in the course of your project. In Git, the repository is just a simple hidden folder named ".git" in the root directory of your project.

Knowing that this folder exists is more than enough. You don't have to (and, moreover, should not) touch anything inside this magical folder.
Repository
Getting such a repository on your local machine can be done in two ways:
- (a) If you have a project locally on your computer that is not yet under version control, you can initialize a new repository for this project.
- (b) If you're getting on board of a project that's already running, chances are there is a repository on a remote server (on the internet or on your local network). You'll then probably be provided with a URL to this repository that you will then "clone" (download / copy) to your local computer.
Repository
(1) As soon as you have a local repository, you can start working on your files: modify, delete, add, copy, rename, or move files in whatever application (your favorite editor, a file browser, ...) you prefer. In this step, you don't have to watch out for anything. Just make any changes necessary to move your project forward.
(2) It's only when you feel you've reached a noteworthy state that you have to consider version control again. Then it's time to wrap up your changes in a commit.
Commit
A commit is a wrapper for a specific set of changes. The author of a commit has to comment what he did in a short "commit message". This helps other people (and himself) to understand later what his intention was when making these changes.
Every set of changes implicitly creates a new, different version of your project. Therefore, every commit also marks a specific version. It's a snapshot of your complete project at that certain point in time (but saved in a much more efficient way than simply duplicating the whole project...). The commit knows exactly how all of your files and directories looked and can therefore be used, e.g., to restore the project to that certain state.
Commit
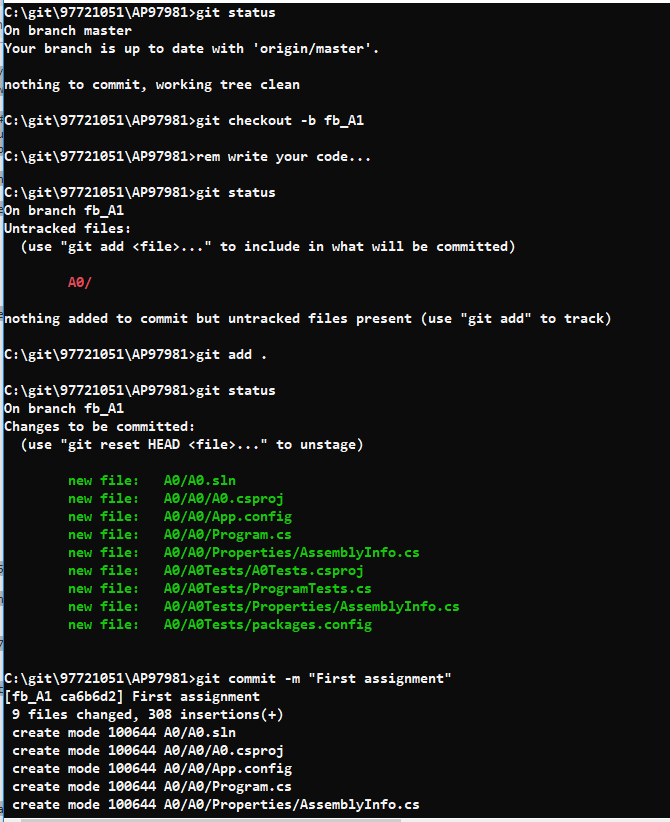
(3) However, before you commit, you'll want to get an overview of what you've changed so far. In Git, you'll use the "status" command to get a list of all the changes you performed since the last commit: which files did you change? Did you create any new ones or deleted some old ones?
(4) Next, you tell Git which of your local changes you want to wrap up in the next commit. Only because a file was changed doesn't mean it will be part of the next commit! Instead, you have to explicitly decide which changes you want to include. To do this, you add them to the so-called "Staging Area".
Commit
(5) Now, having added some changes to the Staging Area, it's time to actually commit these changes. You'll have to add a short and meaningful message that describes what you actually did. The commit will then be recorded in your local Git repository, marking a new version of your project.
(6) From time to time, you'll want to have a look at what happened in the project - especially if you're working together with other people. The "log" command lists all the commits that were saved in chronological order. This allows you to see which changes were made in detail and helps you comprehend how the project evolved.
Commit
(7) Also when collaborating with others, you'll both want to share (some of) your changes with them and receive the changes they made. A remote repository on a server is used to make this exchange possible.
Local & Remote Repositories
There are two kinds of repositories:
- A "local" repository resides on your local computer, as a ".git" folder inside your project's root folder. You are the only person that can work with this repository, by committing changes to it.

Local & Remote Repositories
There are two kinds of repositories:
- A "remote" repository, in contrast, is typically located on a remote server on the internet or in your local network. No actual working files are associated with a remote repository: it has no working directory but it exclusively consists of the ".git" repository folder. Teams are using remote repositories to share & exchange data: they serve as a common base where everybody can publish their own changes and receive changes from their teammates.
Starting with an Unversioned Project
Let's start with an existing project that is not yet under version control. Change into the project's root folder on the command line and use the "git init" command to start versioning this project:
> cd path/to/project/folder
> git init
Starting with an Unversioned Project
Now take a moment to look at the files in that directory (including any hidden files):
> dirYou'll see that a new, hidden folder was added, named ".git". All that happened is that Git created an empty local repository for us. Please mind the word "empty": Git did not add the current content of your working copy as something like an "initial version". The repository contains not a single version of your project, yet.
Working Copy
The root folder of your project is often called the "working copy" (or "working directory"). It's the directory on your local computer that contains your project's files.
You can always ask the version control system to populate your working copy with any version of your project. But you always only have one working copy with one specific version on your disk - not multiple in parallel.
Ignoring Files
Typically, in every project and on every platform, there are a couple of files that you don't want to be version controlled: on Mac OS, e.g., those pesky ".DS_Store" files aren't worth versioning. In other projects, you might have build or cache files that make no sense in a version control system. You'll have to decide yourself which files you don't want to include.
Ignoring Files
As a simple rule of thumb you'll most likely want to ignore files that were created automatically (as a "by-product"): temporary files, logs, cache files...
Other examples for excluded files range from compiled sources to files that contain passwords or personal configurations.
A helpful compilation of ignore rules for different projects and platforms can be found here: github.com/github/gitignore
Which Files Should I Ignore?
Ignoring Files
The list of files to ignore is kept in a simple file called ".gitignore" in the root folder of your project. It's highly recommended to define this list at the very beginning of your project - before making your first commit. Because once files are committed, you'll have to jump through some hoops to get them out of version control, again.
Now, let's get going: Create an empty file in your favorite editor and save it as ".gitignore" in your project's root folder. If you're on a Mac, e.g., you'll want to make sure it contains at least the following line:
> .DS_StoreIgnoring Files
If there are other files you want to ignore, simply add a line for each one. Defining these rules can get quite complex. Therefore, to keep things simple, I'll list the most useful patterns which you can easily adapt to your own needs:
-
Ignore one specific file:
path/to/file.ext -
Ignore all files with a certain name
filename.ext -
Ignore all files of a certain type
*.ext -
Ignore all files in a certain folder:
path/to/folder/*
Making Your First Commit
With some ignore rules in place, it's time to make our initial commit for this project. We'll go into great detail about the whole process of committing a little later in this book. For now, simply execute the following commands:
> git add -A
> git commit -m "Initial commit"
Starting with an Existing Project on a Server
When you're getting on board of a project that's already running, you were probably given a URL to the project's remote repository on a server. Such a URL can take many forms:
- ssh://user@server/git-repo.git
- user@server:git-repo.git
- http://example.com/git-repo.git
- https://example.com/git-repo.git
- git://example.com/git-repo.git
Starting with an Existing Project on a Server
No matter what format the URL is, you can just pour it into the "git clone" command. However, you should first make sure that you are in the folder where you want this project to be downloaded to:
> cd your/development/folder/
> git clone https://github.com/gittower/git-crash-course.git
Git will now download a complete copy of this repository to your local disk - on condition that you're allowed to access this repository.
Working on Your Project
The Status of a File
In general, files can have one of two statuses in Git:
untracked: a file that is not under version control, yet, is called "untracked". This means that the version control system doesn't watch for (or "track") changes to this file. In most cases, these are either files that are newly created or files that are ignored and which you don't want to include in version control at all.
tracked: all files that are already under version control are called "tracked". Git watches these files for changes and allows you to commit or discard them.
The Staging Area
At some point after working on your files for a while, you'll want to save a new version of your project. Or in other words: you'll want to commit some of the changes you made to your tracked files.
one of Git's greatest features, comes in very handy: it allows you to determine which of your local changes shall be committed. Because in Git, simply making some changes doesn't mean they're automatically committed. Instead, every commit is "hand-crafted": each change that you want to include in the next commit has to be marked explicitly ("added to the Staging Area" or, simply put, "staged").
The Staging Area

Commit Only Related Changes
When crafting a commit, it's very important to only include changes that belong together. You should never mix up changes from multiple, different topics in a single commit. For example, imagine wrapping both some work for your new login functionality and a fix for bug #122 in the same commit:
Understanding what all those changes really mean and do gets hard for your teammates (and, after some time, also for yourself). Someone who's trying to understand the progress of that new login functionality will have to untangle it from the bugfix code first.
Commit Only Related Changes
Undoing one of the topics gets impossible. Maybe your login functionality introduced a new bug. You can't undo just this one without undoing your work for fix #122, also!
Instead, a commit should only wrap related changes: fixing two different bugs should produce (at the very least) two separate commits; or, when developing a larger feature, every small aspect of it might be worth its own commit.
Small commits that only contain one topic make it easier for other members of your team to understand the changes - and to possibly undo them if something went wrong.
Getting an Overview of Your Changes
Let's have a look at what we've done so far. To get an overview of what you've changed since your last commit, you simply use the "git status" command:
> git status
# On branch master
# Changes not staged for commit:
#   (use "git add/rm <file>... " to update what will be committed)
#   (use "git checkout -- <file>..." to discard changes in working
#    directory)
#
#       modified:   css/about.css
#       modified:   css/general.css
#       deleted:    error.html
#       modified:   imprint.html
#       modified:   index.html
#
# Untracked files:
#    (use "git add <file>..." to include in what will be committed)
#       new-page.html
no changes added to commit (use "git add" and/or "git commit -a")
Getting Ready to Commit
Now it's time to craft a commit by staging some changes with the "git add" command:
> git add new-page.html index.html css/*With this command, we added the new "new-page.html" file, the modifications in "index.html", and all the changes in the "css" folder to the Staging Area. Since we also want to record the removal of "error.html" in the next commit, we have to use the "git rm" command to confirm this:
> git rm error.htmlWrite Good Commit Messages
Time spent on crafting a good commit message is time spent well: it will make it easier to understand what happened for your teammates (and after some time also for yourself).
Begin your message with a short summary of your changes (up to 50 characters as a guideline). Separate it from the following body by including a blank line. The body of your message should provide detailed answers to the following questions: What was the motivation for the change? How does it differ from the previous version?
Committing Your Work
The "git commit" command wraps up your changes:
> git commit -m "Implement the new login box"If you have a longer commit message, possibly with multiple paragraphs, you can leave out the "-m" parameter and Git will open an editor application for you (which you can also configure via the "core.editor" property).
What Makes a Good Commit?
- Related Changes
- As stated before, a commit should only contain changes from a single topic. Don't mix up contents from different topics in the same commit. This will make it harder to understand what happened.
-
Completed Work
- Never commit something that is half-done. If you need to save your current work temporarily in something like a clipboard, you can use Git's "Stash" feature (which will be discussed later in the book). But don't eternalize it in a commit.
What Makes a Good Commit?
- Tested Work
- Related to the point above, you shouldn't commit code that you think is working. Test it well - and before you commit it to the repository.
- Short & Descriptive Messages
- A good commit also needs a good message. See the paragraph above on how to "Write Good Commit Messages" for more about this.
Inspecting the Commit History
Git saves every commit that is ever made in the course of your project. Especially when collaborating with others, it's important to see recent commits to understand what happened.
The "git log" command is used to display the project's commit history:
> git log
commit 2dfe283e6c81ca48d6edc1574b1f2d4d84ae7fa1
Author: Tobias Günther <support@learn-git.com>
Date: Fri Jul 26 10:52:04 2013 +0200

    Implement the new login box

commit 2b504bee4083a20e0ef1e037eea0bd913a4d56b6
Author: Tobias Günther <support@learn-git.com>
Date: Fri Jul 26 10:05:48 2013 +0200

    Change headlines for about and imprint

commit 0023cdddf42d916bd7e3d0a279c1f36bfc8a051b
Author: Tobias Günther <support@learn-git.com>
Date: Fri Jul 26 10:04:16 2013 +0200

    Add simple robots.txt
The Commit Hash
Every commit has a unique identifier: a 40-character checksum called the "commit hash". While in centralized version control systems like Subversion or CVS, an ascending revision number is used for this, this is simply not possible anymore in a distributed VCS like Git: The reason herefore is that, in Git, multiple people can work in parallel, committing their work offline, without being connected to a shared repository. In this scenario, you can't say anymore whose commit is #5 and whose is #6.
Since in most projects, the first 7 characters of the hash are enough for it to be unique, referring to a commit using a shortened version is very common.
Commit log
> git log -p
commit 2dfe283e6c81ca48d6edc1574b1f2d4d84ae7fa1
Author: Tobias Günther <support@learn-git.com>
Date: Fri Jul 26 10:52:04 2013 +0200

    Implement the new login box

diff --git a/css/about.css b/css/about.css
index e69de29..4b5800f 100644
--- a/css/about.css
+++ b/css/about.css
@@ -0,0 +1,2 @@
+h1 {
+  line-height:30px; }
\ No newline at end of file
di.ff --git a/css/general.css b/css/general.css
index a3b8935..d472b7f 100644
--- a/css/general.css
+++ b/css/general.css
@@ -21,7 +21,8 @@ body {

 h1, h2, h3, h4, h5 {
   color:#ffd84c;
-  font-family: "Trebuchet MS", "Trebuchet"; }
+  font-family: "Trebuchet MS", "Trebuchet";
+  margin-bottom:0px; }

 p {
   margin-bottom:6px;}
diff --git a/error.html b/error.html
deleted file mode 100644
index 78alc33..0000000
--- a/error.html
+++ /dev/null
@@ -1,43 +0,0 @@
- <html>
-
-   <head>
-     <title>Tower :: Imprint</title>
-     <link rel="shortcut icon" href="img/favicon.ico" />
-     <link type="text/css" href="css/general.css" />
-   </head>
-
Apart from this metadata, Git also allows you to display the detailed changes that happened in each commit. Use the "-p" flag with the "git log" command to add this kind of information:
Part 2
Branching & Merging
Branching & Working in Contexts
In every project, there are always multiple different contexts where work happens. Each feature, bugfix, experiment, or alternative of your product is actually a context of its own: it can be seen as its own "topic", clearly separated from other topics.
This leaves you with an unlimited amount of different contexts. Most likely, you'll have at least one context for your "main" or "production" state, and another context for each feature, bugfix, experiment, etc.
Branching & Working in Contexts
In real-world projects, work always happens in multiple of these contexts in parallel:
- While you're preparing 2 new variations of your website's design (context 1 & 2)...
- you're also trying to fix an annoying bug (context 3).
- On the side, you also update some content on your FAQ pages (context 4), while...
- one of your teammates is working on a new feature for your shopping cart (context 5),...
- and another colleague is experimenting with a whole new login functionality (context 6).
Branching & Working in Contexts


Branches
All the changes you make at any time will only apply to the currently active branch; all other branches are left untouched. This gives you the freedom to both work on different things in parallel and, above all, to experiment - because you can't mess up! In case things go wrong you can always go back / undo / start fresh / switch contexts...
Luckily, branches in Git are cheap & easy. There's no reason not to create a new branch when you start working on a new topic, no matter how big or small it might be.
Use Branches Extensively
Branching is one of Git’s most powerful features – and this is not by accident: quick and easy branching was a central requirement from day one. Branches are the perfect tool to help you avoid mixing up different lines of development. You should use branches extensively in your development workflows: for new features, bug fixes, experiments, ideas…
Git basic commands
-
init
-
add
-
commit
-
push
-
merge
-
fetch
-
pull
-
branch
-
checkout
Git basic commands
-
tag
-
stash
-
reset
-
diff
-
rebase
-
cherry pick
Git Simulators
Using Git
First Time
New Assignment
Introduction to Git
By ali4heydari
Introduction to Git
A quick intro to Git VCS


