


Andy Repton
Mission Critical Engineer, Speaker at meetups and conferences, focusing on Cloud Native technologies
Tweakers and Schuberg Philis
Andy Repton,
Mission Critical Engineer
@ Schuberg Philis
@SethKarlo
Dennis Brouwer, Mission Critical Engineer @ Schuberg Philis
@dennusb
Omar
Eimar
Ninad
Eelco
Ismael
Michael
Giancarlo
Raphael
http://bit.ly/tweakersworkshop
http://bit.ly/tweakersslack
# If on Linux/Mac:
$ cd tweakers-workshop
$ ls
README.md    database.sql db           index.js     package.json views        workshop.sh
$ vim Dockerfile

# If on Windows:
$ Set-Location tweakers-workshop

#use notepad to create the file named 'Dockerfile'# Base image from the default Node 8 image
FROM node:8-alpineInside the Dockerfile, we start with a FROM keyword. This allows us to pull in a preexisting container image and build on top of it
Here, we're going to start with the official node image (when the URL is not set Docker will default to the Docker Hub) and use the alpine tag of that image
# Docker format:
<repository>/<image>:<tag># Base image from the default Node 8 image
FROM node:8-alpine
# Set /usr/src/app as the directory where our app resides
WORKDIR /usr/src/appNext, we'll set the WORKDIR for the container. This will be the where docker will run the process from
Every new command in the Dockerfile will create a new layer. Any layers that already exist on the host will be reused rather than recreated. Docker keeps track of these using a hash
# Base image from the default Node 8 image
FROM node:8-alpine
# Set /usr/src/app as the directory where our app resides
WORKDIR /usr/src/app
#Copy the package.json to the container
COPY package*.json ./Now we will COPY the package.json of our guestbook into the container from our current working directory
Docker cannot copy files from outside of this directory into the container, to prevent someone from giving you a malicious Dockerfile that might copy confidential files into the container
# Base image from the default Node 8 image
FROM node:8-alpine

# Set /usr/src/app as the directory where our app resides
WORKDIR /usr/src/app
#Copy the package.json to the container
COPY /etc/passwd /usr/src/appFor example, this won't work:
docker build .
Sending build context to Docker daemon 230.4kB
Step 1/2 : FROM node:8-alpine
---> df48b68da02a
Step 2/2 : COPY /etc/passwd /usr/src/app
COPY failed: stat /var/lib/docker/tmp/docker-builder918813293/etc/passwd: no such file or directory# Base image from the default Node 8 image
FROM node:8-alpine
# Set /usr/src/app as the directory where our app resides
WORKDIR /usr/src/app
#Copy the package.json to the container
COPY package*.json ./
#Running npm install to make sure all dependencies are installed
RUN npm installNow we will RUN an npm install. RUN only applies on the build step, this is not what will run when the container is started
# Base image from the default Node 8 image
FROM node:8-alpine

# Set /usr/src/app as the directory where our app resides
WORKDIR /usr/src/app

#Copy the package.json to the container
COPY package*.json ./
#Running npm install to make sure all dependencies are installed
RUN npm install
#Copy the source of the app to the container
COPY . .And now we can COPY the rest of our Guestbook into the container
# Base image from the default Node 8 image
FROM node:8-alpine

# Set /usr/src/app as the directory where our app resides
WORKDIR /usr/src/app

#Copy the package.json to the container
COPY package*.json ./

#Running npm install to make sure all dependencies are installed
RUN npm install
#Copy the source of the app to the container
COPY . .
#Exposing port 80
EXPOSE 80Next, we will EXPOSE the container on port 80, so we can reach the application
# Base image from the default Node 8 image
FROM node:8-alpine

# Set /usr/src/app as the directory where our app resides
WORKDIR /usr/src/app

#Copy the package.json to the container
COPY package*.json ./

#Running npm install to make sure all dependencies are installed
RUN npm install

#Copy the source of the app to the container
COPY . .
#Exposing port 80
EXPOSE 80
#The start command for the container
CMD [ "npm", "start" ]And finally we will add the CMD to the container image, which is what Docker will run when the container is started
$ docker build .
Sending build context to Docker daemon    172kB
Step 1/7 : FROM node:8-alpine
 ---> df48b68da02a
Step 2/7 : WORKDIR /usr/src/app
 ---> Using cache
 ---> af799e6f4e50
Step 3/7 : COPY package*.json ./
 ---> Using cache
 ---> f1dab9fdeebd
Step 4/7 : RUN npm install
 ---> Using cache
 ---> d7d77f36899b
Step 5/7 : COPY . .
 ---> d0d1c0a47688
Step 6/7 : EXPOSE 80
 ---> Running in 25f8f11dcdf2
Removing intermediate container 25f8f11dcdf2
 ---> f67edb95e5ad
Step 7/7 : CMD [ "npm", "start" ]
 ---> Running in 9654b5e9692e
Removing intermediate container 9654b5e9692e
 ---> fafc76f4a21d
Successfully built fafc76f4a21d
With the Dockerfile complete, we can build our application
$ docker tag fafc76f4a21d sbpdemo/guestbookThe original name is a non friendly hash. We can tag this with a sensible name
And now we can run the container
$ docker run -p 80:80 sbpdemo/guestbook

> guestbook-tweakers-sbp@1.0.0 start /usr/src/app
> node index.js

Using file database!
Schuberg Philis - Tweakers Guestbook starting!
Information:
 If you want to use the killswitch (for liveness probes) use KILLHEALTHCHECK=true
 If you want to use MySQL as datasbase, use DATABASE_TYPE=mysql
 Set the name of your guestbook with NAME=<name>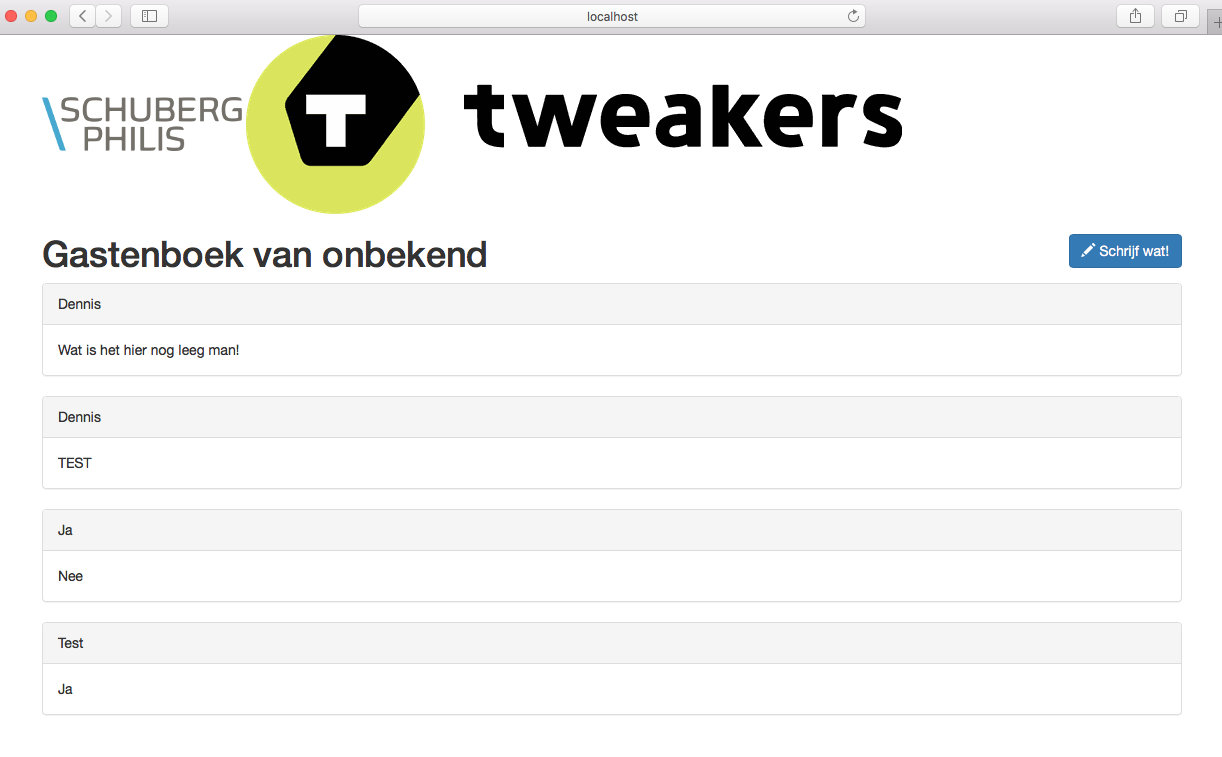
Server listening on http://:::80Using the -p flag, we can now access our container on port 80 via localhost
Try adding a comment to the guestbook!
$ docker run -p 80:80 -d sbpdemo/guestbook
d505aed5555015ac5bd1830e6aaabce28f4c4397f9afb5852f483218c364ed59
Either use ctrl + C or close your terminal to stop the container. Now let's restart it with the -d flag to daemonize it
Are your entries still there?
$ docker ps
CONTAINER ID        IMAGE               COMMAND                  CREATED             STATUS              PORTS                NAMES
15389537b93f        sbpdemo/guestbook   "npm start"              41 minutes ago      Up 41 minutes       0.0.0.0:80->80/tcp   nifty_albattani

$ docker kill ${your_container_id}

$ docker run -p 80:80 --mount source=test,target=/usr/src/app/db/ -d sbpdemo/guestbook
54d928c956c8cd89d6e7682fdec81a7c342e3b454f4884571014e5fc77f04601
We can use Docker volumes to keep the db.json persisted on your laptop
Add a new comment again to the guestbook
$ docker kill 54d928c
54d928c
$ docker run -p 80:80 --mount source=test,target=/usr/src/app/db/ -d sbpdemo/guestbook
a23bb19046fef6151548016580a4254e40d85e937159326dd7e582160b350a1e
Now let's restart again and you'll see the comment is still there
We've used a docker volume to hold the information
$ docker volume inspect test
[
    {
        "CreatedAt": "2018-10-14T13:47:45Z",
        "Driver": "local",
        "Labels": null,
        "Mountpoint": "/var/lib/docker/volumes/test/_data",
        "Name": "test",
        "Options": null,
        "Scope": "local"
    }
]We can pass environment variables through to docker with the --env option
$ docker run -p 80:80 --env NAME="Andy" --mount source=test,target=/usr/src/app/db/ -d sbpdemo/guestbook
6290bca82f3cc9c5bdd010defa1f29af4568ff3bd186049e2a0c89534a40acd4
With this, we can configure options inside our container without adjusting the image itself
cd tweakers-workshop

./workshop.sh connect user22

mv ~/.kube/config my_kube_config_backup
mv user22.kubeconfig ~/.kube/config
There is a script we'll use called ./workshop.sh (and workshop.ps1 for Windows)
If you feel more comfortable, you can directly download your kubeconfig from this link:
https://s3-eu-west-1.amazonaws.com/sbp-demo-public/${cluster_name}.kubeconfig
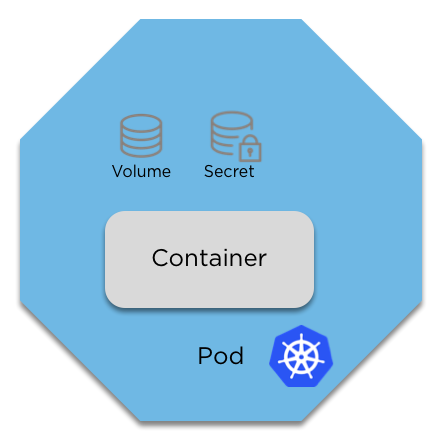
A pod is more than just a container (or image). It contains configuration, volumes, the amount of RAM and/or CPU you need (allocations) and priority
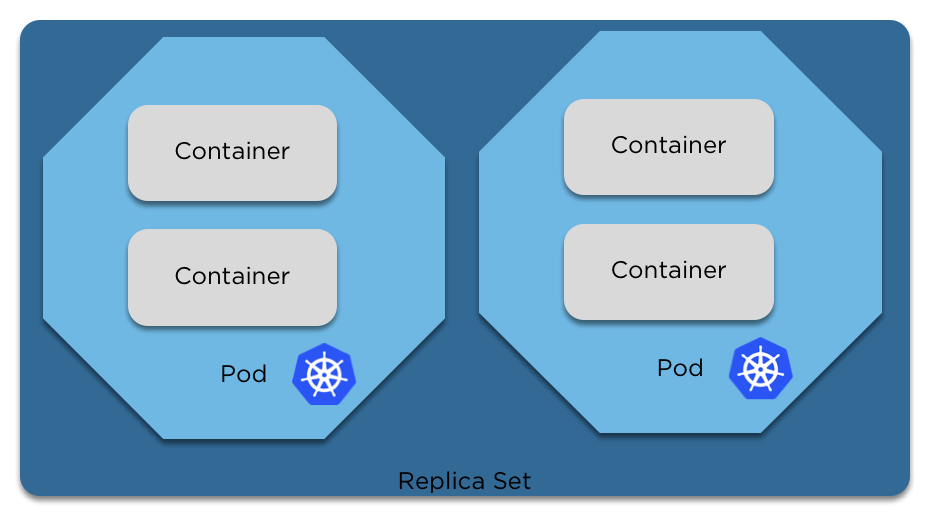
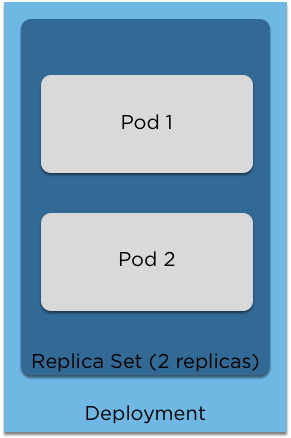
Replica sets are quite simple. They ensure the number of pods you request are running.
If you have too many, one will be terminated.
If you have too few, one will be created.
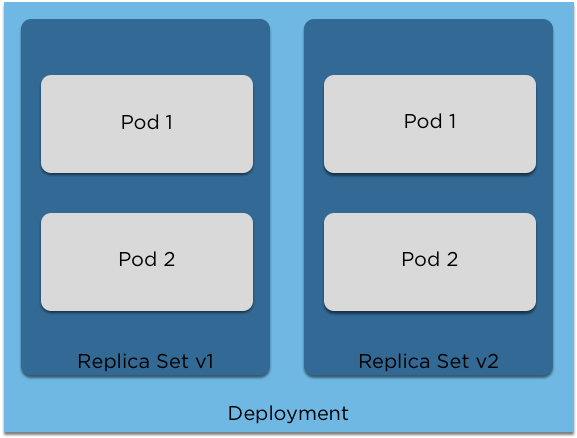
These are versioned copies of a replica set. They can be upgraded, downgraded and when they are changed a new copy is created.
$ docker tag sbpdemo/guestbook sbpdemo/guestbook:${user_ID}For example, as user1:
$ docker tag sbpdemo/guestbook sbpdemo/guestbook:user1Please ensure you have done this so as to not override others images!
$ docker login
Login with your Docker ID to push and pull images from Docker Hub. If you don't have a Docker ID, head over to http
s://hub.docker.com to create one.
Username: sbpdemo
Password:
WARNING! Your password will be stored unencrypted in /home/arepton/.docker/config.json.
Configure a credential helper to remove this warning. See
https://docs.docker.com/engine/reference/commandline/login/#credentials-store
Login Succeeded
Login with the username 'sbpdemo' and the password provided
And push our docker image from before
$ docker push sbpdemo/guestbook:${user_id}$ kubectl run my-guestbook --image sbpdemo/guestbook:${user_id}$ kubectl get pods
NAME READY STATUS RESTARTS AGE
my-guestbook-54cc64dbcf-fwds2 1/1 Running 0 1mWe can port-forward to our pod to view it remotely
$ kubectl port-forward my-guestbook-54cc64dbcf-fwds2 8080:80
Forwarding from 127.0.0.1:8080 -> 80
Forwarding from [::1]:8080 -> 80
Handling connection for 8080
Handling connection for 8080
Open http://localhost:8080 to view it
$ kubectl expose deployment my-guestbook --type=LoadBalancer --port=80
service/my-guestbook exposed
Once again, this is a challenging and complicated task...
Try visiting the new CNAME in your browser!
$ kubectl get services
NAME           TYPE           CLUSTER-IP     EXTERNAL-IP                                                              PORT(S)        AGE
kubernetes     ClusterIP      100.64.0.1     <none>                                                                   443/TCP        2d
my-guestbook LoadBalancer 100.67.30.86 a8ef38fb4cfcb11e89b610afb2428ec8-705870703.eu-west-1.elb.amazonaws.com 80:32567/TCP 39sLet's clean up our deployment and redeploy using an environment variable
$ kubectl delete deployment my-guestbook
deployment.extensions "my-guestbook" deleted

$ kubectl run my-guestbook --image sbpdemo/guestbook:user1 --env NAME=Andy
deployment.apps/my-guestbook created
Refresh your webpage!
$ kubectl apply -f mariadb/Create your database and cluster ip using:
And confirm your pod is running using the get pods command again
$ kubectl get pods
NAME                            READY   STATUS    RESTARTS   AGE
my-guestbook-5cd7c6b86d-jbq29   1/1     Running   0          2m
mysql-5766c846b5-jx5qf 1/1 Running 0 2m$ kubectl port-forward mysql-5766c846b5-jx5qf 3306
Forwarding from 127.0.0.1:3306 -> 3306
Forwarding from [::1]:3306 -> 3306Once again, create a port-forward so you can connect to your mysql container
Now, open a new shell (or if using a Mac/Linux, run this command in the background with &)
$ docker run -it mysql:5.6 mysql -h host.docker.internal -u root -p
Enter password: Handling connection for 3306

Welcome to the MySQL monitor.  Commands end with ; or \g.
Your MySQL connection id is 10
Server version: 5.6.41 MySQL Community Server (GPL)

Copyright (c) 2000, 2018, Oracle and/or its affiliates. All rights reserved.

Oracle is a registered trademark of Oracle Corporation and/or its
affiliates. Other names may be trademarks of their respective
owners.

Type 'help;' or '\h' for help. Type '\c' to clear the current input statement.

mysql>
We now need to install the database schema, which will require the mysql command. Instead of installing this on our laptops, we can use docker!
(For those using Linux, this probably won't work, but put your hand up and we'll come and help. You'll need to replace the host with the ip of your VM)
$ docker run -i mysql:5.6 mysql -h host.docker.internal -u root -ppassword < guestbook/database.sql
Warning: Using a password on the command line interface can be insecure.
Handling connection for 3306
Now that we can connect, import the database schema:
And you can confirm our schema looks ok:
$ docker run -it mysql:5.6 mysql -h host.docker.internal -u root -p messages -e "SHOW TABLES;"
Enter password:
Handling connection for 3306
+--------------------+
| Tables_in_messages |
+--------------------+
| messages           |
+--------------------+
Using port-forwards and docker, it's possible to move all sorts of workloads to the cloud quickly and easily
$ kubectl patch deployment mysql -p '{"spec":{"template":{"spec":{"containers":[{"name":"mysql","image":"sbpdemo/mysql:5.6"}]}}}}'
I've created another image with the schema pre-loaded
$ kubectl delete deployment my-guestbook

$ kubectl run my-guestbook --image sbpdemo/guestbook:user1 --env NAME=Andy --env DATABASE_TYPE="mysql"
Refresh your page and add your comments!
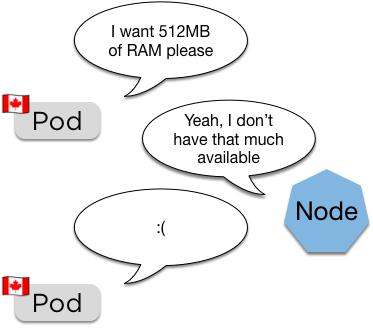
(Canadian pods are very polite)
spec:
  containers:
    resources:
      requests:
        memory: "64Mi"
cpu: "250m"Pod will remain pending until space becomes available (also how the cluster autoscaler works)
spec:
  containers:
    resources:
      limits:
        memory: "128Mi"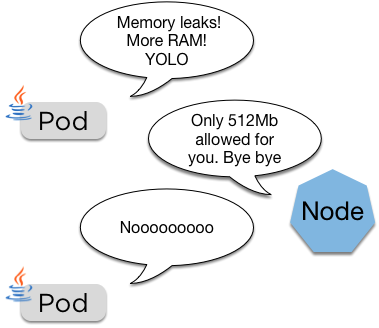
cpu: "500m"If the pod goes over its limit it'll be restarted
apiVersion: v1
kind: ResourceQuota
metadata:
  name: k8s-quota
spec:
  hard:
    requests.cpu: "2"
    requests.memory: 2Gi
    limits.cpu: "2"
limits.memory: 2GiDeveloper:
Cluster Admin:
We'll use the quota from above:
$ kubectl create -f quotas-limits/quota.yml
resourcequota/k8s-quota created
And now let's try and scale out our deployment:
$ kubectl scale deployment my-guestbook --replicas=10
deployment.extensions/my-guestbook scaled
And now we check if the quota worked...
$ kubectl get pods
NAME                            READY   STATUS    RESTARTS   AGE
my-guestbook-7965b5f789-ck9jv   1/1     Running   0          8m
mysql-5d76fb8d49-dxnnb 1/1 Running 0 9mThis could be quite confusing if someone didn't know about the quota. Let's do some debugging:
$ kubectl get replicasets
NAME                      DESIRED   CURRENT   READY   AGE
my-guestbook-7965b5f789   10        1         1       22m
mysql-5d76fb8d49          1         1         1       19m

kubectl describe replicaset my-guestbook-7965b5f789
Name:           my-guestbook-7965b5f789
Events:
  Type     Reason            Age                   From                   Message
  ----     ------            ----                  ----                   -------
  Normal   SuccessfulCreate  24m                   replicaset-controller  Created pod: my-guestbook-7965b5f789-dbctw
~~~Truncated~~~
  Warning  FailedCreate      3m23s                 replicaset-controller  Error creating: pods "my-guestbook-7965b5f789-j2wkr" is forbidden: failed quota: k8s-quota: must specify limits.cpu,limits.memory,requests.memory
  Warning  FailedCreate      2m3s (x6 over 3m22s)  replicaset-controller  (combined from similar events): Error creating: pods "my-guestbook-7965b5f789-wdhgm" is forbidden: failed quota: k8s-quota: must specify limits.cpu,limits.memory,requests.memory
When a quota is active, all pods must have limits and requests set.
We'll redo our kubectl run command and add the requests and limits in:
$ kubectl delete deployment my-guestbook
$ kubectl run my-guestbook --image sbpdemo/guestbook:user1 --env NAME=Andy --env=DATABASE_TYPE=mysql --requests='cpu=100m,memory=256Mi' --limits='cpu=150m,memory=512Mi' --replicas=10
deployment "my-guestbook" created
And now we can see the quota protected us:
$ kubectl get pods
NAME                           READY   STATUS    RESTARTS   AGE
my-guestbook-97f659799-6jmq9   1/1     Running   0          1m
my-guestbook-97f659799-9c4p6   1/1     Running   0          1m
my-guestbook-97f659799-btxcs   1/1     Running   0          1m
my-guestbook-97f659799-x9w59   1/1     Running   0          1m
mysql-5d76fb8d49-dxnnb         1/1     Running   0          15m
Let's check on the other 6 pods:
$ kubectl describe replicaset my-guestbook-97f659799
Warning FailedCreate 3m30s replicaset-controller Error creating: pods "my-guestbook-97f659799-kdm8g" is forbidden: exceeded quota: k8s-quota, requested: limits.memory=512Mi, used: limits.memory=2Gi, limited: limits.memory=2GiA readiness probe will stop a pod from being entered into Service until it's ready
Some examples include:
readinessProbe:
      exec:
        command:
        - grep 'alive'
        - /var/log/application.log
readinessProbe:
httpGet:
path: /healthz
port: 8080
httpHeaders:
- name: X-Custom-Header
value: DevOpsDaysreadinessProbe:
tcpSocket:
port: 8080
initialDelaySeconds: 15
periodSeconds: 20ports:
- name: liveness-port
containerPort: 8080
hostPort: 8080
livenessProbe:
httpGet:
path: /healthz
port: liveness-port$ kubectl apply -f readiness_probe1.ymlWe can add a readiness probe by editing our deployment and adding it to the pod spec. An example is in the repo using the image "sbpdemo/guestbook:user1"
Open this file, editing the image tag to match your own guestbook image, and then apply:
$ kubectl apply -f readiness_probe2.ymlYou'll now see via a kubectl get pods that your pod is not ready, this is because the readiness probe is not correct.
You can fix this using the second readiness probe yaml file, once again editing it first to change to your own tag:
$ kubectl apply -f liveness_probe.ymlUsed to restart a pod when it's 'dead'
This is key for when your application might be 'dead' but the process itself is still running
For example:
Role Based Access Control is the successor to ABAC (Attribute Based Access control)
It comprises of Roles and Bindings
kind: Role
apiVersion: rbac.authorization.k8s.io/v1
metadata:
  namespace: default
  name: read-only-pods-deploy
rules:
- apiGroups: [""]
  resources: ["pods", "deployments"]
  verbs: ["get", "watch", "list"]
kind: RoleBinding
apiVersion: rbac.authorization.k8s.io/v1
metadata:
name: read-only-pods-deploy
namespace: default
subjects:
- kind: Group
name: managers
apiGroup: rbac.authorization.k8s.io
- kind: User
name: product-owner
apiGroup: rbac.authorization.k8s.io
roleRef:
kind: Role
name: read-only-pods-deploy
apiGroup: rbac.authorization.k8s.iokind: Role
apiVersion: rbac.authorization.k8s.io/v1
metadata:
namespace: default
name: read-only-pods-deploy
rules:
- apiGroups: [""]
resources: ["pods", "deployments"]
verbs: ["get", "watch", "list"]This is an example of a role that only allows read only access to pods and deployments in the default namespace
kind: RoleBinding
apiVersion: rbac.authorization.k8s.io/v1
metadata:
  name: read-only-pods-deploy
  namespace: default
subjects:
- kind: Group
  name: managers
  apiGroup: rbac.authorization.k8s.io
- kind: User
  name: product-owner
  apiGroup: rbac.authorization.k8s.io
roleRef:
  kind: Role
  name: read-only-pods-deploy
apiGroup: rbac.authorization.k8s.ioNow we can apply this role to the 'managers' group and the user product-manager, to ensure nothing gets broken
Role Bindings apply to a namespace, if you want it for the entire cluster you can use a 'ClusterRoleBinding'
In each of your clusters there is an additional user, named 'devopsandy'. The challenge is:
Raise your hand or call out when you've done it and Andy will test from the stage
Answers can be found here:
https://bit.ly/rbacanswers
By Andy Repton
Docker and Kubernetes workshop for the Tweakers event at Schuberg Philis


